Comparing Playwright and Cypress Component Testing: Setup, Debugging, and CI Integration
Playwright component testing fits teams that want one runner for both component and E2E tests with strong CI debugging and cross-browser coverage. Cypress component testing shines for its interactive runner UI and fast authoring experience.


Playwright Component Testing vs Cypress: Which Should You Use in CI
There are many ways to run browser component tests. In this guide, we compare the 2 most widely used options: Playwright and Cypress.
Playwright component testing is best for a single, code first runner across component and end to end tests, with trace based CI debugging and consistent cross browser coverage.
Cypress component testing prioritizes the runner UI, but in CI heavy workflows it often needs stricter conventions around selectors, waits, and artifact handling to remain stable.
This post compares both frameworks for component testing. You will see how setup will work, how debugging works in CI, where flake usually comes from, and how to integrate component tests into your pipeline.
If you choose Playwright component testing, you can stream runs into TestDino to centralize traces, screenshots, and run history for faster triage.
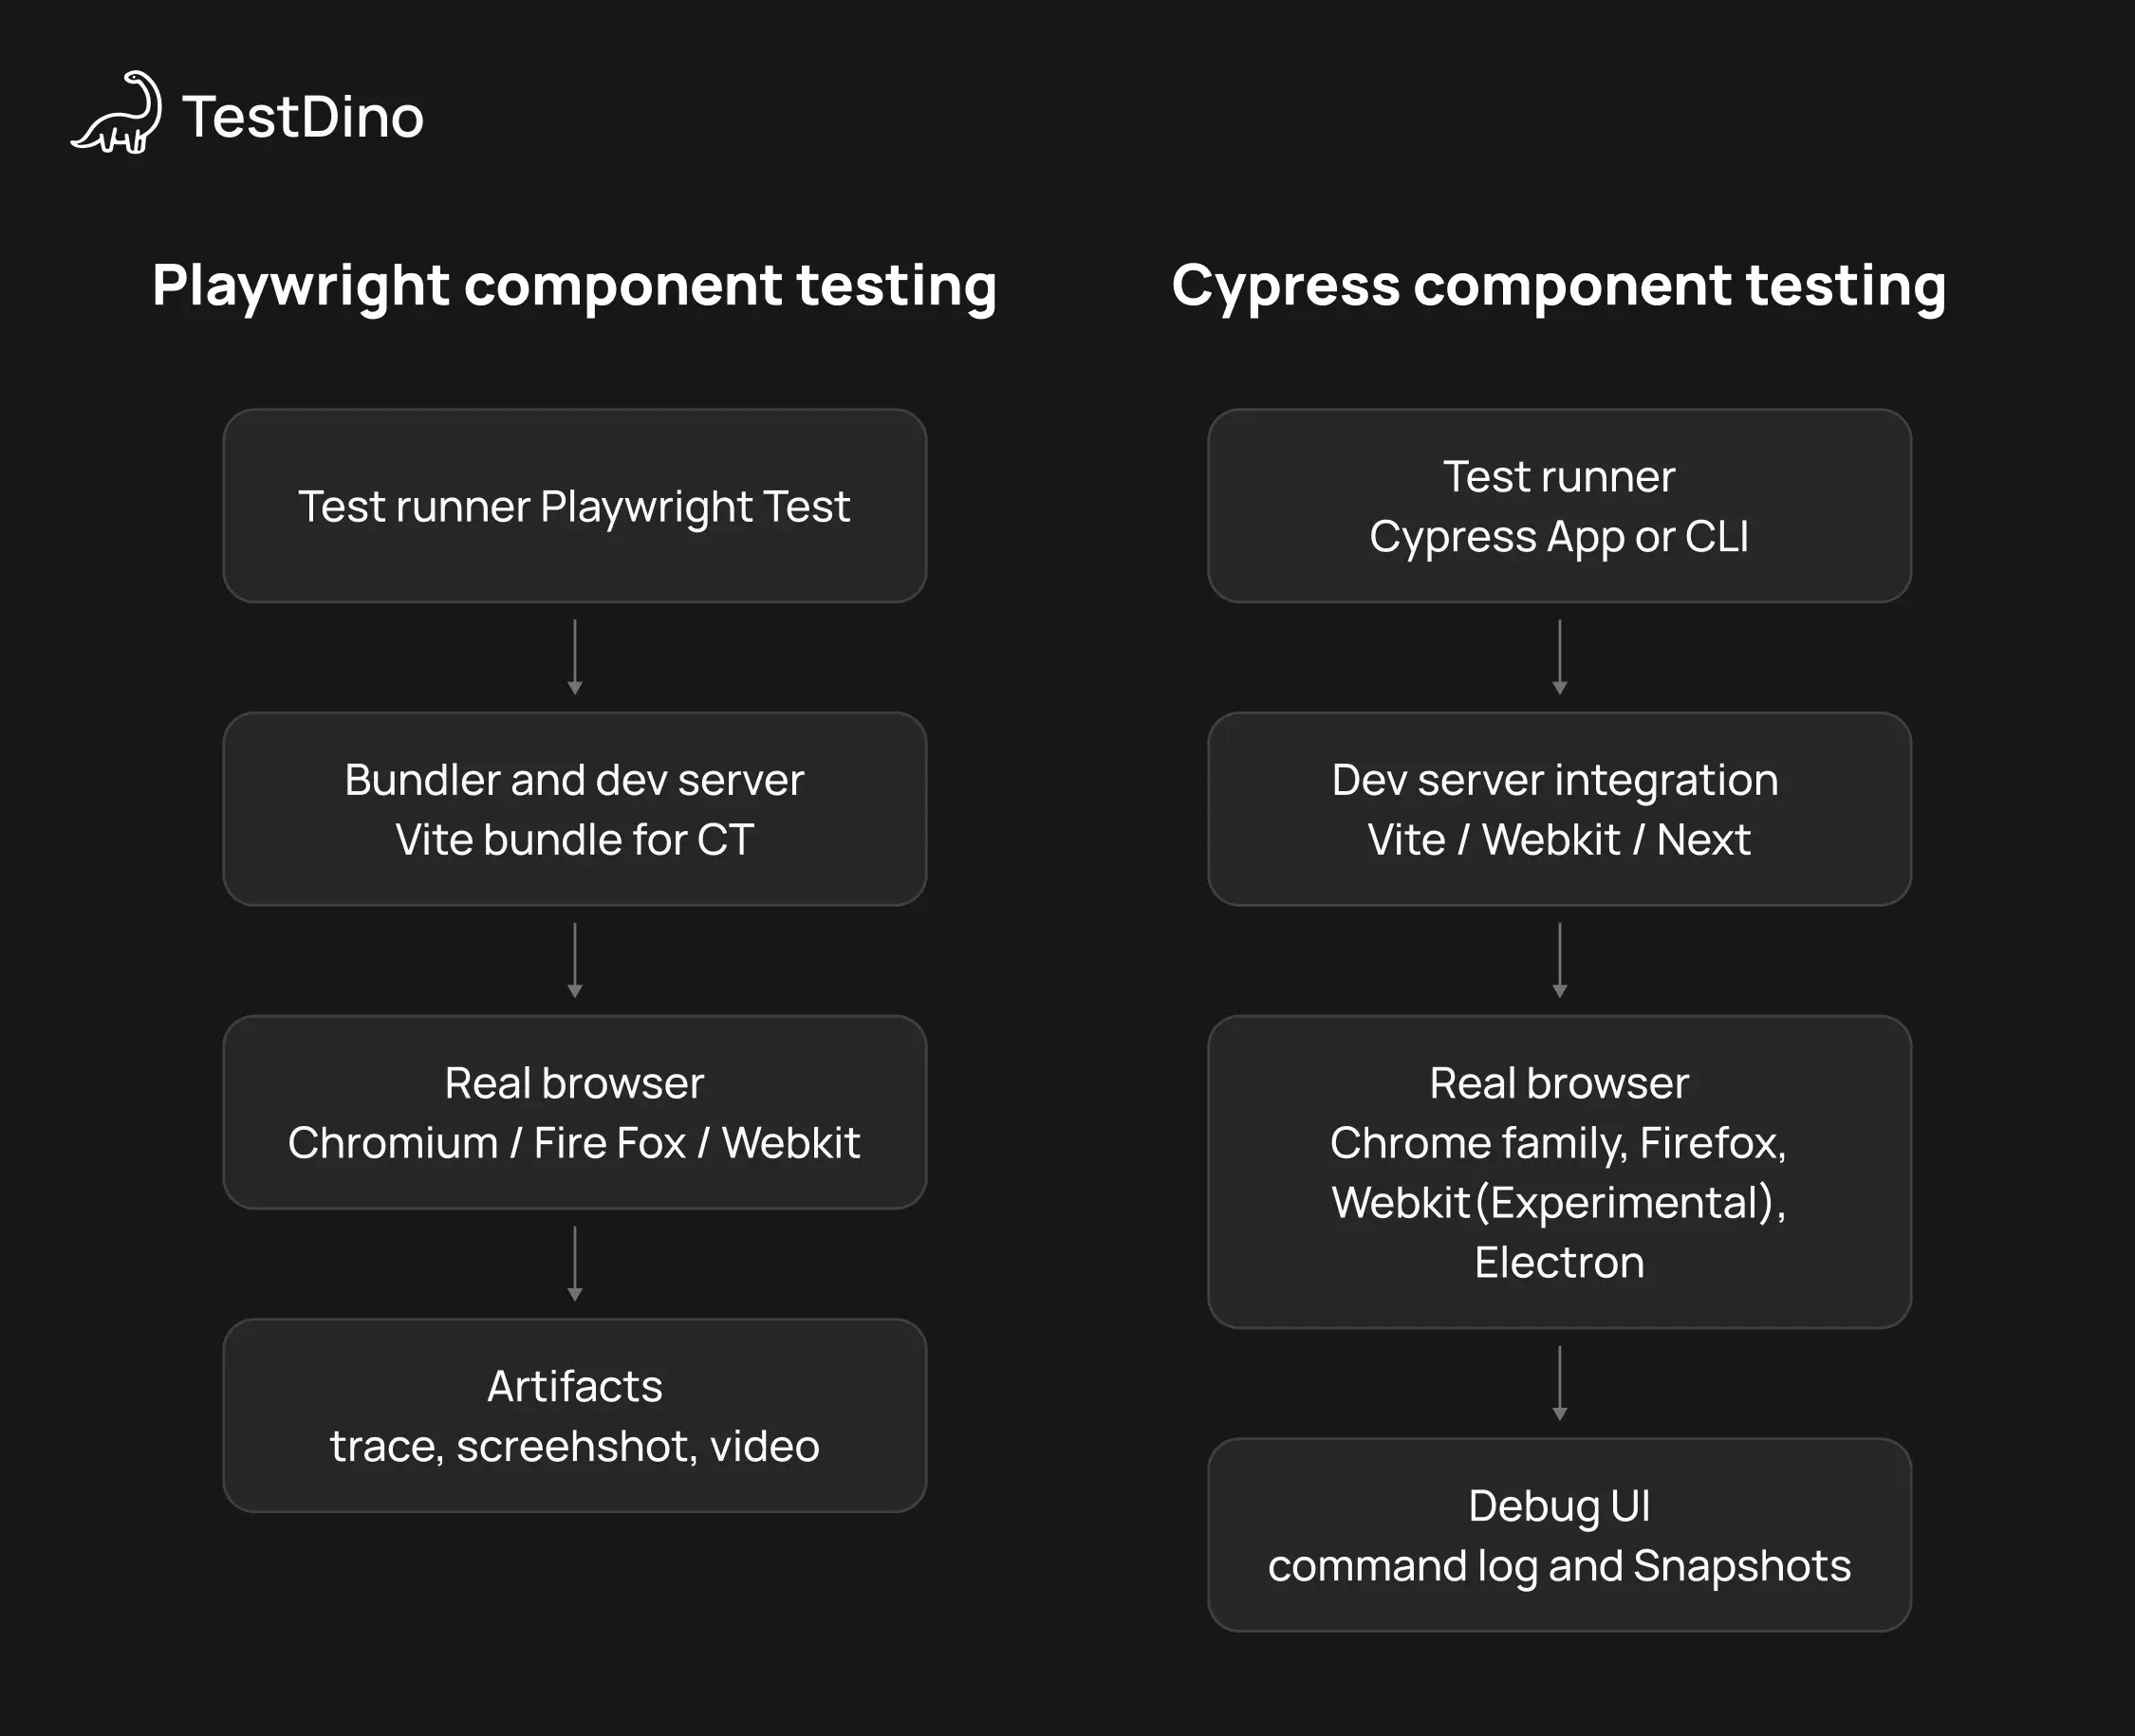
Core mental models for component testing
This diagram is a quick mental model of where each tool sits in the stack. It is not a benchmark and it is not a full architecture diagram.
go run ./cmd/validate -- --name testdino-mcp
Component testing sits between unit tests and end to end tests.
It is not js dom only rendering. It is a real browser rendering a real component with real events. You mount the component in isolation, drive it, and assert behavior.
Component tests are great when:
-
The UI has state transitions that are annoying to cover through full flows.
-
You are building a component library or design system.
-
You want faster PR feedback than full app end to end runs.
Component tests are a bad fit when:
-
The component only works when the full app bootstraps, and mocking becomes a second job.
-
You mostly care about integrations across multiple pages and services.
Playwright component testing integration (React example)
Start with the official Playwright component testing docs. Most teams scaffold component testing with the init command because it sets up the right packages and scripts:
npm init playwright@latest -- --ct
Step 1. Add scripts that devs will actually use
In package.json, keep the scripts boring and predictable:
{
  "scripts": {
    "test:ct": "playwright test --ct",
    "test:ct:ui": "playwright test --ct --ui",
    "test:ct:report": "playwright test --ct --reporter=html"
  }
}
Your blog uses npm run test:ct in the CI diagram. This makes that real.
Step 2. Create a mount wrapper for providers
This is the part most “hello world” guides skip. Your components rarely render correctly without providers.
Create tests/ct/mount.tsx:
import React from "react";
import { ThemeProvider } from "../providers/ThemeProvider";
import { QueryClient, QueryClientProvider } from "@tanstack/react-query";
const queryClient = new QueryClient();
export function withProviders(node: React.ReactNode) {
  return (
    <ThemeProvider>
      <QueryClientProvider client={queryClient}>{node}</QueryClientProvider>
    </ThemeProvider>
  );
}
Now in tests you mount with providers:
import { test, expect } from "@playwright/experimental-ct-react";
import { Stepper } from "./Stepper";
import { withProviders } from "../../tests/ct/mount";

test("increments", async ({ mount }) => {
  const component = await mount(withProviders(<Stepper initial={0} />));
  await component.getByRole("button", { name: "Increment" }).click();
  await expect(component.getByText("1")).toBeVisible();
});
This keeps component testing close to real app behavior without spinning up the full app.
Step 3. Decide on a selector contract
If you want low churn, pick a contract and stick to it.
Use roles and labels for most selectors. When you need a stable hook, add a test id, for example data-testid="increment".
This is where Playwright component testing stays readable. You avoid fragile class selectors and you do not couple tests to CSS.
Step 4. Turn on traces for CI failures
You do not need traces for every passing test. You need traces when things fail.
In your Playwright config, enable traces on first retry for CI. The exact file name depends on your scaffold, but it is typically a Playwright config generated by the component testing init.
use: {
  trace: "on-first-retry"
}
When a test flakes in CI, traces usually save the most time. If you want those traces collected and viewable across PRs, this is where TestDino becomes useful.
Step 5. CI wiring (GitHub Actions example)
A minimal CI job should cache dependencies, run component tests, then upload artifacts.
name: component-tests
on: [pull_request]
jobs:
  ct:
    runs-on: ubuntu-latest
    steps:
      - uses: actions/checkout@v4
      - uses: actions/setup-node@v4
        with:
          node-version: 20
          cache: npm
      - name: Install
        run: npm ci
      - name: Install browsers
        run: npx playwright install --with-deps
      - name: Run Playwright CT
        run: npm run test:ct
      - name: Upload Playwright artifacts
        if: always()
        uses: actions/upload-artifact@v4
        with:
          name: playwright-ct-artifacts
          path: |
            playwright-report
            test-results
If you want centralized history and faster triage than digging through artifacts per PR, wire your run into the TestDino CLI overview and then use TestDino getting started to confirm ingestion.
Step 6. Optional. Stream Playwright CT into TestDino
This is the clean “make failures visible” move for Playwright CT.
A good workflow is:
Run component testing in CI, upload the standard Playwright artifacts, then stream the same run into TestDino so you have traces and run history in one place.

Cypress component testing integration (React example)
Start from the official Cypress component testing guide. The reason most teams use the Cypress app is that it generates the right config for your framework and bundler.
npx cypress open
Pick component testing. Cypress will generate the component testing setup and a cy.mount command for your stack.
Step 1. Lock in scripts for local and CI
{
  "scripts": {
    "test:ct": "cypress run --component",
    "test:ct:ui": "cypress open --component"
  }
}
In package.json:
Step 2. Confirm the mount command uses your providers
Just like Playwright, your components likely need providers.
Cypress usually generates cypress/support/component.ts or similar. That is where cy.mount is defined. Wrap your mount with the same providers the app uses.
Pseudo structure:
// cypress/support/component.ts
import { mount } from "<generated by cypress>";
import { ThemeProvider } from "../../src/providers/ThemeProvider";

Cypress.Commands.add("mount", (component, options) => {
  return mount(<ThemeProvider>{component}</ThemeProvider>, options);
});
The import path for mount depends on your framework and the adapter Cypress sets up. The Cypress wizard wires this correctly, so the safe approach is to edit the generated file instead of guessing the adapter.
Step 3. Make the first test real
A minimal spec:
import Stepper from "./Stepper";

describe("<Stepper />", () => {
  it("increments", () => {
    cy.mount(<Stepper initial={0} />);
    cy.contains("button", "Increment").click();
    cy.contains("1").should("be.visible");
  });
});
Cypress is at its best when you use retryable assertions and keep the command chain clean.
Step 4. CI wiring (GitHub Actions example)
A minimal CI job for Cypress component testing should cache npm, run component testing, then upload screenshots and videos.
name: component-tests
on: [pull_request]
jobs:
  ct:
    runs-on: ubuntu-latest
    steps:
      - uses: actions/checkout@v4
      - uses: actions/setup-node@v4
        with:
          node-version: 20
          cache: npm
      - name: Install
        run: npm ci
      - name: Run Cypress CT
        run: npm run test:ct
      - name: Upload Cypress artifacts
        if: always()
        uses: actions/upload-artifact@v4
        with:
          name: cypress-ct-artifacts
          path: |
            cypress/screenshots
            cypress/videos
Playwright component testing vs Cypress component testing
Here is the high level comparison. This table is meant to be a starting point, not a religious war.
| What you care about | Playwright component testing | Cypress component testing |
|---|---|---|
| Authoring style | Async await, Playwright Test | Chainable commands, Cypress runner |
| Debugging | Trace viewer, screenshots, optional video | Runner UI, command log, snapshots |
| Cross browser runs | Chromium, Firefox, WebKit via projects | Depends on Cypress browser support in your env |
| CI scaling | Workers and sharding from Playwright Test | Parallelization via CI strategies or Cypress tooling |
| Reporting | Strong artifacts, easy to centralize with TestDino | Great interactive debug UI, CI artifacts need wiring |
Debugging loop: What happens when the build goes red
This is where you will feel the difference.
Cypress component testing debugging loop
Cypress is built around an always on runner. When a test fails, you scrub the command timeline and see the DOM at each step. It feels like debugging with training wheels, and that is a compliment.
If your day to day work is writing tests while building UI, Cypress component testing can feel like the faster feedback loop.
Playwright component testing debugging loop
Playwright component testing debugging is artifact first. You can run headed locally, but the superpower is what you get when something fails in CI.
Traces give you a timeline of actions, DOM snapshots, network, and screenshots. When the failure is flaky or only shows up in CI, traces are usually the fastest path to root cause.
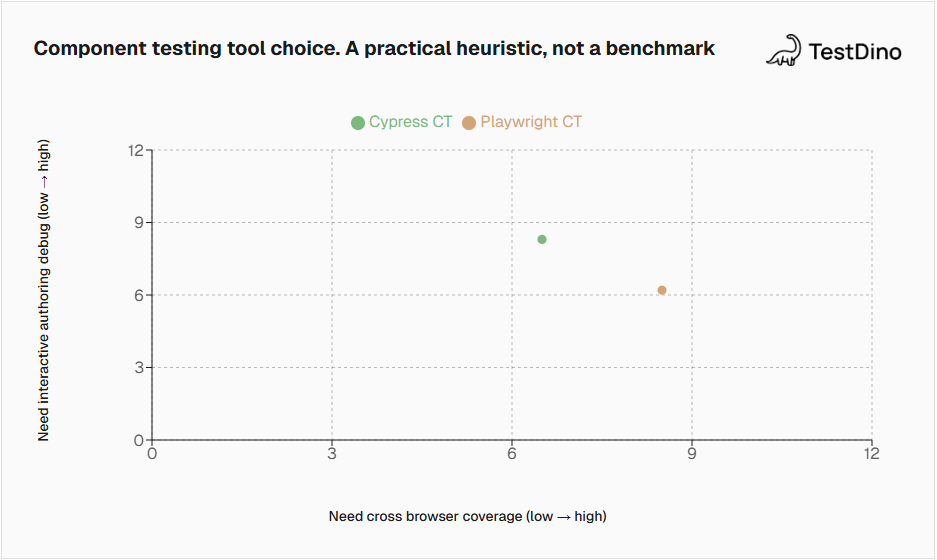
What the decision matrix image represents
The decision matrix is a heuristic. It is not performance data. The horizontal axis is how much you care about cross browser coverage. The vertical axis is how much you value interactive authoring debug while writing tests. The points show where teams tend to land based on those preferences.
Component tests get flaky for different reasons than end to end tests, but the fix is the same. Make the test deterministic and isolate state.
Common flake sources:
-
State updates that you do not await, especially around transitions and debounce timers
-
Shared globals leaking across tests
-
Network calls that are not mocked, or mocks that drift
-
Selectors that depend on layout or CSS class names
-
Mounting too much, then waiting on half the app
Here is a checklist you can paste into a PR template.
Playwright specific tip: Let Playwright expectations auto wait. If you are sprinkling manual sleeps, you are probably masking a timing bug you could fix cleanly.
Cypress specific tip: Lean into retryable assertions like should. If you fight the command chain with custom async patterns, you will create your own flake.
CI and reporting. Keeping artifacts and trends visible
Local runs are easy. CI is where your team decides if component testing is worth it.
The goal in CI is simple:
-
Run the suite fast.
-
Keep the artifacts.
-
Make failures easy to debug.
-
Track stability over time.
Here is a clean CI flow diagram. It replaces the earlier one with crossing arrows.
Playwright component testing in CI
Playwright component testing uses the Playwright Test runner, so you get the usual knobs: workers, projects, and sharding.
If you are trying to cut runtime by splitting the suite across machines, read the Playwright sharding guide and keep the sharding strategy consistent across PRs. If the strategy changes every week, your timing data becomes useless.
Once Playwright component testing is in CI, reporting is mostly about visibility. If you want to centralize traces and run history for triage, start with TestDino getting started and the TestDino CLI overview.
Cypress component testing in CI
Cypress component testing runs headless with cypress run --component. You will want to wire artifact upload for screenshots and videos based on your CI provider.
Cypress also has reporting and dashboards in its ecosystem. If your org already uses those, you get a smooth path to trend tracking.
Where TestDino fits
If you choose Playwright component testing, TestDino is a natural add on because it is built around Playwright artifacts. You get a place to review traces, screenshots, and run history without digging through CI logs.
Final Call
If you are still torn, decide based on what your team does most weeks, not what looks cool on Twitter.
Choose Playwright component testing when you want one stack for component tests and end to end tests, and you care about trace based debugging and cross browser coverage.
Choose Cypress component testing when you want the best interactive authoring experience and your team leans on the runner UI to move fast.
Conclusion
Playwright component testing wins when you want a unified testing stack and deep failure artifacts. Cypress component testing wins when you want the most ergonomic authoring and debugging UI.
If you want a low risk way to choose, do a one day spike:
-
Pick one component that regularly breaks.
-
Write five focused tests in each tool.
-
Run them locally and in CI.
-
Pick based on dev loop and triage speed, then wire reporting. If you pick Playwright component testing, add TestDino to keep runs visible.
FAQs
Table of content
Flaky tests killing your velocity?
TestDino auto-detects flakiness, categorizes root causes, tracks patterns over time.
Follow Us