Playwright Custom Reporter
Learn how to create a Playwright custom reporter that tracks retries, step timing, and slow tests to produce clear, CI friendly reports.
Looking for Smart Playwright Reporter?
Playwright is known for fast, reliable browser automation, but as test suites grow, teams care less about just passing tests and more about how results are reported.
Clear Playwright reporting matters when debugging failures, tracking retries, or understanding slow tests in CI.
Playwright ships with built-in reporters like HTML, JSON, and JUnit. They work for basic test results, but they stop short when teams need custom fields, smarter logic, or CI-friendly output that fits real workflows.
That is where a Playwright custom reporter comes in. This guide shows how to build one step by step, using a real implementation that handles retries, slow test detection, and CI reporting, so your test results actually help you move faster.
Introduction to Playwright Reporters
Every Playwright test run emits events. A test starts, a test ends, retries happen, and the run finishes. Reporters listen to these events and turn them into output.
Playwright ships with several built-in reporters:
- List reporter: Prints each test result to the console as it runs. Useful for quick local feedback.
- Dot reporter: Shows a compact dot-based output for fast visual progress.
- HTML reporter: Generates an interactive local report with steps, screenshots, and traces.
- JSON reporter: Exports structured test data for custom processing or tooling.
- JUnit reporter: Produces XML output commonly used by CI systems and test dashboards.
These reporters work well when you only need a pass or fail status. Gaps appear when teams need deeper answers, such as
- Total test duration, not just pass or fail
- Clear start and end time for each test
- Step-by-step execution with precise timing
- Which step consumed most of the test runtime
- Visibility into setup, navigation, and cleanup costs
And this is why teams build a Playwright custom reporter, which gives direct access to test data during execution and full control over how results are processed and stored.
What is a Playwright Custom Reporter?
A Playwright custom reporter is a JavaScript or TypeScript class that plugs into Playwright’s reporting system by implementing the Reporter interface. It gives you control over how Playwright test results are collected, processed, and exported.
Built-in Playwright reporting exposes raw results with limited interpretation. A custom reporter works directly at the test and step lifecycle, which allows you to compute retries, flag slow tests, and attach custom metadata while the run is happening. This makes it well-suited for CI reporting, dashboards, and analytics.
Playwright calls specific methods on the reporter as execution progresses. In this implementation, the key methods are:
- onTestBegin: Runs when a test starts. Useful for initializing timers or per-test state.
- onStepBegin: Runs when a test step starts. Helpful for step-level tracking and detailed execution flow.
- onStepEnd: Runs when a step finishes. Used to capture step duration, status, or failures.
- onTestEnd: Runs after each test attempt, including retries. This is where pass or fail status, retries, duration, and flakiness are finalized.
You do not need to implement every reporter method. Most real-world custom reporters focus on the methods that align with their reporting goals.
Because the reporter runs in the same Node.js process as Playwright, it can use standard Node APIs like fs to write files, send data to external systems, or integrate directly with CI pipelines and internal tools.
Why Use a Custom Reporter?
Teams use a Playwright custom reporter when built-in reporters are not enough.
A Playwright custom reporter is useful when:
- You want full control over the output format
- You need custom logic, not just raw results
- You want to enrich test data with computed fields
- You want reports that fit CI, dashboards, or analytics tools
Built-in reporters are general-purpose by design. A custom reporter is built for your workflow.
For example, many teams care less about a single test attempt and more about the total time across retries. Built-in reporters do not compute that. A custom reporter can.
Built-in Reporters vs Custom Reporters
Built-in reporters show test results in a fixed way. They are easy to use but limited. You get what Playwright gives you and nothing more.
Custom reporters let you control the data. You decide what to track, how retries are handled, and what the final output looks like. They take a bit more effort but solve real reporting problems.
Built-in reporter example
Using the JSON reporter:
reporter: [
['json']
]
This gives you a pass or fail status, a single duration per test, and retry details buried inside the UI. There is no way to export custom fields or compute values like total time across retries or a slow-test flag.
What the built-in JSON reporter gives you:
{
  "title": "should place order",
  "results": [
    {
      "retry": 0,
      "status": "failed",
      "duration": 1800
    },
    {
      "retry": 1,
      "status": "passed",
      "duration": 2400
    }
  ]
}
Custom reporter example
Using a custom reporter:
The custom output, for example, custom-report.json, can include every retry as a first-class record, total duration across retries, a passedOnRetry flag, and a slow flag based on your own rules.
What teams actually want to know:
{
"test": "should place order",
"finalStatus": "passed",
"passedOnRetry": true,
"retryCount": 1,
"totalDurationMs": 4200,
"slow": true,
"owner": "payments",
"ciBlocking": false
}
This is the difference between reading test results and treating them as structured data you can analyze, trend, and act on.
How to Create a Playwright Custom Reporter
Creating a custom reporter requires three parts working together: a test that produces navigation behavior, a reporter that listens to test events, and a config file that registers the reporter.
Each part is explained in sequence below.
 Prerequisites
Before building a custom reporter, the project must be ready to run Playwright tests.
You need Node.js installed and a Playwright project initialized. If Playwright is not installed yet, install it using:
npm init -y

npm install -D

@playwright/test

npx playwright install
This installs Playwright, browsers, and creates the base test environment. Once this is done, you can add custom reporters without any extra dependencies.
Folder Structure Required
Before writing code, it is important to understand where each file lives and why.
project
├─ tests/
│ └─ navigation.spec.js
└─ custom-reporter.js
├─ playwright.config.js
The project folder is the parent folder where all the files and folders required for our testing reside. The tests folder contains Playwright test files. The reporter file contains the custom reporter implementation. The Playwright config file connects everything.
Keeping the test in its own folder avoids mixing test logic with reporting logic.
Step-by-Step Implementation
1. Sample Test Used for Reporting
What the test actually does: This guide uses a navigation-based test.
The test visits two real sites in sequence and records step-level timing:
- Visit cms.testdino.com
- Visit playwright.dev
Each action is wrapped in a test.step() so the custom reporter can track:
- Step start time
- Step end time
- Step duration
const { test } = require('@playwright/test');

test.describe('Custom Reporter Demo', () => {
  test('navigation test', async ({ page }) => {
    await test.step('visit cms.testdino.com', async () => {
      await page.goto('https://cms.testdino.com', { waitUntil: 'networkidle' });
    });

    await test.step('visit playwright.dev', async () => {
      await page.goto('https://playwright.dev', { waitUntil: 'networkidle' });
    });
  });
});
This setup is useful when you want to understand what happened during the test, not just whether it passed or failed.
2. Custom Reporter Implementation
This is the custom reporter used in this guide. It focuses on execution timing and visibility.
const fs = require('fs');
const path = require('path');

class CustomReporter {
  constructor() {
    this.steps = [];
    this.testStart = null;
    this.testEnd = null;
    this.testTitle = '';
    this.status = '';
  }

  onTestBegin(test) {
    this.testTitle = test.title;
    this.testStart = Date.now();
  }

  onStepBegin(test, result, step) {
    step._startTime = Date.now();
  }

  onStepEnd(test, result, step) {
    const endTime = Date.now();

    this.steps.push({
      name: step.title,
      start: step._startTime,
      end: endTime,
      duration: endTime - step._startTime
    });
  }

  onTestEnd(test, result) {
    this.testEnd = Date.now();
    this.status = result.status;

    const totalDuration = this.testEnd - this.testStart;

    console.log('\nTest Result');
    console.log('-----------');
    console.log(`Test: ${this.testTitle}`);
    console.log(`Status: ${this.status}`);
    console.log(`Total duration: ${totalDuration} ms`);

    this._generateHtml(totalDuration);
  }

  _generateHtml(totalDuration) {
    const rows = this.steps.map((s, i) => `${i + 1}${s.name}${new Date(s.start).toLocaleTimeString()}${new Date(s.end).toLocaleTimeString()}${s.duration} ms

    `).join('');

    const html = `
<!DOCTYPE html>
<html>
<head>
  <meta charset="utf-8">
  <title>Playwright Test Report</title>
  <style>
    body { font-family: Arial, sans-serif; padding: 24px; background: #ffffff; color: #111; }
    h2 { margin-bottom: 8px; }
    .summary { margin-bottom: 24px; line-height: 1.6; }
    table { width: 100%; border-collapse: collapse; font-size: 14px; }
    th, td { padding: 10px 12px; border-bottom: 1px solid #ddd; text-align: left; }
    th { background: #f5f5f5; font-weight: bold; }
    tr:last-child td { border-bottom: none; }
  </style>
</head>
<body>

<h2>Test Summary</h2>
<div class="summary">
  <div><b>Test:</b> ${this.testTitle}</div>
  <div><b>Status:</b> ${this.status}</div>
  <div><b>Start:</b> ${new Date(this.testStart).toLocaleTimeString()}</div>
  <div><b>End:</b> ${new Date(this.testEnd).toLocaleTimeString()}</div>
  <div><b>Total duration:</b> ${totalDuration} ms</div>
</div>

<h2>Steps</h2>
<table>
  <thead>
    <tr>
      <th>#</th>
      <th>Step</th>
      <th>Start time</th>
      <th>End time</th>
      <th>Duration</th>
    </tr>
  </thead>
  <tbody>
    ${rows}
  </tbody>
</table>

</body>
</html>
`;

    fs.writeFileSync(
      path.join(process.cwd(), 'custom-report.html'),
      html
    );
  }
}

module.exports = CustomReporter;
What the reporter actually captures
| Field | Purpose |
|---|---|
| testTitle | Name of the test |
| status | Passed or failed |
| testStart | Test start time |
| testEnd | Test end time |
| totalDuration | Total test duration |
| stepName | Human-readable step title |
| stepStart | When the step started |
| stepEnd | When the step ended |
| stepDuration | Time taken by each step |
Custom Reporter Behavior
What happens during a run
- onTestBegin records the test start time.
- onStepBegin records the start time for each step.
- onStepEnd records the end time and duration for each step.
- onTestEnd:
- Calculates total test duration
- Logs a summary to the terminal
- Generates an HTML report
3. Configuring in playwright.config.js
To activate the custom reporter, it must be registered in the Playwright config.
const { defineConfig } = require('@playwright/test');

module.exports = defineConfig({
  reporter: [['./custom-reporter.js']] ,
  use: {
    headless: false
  }
});
This configuration runs only the custom reporter. The custom reporter itself handles all reporting logic, terminal output, and HTML generation.
4. Output
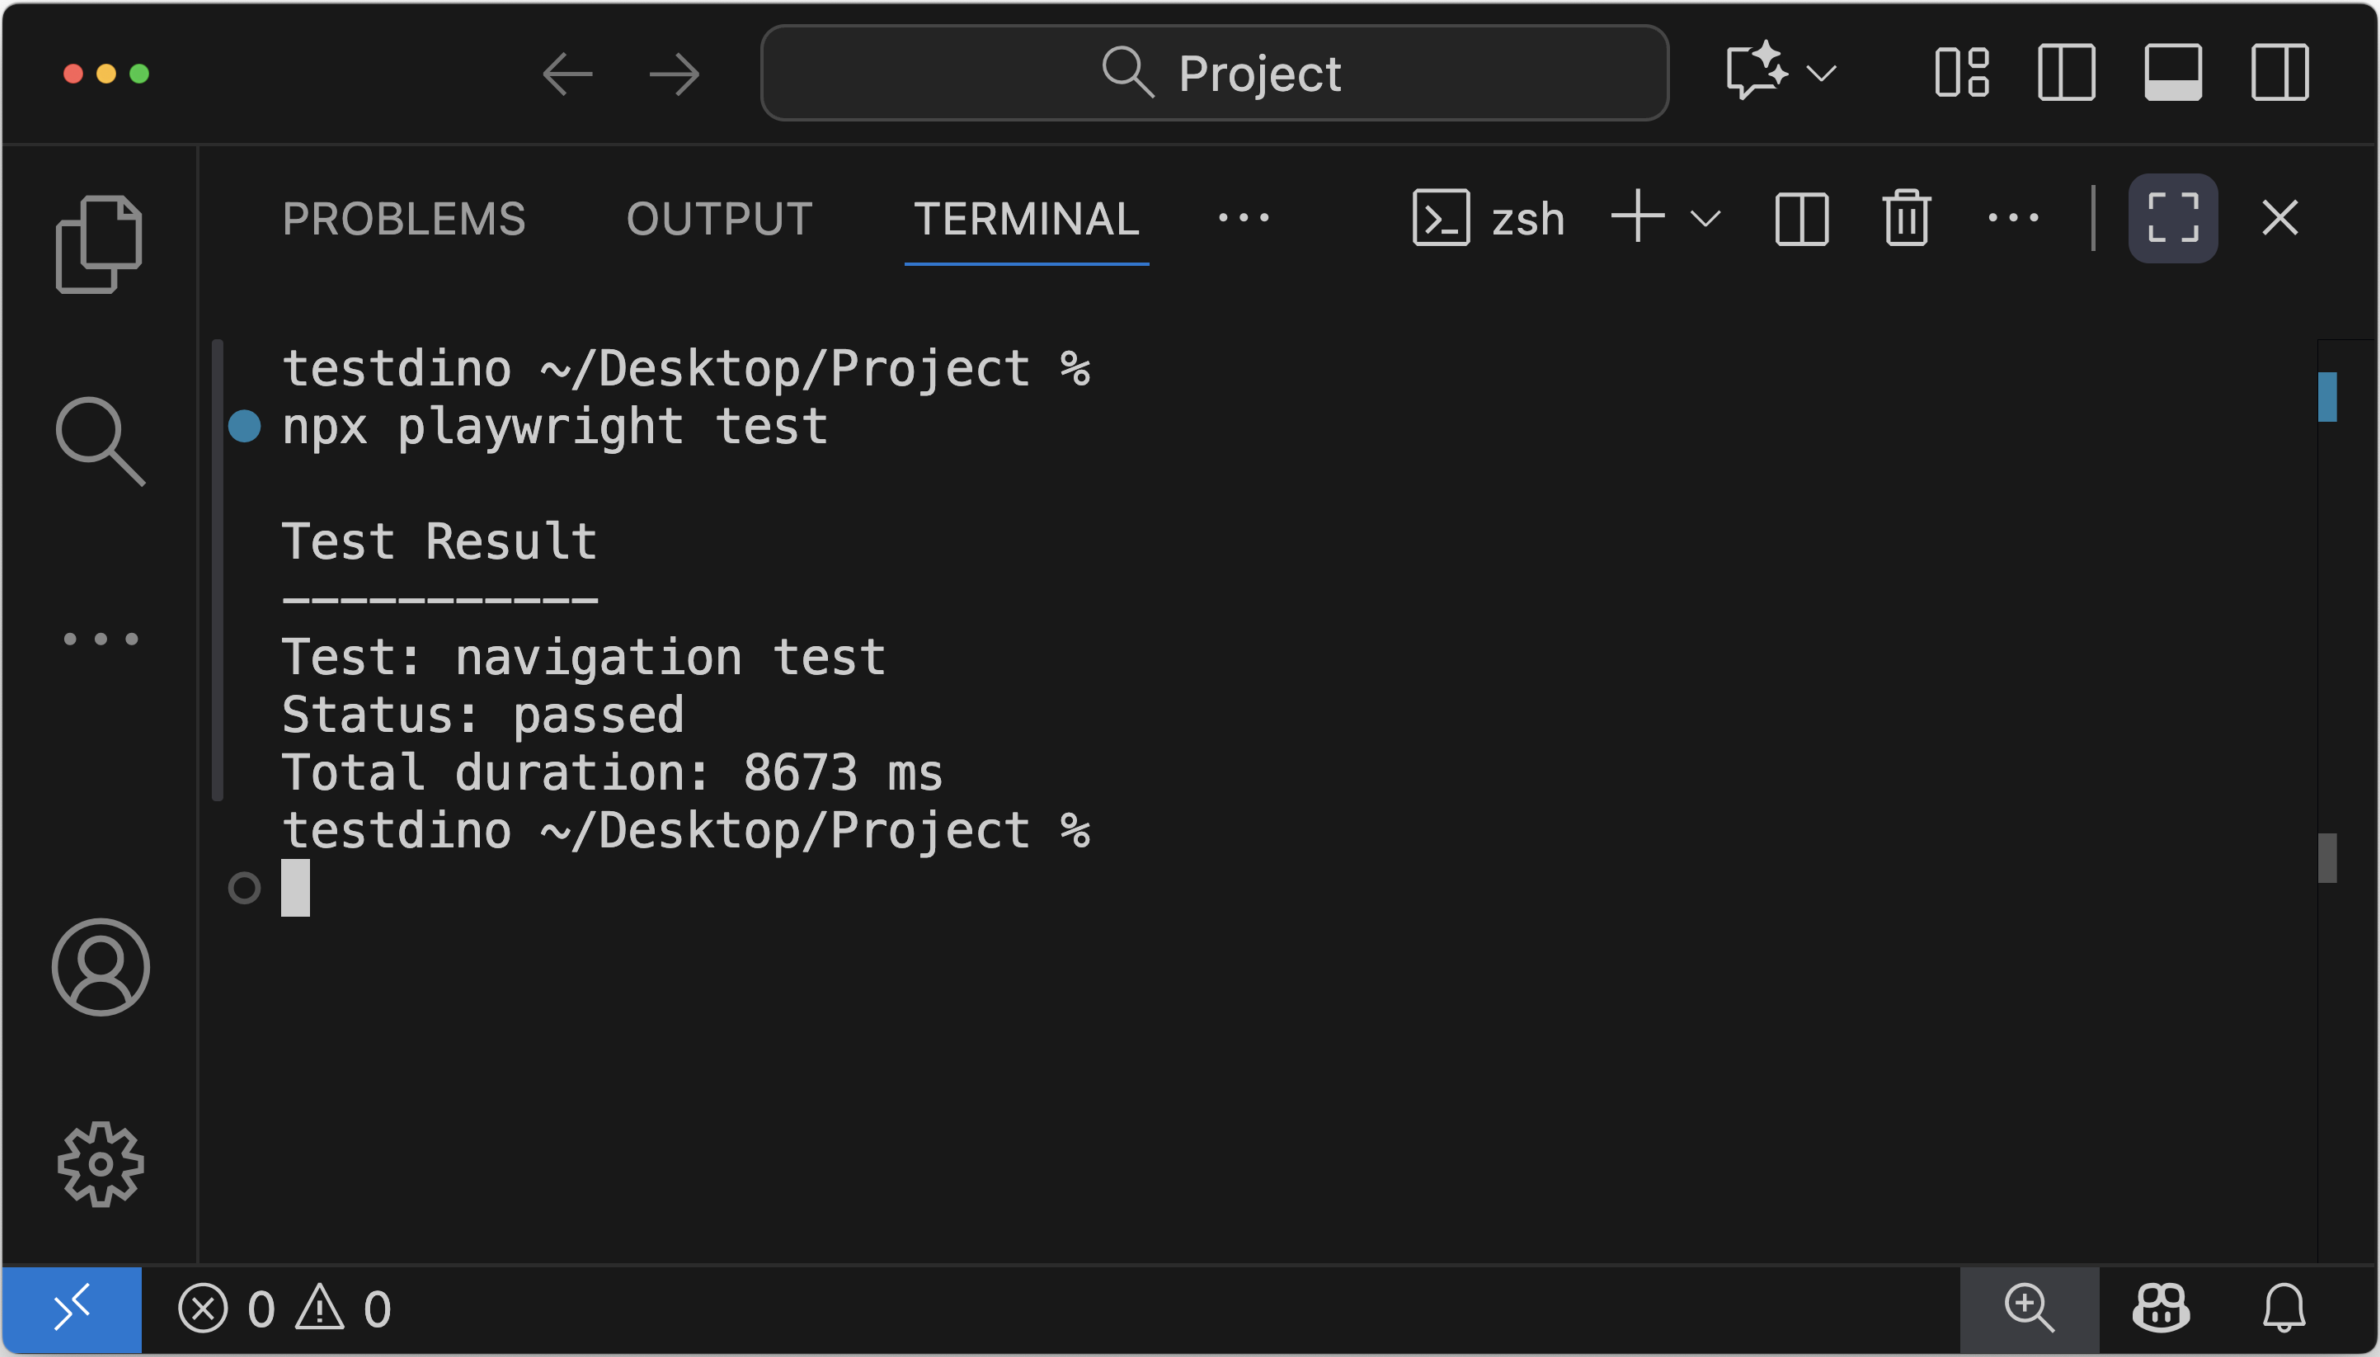
Run the test
To execute the test and generate the reports, run the following command in your terminal:
npx playwright test
This runs the test suite and triggers both the terminal output and the HTML report generated by the custom reporter.
Terminal Output Section
At the end of the test, the reporter prints a concise summary to the terminal, including the test name, status, and total duration. This makes it easy to understand results without opening the HTML report.
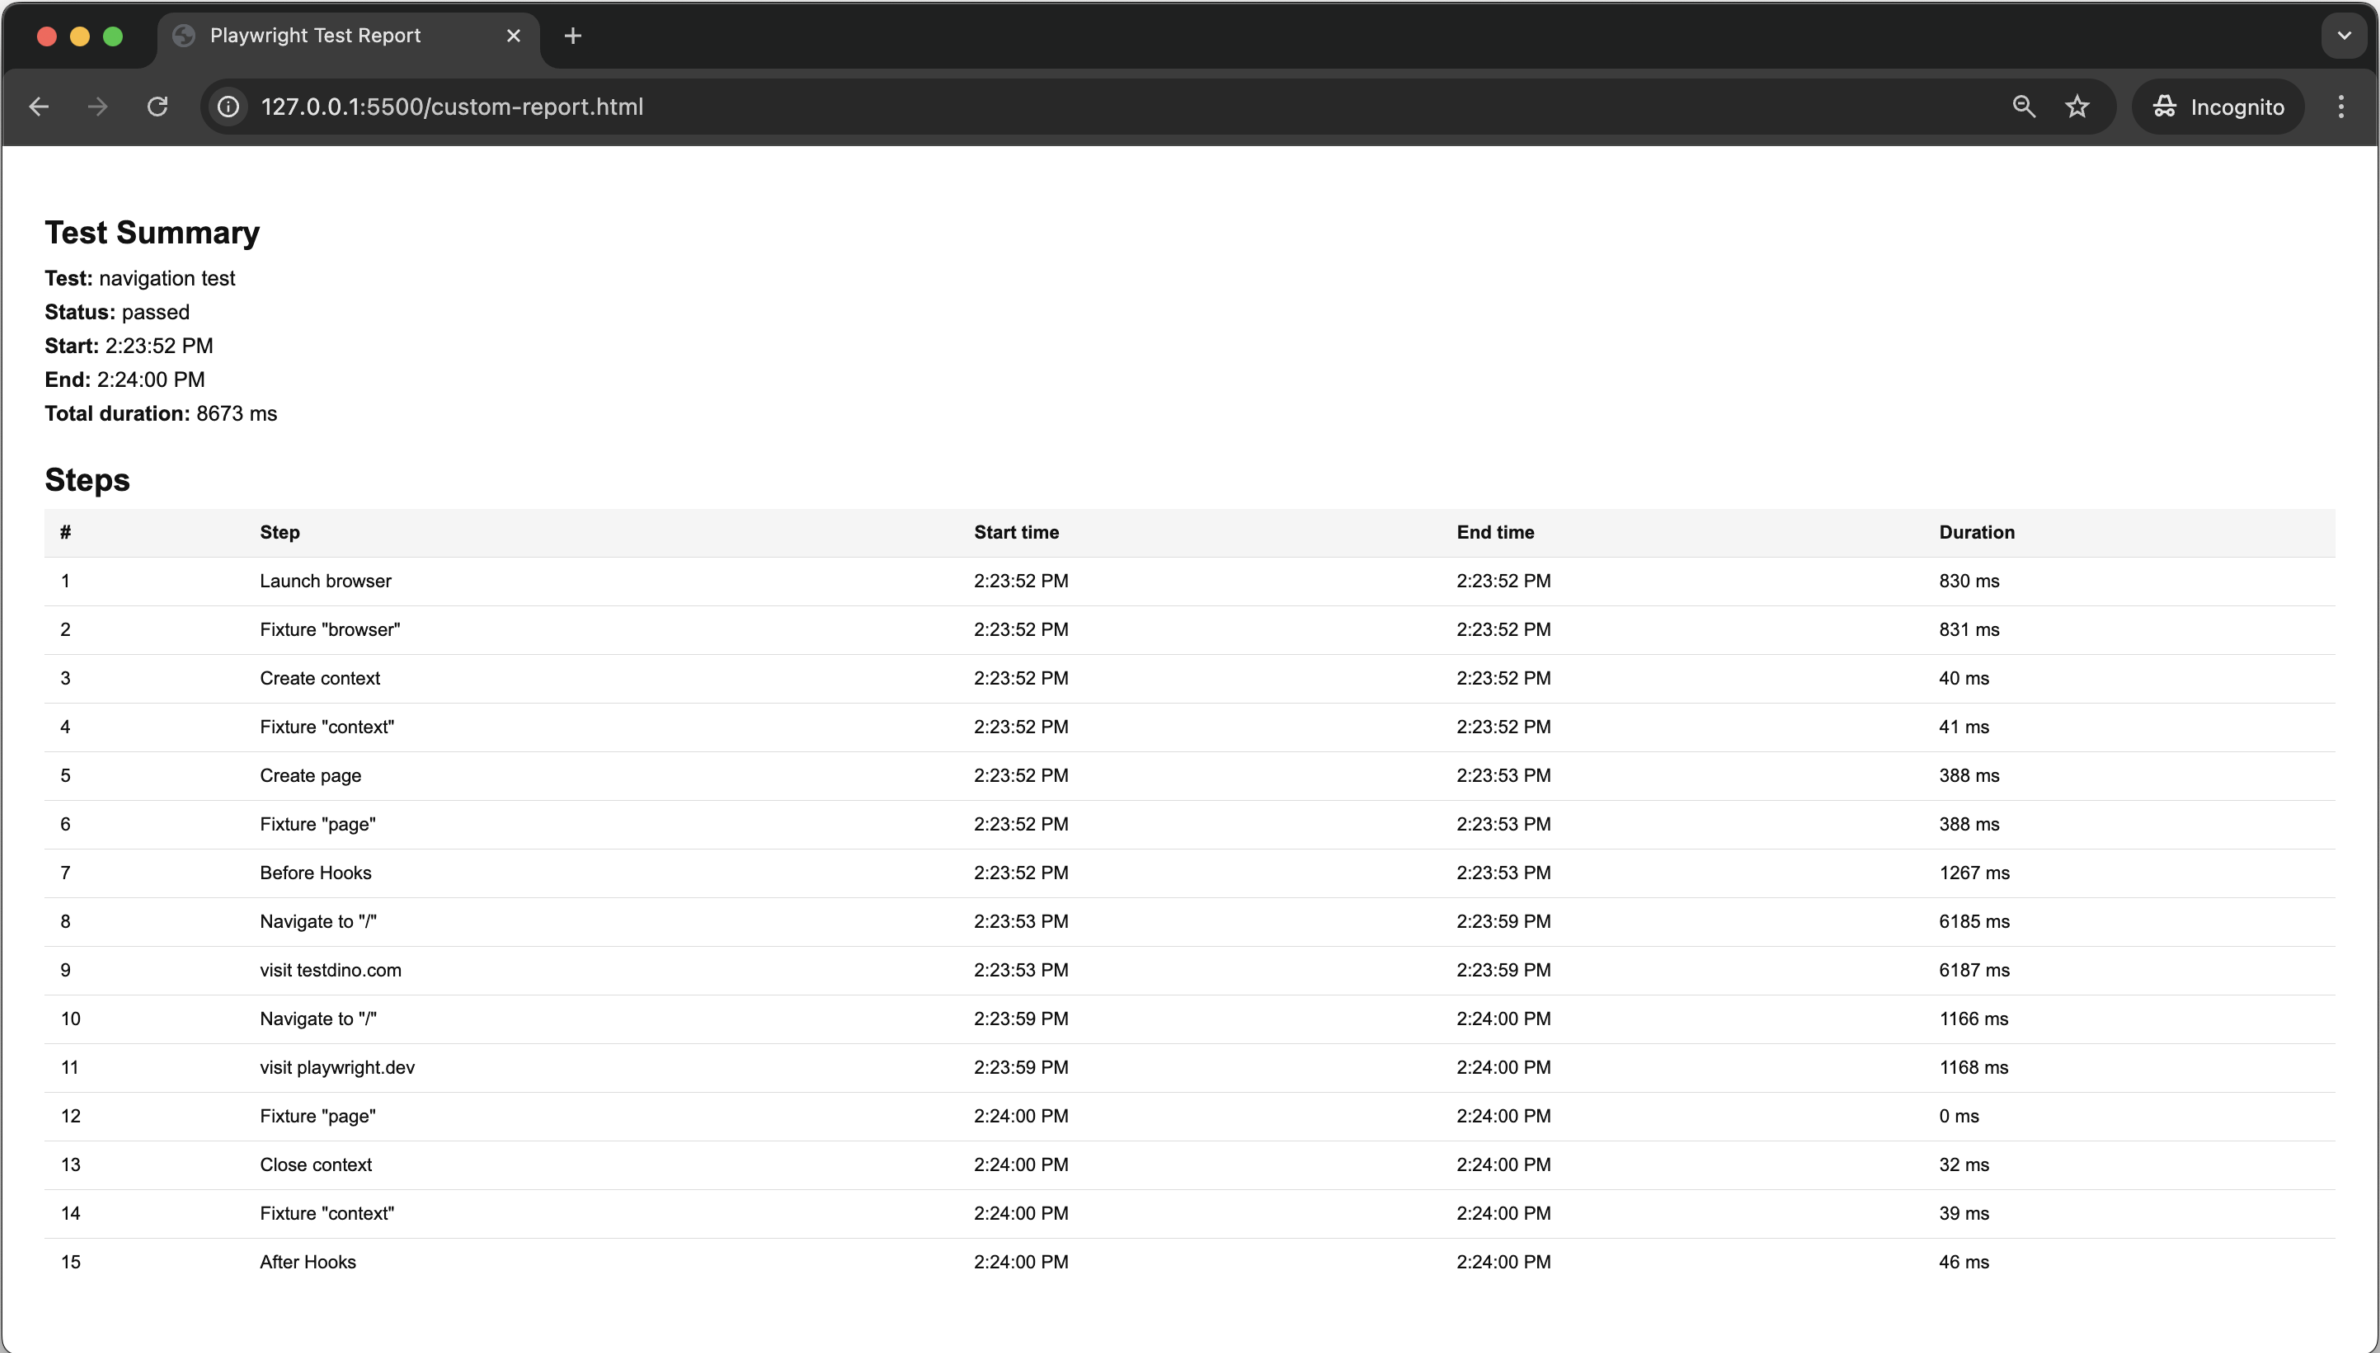
HTML Report Output Section
The HTML report focuses on readability. It shows a clear timeline of what happened during the test, step by step, without hiding details inside a table.
Advanced Features and Extensions
Once your custom reporter is in place, extending it is straightforward. Since it already captures test timing and step-level data, you can layer in useful additions like annotations, step grouping by test or file, or a lightweight JSON summary for CI.
Many teams also improve terminal output so failures and slow tests stand out clearly in logs.
Because the reporter runs in Node.js, sending results to external systems is easy. You can post data to APIs, store it in databases, or feed it into analytics tools.
Platforms like TestDino build on this pattern by collecting structured reporter output across multiple runs and transforming individual test results into trends that teams can track and act upon over time.
Common Errors and Fixes
- Reporter not running: Verify the reporter path in playwright.config.js points to the correct file.
- HTML report not created: Ensure onTestEnd() is implemented, and the process has write access to the project directory.
- Steps missing in the report: Only steps wrapped in test.step() are tracked. Confirm steps are defined correctly.
- Incorrect step timing: Always await async actions inside steps. Unawaited calls skew timing data.
- Test file not detected: Playwright runs tests from the tests directory by default. Move the file there or update testDir.
- Invalid CLI command: npx playwright navigation.spec.js is invalid. Use npx playwright test.
- Playwright command not found: Install Playwright with npm install -D @playwright/test.
- npm or npx not found: Node.js is missing or not in the system path. Install Node.js and restart the terminal.
- No console output in CI: Some CI systems suppress stdout. Check CI log settings if output is missing.
Compare with Built-in Reporters
| Aspect | Built-in Reporters | Custom Reporter |
|---|---|---|
| Setup | Minimal | Requires code |
| Retry visibility | Limited | Full control |
| Custom fields | Not possible | Fully supported |
| CI flexibility | Fixed | Flexible |
Best Practices
- Keep the reporter logic simple and focused on collecting data, not doing heavy processing.
- Avoid expensive work inside onTestEnd. Capture what you need there and process it once at the end.
- Store results in memory during the run and write files only after all tests finish.
- If other tools or systems consume the report, keep the output format stable and version it when changes are necessary.
- Start small, keep the output clear, and extend the reporter only when the data shows a real need.
FAQs
A custom reporter is a class that listens to Playwright test lifecycle events and produces output in a format you control, such as terminal logs or an HTML report.
Add the reporter file path to the reporter array in playwright.config.js.
Most custom reporters use onTestBegin, onStepBegin, onStepEnd, and onTestEnd. Other methods are optional.
Yes. When tests use test.step(), the reporter can record step names, timing, and duration.
Yes. Playwright allows multiple reporters in a single run, so a custom reporter can run alongside the HTML reporter if needed.

Pratik Patel
Co-founder