Playwright AI Codegen: Generate Tests Automatically
Playwright Codegen gets you runnable tests fast by recording real browser flows. Use AI to refactor the noisy output into stable, reviewable tests that actually survive CI.
If you want Playwright coverage fast, Codegen is the quickest way to get a runnable draft.
You click through a real browser, and Playwright writes the code. The catch is that raw recordings are usually too noisy for a long-living suite.
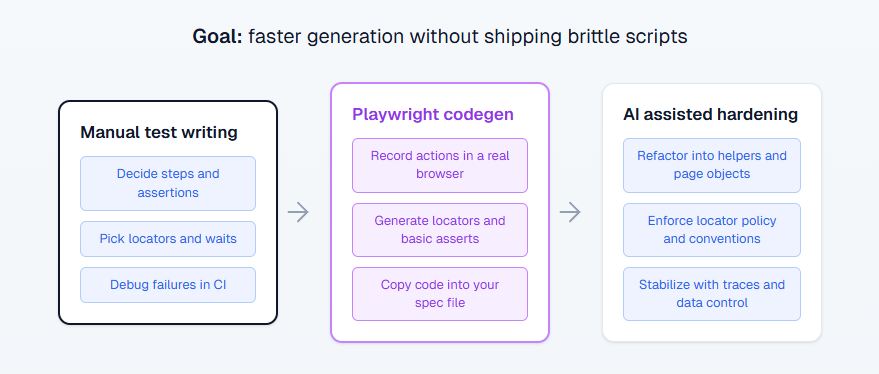
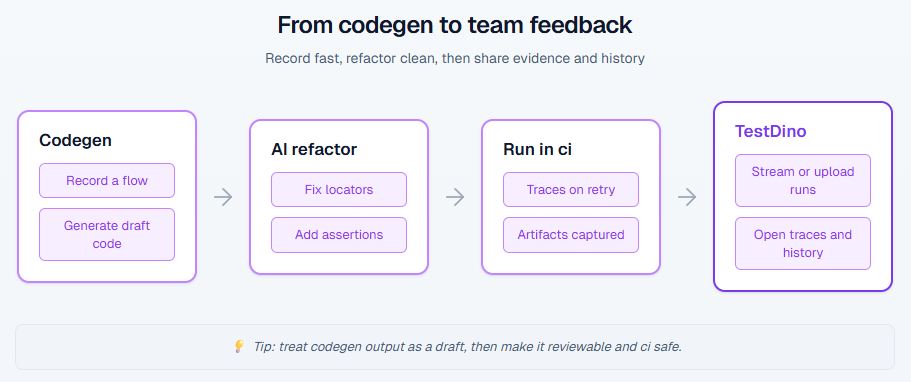
This guide shows a workflow that actually ships: record with Codegen, refactor with clear rules, then harden for CI.
What is Playwright AI Codegen?
Playwright Codegen is Playwright's recorder. You interact with the app in a real browser while the inspector generates test code and locators.
The "AI" part is not a Playwright feature. It is how you use an AI coding agent to turn the recording into clean tests that match your repo style and survive review.
Here is the shortest definition you can paste into a doc or answer box:
Playwright AI Codegen is a workflow where you use Playwright Codegen to record a user flow, then use AI to refactor the generated script into stable, maintainable tests.
What Codegen gives you in five minutes
Codegen is great at capturing the truth of the UI. You do not forget the weird modal, the extra redirect, or the hidden animation. It also gives you working starter locators, which is usually the slowest part when you start a new flow.
In practice, Codegen is best for:

Tip: Record only one happy path per test. If you record exploration clicks, you will ship a script that is hard to review and harder to maintain.
-
bootstrapping a brand new flow when you are starting from zero
-
generating locators you can quickly standardize
-
getting a runnable spec you can iterate on instead of staring at a blank file
Where recordings go wrong
Raw Codegen output is basically click logs. It tends to include extra navigation, brittle selectors, and missing assertions. If you merge recordings as is, you will get the classic suite smell: "Why it worked on my System" and "it flaked every third run".
The fix is simple: treat Codegen output as a draft, not as production test code.
Note: Most flakes from recorded tests come from two things: weak assertions and brittle locators. Fix those first before you blame timing.
When should you use Codegen vs hand written tests?
Use Codegen when speed matters and you need a working baseline today. Write by hand when you need architecture, reuse, and long term stability.
If your suite is a product, Codegen is your sketch tool. You still have to engineer the final version.
Here is a decision table that makes this choice obvious.
| Situation | Best move | Why it works |
|---|---|---|
| New flow, you need one passing test today | Start with Codegen | You get a runnable draft fast |
| Login is painful to repeat | Codegen plus storage state | You log in once and reuse state for more recordings |
| Long term regression suite | Write by hand or refactor recordings hard | You need structure, not a linear script |
| UI changes daily | Record only as a starting point | Selectors rot quickly without policy |
| Many similar crud flows | One good recording, then AI templates the rest | You reuse patterns instead of rebuilding each time |
| Fails only in CI | Debug with traces, do not re record blindly | Traces show what happened, step by step |
Quick rule of thumb
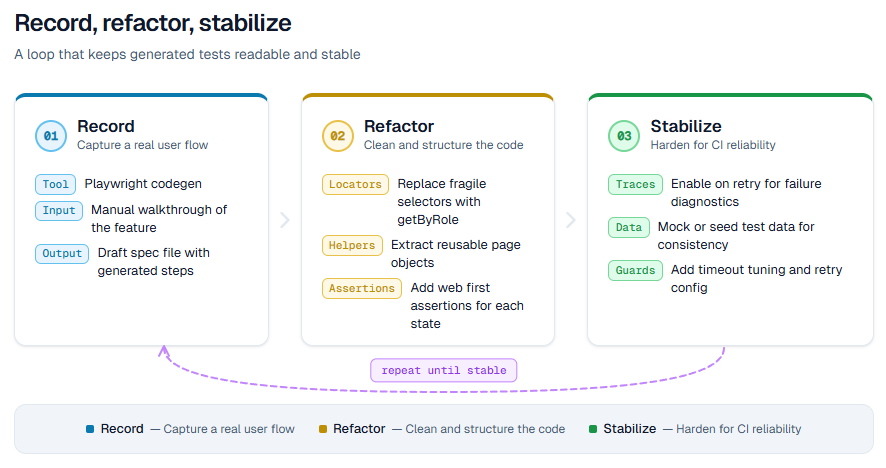
Record to get momentum, then refactor until the test reads like intent, not like a replay.
How to generate tests with Codegen step by step
This is the fastest path to a clean draft. The goal is not to record everything. The goal is to capture one tight happy path that becomes your template.
Step 1 – Install and sanity check
In a Node project, install Playwright Test and download browsers.
npm i -D @playwright/test
npx playwright install
Run one test to confirm your setup works before you record anything.
Step 2 – Start Codegen from the inspector
You can record from the cli or from the vs code extension. If your team is in vs code, the extension is smoother. If you want a quick spike, the cli inspector is perfect.
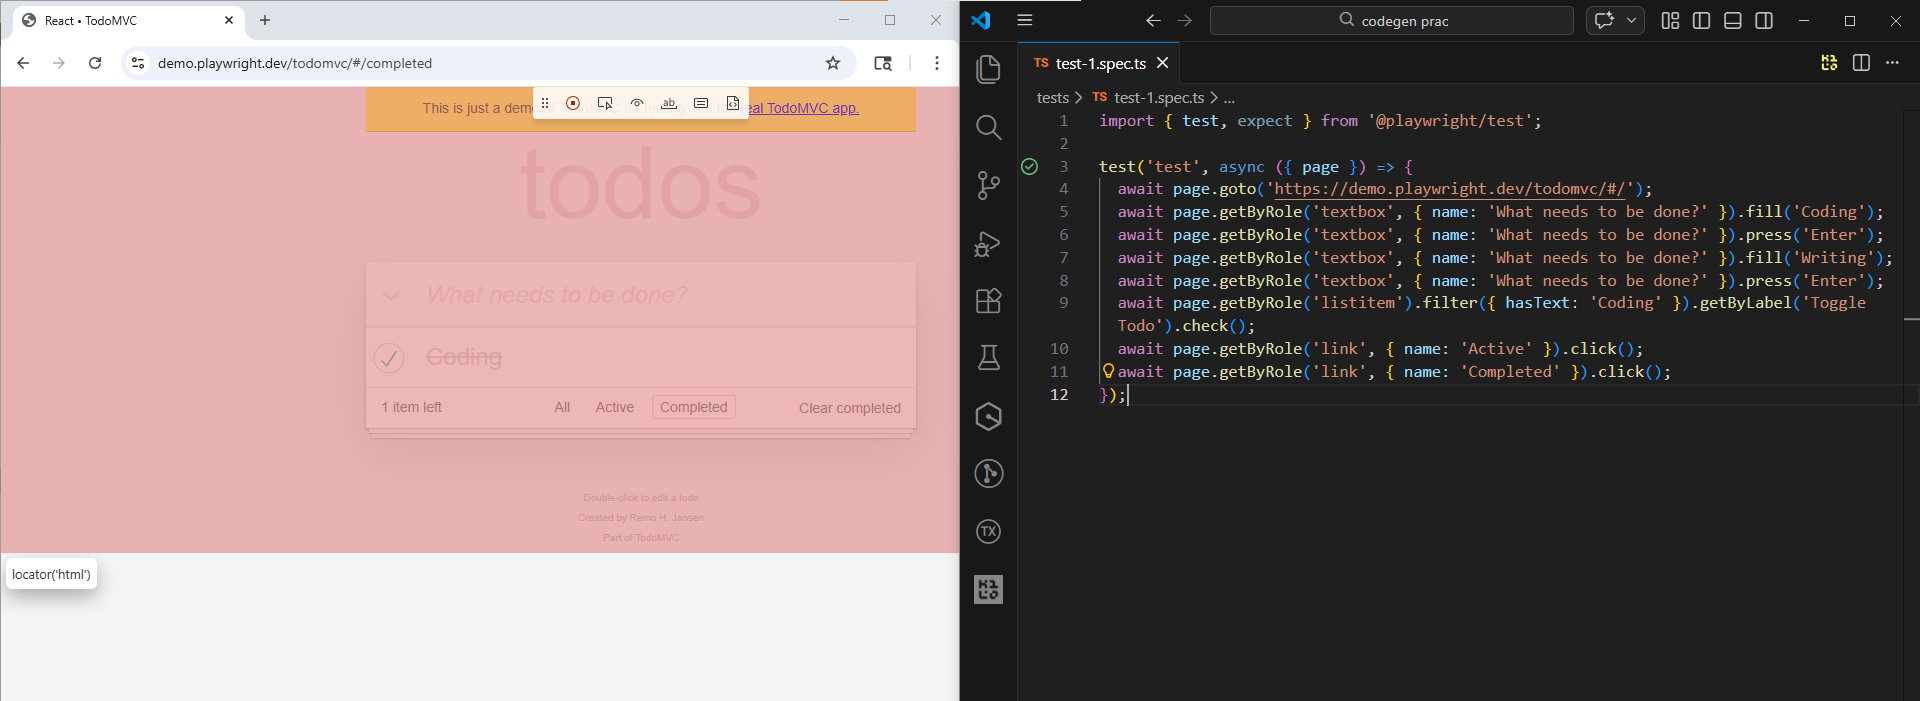
npx playwright codegen https://demo.playwright.dev/todomvc/#/Note: This demo app has no login. For the storage state step, you are using it to persist localStorage, so your todos appear without retyping. The same workflow applies to real apps where storage state also includes cookies.
You will see two windows. One is the browser you click in. The other is the inspector that shows the generated code and locators.
Step 3 – Record one happy path only
Keep it tight. One test should cover one behavior.
A clean recording usually looks like:
-
Navigate to the page
-
Do the key action
-
Assert the success state
Do not mix admin setup and the user flow. If setup is required, do it outside the recording.
Step 4 – Add at least one real assertion
Recording clicks is not testing. While recording, switch to assertion mode in the inspector and click the element that proves success.
Aim for one assertion that proves the outcome, plus one that proves the right data is shown if that matters. Avoid asserting every pixel.
Tip: Pick assertions that prove state change, not layout. For TodoMVC, "items left" and the presence of a todo in the list are better than checking css or exact positions.
Step 5 – Save auth state so you skip login
Login flows are the fastest way to waste hours.
Codegen can save storage state to a file at the end of the session. That includes cookies and local storage, which is enough for most apps to start in an authenticated state next time.
npx playwright codegen --save-storage=auth.json https://demo.playwright.dev/todomvc/#/Keep that file local. Add it to .gitignore.
Now record while already logged in:
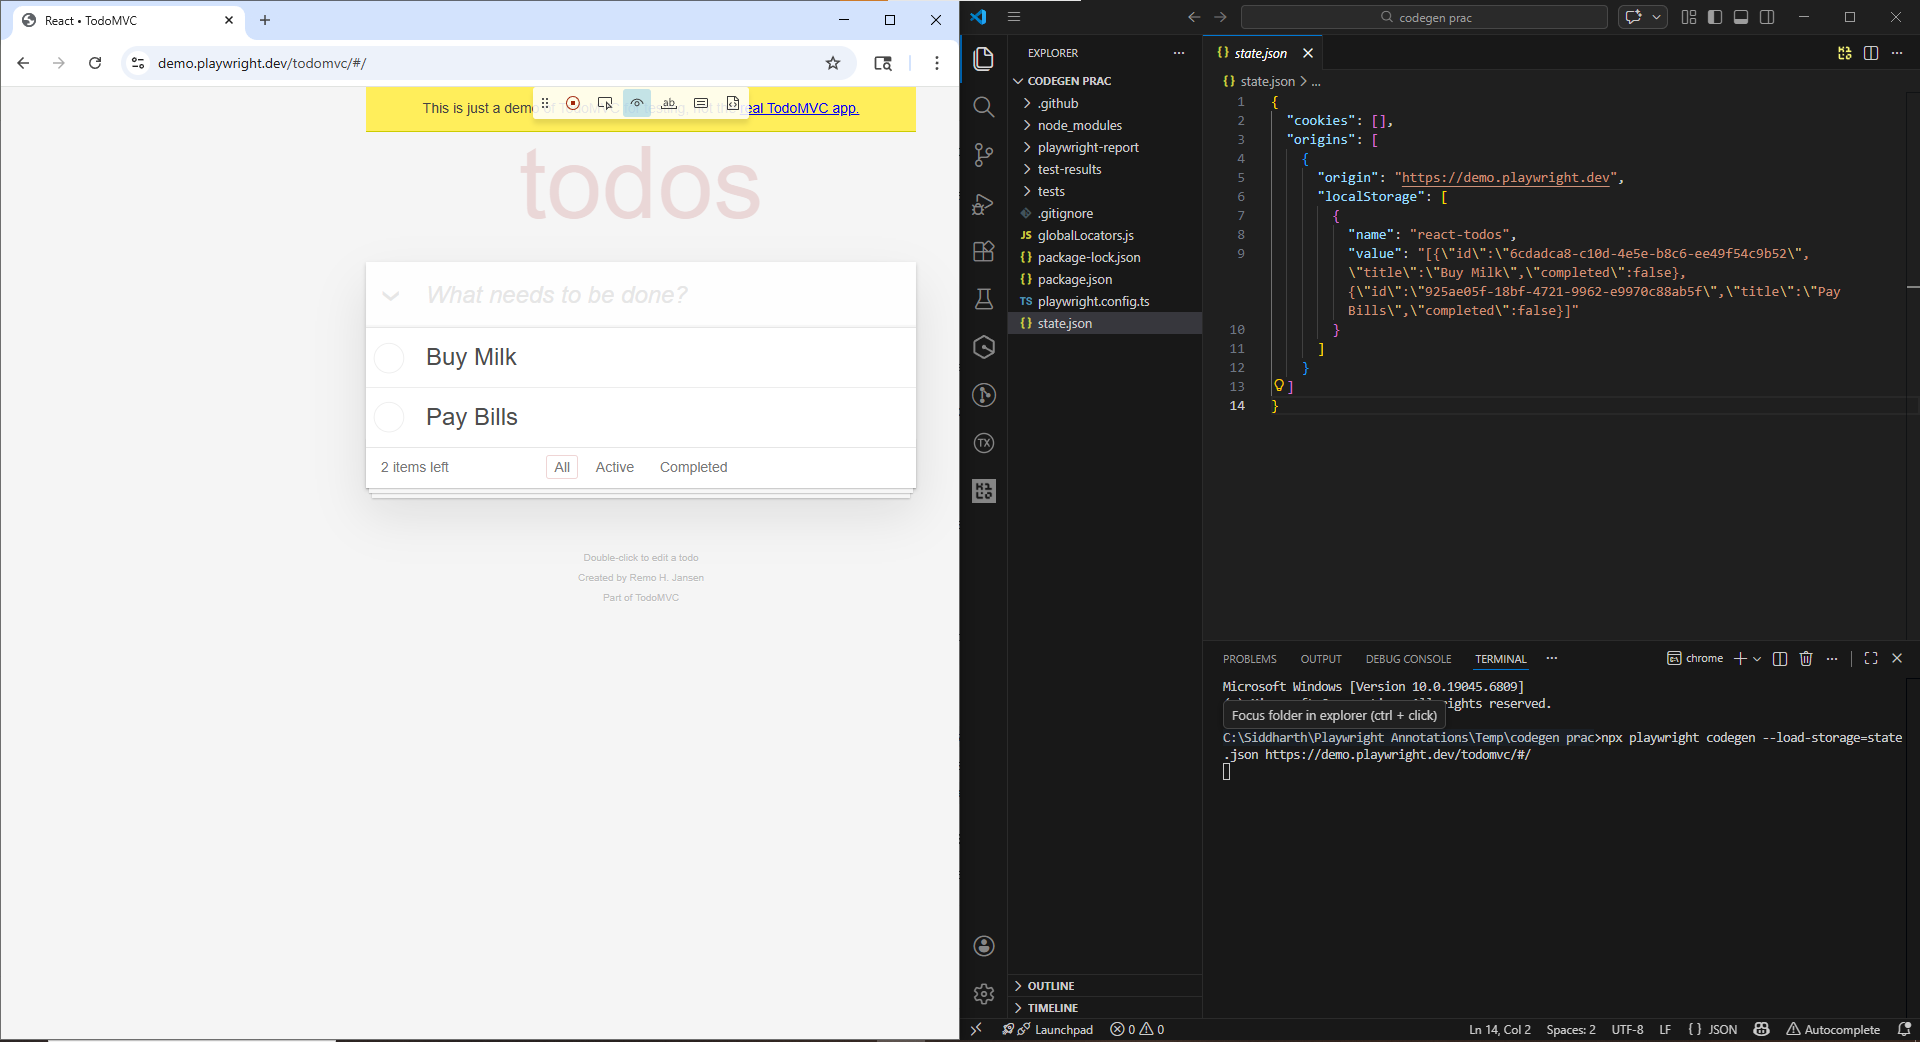
npx playwright codegen --load-storage=auth.json https://demo.playwright.dev/todomvc/#/Step 6 – Record in the same device profile you run in
If your app changes behavior on mobile, record with the same viewport or device profile you will run in CI.
npx playwright codegen --device="iPhone 13" https://demo.playwright.dev/todomvc/#/Step 7 – Paste into a spec and run once
Copy the generated code into a real spec file and run it once. Do not let raw recordings sit in the repo.
npx playwright test path/to/your.spec.tsIf it fails, fix the locator or add the missing assertion. Re recording is a last resort.
How to refactor recordings for code review
This is where Codegen becomes production ready. If you skip this, you will ship brittle scripts.
Lock a locator strategy and enforce it
A locator policy is the difference between a stable suite and a flaky mess. Pick a rule and stick to it.
A practical order that holds up well:
-
getByRole with an accessible name for interactive UI
-
getByLabel for form fields
-
getByTestId when the app exposes stable ids
-
css selectors as a last resort
Here is the kind of refactor that saves you from future pain:
// Before: brittle selector captured during recording
await page.locator('div:nth-child(3) > button').click();
// After: readable intent
await page.getByRole('button', { name: 'Checkout' }).click();
If you want a deeper locator playbook for AI agents, link your team to Playwright Skill. It is a set of practical guides maintained by TestDino that emphasizes readable selectors and stable patterns.
Tip: Locator policy is the easiest way to reduce flake fast. If your app can add stable test ids, use getByTestId for the few elements that do not have good roles or labels, then keep the rest role based.
Extract setup into helpers or fixtures
Raw recordings repeat setup steps everywhere. That makes suites slow, noisy, and hard to debug.
Extract the boring parts:
-
authentication
-
data creation
-
navigation to the page under test
Example helper:
async function login(page) {
  await page.goto('/login');
  await page.getByLabel('Email').fill(process.env.E2E_EMAIL);
  await page.getByLabel('Password').fill(process.env.E2E_PASSWORD);
  await page.getByRole('button', { name: 'Sign in' }).click();
}
This is not about fancy architecture. It is about keeping the test body focused on the one behavior you care about.
Use web first assertions, not manual checks
Playwright's async assertions wait and retry until the condition is met. That is exactly what you want for ui that loads asynchronously.
Prefer:
await expect(page.getByText('Welcome')).toBeVisible();Avoid patterns like isVisible() checks for core assertions. Those checks can be useful for branching logic, but they do not replace a real assertion.
How to scale with AI agents without junk tests
AI can help a ton, but only when you constrain it. If you let it freestyle, you will get tests that look correct and fail instantly.
Give AI a refactor job, not a blank page
The best use of AI here is transformation. You hand it Codegen output, and it rewrites it into your style.
This prompt works because it is specific and reviewable:
Refactor this Playwright Codegen output into a maintainable spec.
Constraints:
1) Prefer getByRole, getByLabel, getByTestId. Avoid nth, first, last.
2) Extract repeated steps into helpers or fixtures.
3) Use web first assertions. No hard sleeps.
4) Keep one behavior per test.
Return an updated spec file only.
If you want to see this approach used on a real project, the walkthrough Playwright Skill Claude Code shows the full loop of generating tests, running them, and fixing failures.
Use Playwright mcp for agent driven exploration
If you are experimenting with agent driven coverage, the Playwright mcp server lets mcp clients drive browsers using structured snapshots.
Use this when you want an agent to explore the UI and propose missing scenarios. Do not use it when you need pixel perfect assertions.
Minimal config example:
{
  "mcpServers": {
    "playwright": {
      "command": "npx",
      "args": ["@playwright/mcp@latest"]
    }
  }
}
Treat agent output like any other code. Review it, run it, refactor it.
Stream results to TestDino for fast feedback
Once you start generating more tests, your bottleneck is no longer writing. It is debugging and visibility. You want to answer questions like: what failed, is it flaky, did it fail last week, and where is the trace.
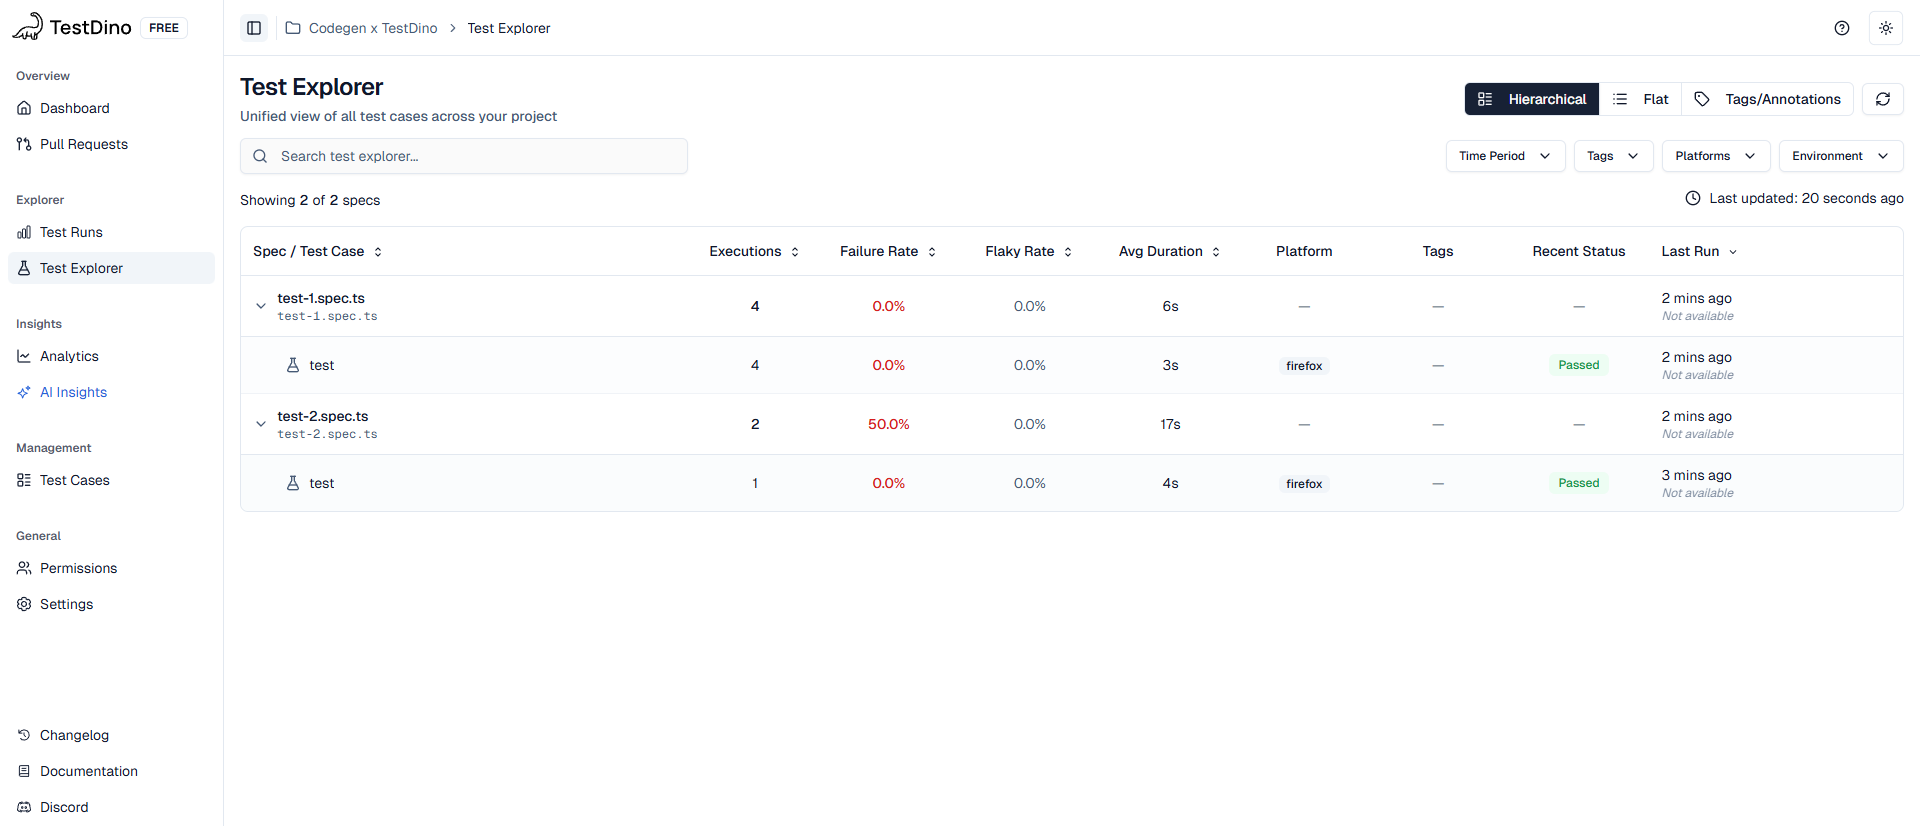
That is where TestDino is useful. Its official docs show two common flows:
-
Stream results in real time using the TestDino cli and the @testdino/playwright package
-
Upload reports and artifacts after a run using the getting started guide
A minimal local run looks like this:
npm install @testdino/playwright
export TESTDINO_TOKEN="your-api-token"
npx tdpw test
In CI, you usually run Playwright normally, then upload the report folder so your traces and screenshots are available to the team. The Trace Viewer guide explains what gets captured and how to upload it.
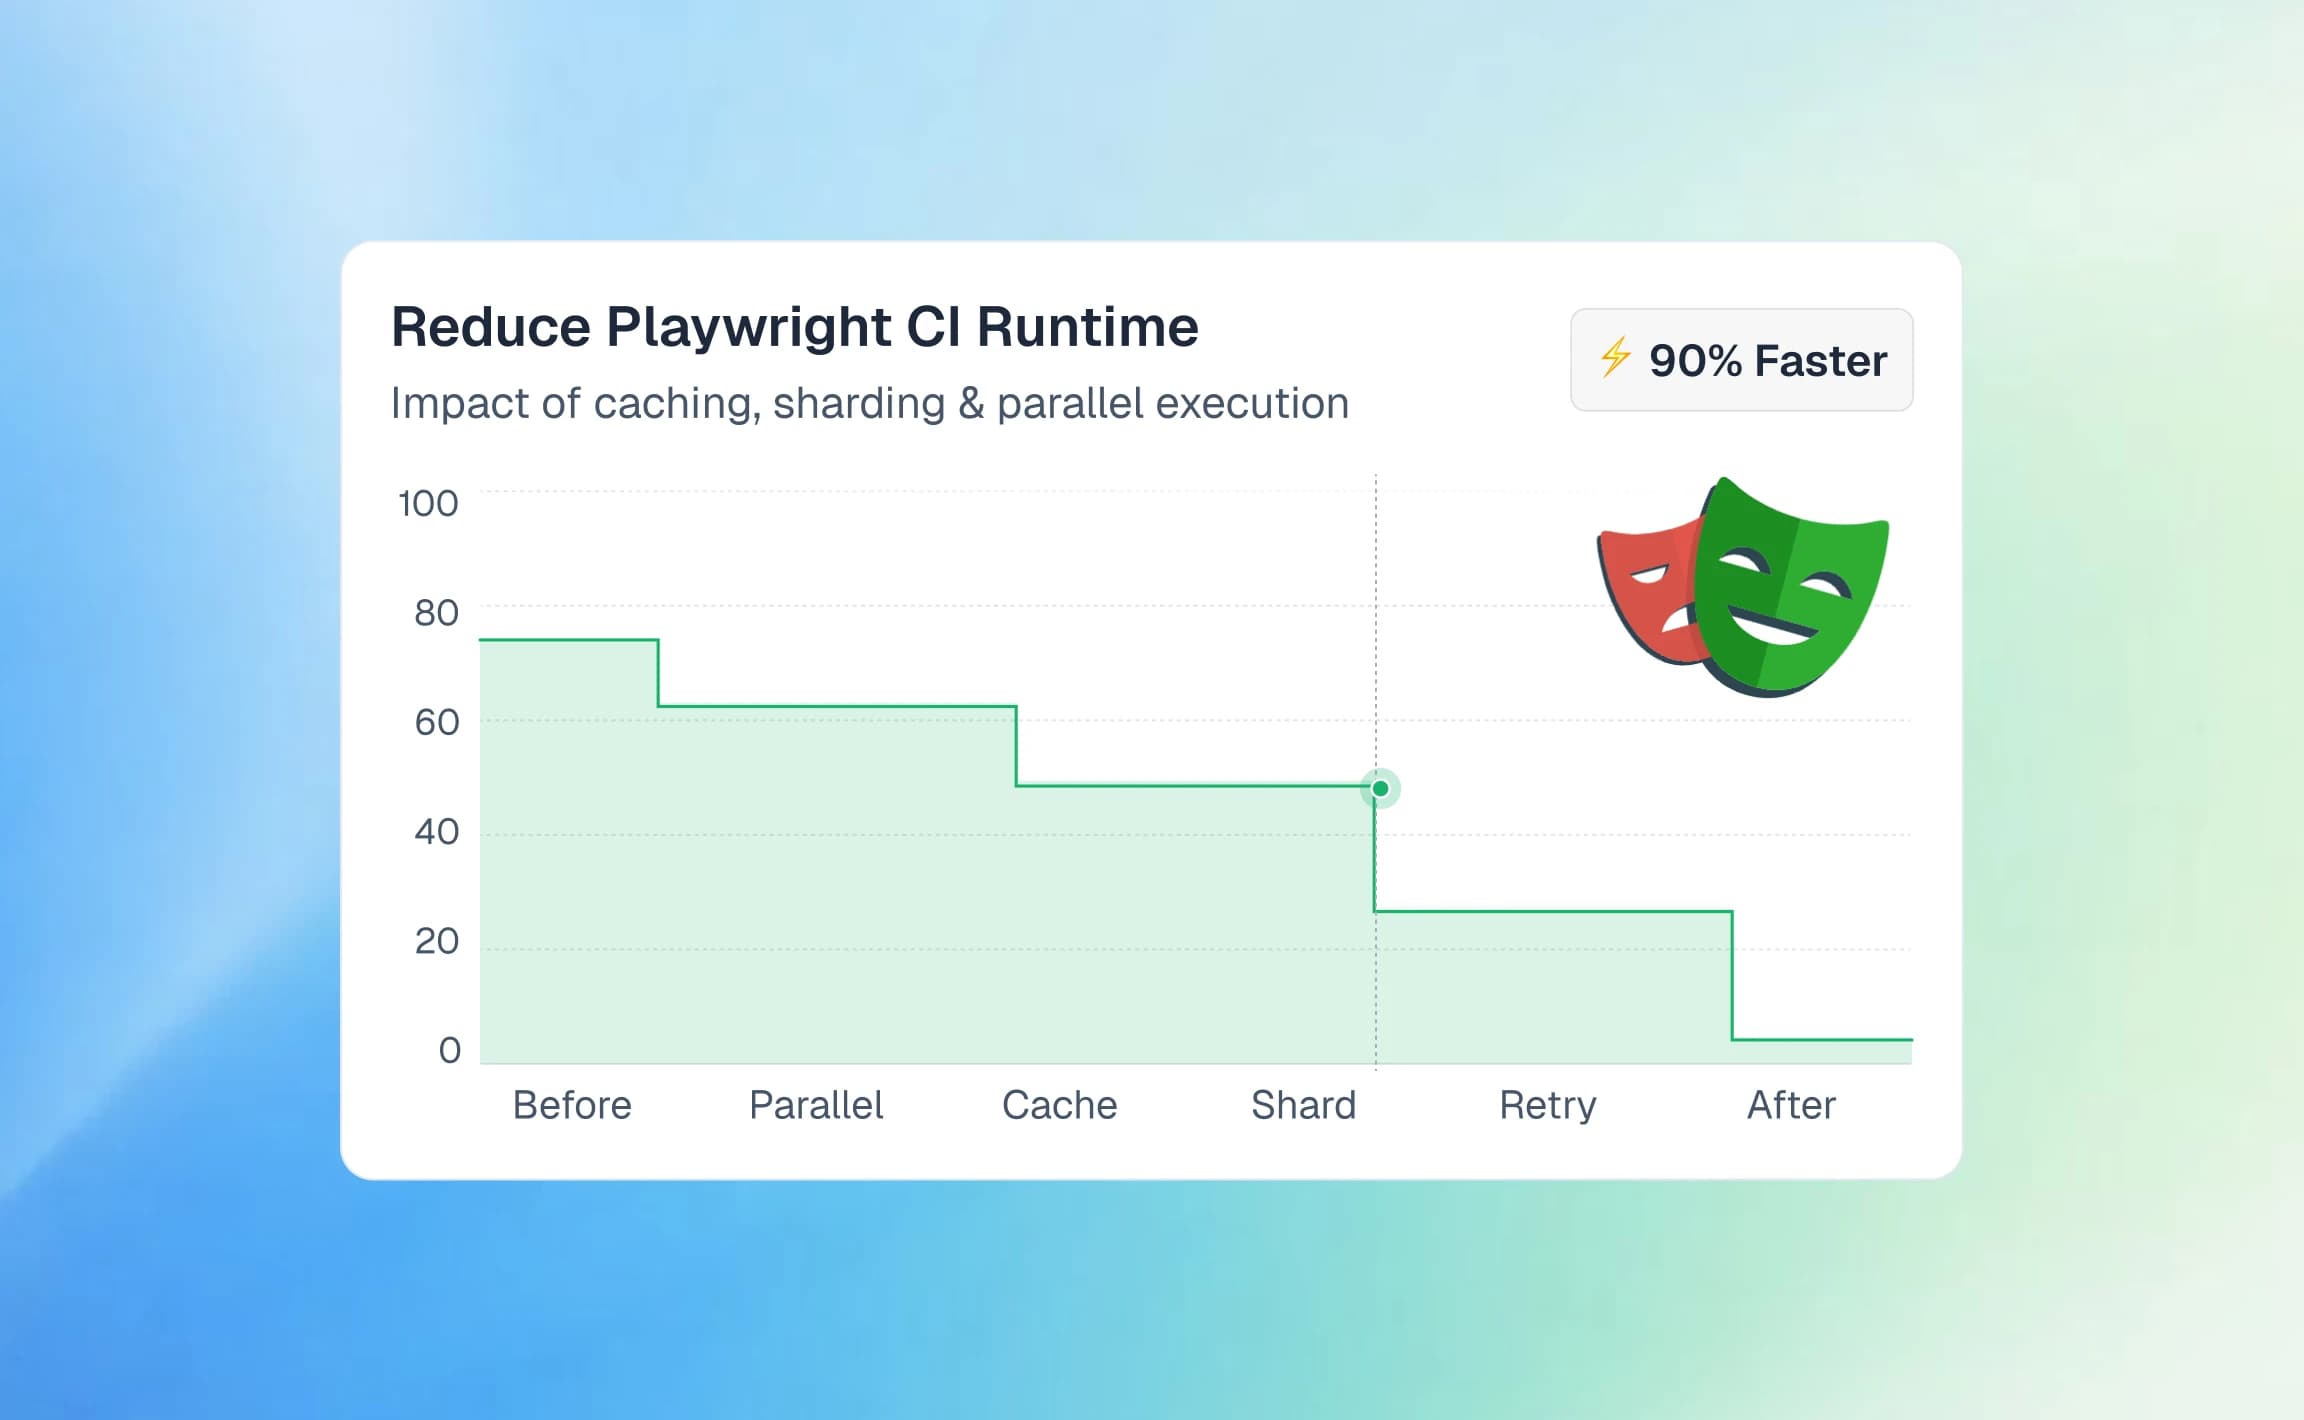
How to keep generated tests stable in CI
Auto generating tests is easy. Keeping them stable is the actual job.
Turn on traces, then debug like a pro
If a test fails in CI but passes locally, you need evidence.
Configure Playwright to record traces, ideally only on first retry to limit overhead:
// playwright.config.ts
export default defineConfig({
  use: {
    trace: 'on-first-retry'
  }
});
When you have a trace zip, you can open it locally:
npx playwright show-trace path/to/trace.zipIf you want traces in a shared place instead of downloading artifacts, the TestDino trace viewer doc shows how to upload traces so the team can open them in the browser.
Related deep dive: Playwright debugging guide covers the exact workflow for tracing CI failures.
Control network and data to cut flake
A big chunk of flake is just uncontrolled dependencies.
If your test depends on an external api, you are letting the network decide your build result. Either seed stable data or mock the unstable edges.
Playwright request routing gives you deterministic responses:
await page.route('**/api/products', async route => {
  await route.fulfill({ json: { items: [] } });
});
For a practical walkthrough, Playwright network mocking shows how to intercept and mock api calls without creating fake confidence.
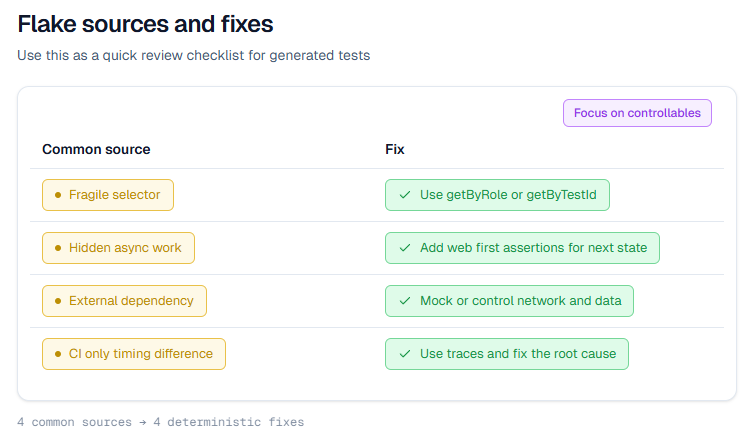
Use a short CI review checklist
Generated tests should pass a small checklist before they get merged. This prevents silent flake from creeping in.
| Risk | What it looks like | Fix |
|---|---|---|
| Fragile selector | nth, first, deep css path | Replace with getByRole or getByTestId |
| Hidden async work | Click happens, page is still loading | Add a web first assertion for the next state |
| External dependency | Real api returns variable data | Mock, stub, or seed stable fixtures |
| Auth drift | Login UI changes and many tests die | Reuse storage state or api login |
| Visual diffs are hard to review | Baselines exist but nobody checks diffs | Follow TestDino visual testing |
If your suite is getting slower as it grows, the benchmarks and patterns in Playwright slow tests are a solid next read.
Conclusion
Playwright Codegen gets you from zero to runnable test code fast. AI can turn that draft into production tests, but only if you enforce locator policy, readable structure, and real assertions.
If you adopt one habit from this blog, make it this: treat Codegen output as a draft. Refactor it, then harden it with traces, deterministic data, and controlled dependencies. When your team needs shared visibility, stream or upload runs using the TestDino cli so traces and artifacts are not trapped inside a single CI job.
FAQs

Savan Vaghani
Product Developer