Playwright API Testing: A Comprehensive Guide with Examples and Best Practices
A hands-on guide to testing REST APIs with Playwright’s built-in APIRequestContext. Covers GET, POST, PUT, PATCH, and DELETE requests with token-based authentication, plus CI reporting with TestDino.
If your team already runs Playwright for UI tests, you don't need a separate tool for API testing.
Playwright ships with a built-in APIRequestContext that handles HTTP requests natively - same framework, same test runner, same reports.
No Postman, no RestAssured, no context switching.
No third-party HTTP libraries needed.
Where does API Testing fit in your Test Suite?
Most teams follow the testing pyramid: 70% unit tests, 20% API/integration tests, and 10% end-to-end UI tests. Unit tests are fast and isolated, but can't catch integration issues. E2E tests are comprehensive but slow and flaky.
API tests sit in the sweet spot; they're faster than UI tests, more realistic than unit tests, and give you the confidence that your backend actually works before you involve a browser.
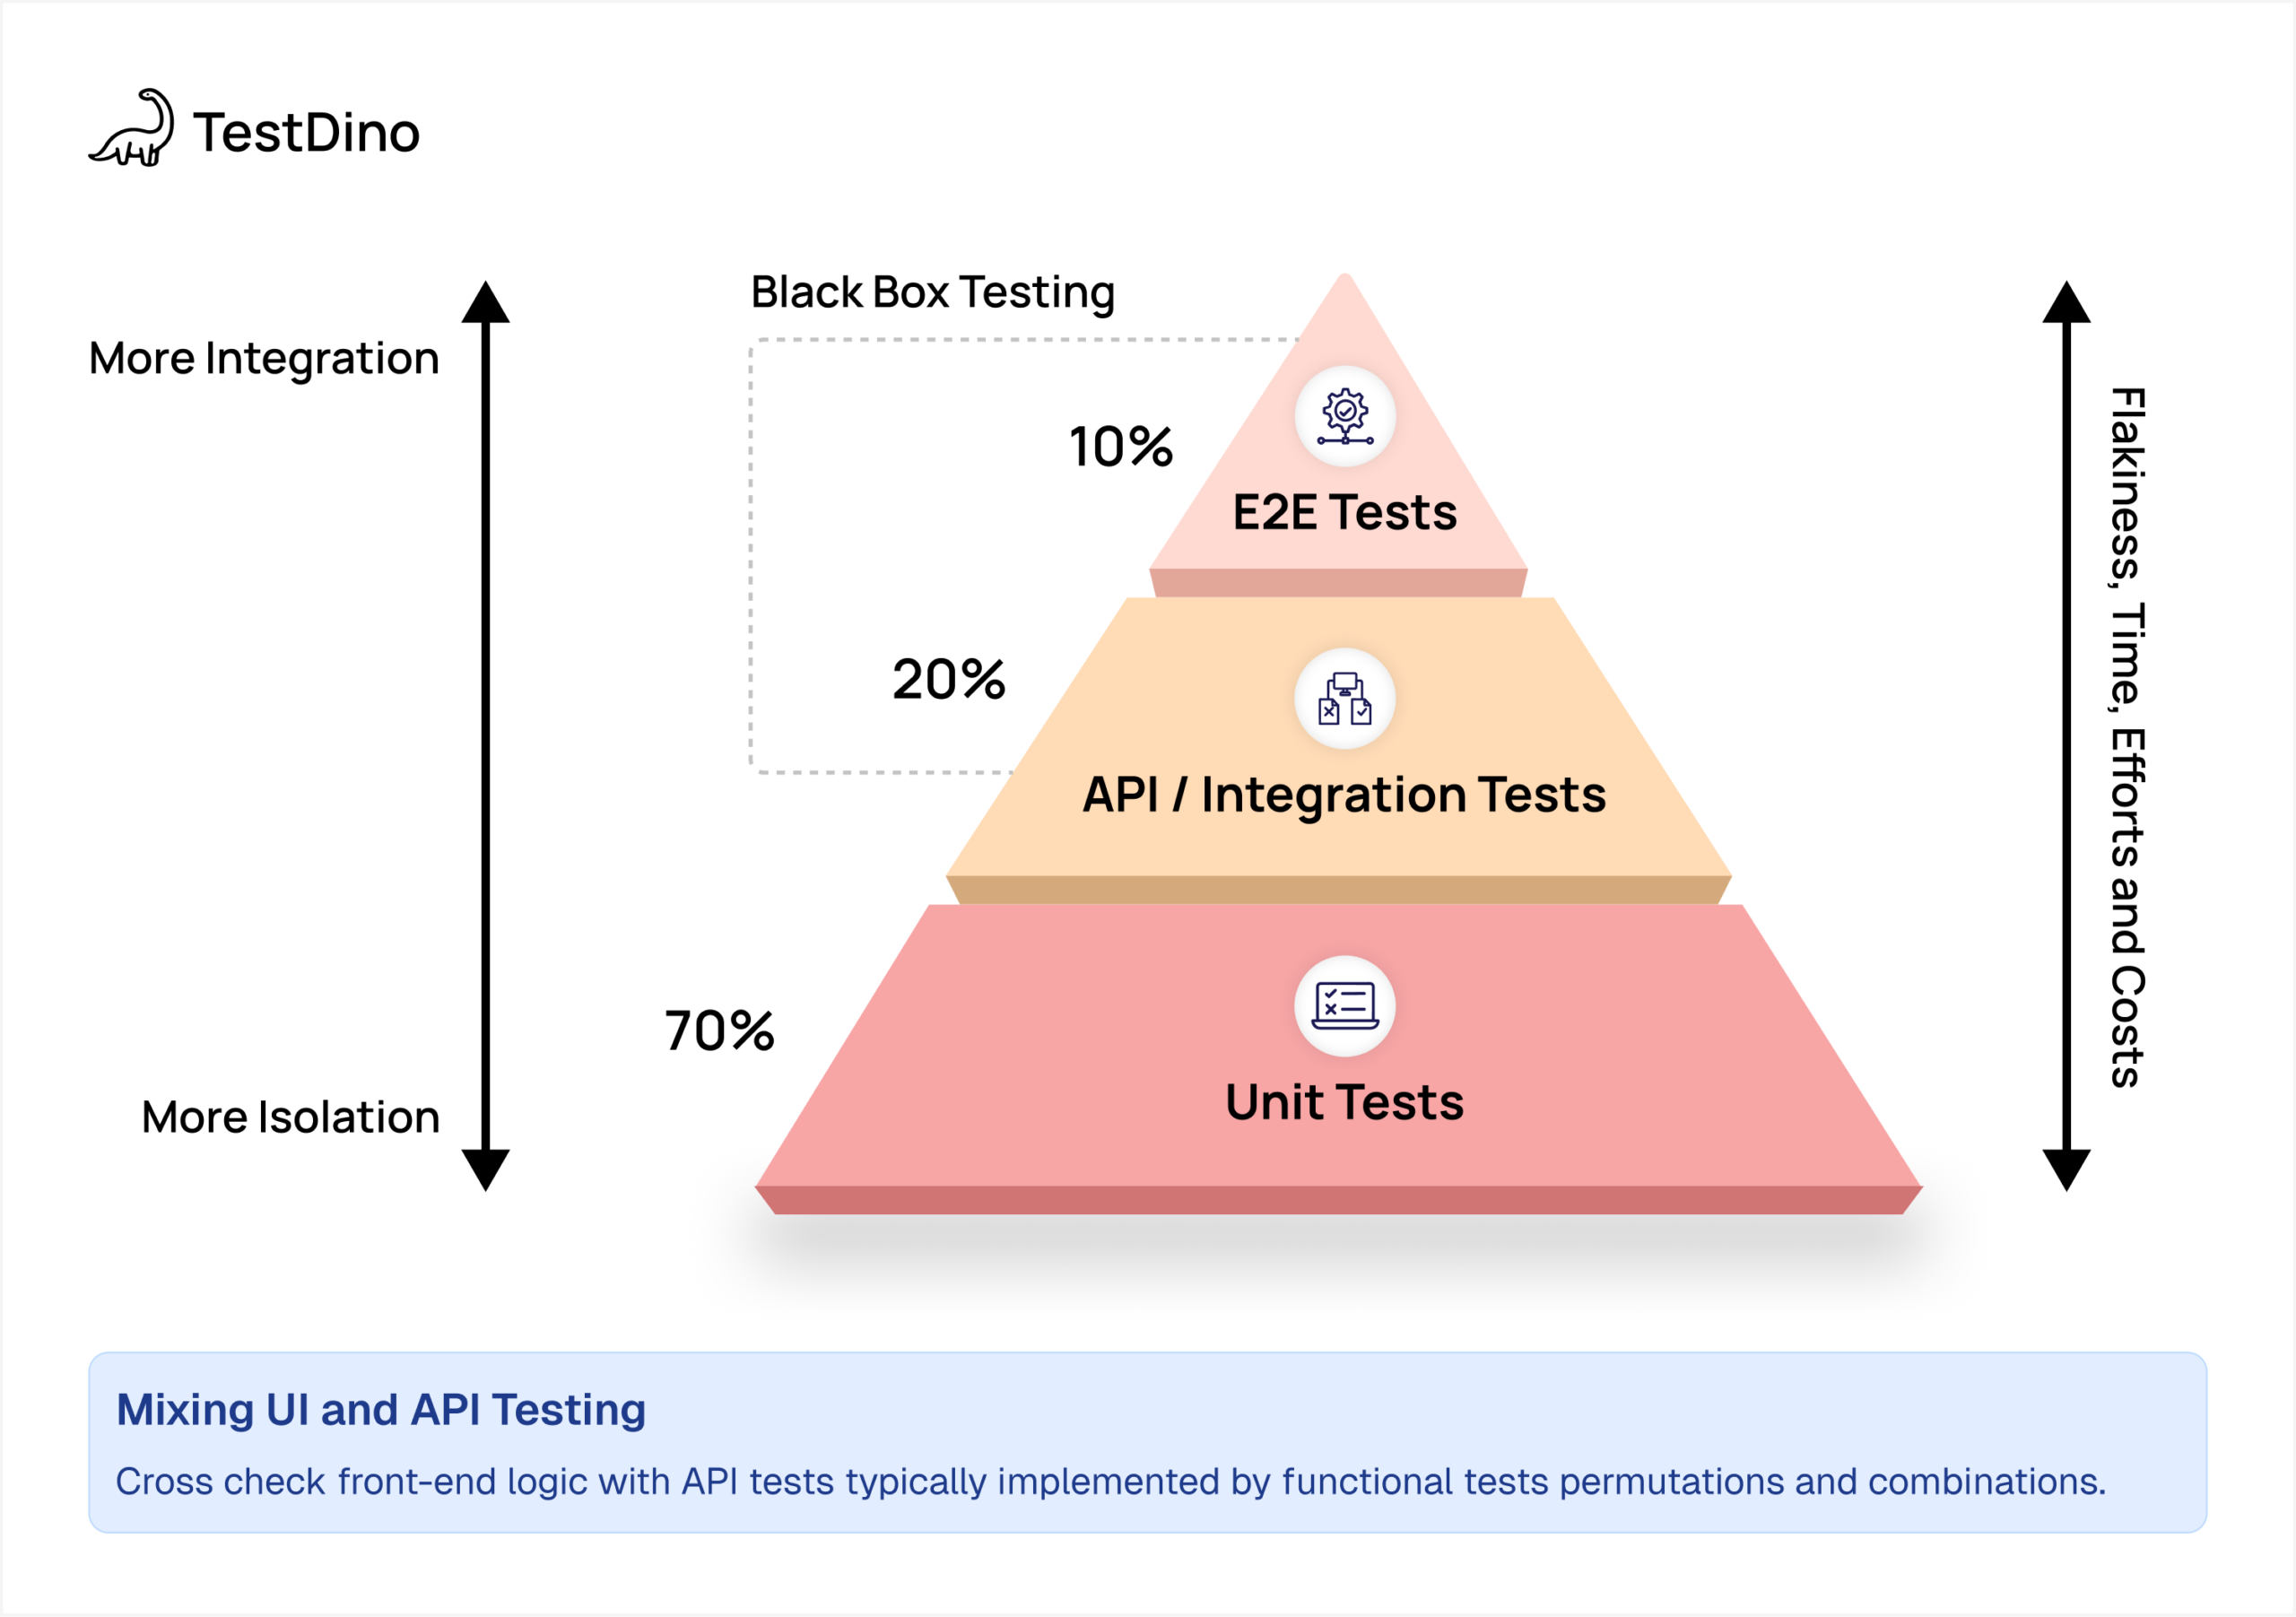
Here's why this matters for Playwright users: instead of maintaining unit tests in Jest, API tests in Postman, and UI tests in Playwright, you can collapse that 20% API layer and the 10% E2E layer into a single framework.
Write API tests to verify your endpoints work correctly, then use those same tests to set up data for UI tests. Same language, same tooling, same CI pipeline. You get the speed benefits of API testing without the context switching.
This guide walks you through building that combined approach. You'll test REST APIs using Playwright's APIRequestContext, authenticate with token-based auth, and set up TestDino reporting so both your API and UI test results land in one dashboard.
How to do API Testing with Playwright?
Playwright lets you send HTTP requests and validate responses without opening a browser. It's built into Playwright through the APIRequestContext, which means you can test your backend endpoints using the same tool you use for frontend automation.
Unlike tools like Postman or RestAssured, Playwright's inbuilt API testing capabilities integrates directly with your existing test suite. You write tests in JavaScript or TypeScript, run them with the same command, and see results in the same HTML report. The APIRequestContext shares authentication state with browser contexts, so you can log in via API and immediately start testing UI flows without filling out login forms again.
API testing with Playwright covers 3 main scenarios.
- You can test your backend endpoints independently to verify they return correct status codes and data structures.
- You can use API calls to set up test data before UI tests run, which is faster than clicking through forms.
- And you can validate server-side state after UI actions complete, making sure database changes actually happened.
In this guide, you'll build a complete Playwright API test suite against the Restful Booker API. You'll cover GET, POST, PUT, PATCH, and DELETE requests with token-based auth, plus set up TestDino reporting for centralized test analytics
Why Use Playwright for API Testing?
Most teams use separate tools for API and UI testing. Postman for APIs, Playwright for browsers, different syntax for each. That split creates maintenance overhead and makes it harder to test full user workflows.
Playwright solves this by handling both in one framework. Your API tests use the same assertions, fixtures, and configuration as your UI tests. You don't need to learn new syntax or maintain two different test runners.
Here's what makes Playwright different for API testing:
Shared authentication state. Log in via API, get a token, then pass that token to browser tests. No repeated login flows. The APIRequestContext and browser context share cookies and local storage, so authentication happens once.
Same test runner for everything. Run API and UI tests together with npx playwright test no switching between tools. Your CI pipeline runs one command and gets one report showing both API and browser results.
Built-in retry logic. Playwright's auto-wait works for API calls too. If an endpoint is slow or returns a 503, Playwright retries automatically. You don't write custom retry loops.
Better debugging. Failed API tests show in the same trace viewer as UI tests. You see request headers, response bodies, and timing, all in one interface. No copying curl commands between tools.
TypeScript support. Write API tests with full type safety. Playwright's types catch errors before tests run, and your editor autocompletes API methods as you type.
Teams often waste hours debugging why UI tests fail, only to find the backend returned bad data. With Playwright, you test the API first, confirm it works, then test the UI. Same framework means you catch backend issues earlier.
Setting Up Playwright for API Testing
Getting started with Playwright API testing takes about five minutes. You need Node.js installed and a project directory ready.
Step 1 - Install Playwright
Open your terminal and run this command in your project folder:
npm init playwright@latest
Follow the prompts. Pick JavaScript or TypeScript based on your team's preference. Let it create the tests folder and install browsers. You don't need the browsers for pure API testing, but they're useful when you mix API and UI tests later.
Step 2 - Configure the Project
For this guide, we'll test against the Restful Booker API, a free test API for practicing CRUD operations with token-based authentication. Here's the full playwright.config.ts that sets up the base URL, headers, reporters, and TestDino integration:import { defineConfig } from '@playwright/test';
export default defineConfig({
testDir: './tests',
timeout: 30000,
reporter: [
['list'],
['json', { outputFile: './playwright-report/report.json' }],
['html', { outputDir: './playwright-report' }],
],
use: {
baseURL: 'https://restful-booker.herokuapp.com',
extraHTTPHeaders: {
'Content-Type': 'application/json'
},
trace: 'on'
},
});
 Store Secrets Safely
Store API tokens in environment variables, never commit them to your repository. Use .env files locally and GitHub secrets in CI.
Step 3 - Create a Helper for Saving Responses
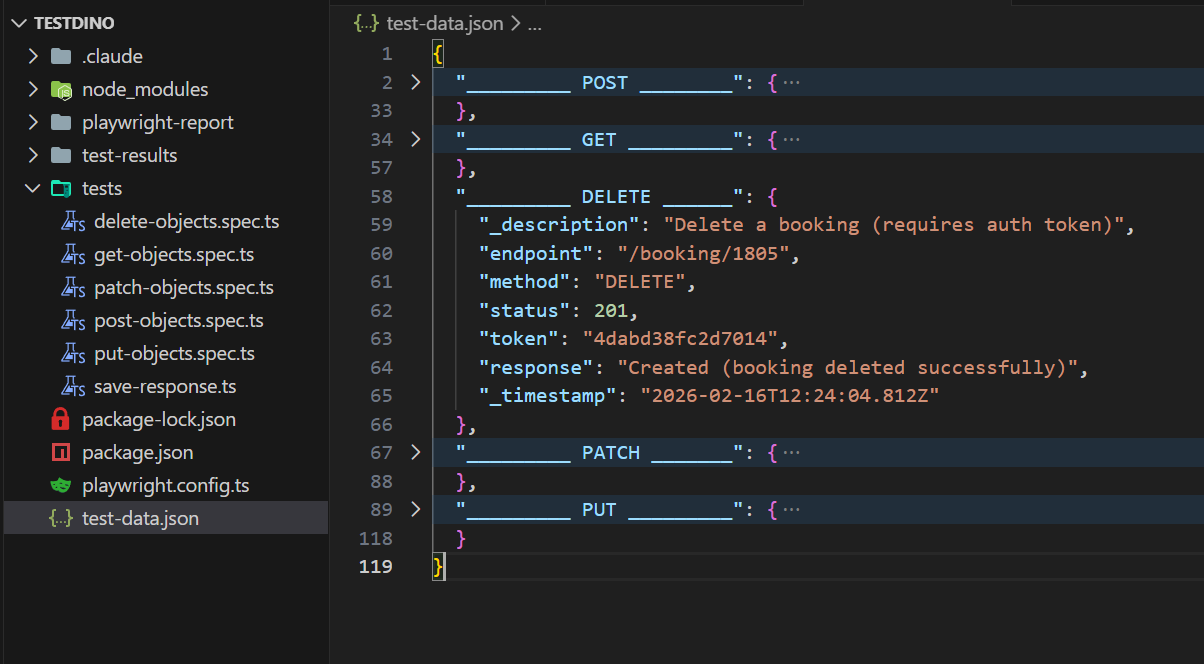
To keep test data organized, you can create a utility that logs each API response to a JSON file. This is helpful for debugging and keeping a record of what each test produced:
import * as fs from 'fs';
import * as path from 'path';
const filePath = path.join(__dirname, '..', 'test-data.json');
export function saveResponse(section: string, data: object) {
let existing: Record<string, any> = {};
if (fs.existsSync(filePath)) {
existing = JSON.parse(fs.readFileSync(filePath, 'utf-8'));
}
existing[section] = {
...data,
_timestamp: new Date().toISOString(),
};
fs.writeFileSync(filePath, JSON.stringify(existing, null, 2));
}
This writes a test-data.json file at the project root with timestamped entries for each API call. Not required for testing, but very useful when you want to inspect responses after a run.
How to Test APIs with Playwright (with Examples)
Let's build real API tests using the Restful Booker API. This is a live test API that supports booking management with full CRUD operations and token-based authentication. Every example below is a working test you can run right now.
Testing GET Requests
GET requests fetch data from an endpoint. Here's how to test that the booking list returns successfully:
import { test, expect } from '@playwright/test';
import { saveResponse } from './save-response
test('GET Request : used to get all the booking details', async ({ request }) => {
const response = await request.get('/booking');
const body = await response.json();
console.log(body);
expect(response.ok()).toBeTruthy();
expect(response.status()).toBe(200);
saveResponse('_________ GET _________', {
_description: 'Get all booking details'
endpoint: '/booking',
method: 'GET',
status: response.status(),
response: body.slice(0, 5),
});
});
This test checks two things: the response status is 200 and the response is truthy (meaning no server error). The response.json() method parses the body automatically. We save the first five results to keep the log file clean.

Testing POST Requests
POST requests create new resources. You send data in the request body and verify the server processes it correctly:
import { test, expect } from '@playwright/test';
import { saveResponse } from './save-response';
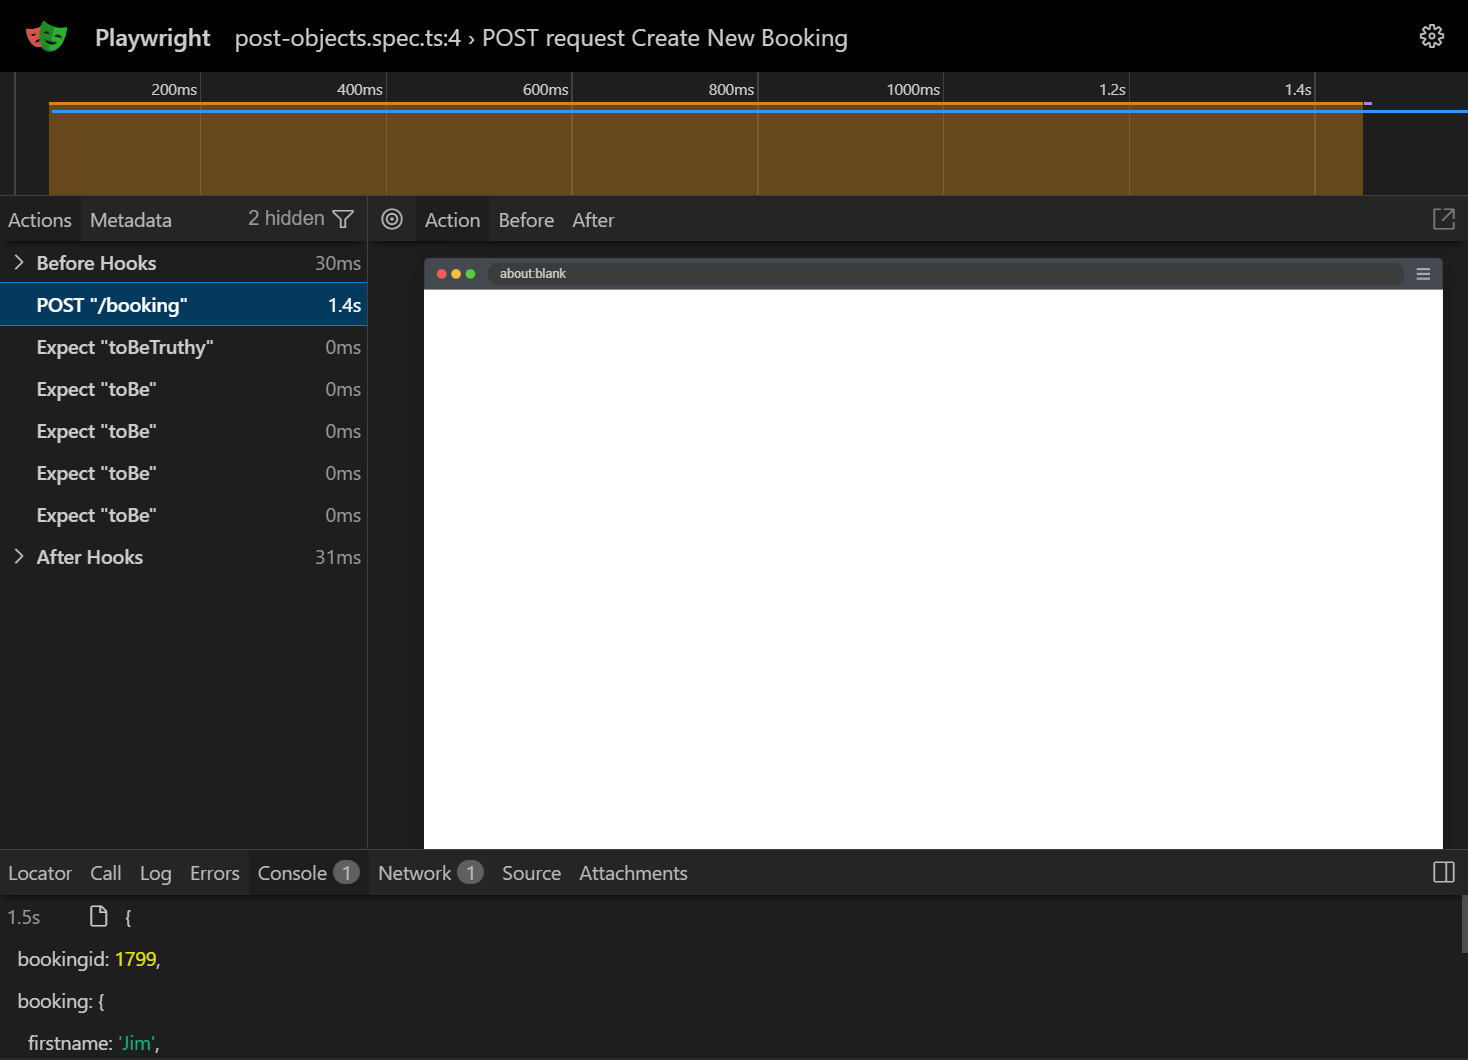
test('POST request Create New Booking', async ({ request }) => {
const requestData = {
firstname: 'Jim',
lastname: 'Brown',
totalprice: 111,
depositpaid: true,
bookingdates: {
checkin: '2025-01-01',
checkout: '2025-02-01'
},
additionalneeds: 'Breakfast'
};
const response = await request.post('/booking', { data: requestData });
const responseBody = await response.json();
console.log(responseBody);
expect(response.ok()).toBeTruthy();
expect(response.status()).toBe(200);
expect(responseBody.booking.firstname).toBe('Jim');
expect(responseBody.booking.lastname).toBe('Brown');
expect(responseBody.booking.totalprice).toBe(111);
saveResponse('_________ POST ________', {
_description: 'Create a new booking'
endpoint: '/booking',
method: 'POST',
status: response.status(),
request: requestData,
response: responseBody
});
});
The data option holds your request payload. Playwright serializes it to JSON automatically. Notice we're checking specific fields in the response, not just the status code. This catches cases where the server accepts the request but saves wrong data.
Testing PUT Requests
PUT requests replace an existing resource entirely. This test first authenticates to get a token, creates a booking, then updates it with completely new data:
import { test, expect } from '@playwright/test';
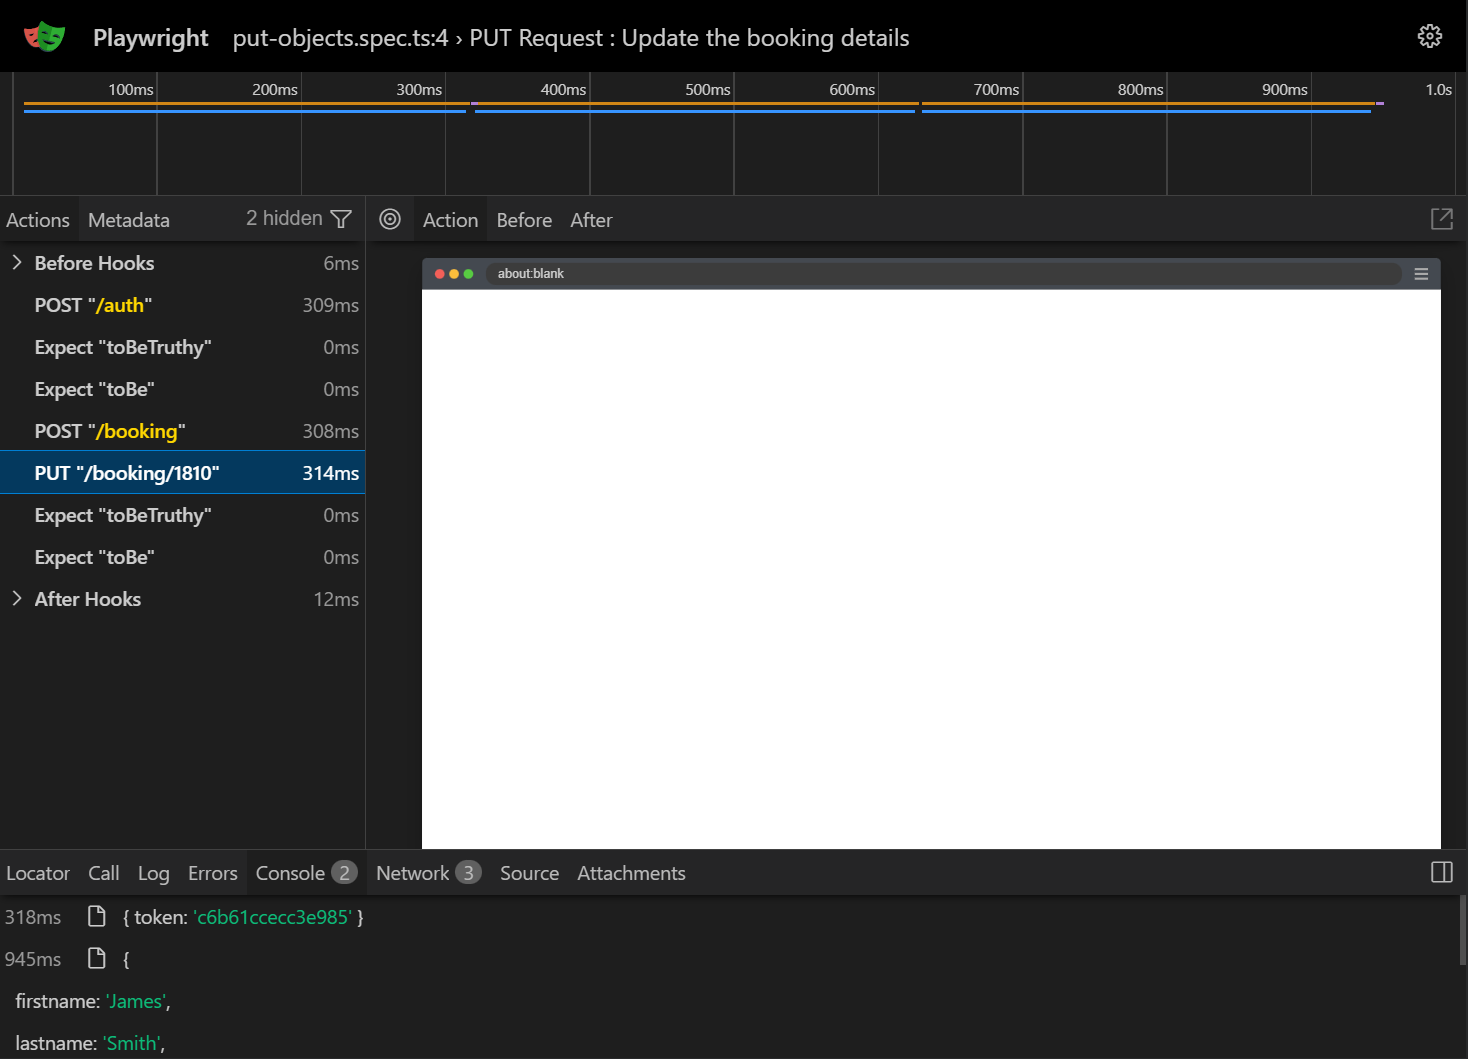
import { saveResponse } from './save-response';test('PUT Request : Update the booking details', async ({ request }) => {
// Generate the Token
const tokenResponse = await request.post('/auth', {
data: {
username: 'admin',
password: 'password123'
},
});
const tokenBody = await tokenResponse.json();
expect(tokenResponse.ok()).toBeTruthy();
expect(tokenResponse.status()).toBe(200);
const token = tokenBody.token;
// First create a booking to update
const createResponse = await request.post('/booking', {
data: {
firstname: 'Jim',
lastname: 'Brown',
totalprice: 111,
depositpaid: true,
bookingdates: {
checkin: '2025-01-01',
checkout: '2025-02-01'
},
additionalneeds: 'Breakfast'
},
});
const created = await createResponse.json();
const bookingId = created.bookingid;
// Update the Booking detail
const updateData = {
firstname: 'James',
lastname: 'Smith',
totalprice: 222,
depositpaid: false,
bookingdates: {
checkin: '2025-03-01',
checkout: '2025-04-01'
},
additionalneeds: 'Lunch'
};
const updateResponse = await request.put(`/booking/${bookingId}`, {
headers: {
'Content-Type': 'application/json',
Accept: 'application/json',
Cookie: `token=${token}`
},
data: updateData
});
const updateBody = await updateResponse.json();
expect(updateResponse.ok()).toBeTruthy();
expect(updateResponse.status()).toBe(200);
saveResponse('_________ PUT _________', {
_description: 'Full update of booking details (requires auth token)',
endpoint: `/booking/${bookingId}`,
method: 'PUT',
status: updateResponse.status(),
token: token,
request: updateData,
response: updateBody
});
});
Notice the pattern: authenticate first, create test data, then perform the actual test. The auth token gets passed as a Cookie header. This is how most real-world APIs work. You don't test against pre-existing data that might change or disappear.
Testing PATCH Requests
PATCH requests update only specific fields, leaving the rest unchanged. This is different from PUT, which replaces the entire resource:
import { test, expect } from '@playwright/test';
import { saveResponse } from './save-response';
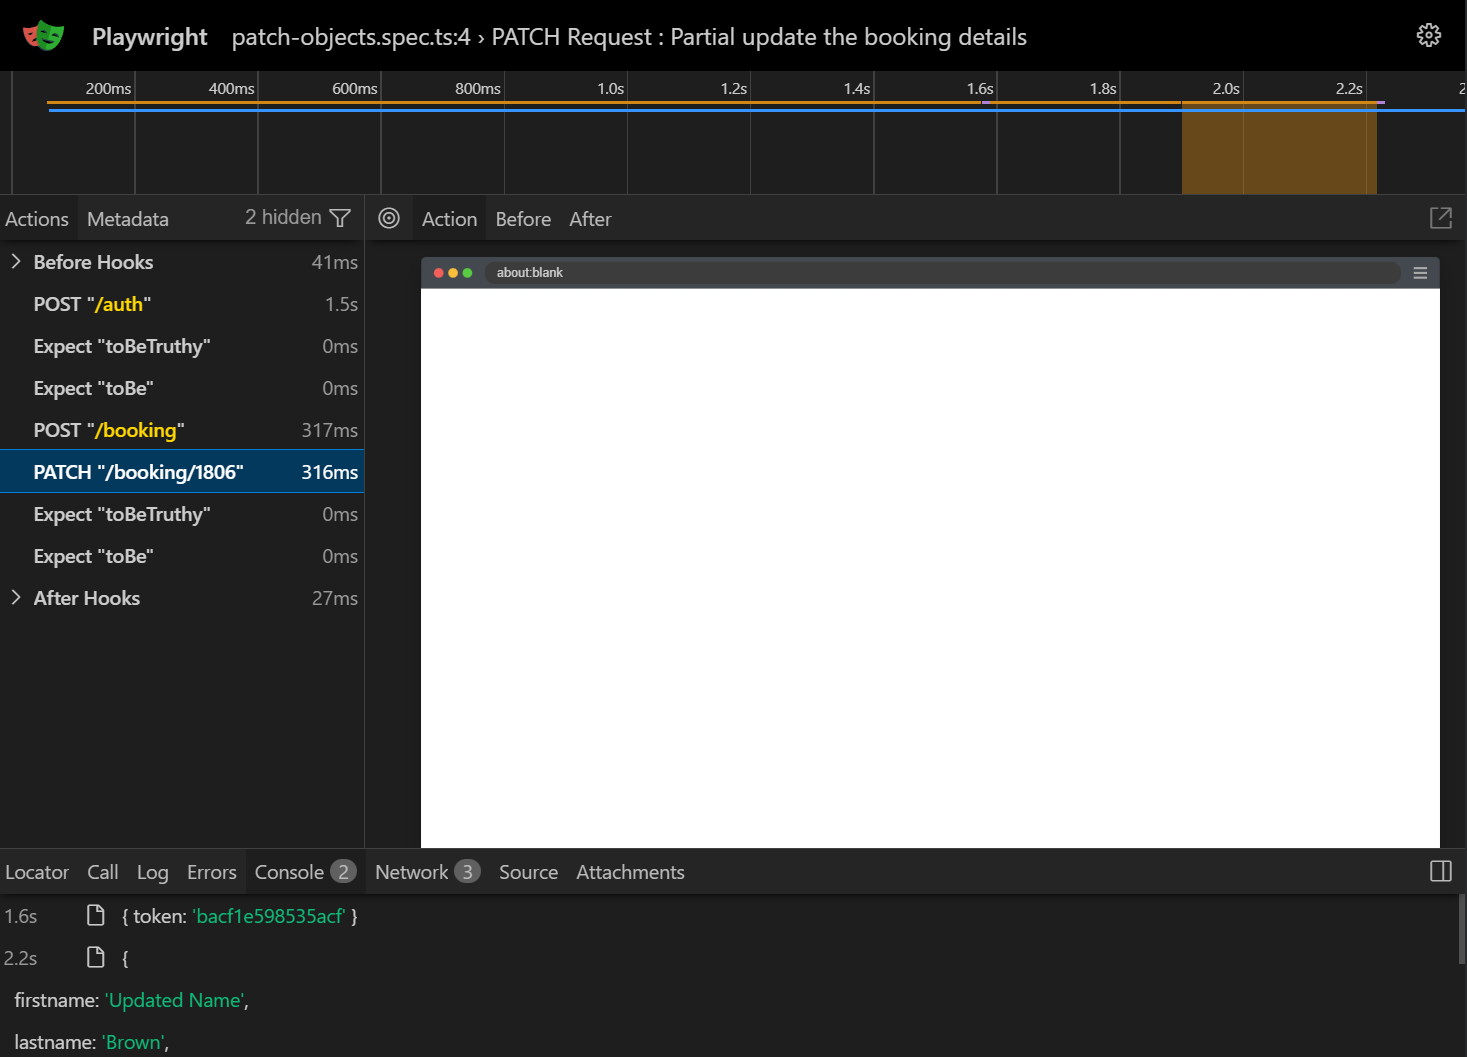
test('PATCH Request : Partial update the booking details', async ({ request }) => {
// Generate the Token
const tokenResponse = await request.post('/auth', {
data: {
username: 'admin',
password: 'password123'
}
});
const tokenBody = await tokenResponse.json();
expect(tokenResponse.ok()).toBeTruthy();
expect(tokenResponse.status()).toBe(200);
const token = tokenBody.token;
// First create a booking to patch
const createResponse = await request.post('/booking', {
data: {
firstname: 'Jim',
lastname: 'Brown',
totalprice: 111,
depositpaid: true,
bookingdates: {
checkin: '2025-01-01',
checkout: '2025-02-01'
},
additionalneeds: 'Breakfast'
}
});
const created = await createResponse.json();
const bookingId = created.bookingid;
// Partial Update the Booking detail
const patchData = { firstname: 'Updated Name' };
const patchResponse = await request.patch(`/booking/${bookingId}`, {
headers: {
'Content-Type': 'application/json',
Accept: 'application/json',
Cookie: `token=${token}` }, data: patchData
}
);
const patchBody = await patchResponse.json();
expect(patchResponse.ok()).toBeTruthy();
expect(patchResponse.status()).toBe(200);
saveResponse('_________ PATCH _______', {
_description: 'Partial update of booking details (requires auth token)',
endpoint: `/booking/${bookingId}`,
method: 'PATCH',
status: patchResponse.status(),
token: token,
request: patchData,
response: patchBody
});
});
The key difference from PUT: we only send <span class="ff-geist-mono" style="background-color:#F1F1F1; padding:0 4px; border-radius:4px;">Updated Name</span>
The server should update just that field and leave lastname, totalprice, and everything else untouched. PATCH tests verify your API handles partial updates correctly.
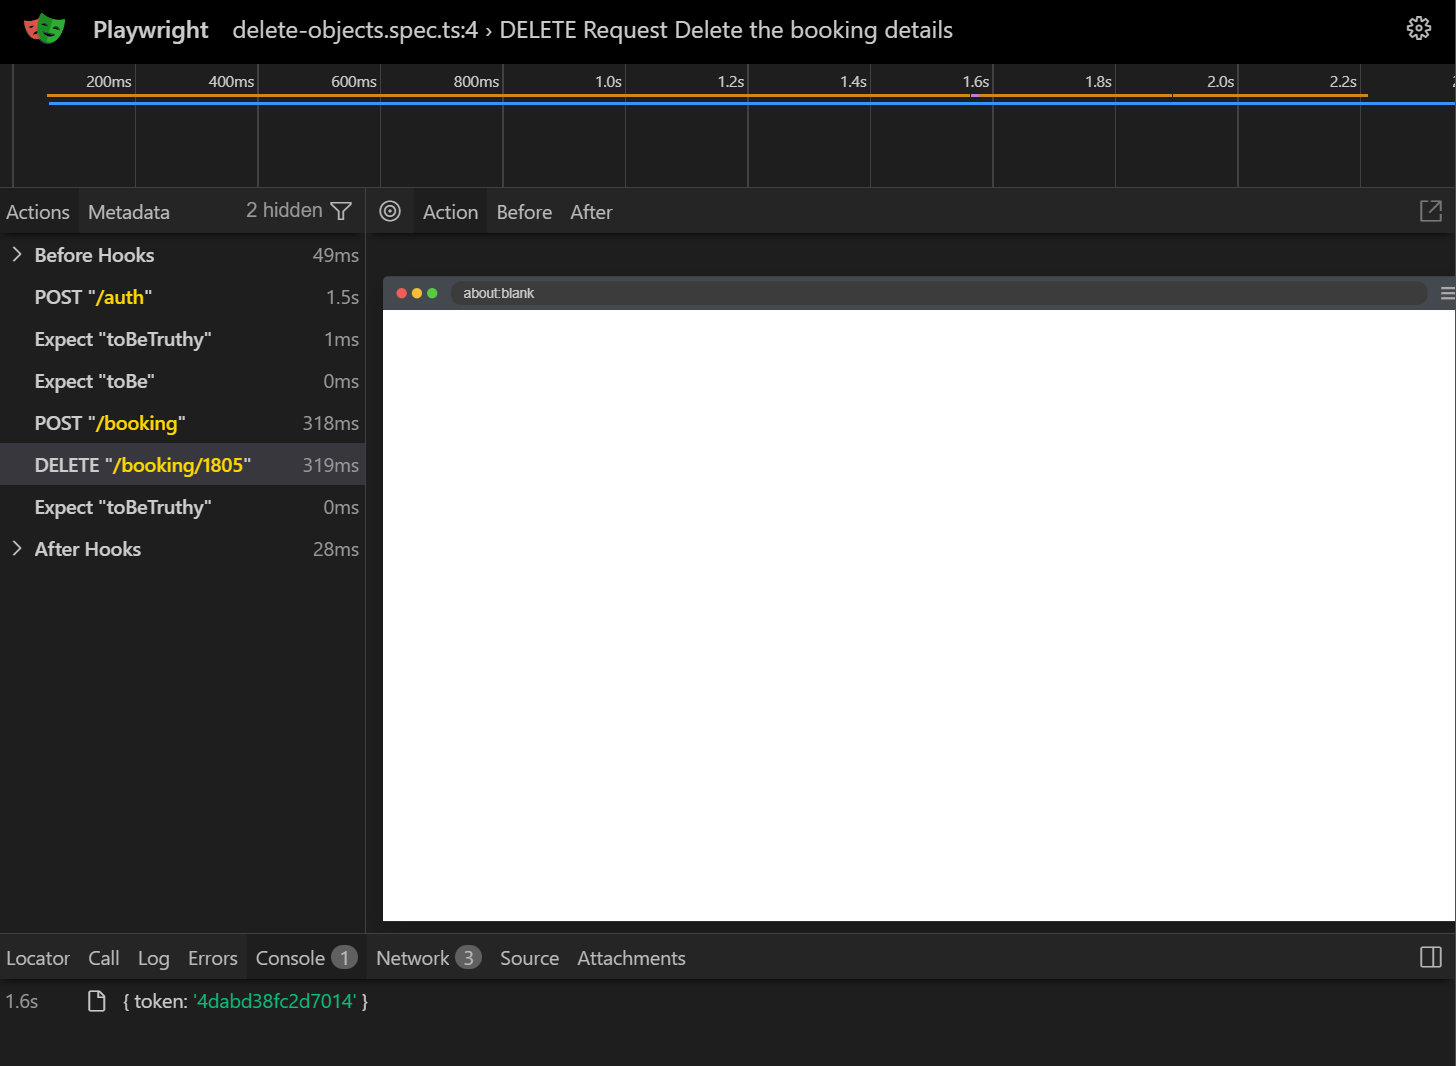
Testing DELETE Requests
DELETE requests remove resources. This test creates a booking specifically to delete it, so we're not dependent on existing test data:
import { test, expect } from '@playwright/test';
import { saveResponse } from './save-response';
test('DELETE Request Delete the booking details', async ({ request }) => {
// Generate the Token
const tokenResponse = await request.post('/auth', {
data: {
username: 'admin',
password: 'password123'
}
});
const tokenBody = await tokenResponse.json();
expect(tokenResponse.ok()).toBeTruthy();
expect(tokenResponse.status()).toBe(200);
const token = tokenBody.token;
// First create a booking to delete
const createResponse = await request.post('/booking', {
data: {
firstname: 'Temp',
lastname: 'User',
totalprice: 100,
depositpaid: true,
bookingdates: {
checkin: '2025-01-01',
checkout: '2025-02-01'
},
additionalneeds: 'None'
}
});
const created = await createResponse.json();
const bookingId = created.bookingid;
// DELETE the Booking detail
const deleteRequest = await request.delete(`/booking/${bookingId}`, {
headers: {
'Content-Type': 'application/json',
Cookie: `token=${token}`
}
});
expect(deleteRequest.ok()).toBeTruthy();
saveResponse('_________ DELETE ______', {
_description: 'Delete a booking (requires auth token)',
endpoint: `/booking/${bookingId}`,
method: 'DELETE',
status: deleteRequest.status(),
token: token,
response: 'Created (booking deleted successfully)'
});
});
The pattern is the same: authenticate, create disposable data, then test the delete. This approach keeps tests independent. Each test creates what it needs and cleans up after itself.
Always create your own test data before running destructive operations like DELETE and PUT. Never rely on pre-existing records that other tests or users might modify or remove.
Authentication in Playwright API Tests
Most production APIs require authentication. The Restful Booker API uses token-based auth, which is common in real-world applications. Let's look at how this works and how to handle it cleanly.
Token-Based Authentication
Every PUT, PATCH, and DELETE request to the Restful Booker API requires a valid token. You get one by posting credentials to the /auth.
endpoint:
const tokenResponse = await request.post('/auth', {
data: {
username: 'admin',
password: 'password123'
},
});const tokenBody = await tokenResponse.json();
const token = tokenBody.token;
Then you pass that token as a Cookie header on protected requests:
const response = await request.put(`/booking/${bookingId}`, {
headers: {
'Content-Type': 'application/json',
Accept: 'application/json',
Cookie: `token=${token}`
},
data: updateData
});
In the examples above, each test generates its own token. For larger suites, you'd want to generate the token once in a setup fixture and share it across tests to reduce unnecessary auth calls.
Reusing Authentication with Fixtures
Don't repeat the auth call in every test file. Create a shared fixture:
import { test as base } from '@playwright/test';
const test = base.extend({
authToken: async ({ request }, use) {
const response = await request.post('/auth', {
data: {
username: 'admin',
password: 'password123'
},
});
const { token } = await response.json();
await use(token);
},
});
export { test };
Now every test that imports this fixture gets a fresh token without duplicating the auth logic.
Never commit authentication credentials to version control. Use GitHub secrets for CI, .env files for local development, and add them to .gitignore immediately.
Setting Up TestDino for Playwright API Test Reporting
Running tests locally is fine for development, but once your API tests hit CI, you need a central place to track results across runs, branches, and team members. TestDino plugs into your existing Playwright setup and gives you a dashboard with AI-powered failure analysis, flaky test tracking, and historical trends.
Here's how to set it up.
Step 1 - Create a TestDino Account and Project
Go to TestDino and sign up. Create a new project and grab your project token. This token works like a password, so don't commit it to your codebase.
Step 2 - Add Reporters to Your Config
TestDino reads Playwright's JSON and HTML reports. Make sure both are enabled in your config file.
import { defineConfig } from '@playwright/test';
export default defineConfig({
  testDir: './tests',
  timeout: 30000,
  reporter: [
    ['list'],
    ['json', { outputFile: './playwright-report/report.json' }],
    ['html', { outputDir: './playwright-report' }],
  ],

  use: {
    baseURL: 'https://restful-booker.herokuapp.com',
    extraHTTPHeaders: {
      'Content-Type': 'application/json'
    },

    trace: 'on'
  },
});
The JSON reporter is required. It produces the structured data that TestDino's CLI reads during upload. The HTML reporter is optional but recommended, as it lets TestDino include screenshots and attachments in its dashboard.
Step 3 - Run Tests and Upload Results
Run your tests as usual:
npx playwright test
Then upload the report to TestDino using the tdpw
npx tdpw upload ./playwright-report --token="your-testdino-token" --upload-html
The <span class="ff-geist-mono" style="background-color:#F1F1F1; padding:0 4px; border-radius:4px;">--upload-html</span> flag tells the CLI to include screenshots and HTML assets alongside the JSON data. You don't need to install tdpw globally. The npx command fetches and runs it directly.
Step 4 - Add TestDino to Your CI Workflow
For GitHub Actions, add the upload step after your tests. Store the token as a secret:
name: Playwright Tests
on: [push, pull_request]
jobs:
  test:
    runs-on: ubuntu-latest
    container: mcr.microsoft.com/playwright:latest
    env: TESTDINO_TOKEN: ${{ secrets.TESTDINO_TOKEN }}
    steps:
      - uses: actions/checkout@v4
      - uses: actions/setup-node@v4
        with:
          node-version: '22.x'
      - name: Install dependencies
        run: |
          npm ci
          npx playwright install --with-deps
      - name: Run tests
        run: npx playwright test
      - name: Upload to TestDino
        if: always()
        run: npx tdpw upload ./playwright-report --token="${{ secrets.TESTDINO_TOKEN }}" --upload-html
The if: always() line is important. It makes sure reports upload even when tests fail, which is exactly when you need them most.
Verify the CLI
Run npx tdpw --version locally to confirm the CLI is available before adding it to your CI pipeline. No global install required.
Once uploads are running, your TestDino dashboard shows test runs with pass/fail counts, failure details with stack traces and screenshots, AI-based hints that tell you whether a failure is a real bug or a flaky test, and historical trends across branches and PRs. For teams running Playwright API tests in CI, this turns scattered JSON files into a shared source of truth.
Best Practices for Playwright API Testing
Writing API tests is straightforward, but writing maintainable ones requires patterns that prevent flakiness and keep things organized.
Create Test Data, Don't Depend on It
Every example in this guide follows the same pattern: create what you need, test it, clean up. This makes tests independent. They don't break because someone else modified a record, and they run reliably in parallel.
Validate More Than Status Codes
A 200 status doesn't mean the response is correct. Check specific field values like we did in the POST test:
expect(responseBody.booking.firstname).toBe('Jim');
expect(responseBody.booking.lastname).toBe('Brown');
expect(responseBody.booking.totalprice).toBe(111);
This catches cases where the server returns 200 but saves or returns the wrong data.
Test Error Paths Too
Happy paths are easy. Make sure your API rejects bad input properly:
test('returns 401 without authentication', async ({ request }) {
  const response = await request.delete('/booking/1', {
    headers: {
      'Content-Type': 'application/json'
    }
  });
  // Should fail without auth token
  expect(response.ok()).toBeFalsy();
});
Error tests verify your API security is working. They're often skipped but catch real production issues.
Handle Flaky Tests with Retries
Network issues happen. APIs timeout, databases lag, services restart. Build retries into your test strategy:
export default defineConfig({
  retries: process.env.CI ? 2 : 0,
  timeout: 30000,
  use: {
    trace: 'retain-on-failure'
  },
});
Run tests without retries locally so you catch real failures fast. In CI, retry twice to handle temporary network issues. The trace on failure shows exactly what went wrong.
TestDino tracks which tests fail most often across all your CI runs. Instead of guessing which flaky tests to fix first, you see failure rates and patterns. The platform groups similar API failures together, so if ten tests fail because your auth endpoint is down, you see one root cause instead of ten separate problems. Check out the Playwright debugging guide to see how traces and logs help you fix API test failures faster.
Different Timeouts for Different Endpoints
Auth calls might need 5 seconds, but heavy reports might need 60 seconds. Override timeout per test when needed instead of setting one global value.
Final
If you use Playwright for UI testing, it also handles API testing without forcing you to learn another tool.
You write tests in the same language, run them with the same command, and debug them in the same trace viewer as your UI tests.
The APIRequestContext shares authentication state with browser contexts, so you can set up data via API and validate it in the UI without repeated login flows.
Start by testing your critical endpoints. Write GET tests to verify data format, POST tests to check creation logic, and DELETE tests to confirm cleanup works. Add authentication through headers or storage state, then combine API setup with UI validation to build faster, more maintainable test suites. For quick reference of essential Playwright commands and patterns, bookmark the Playwright cheatsheet.
Once your API tests run in CI, use TestDino to track failure patterns and debug issues faster. The platform shows which endpoints fail most often, groups related failures together, and gives you AI-powered root cause analysis. Head to cms.testdino.com to see how it works with your Playwright API and UI tests.
FAQs

Savan Vaghani
Product Developer