Testing Flask Apps with Playwright: Setup, CRUD Operations, and Best Practices
Flask app testing with Playwright lets a real browser automatically test your routes and UI flows, so every feature change is validated without manual clicking.


Ever built a Flask app that works in your browser? You click around, and everything looks fine.
But here's the catch. Manual clicking doesn't scale in here. Every time you add a feature or change your route, you're back to clicking through the same flows. Add a task. Edit it. Complete it. Delete it. Over and over.
Flask app testing using Playwright fixes this. Instead of you doing the clicking manually, a real browser automates it for you every single time you push code.
In this guide, we'll build a Flask task manager app from scratch, set up Playwright to test its every CRUD operation, and also walk you through best practices that keep your tests fast and reliable.
It's not just a regular theoretical guide. In fact, this contains all the working code you can copy and run.
What is Flask and why test it?
Flask is a lightweight Python web framework. It's popular for building small to mid-sized web apps, REST APIs, and prototypes. If you've worked with Python, chances are you've touched Flask at some point.
The problem? Flask apps grow fast. What starts as three routes turns into thirty. What was a simple form becomes a multi-step workflow with flash messages, redirects, and session handling.
Unit tests cover your backend logic, but they can't tell you if a button actually works in the browser. They can't confirm that a toast notification appears after adding a task. They won't catch a broken redirect or a missing form field.
That's where end-to-end testing comes in. And Playwright is the best tool for it right now.
Why Playwright for Flask app testing?
There are several tools for browser testing. Selenium has been around forever. Cypress is popular in the JavaScript world. But Playwright's market share keeps growing for good reasons.
Auto-waiting built-in. Playwright waits for elements to be ready before interacting with them. No more sleep(3) hacks or explicit wait conditions.
Multi-browser support. Test on Chromium, Firefox, and WebKit with the same code. One test file, three browsers.
Fast execution. Playwright runs headless by default and parallelizes tests out of the box. Your CRUD test that takes 30 seconds manually? Under 2 seconds with Playwright.
Built-in web server management. This is huge for Flask. Playwright's config can start your Flask server automatically before tests run and shut it down after. Zero manual steps. And if you're using AI assistants for test generation, Playwright MCP makes it even easier to connect AI to your browser automation.
First-class TypeScript/JavaScript support. While Playwright works with Python too, the Node.js version gives you the richest API, the best docs, and the fastest updates.
For Flask app testing using Playwright, the Node.js test runner is the go-to choice, even though your app is Python. Your backend language doesn't have to match your test language.
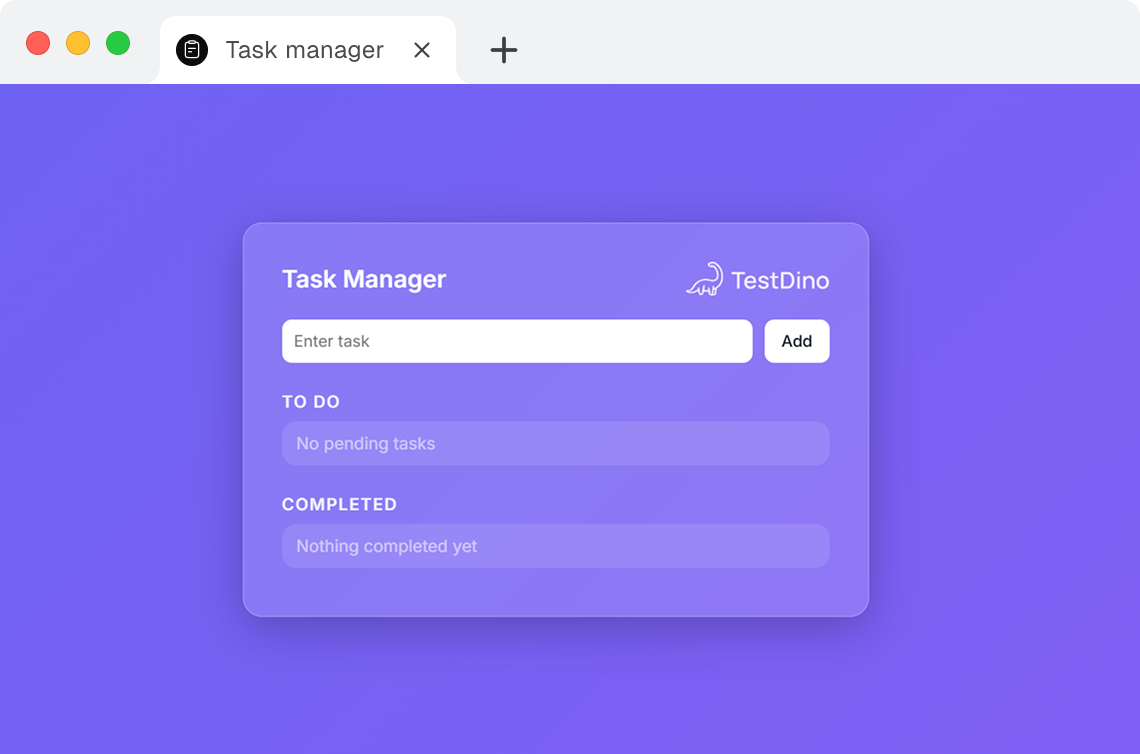
Building the Flask task manager
Before we write tests, we need something to test. Let's build a simple task manager with full CRUD operations.
This app has:
-
A form to add tasks
-
A "To Do" list with edit and complete buttons
-
A "Completed" section with delete functionality
-
Toast notifications for every action
The Full Flask App Code
Task manager flask app repository : https://github.com/dhruv-r3010/Task-manager.git
A few things to notice here.
The app uses in-memory lists instead of a database. Tasks live in tasks[ ] and completed_tasks[ ]. Simple, but enough to test full CRUD behavior.
Flash messages power the toast notifications. After every action (add, edit, complete, delete), the user sees confirmation feedback.
You can clone and navigate the Task Manager Flask App repo using the below commands.
git clone https://github.com/dhruv-r3010/Task-manager.git
cd Task-manager
Running the Flask App
Set up a virtual environment first:
python -m venv venv
source venv/bin/activate   # Mac/Linux
# venv\Scripts\activate    # Windows
Install Flask:
pip install flask
Start the server:
python app.py
Open http://127.0.0.1:5000, and you'll see the task manager running. Try adding a task, editing it, marking it complete, and deleting it. That's the full flow we'll automate next.
Setting up Playwright for Flask App Testing
Here's where things get interesting. We're going to set up Playwright's Node.js test runner to automate the Flask app.
From your project root, run:
npm init -y
npm install -D @playwright/test
npx playwright install
That last command downloads browser binaries for Chromium, Firefox, and WebKit. It takes a minute, but you only do it once.
The Playwright config
Create playwright.config.ts in your project root:
import { defineConfig } from '@playwright/test';

export default defineConfig({
  use: {
    baseURL: 'http://127.0.0.1:5000',
    headless: true,
  },
  webServer: {
    command: 'python app.py',
    port: 5000,
    reuseExistingServer: !process.env.CI,
  },
});
This config does two critical things.
First, baseURL means every page.goto('/') in your tests points to the Flask server. No hardcoded URLs in your test files.
Second, the webServer block tells Playwright to start your Flask app automatically before running tests. When tests finish, the server shuts down. You don't need two terminals or manual server management.
The reuseExistingServer flag is smart. During local development, if Flask is already running, Playwright uses the existing server. In CI, it always starts fresh. This keeps CI/CD integration clean and predictable.
Important: If your Flask server is not running, then Playwright can't run the test. Always verify that your app.py is running before running Playwright tests. This is the #1 cause of "all tests failing" for beginners.
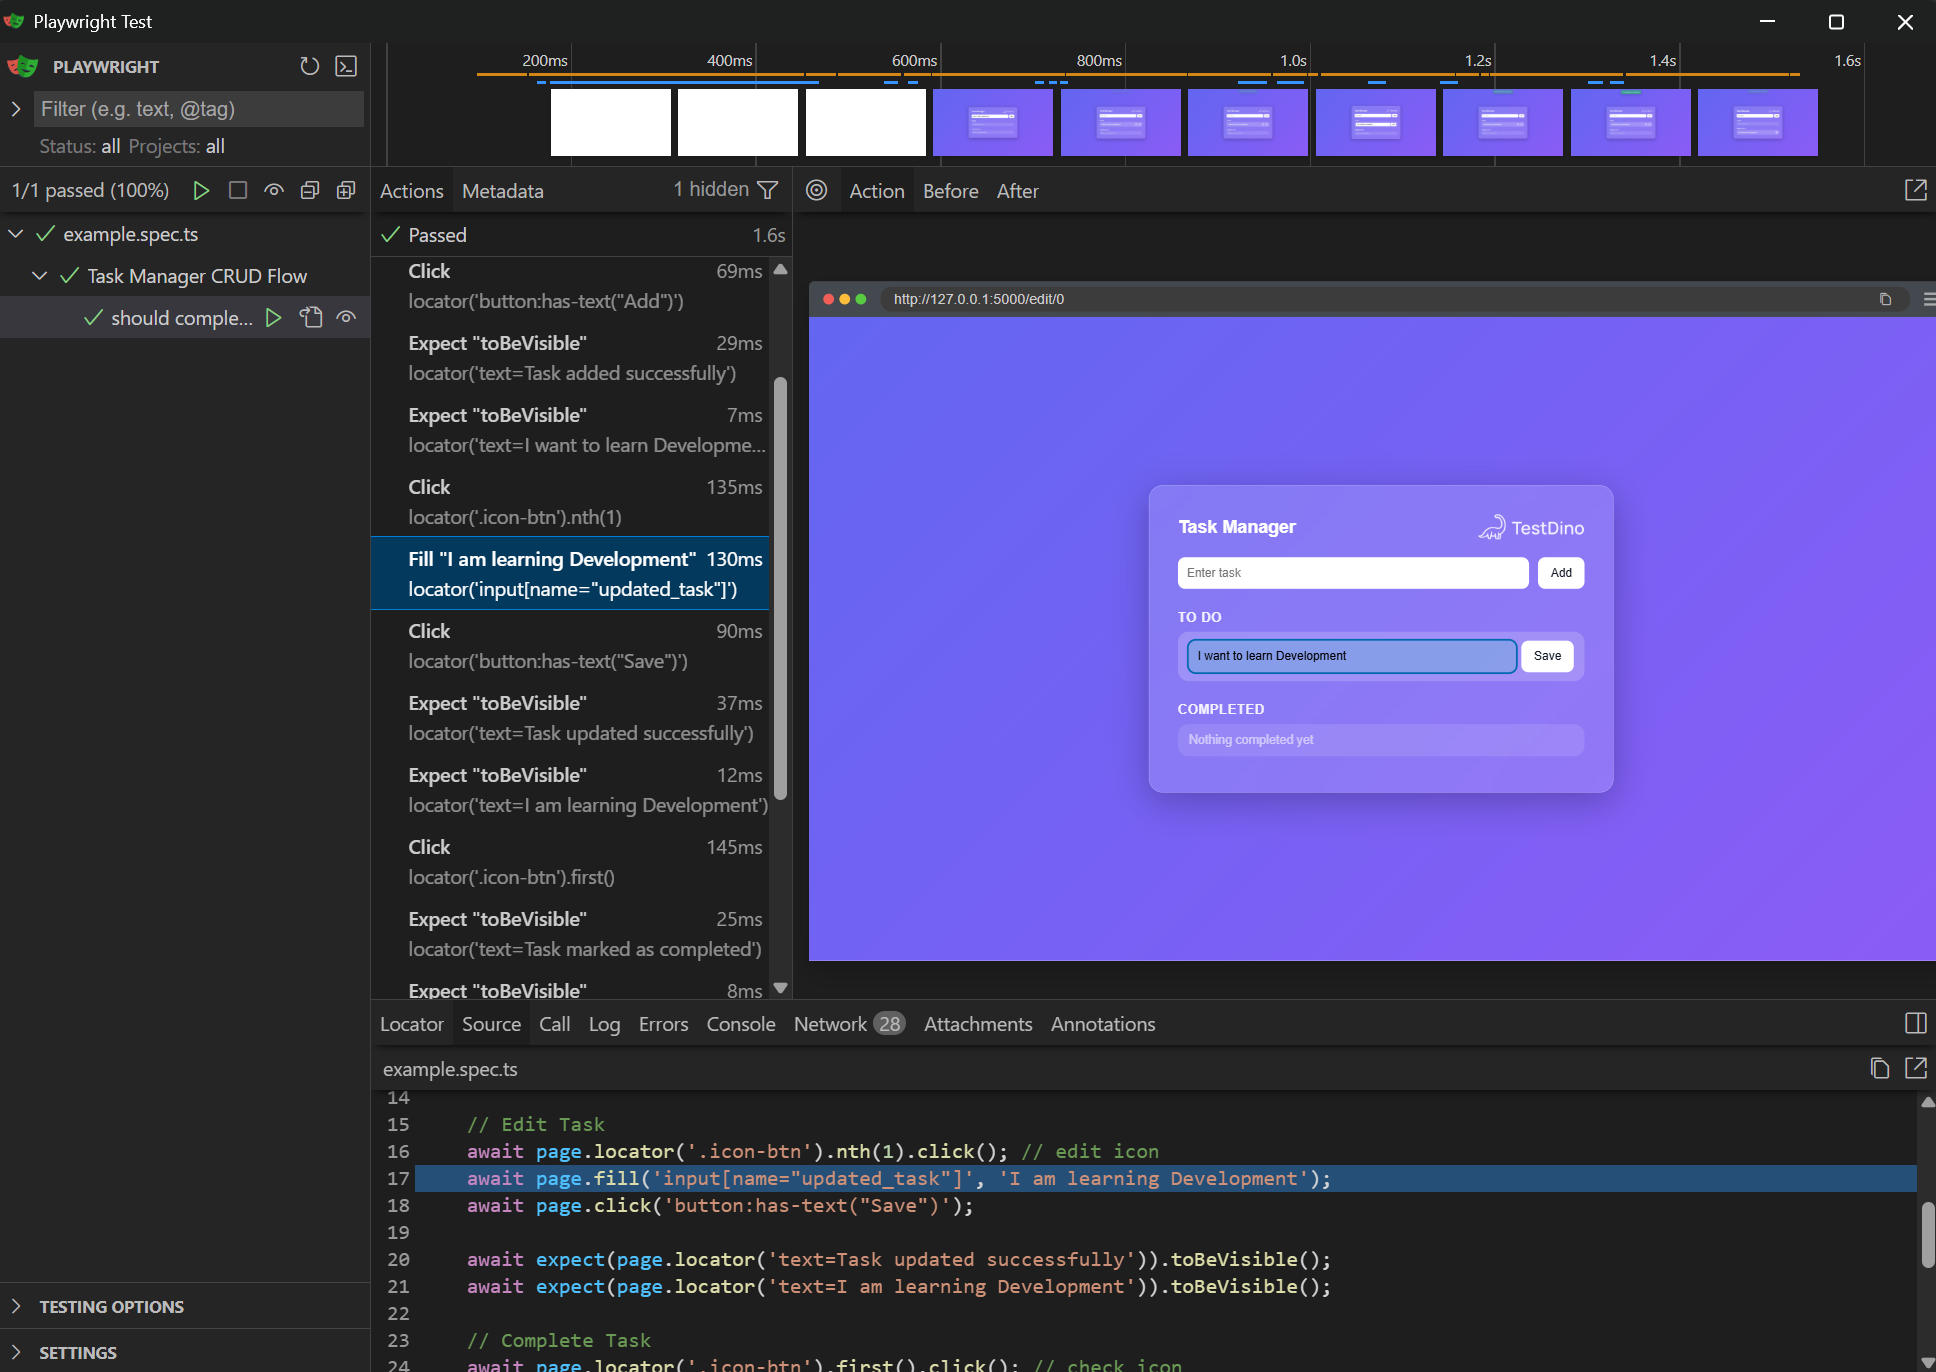
Writing the Playwright Test for Flask CRUD
Now the fun part. Create a file at tests/example.spec.ts:
import { test, expect } from '@playwright/test';

test.describe('Task Manager CRUD Flow', () => {
  test('should complete full CRUD lifecycle', async ({ page }) => {
    await page.goto('/');
    // CREATE - Add a new task
    await page.fill('input[name="task"]', 'I want to learn Development');
    await page.click('button:has-text("Add")');
    await expect(page.locator('text=Task added successfully')).toBeVisible();
    await expect(page.locator('text=I want to learn Development')).toBeVisible();
    // UPDATE - Edit the task
    await page.locator('.icon-btn').nth(1).click();
    await page.fill('input[name="updated_task"]', 'I am learning Development');
    await page.click('button:has-text("Save")');
    await expect(page.locator('text=Task updated successfully')).toBeVisible();
    await expect(page.locator('text=I am learning Development')).toBeVisible();
    // COMPLETE - Mark the task as done
    await page.locator('.icon-btn').first().click();
    await expect(page.locator('text=Task marked as completed')).toBeVisible();
    await expect(page.locator('text=I am learning Development')).toBeVisible();
    // DELETE - Remove the completed task
    await page.locator('.completed .icon-btn').click();
    await expect(page.locator('text=Task deleted successfully')).toBeVisible();
    await expect(page.locator('text=I am learning Development')).not.toBeVisible();
});
});
Let's break down what each section does.
Create: Adding a task
await page.fill('input[name="task"]', 'I want to learn Development');
await page.click('button:has-text("Add")');
Playwright fills the input field and clicks the Add button. After the form submits, Flask redirects back to the home page with a flash message.
We verify two things: the toast says "Task added successfully" and the task text is visible on the page.
Update: Editing a task
await page.locator('.icon-btn').nth(1).click();
await page.fill('input[name="updated_task"]', 'I am learning Development');
await page.click('button:has-text("Save")');
The edit icon is the second .icon-btn in the task row (first is the complete/check icon). Clicking it swaps the task text for an inline edit form. We fill in the new value and save.
The toast confirms the update, and the page shows the modified task text.
Complete: Marking a task done
await page.locator('.icon-btn').first().click();
Clicking the first icon button (the checkmark) moves the task from "To Do" to "Completed." The task still shows on the page, but with a strikethrough style.
Delete: Removing a completed task
await page.locator('.completed .icon-btn').click();
The delete icon lives inside the .completed list item. After clicking, the task disappears completely. We verify with .not.toBeVisible().
This single test covers the entire CRUD lifecycle. Create, Read (we check visibility after every step), Update, and Delete.
test folder structure
Running the Playwright tests
Here are the different ways to run your tests:
Standard headless run:
npx playwright test
This is what you'll use in CI. Fast, no browser window, just results.
Headed mode (see the browser):
npx playwright test --headed
Great for debugging. You watch Playwright click through the app in real time.
Debug UI mode:
npx playwright test --ui
This opens Playwright's visual debugger. You can step through each action, see DOM snapshots, and inspect what went wrong if a test fails.
When the test passes, you'll see output like:
Running 1 test using 1 worker
  ✓ Task Manager CRUD Flow > should complete full CRUD lifecycle (1.2s)
  1 passed (3.5s)
That 1.2 seconds covers adding a task, editing it, completing it, and deleting it. All in a real browser. Compare that to the 30-60 seconds it takes to do manually.

Best practices for Flask App Testing using Playwright
Now that the basics work, here are practical tips to keep your tests stable and maintainable as your Flask app grows.
Use Data Attributes instead of CSS classes
Our test uses .icon-btn and .completed as selectors. These work, but they're tied to styling. If someone renames a CSS class during a redesign, your tests break even though the app still works.
Better approach:
<a href="/complete/{{ loop.index0 }}" data-testid="complete-task">
await page.locator('[data-testid="complete-task"]').click();
Data attributes like data-testid exist purely for testing. Designers can change classes without breaking your test automation. If your Flask app includes visual elements like charts or styled components, consider adding visual testing too.

Tip: Add data-testid attributes from the start when building your Flask templates. Retrofitting them later across dozens of templates is painful. Make it a habit and your future self will thank you.
Keep tests independent
Our single test runs the full CRUD flow sequentially. That works for a demo, but in production, you want isolated tests.
Each test should start with a clean state. Since our Flask app uses in-memory storage, restarting the server resets everything. For more complex apps with databases, use test fixtures or API calls to seed data before each test.
Test toast messages and feedback
Flash messages are easy to overlook. But they're part of the user experience. If a task gets added but the success toast doesn't appear, something is broken.
Our test already does this:
await expect(page.locator('text=Task added successfully')).toBeVisible();
Always verify user feedback, not just data changes.
Don't use fixed timeouts
This is the most common mistake in browser testing:
// DON'T DO THIS
await page.waitForTimeout(3000);
Playwright auto-waits for elements to be ready. If you find yourself adding waitForTimeout, it usually means your selector is wrong or the app has a race condition you should fix.
Run tests in CI
Local testing is great for development. But the real value comes from running Playwright tests in your CI/CD pipeline on every push.
Here's a minimal GitHub Actions workflow:
name: Playwright Tests
on: [push, pull_request]
jobs:
  test:
    runs-on: ubuntu-latest
    steps:
      - uses: actions/checkout@v4
      - uses: actions/setup-node@v4
        with:
          node-version: 20
      - uses: actions/setup-python@v5
        with:
          python-version: '3.11'
      - run: pip install flask
      - run: npm ci
      - run: npx playwright install --with-deps
      - run: npx playwright test
      - uses: actions/upload-artifact@v4
        if: failure()
        with:
          name: playwright-report
          path: playwright-report/
This workflow installs both Python (for Flask) and Node.js (for Playwright), then runs the tests. If anything fails, it uploads the HTML report as an artifact so you can debug.
Note: The npx playwright install --with-deps step is critical for CI. Without --with-deps, the browser binaries download but won't run because OS-level libraries like libatk-bridge2.0 and libnss3 are missing. Your tests will fail with cryptic browser launch errors.
Add reporting for better debugging
The default Playwright console output tells you pass or fail. But when tests fail in CI, you need more detail.
Add reporters to your playwright.config.ts:
export default defineConfig({
  reporter: [
    ['html', { open: 'never' }],
    ['json', { outputFile: 'test-results.json' }],
  ],
// ... rest of config
});
The HTML report gives you screenshots, traces, and step-by-step execution logs for every test. The JSON report is useful for custom reporting tools that parse results automatically.

Structure tests for larger Flask Apps
As your Flask app grows, your test files should grow with it. Here's a clean structure:
tests/
  auth/
    login.spec.ts
    register.spec.ts
  tasks/
    crud.spec.ts
    bulk-actions.spec.ts
  settings/
    profile.spec.ts
Group tests by feature, not by test type. This makes it obvious what's covered and what's not.
For shared setup (like logging in), use Playwright's global setup with storageState to reuse authentication across tests. This avoids repeating login steps and speeds up execution.
Common issues and fixes
Here are problems you'll likely hit when testing Flask apps with Playwright, and how to fix them.
Port conflict. If port 5000 is already in use (common on macOS, where AirPlay uses it), change the port in both app.py and playwright.config.ts.
Server not starting. Make sure Flask is installed in the environment that Playwright launches. If you're using a virtual environment, update the webServer.command to include the full path:
webServer: {
  command: './venv/bin/python app.py',
  port: 5000,
},
Flash messages disappearing too fast. Our toast auto-hides after 2.5 seconds. Playwright's toBeVisible() check runs almost instantly after the action, so this usually isn't a problem. But if you see intermittent failures, add await page.waitForSelector('.toast') before the assertion.
Tests passing locally but failing in CI. This is almost always an environment issue. Make sure CI installs browser dependencies with npx playwright install --with-deps. The --with-deps flag installs OS-level packages like libatk-bridge2.0 that browsers need.
For more patterns on fixing flaky test issues, check out practical guides on isolating test environments and handling async behavior. If your Flask app talks to external APIs, network mocking can remove flakiness caused by third-party dependencies.
Scaling Flask App Testing using Playwright with TestDino
Running tests locally is step one. But as your Flask app and test suite grow, you hit new problems.
Which tests are flaky? How long is your test suite actually taking? Which failures are real bugs vs. infrastructure noise?
TestDino is built specifically for Playwright teams dealing with these questions. It's an AI-powered test reporting and analytics platform that works as a CLI wrapper around Playwright.
Here's what it does in practice.
AI failure classification. When a test fails, TestDino automatically sorts it into buckets: infrastructure issue, code bug, or flaky test. Instead of spending 20 minutes reading logs, you know where to look in seconds.
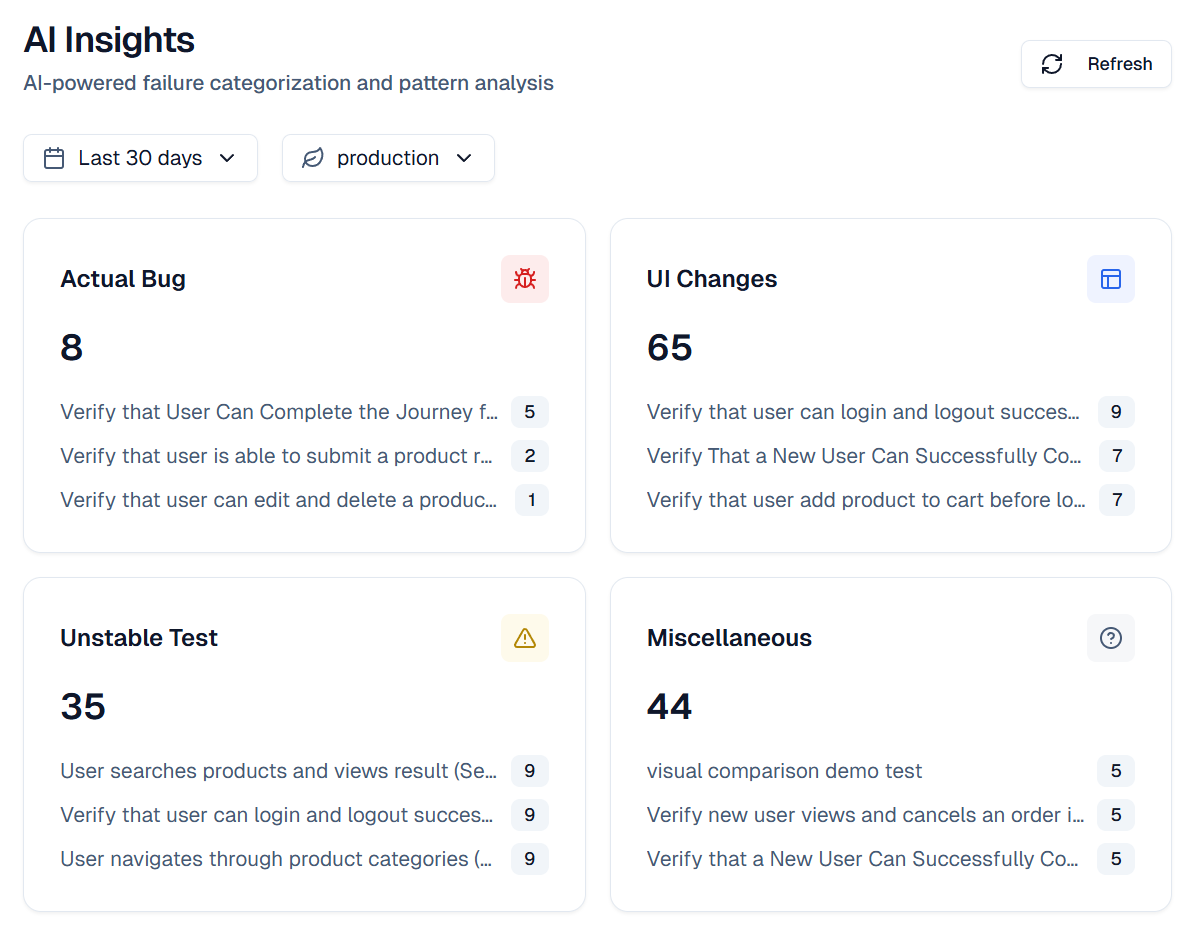
Flaky test tracking. TestDino monitors which tests pass and fail inconsistently across runs. It gives you a prioritized list, so you fix the worst offenders first, not random ones. Teams using this typically save 6-8 hours per week on debugging.
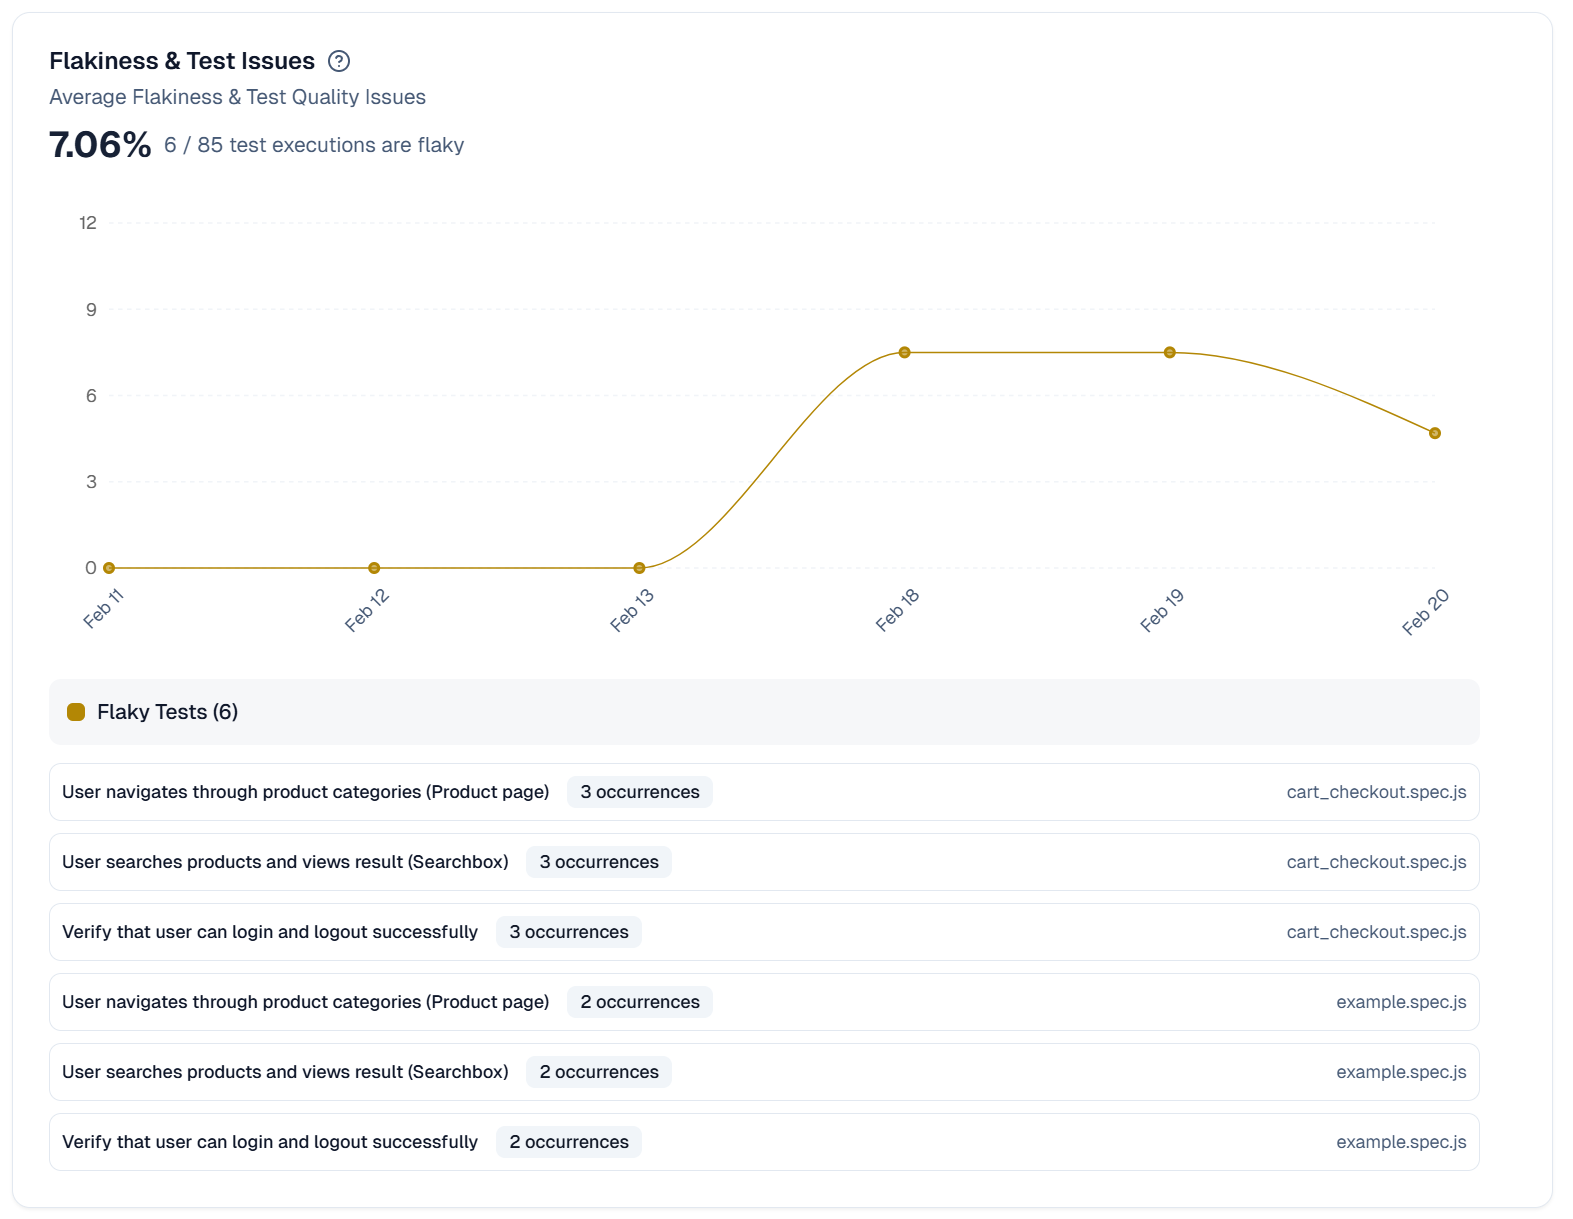
Centralized reports. All your Playwright test results from every CI run land in one dashboard. Historical trends, failure patterns, and execution times are all tracked. No more digging through CI artifacts.
Trace analysis without downloads. TestDino lets you open Playwright traces directly from the dashboard. No downloading .zip files from CI artifacts and opening them locally.
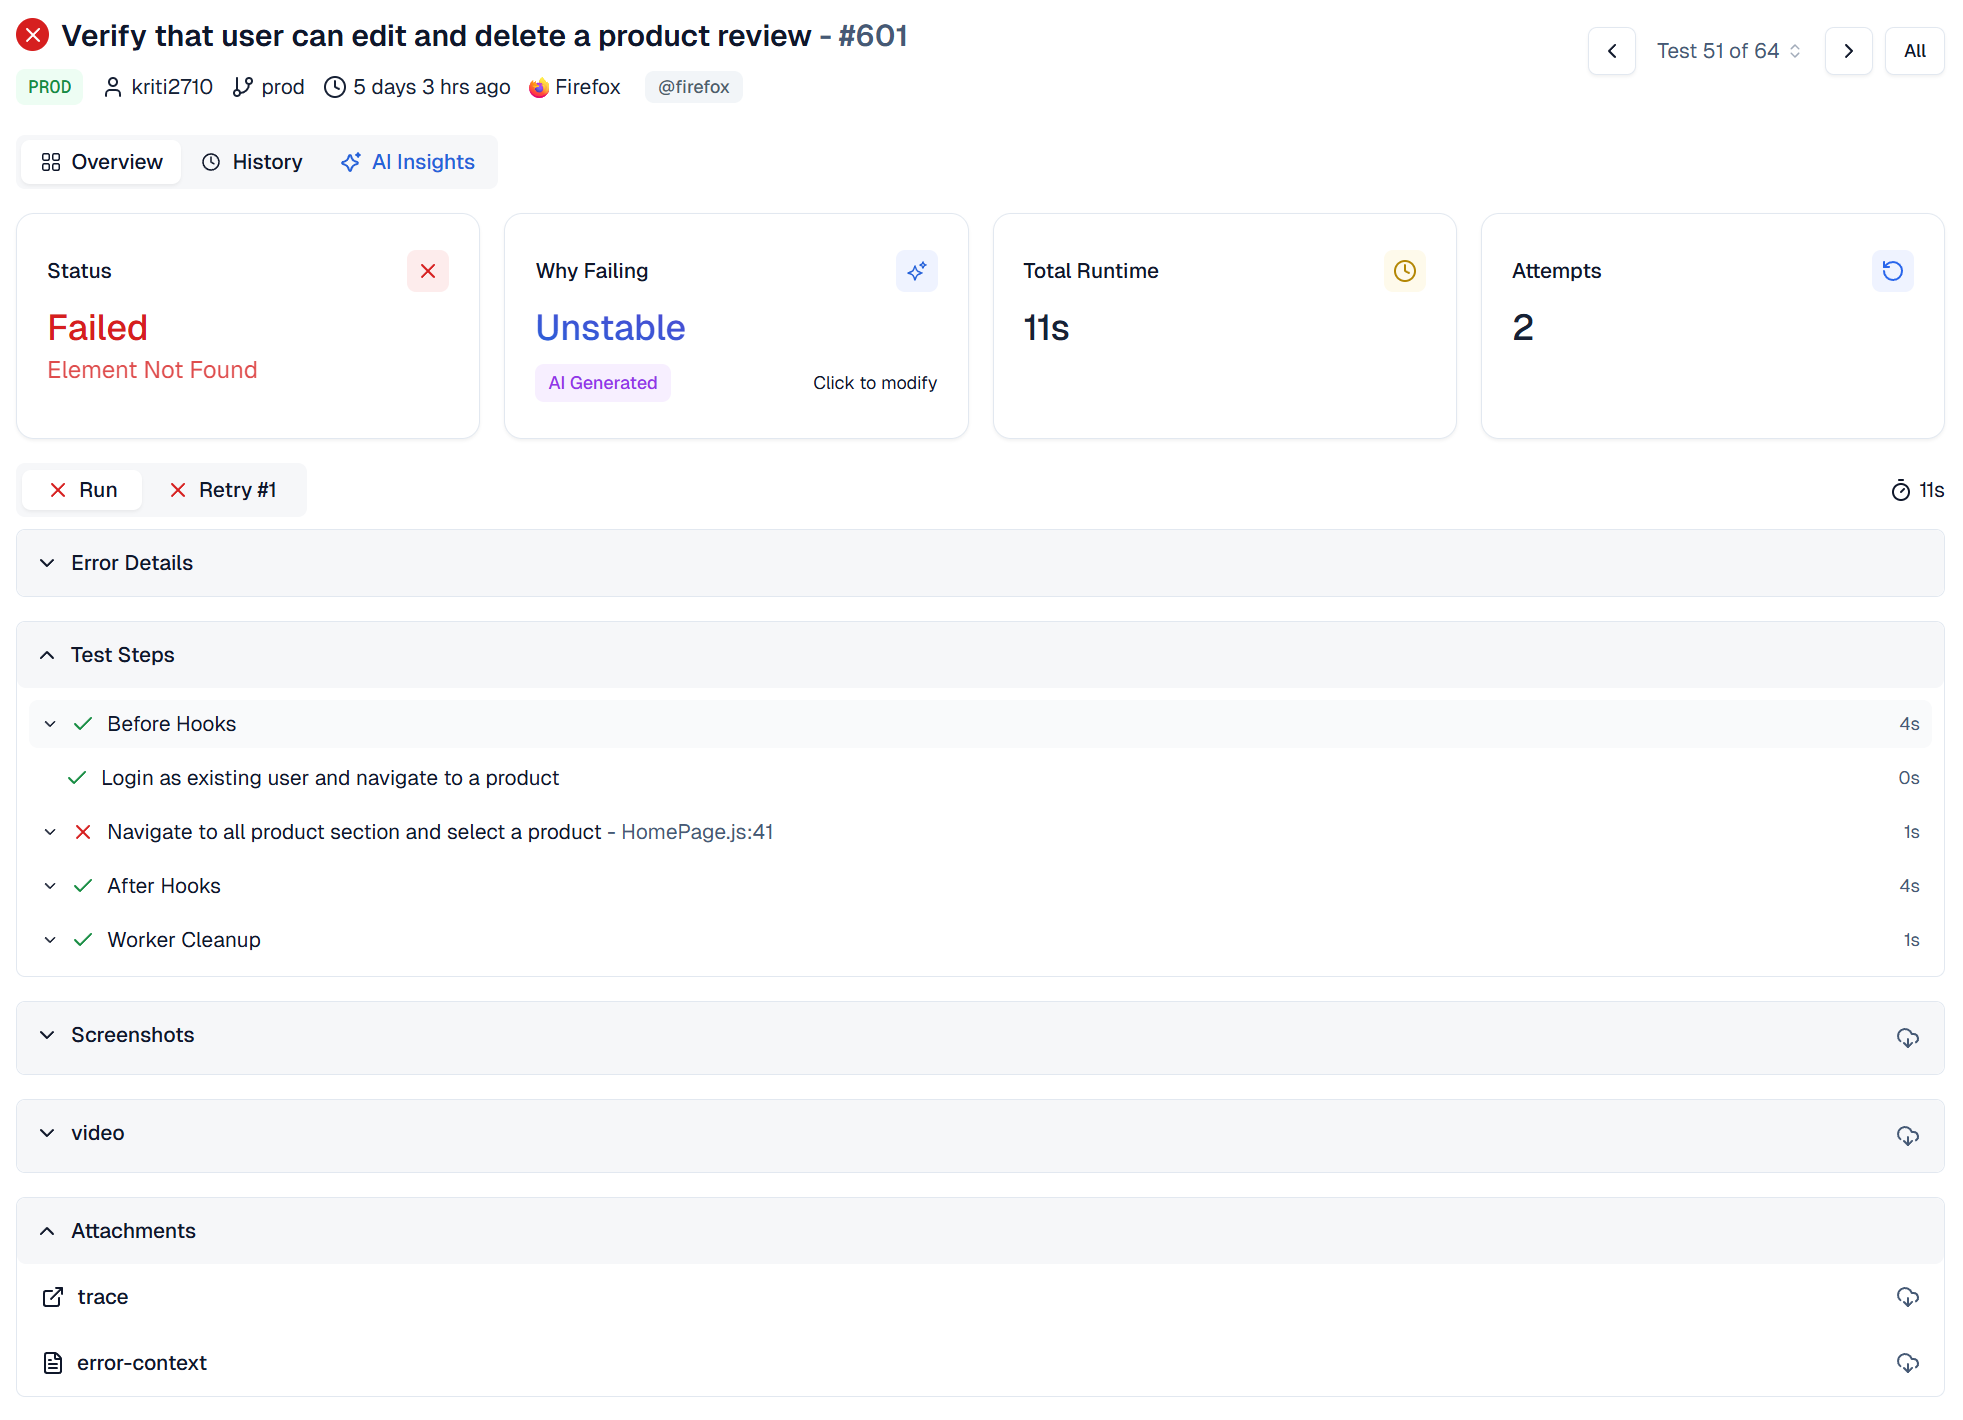
Native integrations. It connects to GitHub for PR comments, Slack for failure alerts, and Jira for auto-creating tickets when new failures appear. Everything stays connected.
Getting started takes one command:
npx tdpw upload ./playwright-report --token="YOUR_API_KEY"
That sends your Playwright report data to TestDino. From there, AI picks up the analysis.
For teams running Flask app testing using Playwright in CI, TestDino turns raw pass/fail results into insights you can act on. It goes beyond basic test intelligence by giving you actual root cause data, not just pass/fail counts. Combined with proper test management, you get full visibility into your test suite's health.
It's the difference between knowing that a test failed and understanding why it failed.
Try the sandbox at sandbox.testdino.com to see it in action, or check out the video demos for a quick walkthrough.
Conclusion
Testing Flask apps with Playwright gives you real confidence in your code. You get actual browser automation, not mocked requests. The setup is quick, and the webServer config means Playwright manages your Flask server automatically.
Start with a single CRUD test as we built here. Then break it into isolated tests as your app grows. Use data-testid attributes for stable selectors, run tests in CI on every push, and add reporting so failures come with context, not just error messages.
The code from this guide works as-is. Copy it, run it, and build from there.
FAQs
Table of content
Flaky tests killing your velocity?
TestDino auto-detects flakiness, categorizes root causes, tracks patterns over time.
Follow Us