Playwright Accessibility Testing: Fast CI Automation Guide
Playwright accessibility testing with axe-core lets you catch WCAG violations on every pull request, not months later in an audit. Add it in minutes, enforce it in CI, and turn accessibility into a continuous quality gate.
Playwright accessibility testing lets you catch WCAG violations inside the same test suite you already run for functional checks. Instead of waiting for a manual audit to surface missing labels or broken contrast ratios, you find them on every pull request, automatically.
Most teams treat accessibility as something they will "get to later." The problem? Later usually means after a user complains, or worse, after a legal notice arrives. ADA-related web accessibility lawsuits exceeded 4,000 federal filings in 2024, and that number keeps climbing. The fix is not a one-time audit. It's a quality gate that runs on every commit.
This guide covers how to add axe-core to your Playwright test suite in under 20 lines of code, enforce WCAG 2.1 AA compliance as a CI quality gate, run fast a11y checks in parallel CI pipelines without slowing your builds, and track accessibility violations over time using centralized test reporting.
How to Automate Playwright Accessibility Testing in CI?
You automate Playwright accessibility testing in CI by combining @axe-core/playwright with your existing test suite and failing the build when violations are detected.
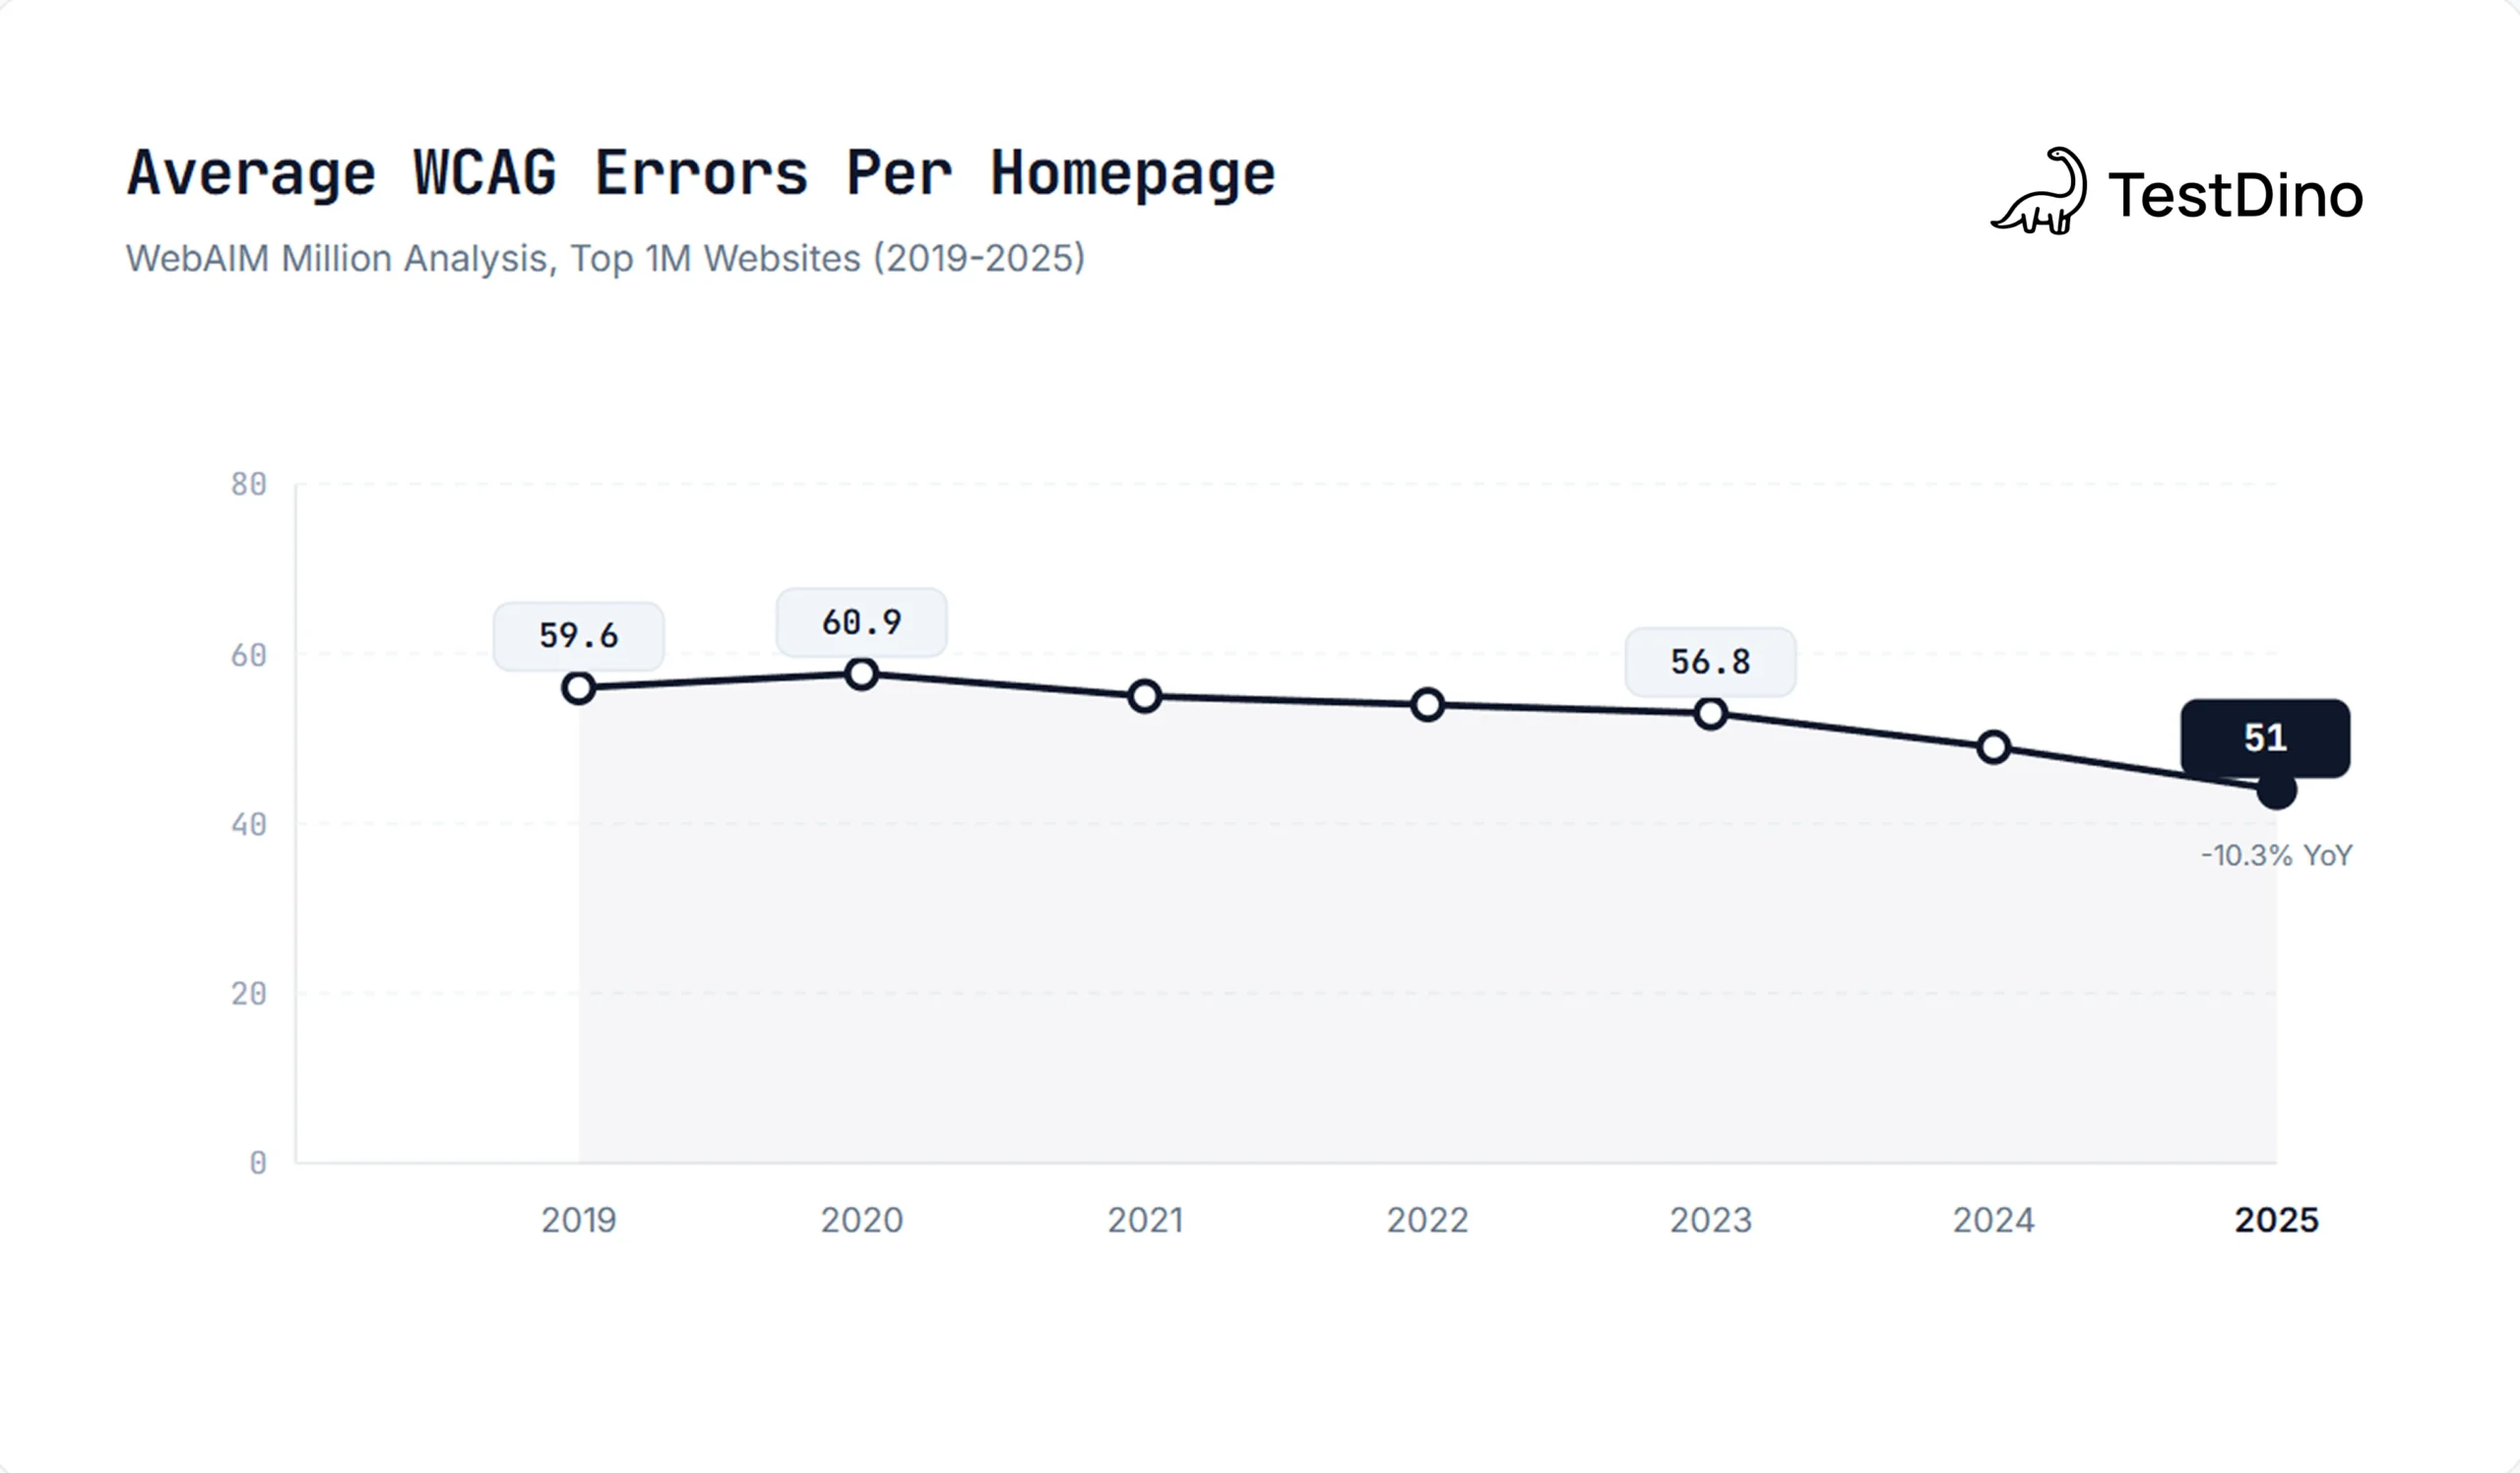
Here's why this matters for you. WebAIM's 2025 Million analysis found an average of 51 detectable WCAG errors per homepage across the top one million websites. That's after years of awareness campaigns. The sites that avoid these numbers share one thing: they test for accessibility the same way they test for bugs, automatically, on every code change.
What is Axe-core ?
The setup takes three steps:
-
Install the package alongside your existing Playwright setup
-
Write a scan using
AxeBuilderafter navigating to any page -
Assert zero violations using standard Playwright
expect
That's the whole pattern. Every test follows the same structure: navigate, scan, assert. You can add it to existing functional tests or write dedicated a11y test files. Either way, axe-core runs inside the same browser context Playwright already controls, so there's no separate tool to configure or maintain.

TIP: Start with your most visited pages. Your homepage, login page, and primary user flow cover the highest-impact surface area. You can expand coverage later without restructuring anything.
What's the Fastest Way to Add axe-core to Playwright Tests?
The fastest way is a single npm install followed by a reusable test fixture, giving you WCAG coverage across every page with under 20 lines of setup code.
Start with the install:
Then write your first accessibility test:
import { test, expect } from '@playwright/test';
import AxeBuilder from '@axe-core/playwright';
test('homepage has no a11y violations', async ({ page }) => {
  await page.goto('https://your-app.com/');
  const results = await new AxeBuilder({ page })
    .withTags(['wcag2a', 'wcag2aa', 'wcag21a', 'wcag21aa'])
.analyze(); expect(results.violations).toEqual([]);
});
That's 10 lines. It navigates to a page, runs a full WCAG 2.1 AA scan, and fails the test if any violation is found. The .withTags() filter focuses the scan on the specific WCAG levels you care about, so you're not drowning in best-practice warnings when you need hard compliance checks.
Making It Reusable with a Fixture
If you're adding accessibility checks to multiple tests, copying that AxeBuilder config everywhere gets messy fast. Playwright fixtures solve this:
import { test as base } from '@playwright/test';
import AxeBuilder from '@axe-core/playwright';
type A11yFixture = {
  makeAxeBuilder: () => AxeBuilder;
};

export const test = base.extend<A11yFixture>({
  makeAxeBuilder: async ({ page }, use) => {
    const makeAxeBuilder = () =>
      new AxeBuilder({ page })
        .withTags(['wcag2a', 'wcag2aa', 'wcag21a', 'wcag21aa'])
        .exclude('#known-third-party-widget');
    await use(makeAxeBuilder);
  },
});
export { expect } from '@playwright/test';
Now every test file imports from your fixture instead of setting up axe-core manually. The tags, exclusions, and configuration live in one place. When you need to adjust rules or add exclusions for known third-party widgets, you change one file.
TIP: Use .exclude() sparingly and only for elements you genuinely can't control (third-party embeds, for example). Every exclusion is a blind spot. Track them in a comment so they don't become permanent.
What axe-core Actually Catches
Axe-core checks against a wide set of rules, but here are the categories that catch the most real-world issues:
| Category | What It Checks | Common Violations |
|---|---|---|
| Color Contrast | Text-to-background ratio against WCAG thresholds | Low-contrast text on buttons, links, and form labels |
| Form Labels | Whether inputs have associated labels | Missing <label>, broken for attributes, empty aria-labels |
| Image Alt Text | Alternative text for images | Missing alt, decorative images without alt="" |
| ARIA Attributes | Correct use of ARIA roles and properties | Invalid aria-* values, missing required ARIA children |
| Document Structure | Heading hierarchy, landmark regions | Skipped heading levels, missing <main> landmark |
| Keyboard Access | Focusable elements, tab order | Elements that can't receive focus, focus traps |
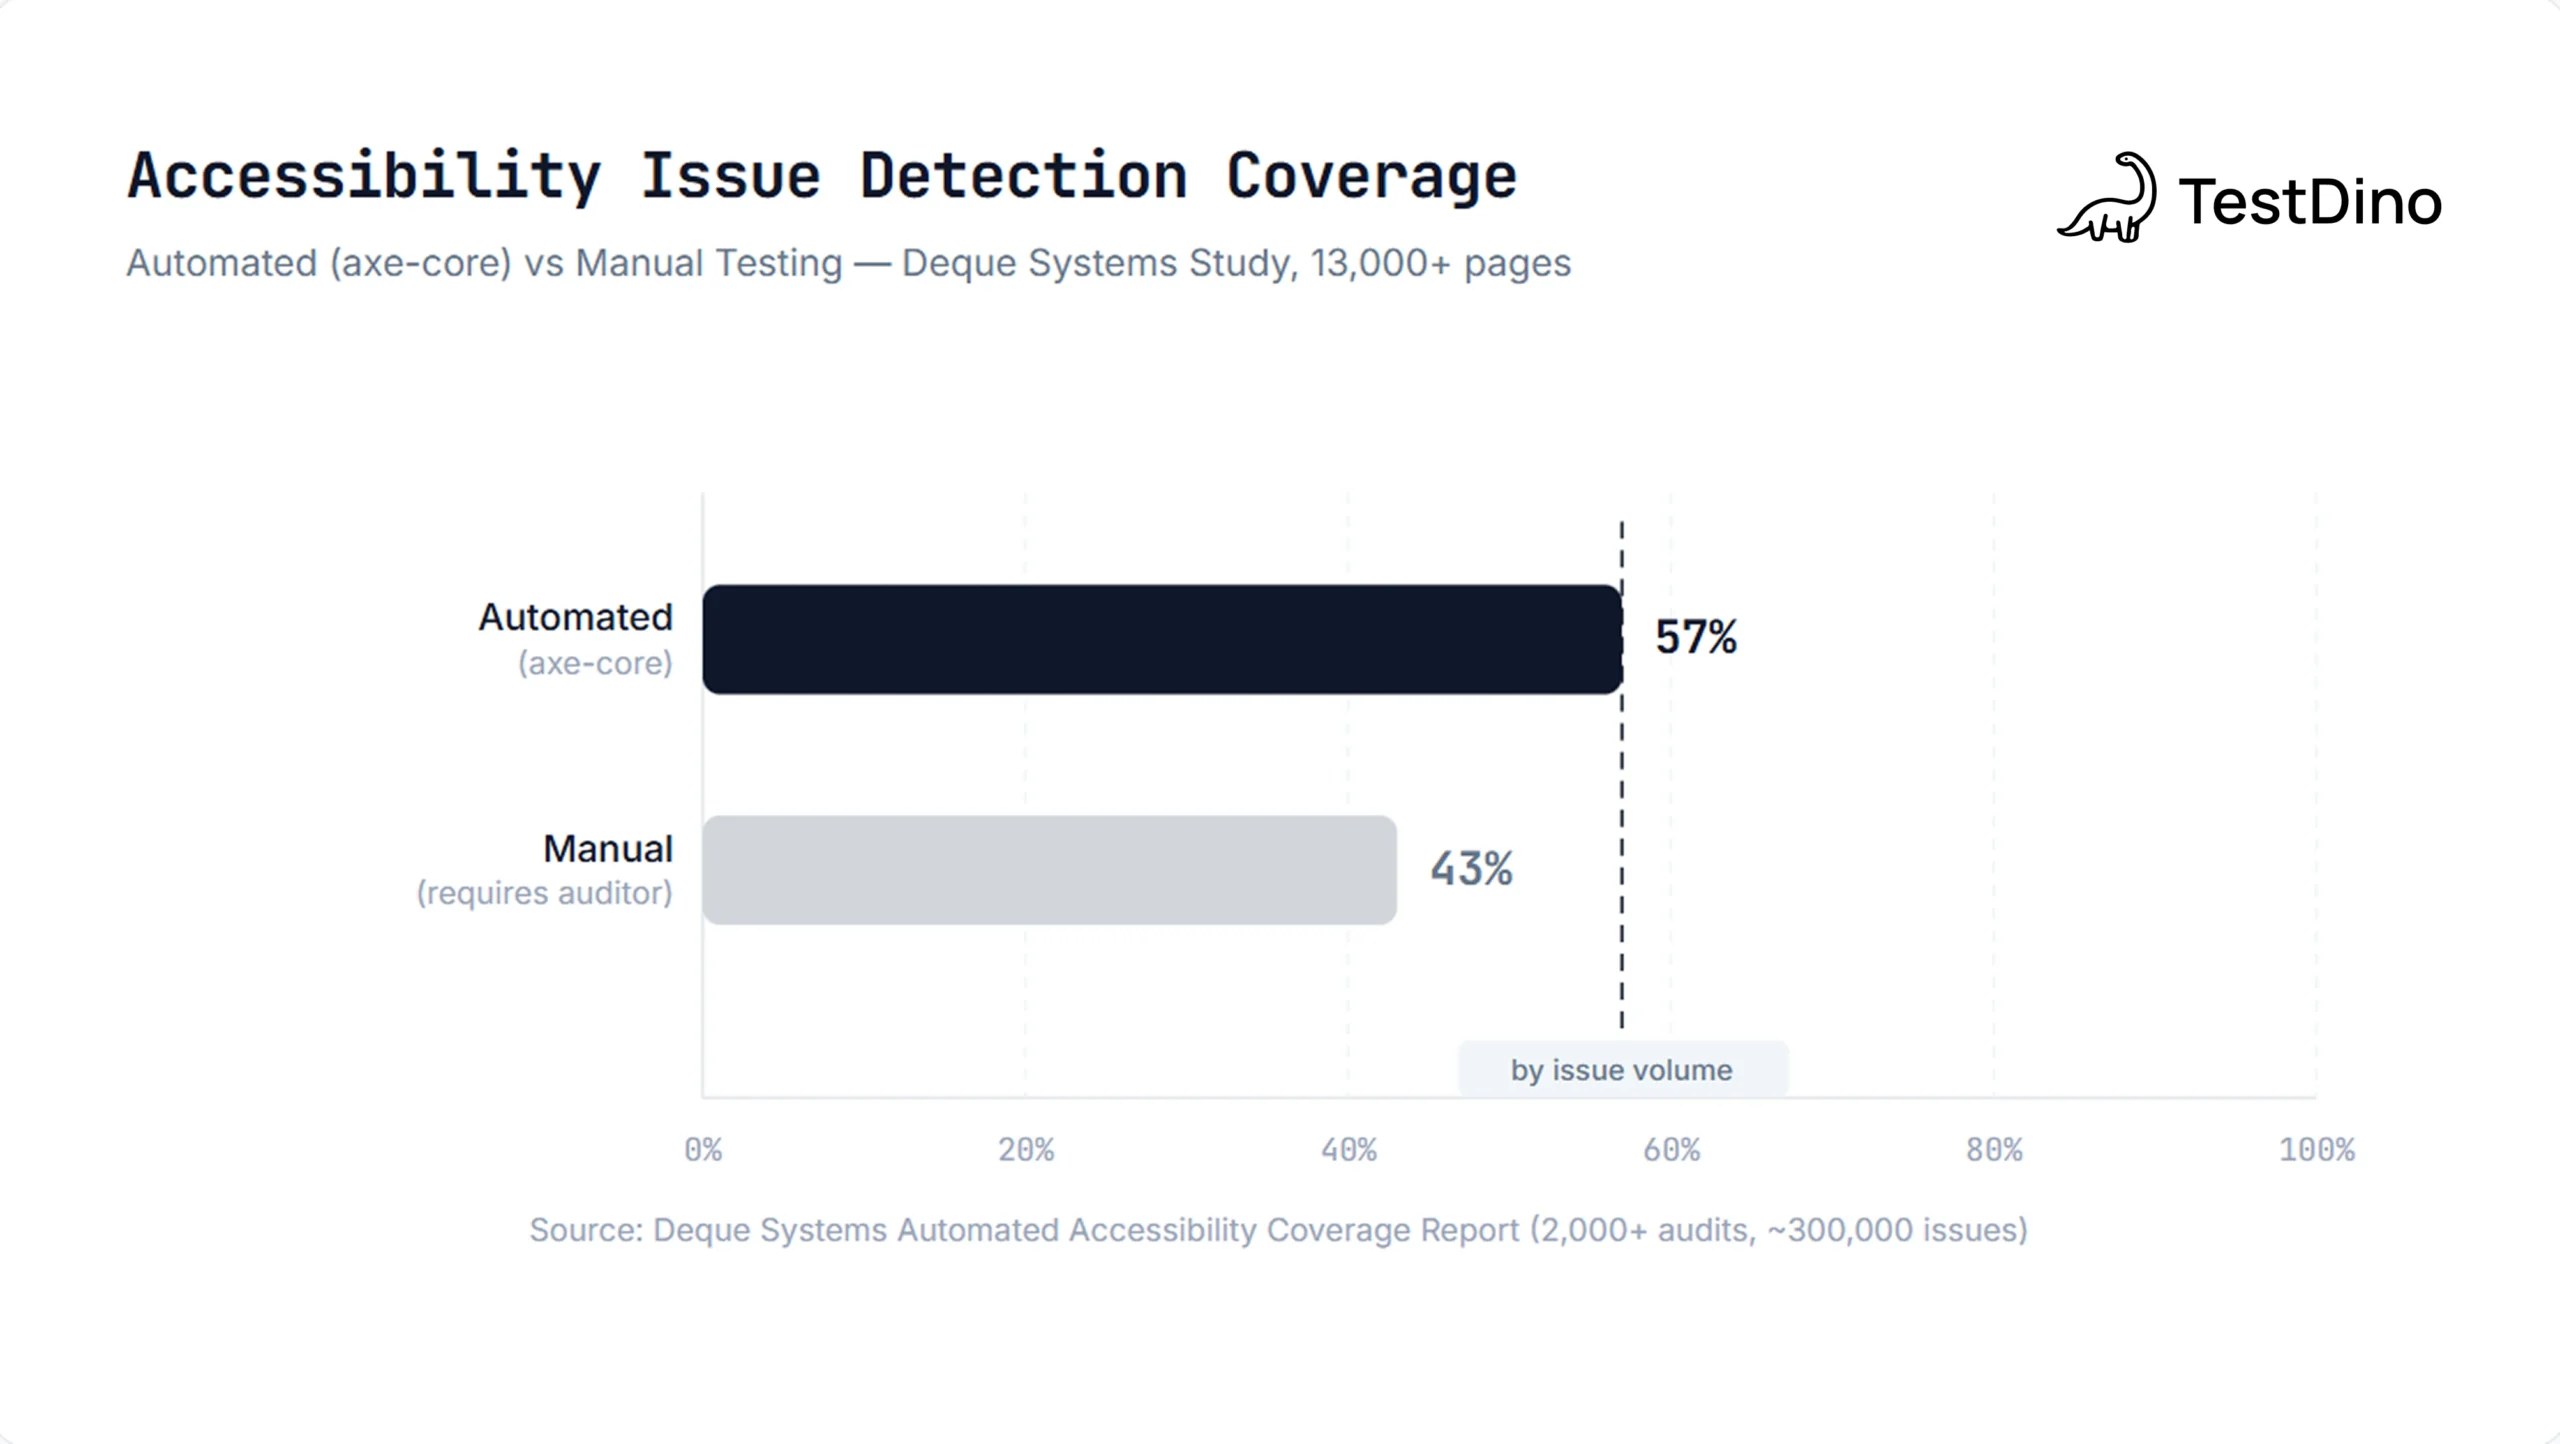
A Deque Systems study found that automated testing with axe-core catches 57% of all accessibility issues by volume. That's much higher than the commonly cited 30% figure, which measures coverage by WCAG success criteria count rather than actual issue volume. The distinction matters: automated scans catch the issues that appear most frequently.

NOTE: Automated testing is powerful, but it doesn't catch everything. Keyboard navigation flow, screen reader experience, and cognitive accessibility still need manual review. Use automated checks as your first line of defense, not your only one. For teams that also need runtime remediation for live users, like ADA overlay compliance, tools like WebAbility complement your CI testing by fixing issues in production that automated scans can flag but can't resolve.
Enforcing WCAG 2.1 AA with CI Quality Gates
Running accessibility tests locally is useful. Running them as a required CI check is where the real value shows up. When a11y tests block the merge, violations get fixed before they ship.
Here's a GitHub Actions workflow that adds playwright accessibility testing as a quality gate:
name: Accessibility Tests
on: [push, pull_request]
jobs:
  a11y:
    runs-on: ubuntu-latest
    steps:
      - uses: actions/checkout@v4
      - uses: actions/setup-node@v4
        with:
          node-version: 20
          cache: 'npm'
      - run: npm ci
      - run: npx playwright install --with-deps chromium
- run: npx playwright test --project=a11yexport default defineConfig({
projects: [
{
name: 'a11y',
testDir: './tests/accessibility',
use: { browserName: 'chromium' }
},
// ... your other functional test projects
]
});Two things to notice. First, you only install Chromium here, not all three browsers. Accessibility violations are DOM-level issues, not browser rendering differences. One browser is enough for a11y checks, and it cuts your install time significantly.
Second, the --project=a11y flag assumes you have a separate Playwright project in your config for accessibility tests:
export default defineConfig({
  projects: [
    {
      name: 'a11y',
      testDir: './tests/accessibility',
      use: { browserName: 'chromium' }
    },
// ... your other functional test projects
]
});This separation keeps a11y tests fast and independent. They don't wait for your full E2E suite to finish. They don't share flaky state. And they give CI a clean signal: accessibility passed or it didn't.
Setting Severity Thresholds
Not every team can fix all violations on day one, especially on legacy applications. You can use axe-core's impact levels to create a phased rollout:
| Impact Level | Examples | Recommended Action |
|---|---|---|
| Critical | Missing form labels, no keyboard access | Block the merge immediately |
| Serious | Low contrast text, missing heading structure | Block the merge (or fix within sprint) |
| Moderate | Redundant ARIA attributes, minor landmark issues | Warn in PR, track for fix |
| Minor | Best-practice suggestions | Log, don't block |
Here's how to filter by impact in your test:
test('no critical or serious a11y violations', async ({ page }) => {
  await page.goto('https://your-app.com/dashboard');
  const results = await new AxeBuilder({ page })
    .withTags(['wcag2a', 'wcag2aa'])
    .analyze();

  const serious = results.violations.filter(
    v => v.impact === 'critical' || v.impact === 'serious'
  );
  expect(serious).toEqual([]);
});TIP:Start strict. Block on critical and serious from day one. If you start lenient, the violation count grows silently and becomes nearly impossible to clean up later. Teams that gate on severity from the beginning report fewer than 10 a11y issues in their backlog within three months.
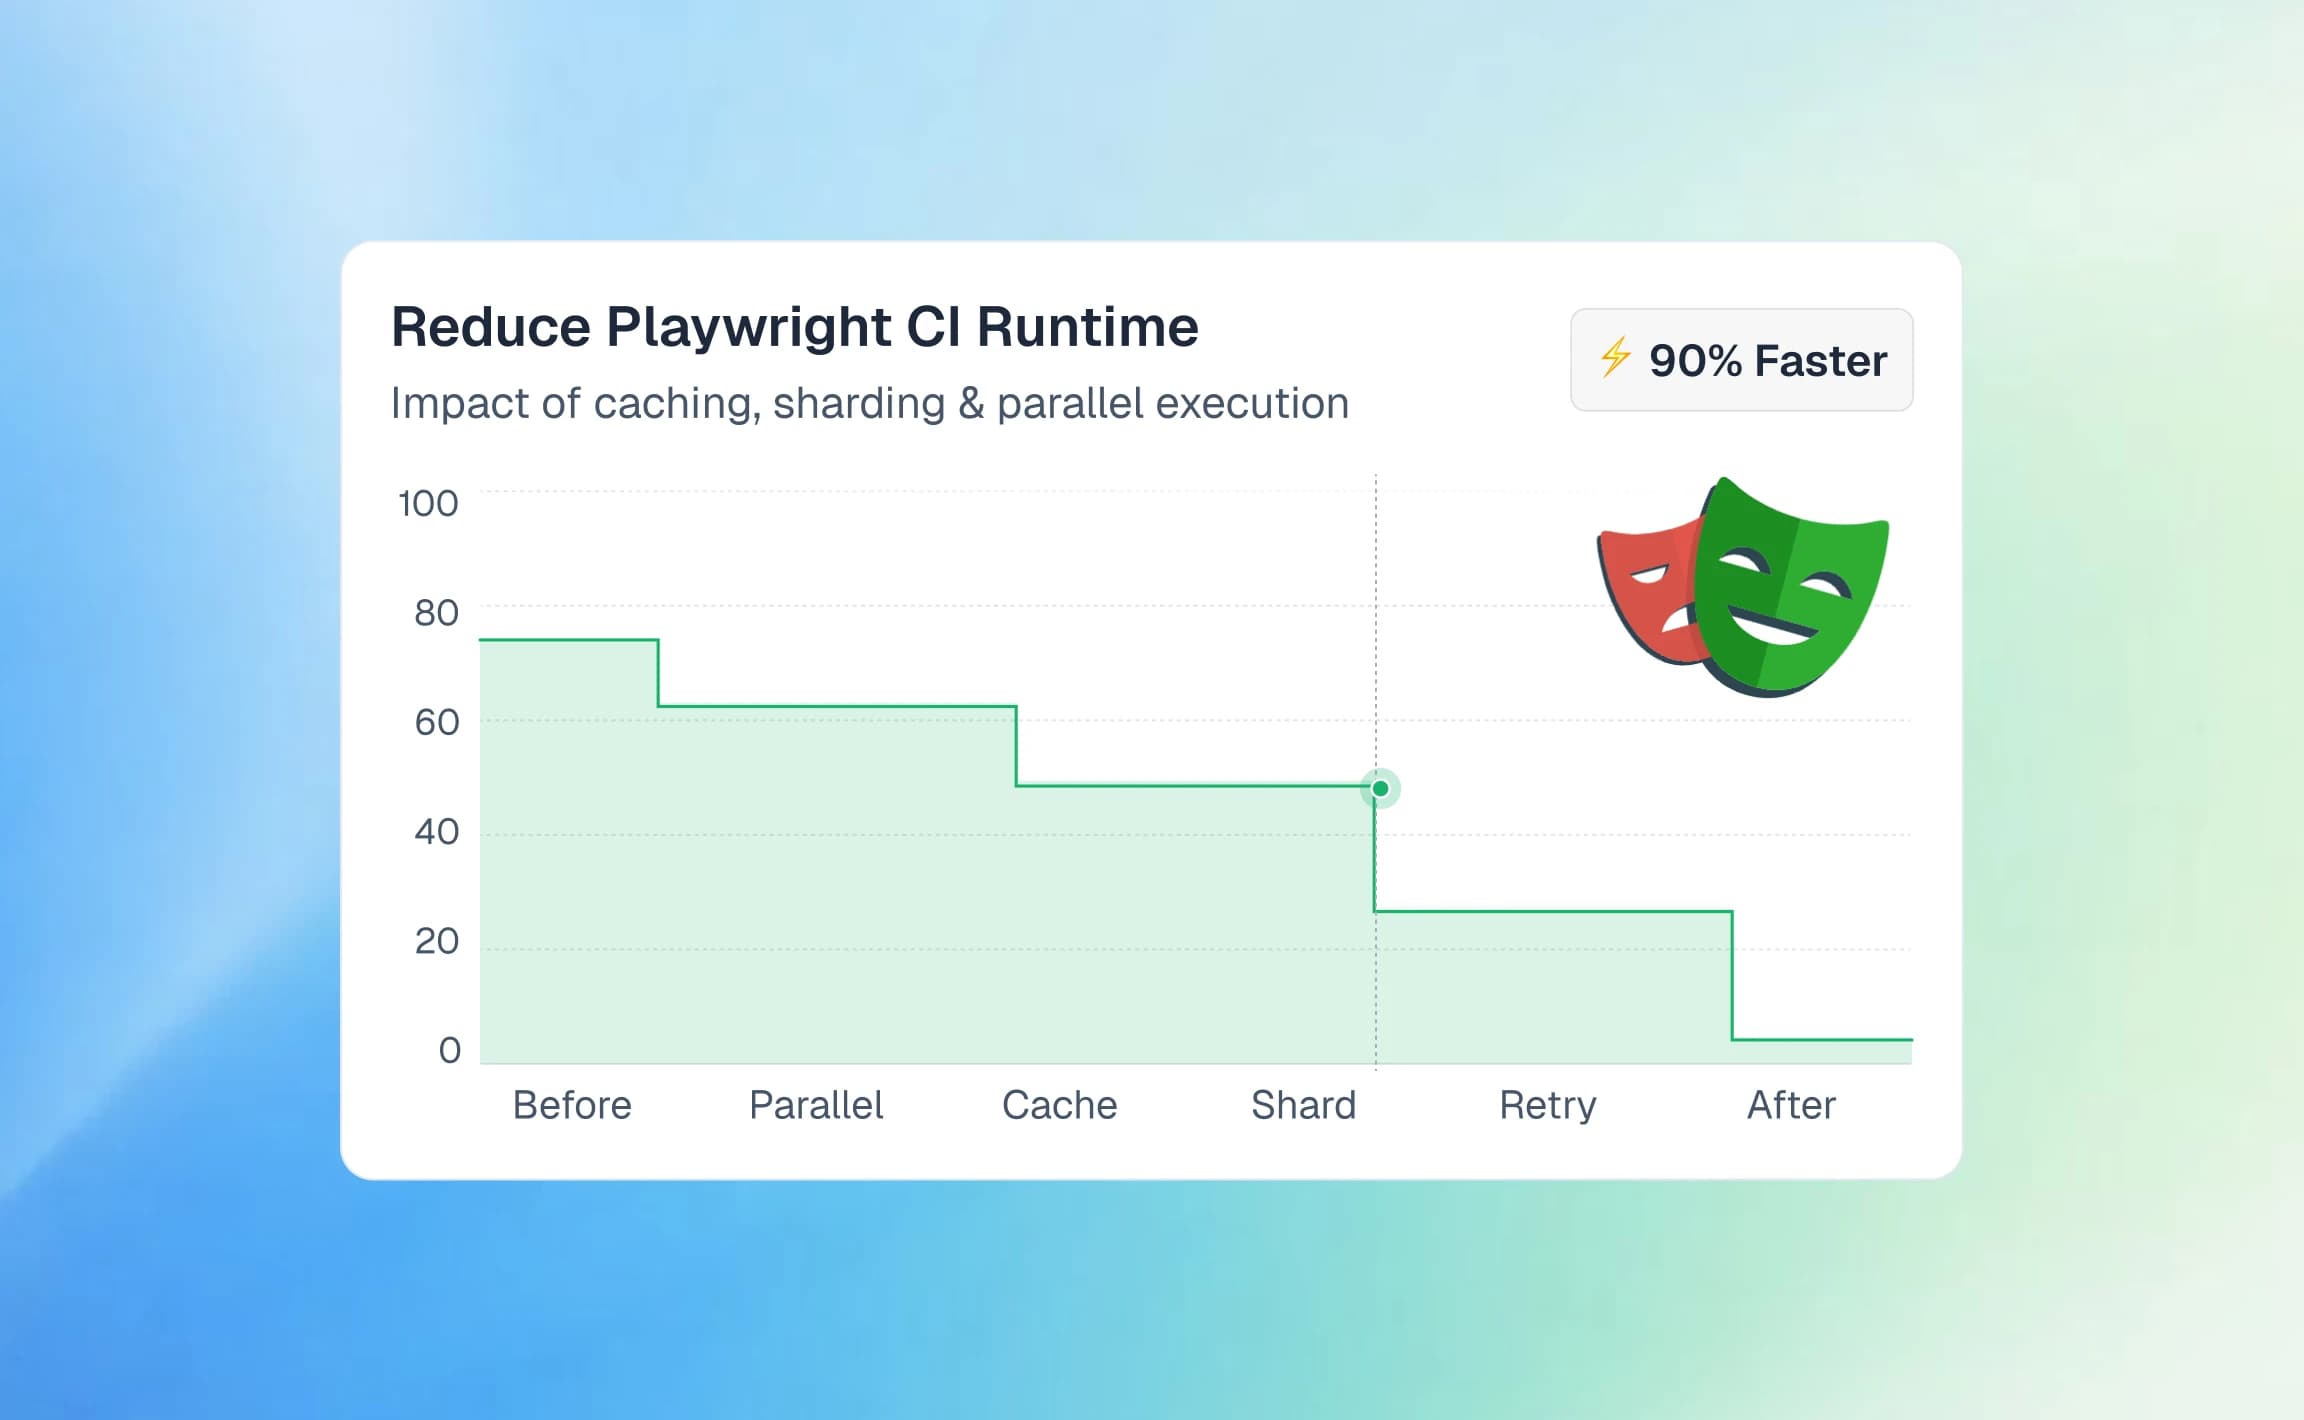
Running Fast A11y Checks in Parallel CI Pipelines
Accessibility tests are fast by nature. An axe-core scan on a single page typically finishes in 200-500ms. The bottleneck is not the scan itself, it's how many pages you need to scan and how your CI is structured.
For teams with 10-20 key pages, a single CI job handles everything easily. But once you're scanning 50+ pages across multiple user flows, you need to think about parallel execution.
Approach 1: Dedicated A11y Job (Recommended for Most Teams)
Run accessibility tests as a separate CI job that runs in parallel with your functional tests:
jobs:
functional-tests:
runs-on: ubuntu-latest
strategy:
matrix:
shard: [1/4, 2/4, 3/4, 4/4]
steps:
- run: npx playwright test --shard=${{ matrix.shard }}
a11y-tests:
runs-on: ubuntu-latest
steps:
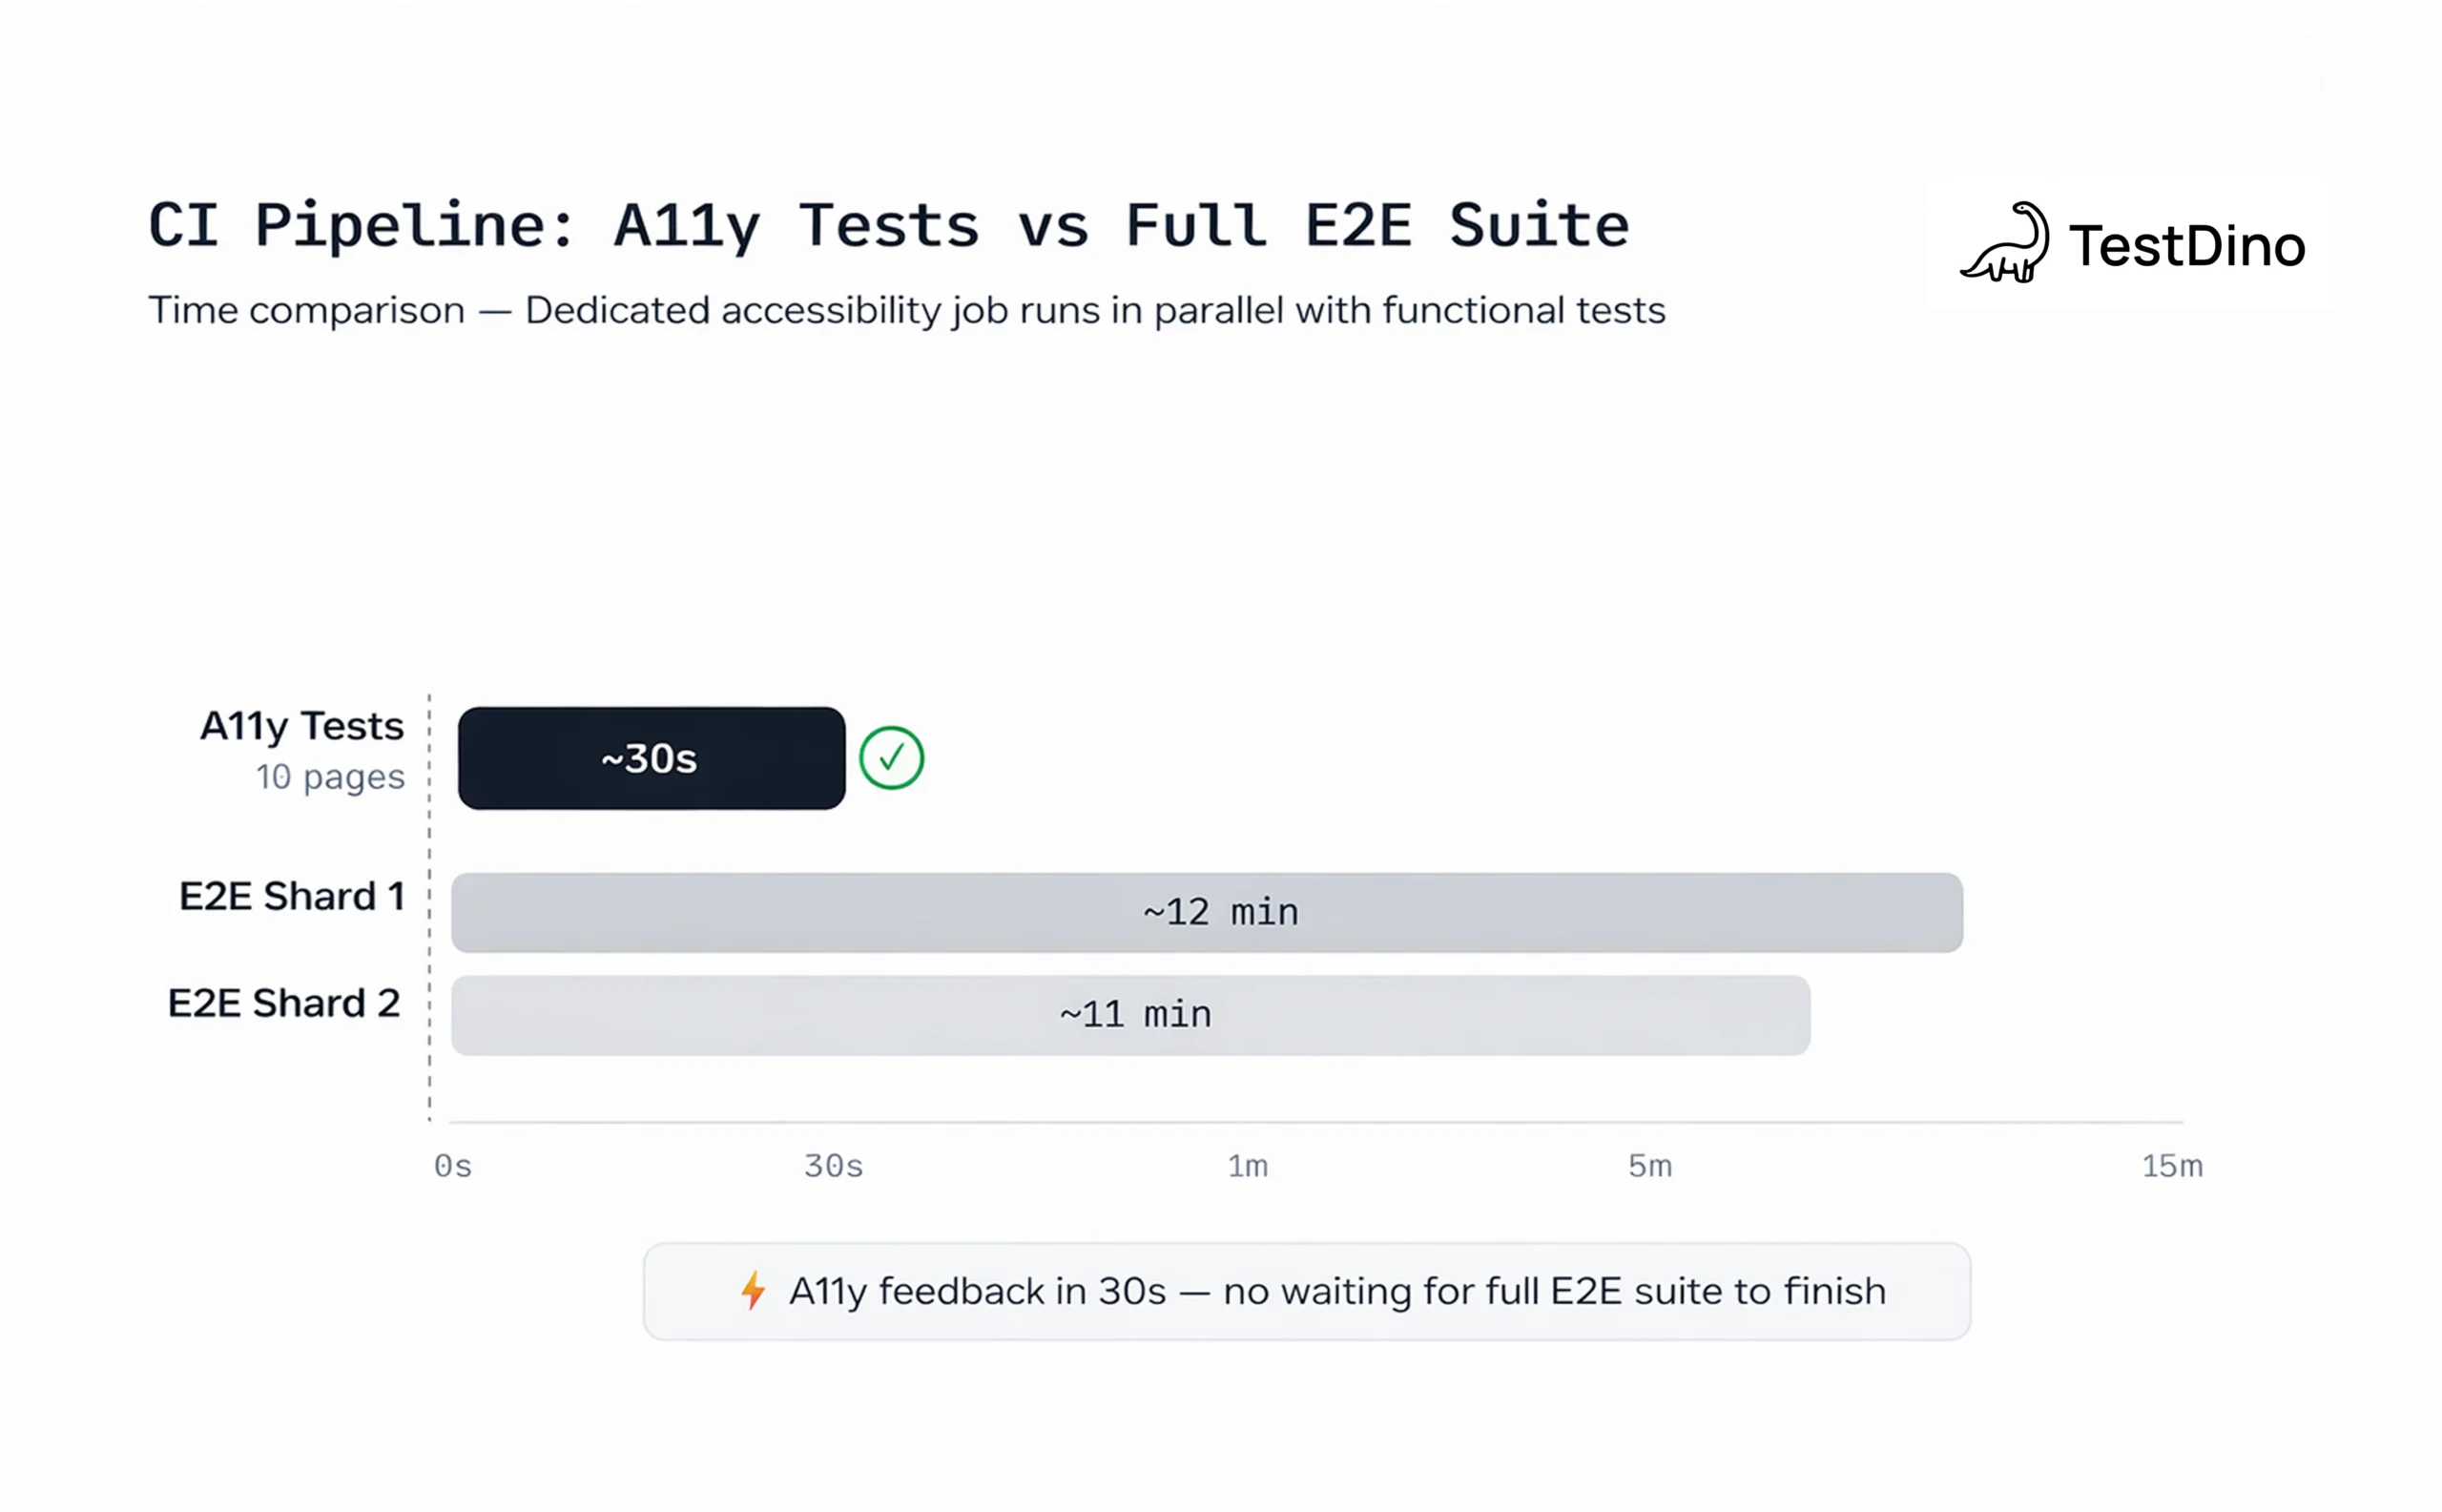
- run: npx playwright test --project=a11yBoth jobs start at the same time. Your functional suite can take 15 minutes across 4 shards while the a11y suite finishes in 30 seconds. No wasted time.
Approach 2: Inline Scans in Functional Tests
For teams that want accessibility coverage on every user flow without separate test files, you can add scans directly to existing tests:
test('user can complete checkout', async ({ page }) => {
  await page.goto('/products');
  // functional assertions...
  // A11y check after page renders
  const results = await new AxeBuilder({ page })
    .withTags(['wcag2a', 'wcag2aa'])
    .analyze();
  expect(results.violations).toEqual([]);
  await page.click('[data-testid="add-to-cart"]');
  // more functional steps...
});
This approach gives you state-aware accessibility checks. You're not just scanning static pages, you're checking accessibility after user interactions like opening modals, expanding menus, or navigating multi-step forms.
NOTE: Inline scans add 200-500ms per check. If you're running them inside every functional test, that overhead adds up. Profile your total suite time and move to dedicated a11y tests if the slowdown becomes noticeable.
Handling Known Violations Without Hiding Problems
Every real codebase has accessibility issues that can't be fixed immediately. Third-party widgets, legacy components, and external embeds often have violations you can't control. The question is how to acknowledge them without disabling your tests.
Excluding Specific Elements
Use .exclude() for elements you genuinely can't modify:
const results = await new AxeBuilder({ page })
  .withTags(['wcag2a', 'wcag2aa'])
  .exclude('#third-party-chat-widget')
  .exclude('[data-testid="legacy-banner"]')
  .analyze();
Disabling Specific Rules Temporarily
If a rule produces violations across many elements and you need time to fix them systematically, disable it with a tracking comment:
const results = await new AxeBuilder({ page })
  .withTags(['wcag2a', 'wcag2aa'])
  // TODO: Fix duplicate-id violations in nav (JIRA-4521)
  .disableRules(['duplicate-id'])
  .analyze();
Snapshot-Based Baselines
For legacy apps with many existing violations, you can adopt an approach similar to snapshot testing: capture a baseline count and ensure new code doesn't increase it.
test('no new a11y violations introduced', async ({ page }) => {
  await page.goto('/legacy-dashboard');
  const results = await new AxeBuilder({ page })
    .withTags(['wcag2a', 'wcag2aa'])
    .analyze();
  // Baseline: 12 known violations as of 2025-02-01
  // Decrease this number as violations are fixed
  expect(results.violations.length).toBeLessThanOrEqual(12);
});
TIP: Track your exclusions and disabled rules in a single file or config. Review them monthly. If a "temporary" exclusion has been there for 6 months, either fix it or document why it's permanent. Untracked exclusions are how accessibility debt compounds silently.
Tracking Accessibility Violations Over Time
Running a11y tests in CI is step one. Knowing whether your violation count is going up or down over time is where real improvement happens.
Standard Playwright reports show you pass/fail for a single run. They don't answer questions like: "Did we introduce new contrast violations this sprint?" or "Which pages have the most recurring a11y issues?"
This is where test reporting tools add value. When you're running dozens of accessibility checks across multiple pages and branches, you need historical data to spot patterns and prioritize fixes.
TestDino, for example, aggregates Playwright test results across CI runs and lets you filter by test tags, branches, and environments. If your a11y tests are tagged clearly (which you should do), you can track accessibility pass rates separately from functional tests and see if they're trending in the right direction.
The AI-powered failure classification also helps here. When an a11y test fails, the failure message includes the violation details from axe-core, like the affected element selector, the WCAG rule ID, and the impact level. A good reporting tool groups these by root cause, so you're not triaging the same "color-contrast" violation across 15 different test files one by one.

For teams just getting started with accessibility tracking, here's a practical rollout plan:
| Week | Action | Expected Outcome |
|---|---|---|
| 1 | Install axe-core, scan top 5 pages | Baseline violation count established |
| 2 | Add CI quality gate (critical + serious) | New violations blocked at PR level |
| 3-4 | Fix existing critical/serious violations | Violation count drops to target |
| 5+ | Expand to all user flows, add inline scans | Comprehensive coverage with stable pass rate |
Scaling Accessibility Testing Across Teams
Once your core a11y tests are running in CI, the next challenge is making accessibility everyone's responsibility, not just the QA team's.
Here's what works:
-
Shared fixtures: Maintain a single
makeAxeBuilderfixture that every team imports. Configuration changes propagate everywhere without anyone editing test files. -
Clear ownership: Tag a11y tests with
@a11yannotations so test management tools can assign them to the right team. If you're using Playwright test management, you can filter dashboards by tag. -
PR feedback loops: When an a11y test fails on a PR, the developer who introduced the violation is the one who sees it. This is the most effective way to build accessibility awareness across a team. No training session competes with "your PR is blocked because this button doesn't have a label."
-
Documentation as code: Keep your axe-core configuration, exclusion list, and severity thresholds in the repo. New team members see the rules on their first clone. There's no separate wiki page to find and forget.
TIP: Accessibility tests work best when they feel like a natural part of your Playwright automation checklist, not a separate process bolted on top. Same repo, same CI, same reporting.
Conclusion
Playwright accessibility testing with axe-core gives you a fast, reliable way to catch WCAG violations before they reach production. The setup takes minutes, the scans run in milliseconds, and the CI integration uses the same tools you already have.
The approach is simple: install @axe-core/playwright, write tests that scan your key pages, and block merges when critical violations appear. Start with your top 5 pages this week. Expand from there.
For teams running large Playwright suites across multiple branches and environments, pairing your a11y tests with a reporting platform like TestDino turns raw pass/fail results into trends you can act on. You see which violations keep coming back, which pages need attention, and whether your accessibility posture is improving or slipping.
Accessibility isn't a feature you ship once. It's a quality standard you enforce continuously, just like any other test in your pipeline.
FAQs
A Deque Systems study found that automated testing with axe-core identifies 57% of accessibility issues by volume. The remaining issues require manual testing with assistive technologies like screen readers and keyboard-only navigation.

Savan Vaghani
Product Developer