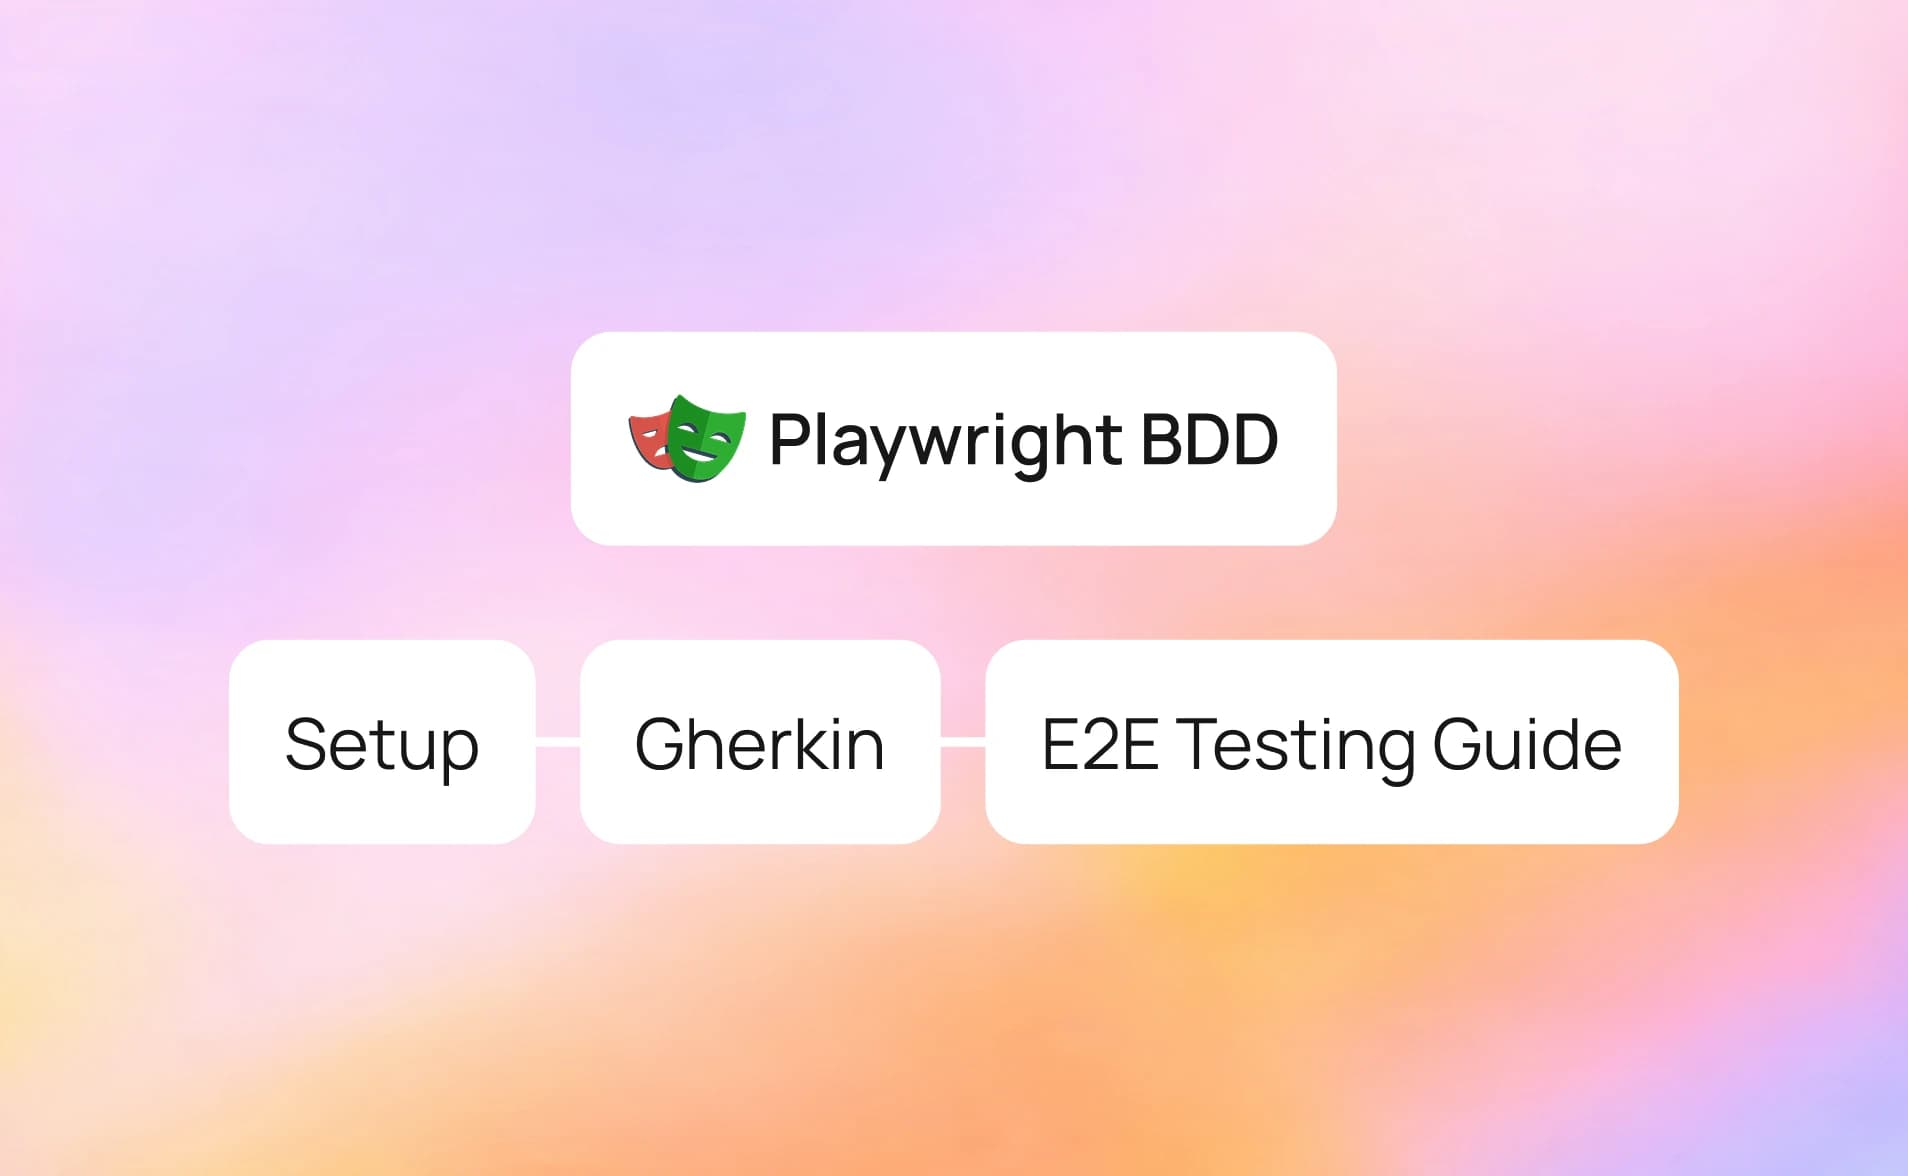
Playwright BDD: Setup, Gherkin & E2E Testing Guide
Want to write tests that everyone on the team can actually read? This guide walks you through setting up Playwright BDD from scratch, writing Gherkin feature files, creating step definitions in TypeScript, and running end-to-end tests. Includes real examples, a framework comparison, and CI/CD tips.
Your test suite has 400 passing tests, but your product manager still asks, "Are we actually testing the checkout flow?" That is the core problem, test scripts written in code are invisible to everyone who does not write code.
Playwright BDD changes that. Instead of buried assertions in TypeScript files, your tests start as plain English scenarios: "Given the user is on the login page, When they enter valid credentials, Then the homepage should be visible." These sentences are not comments. They directly control an actual browser running real end-to-end checks across Chromium, Firefox, and WebKit.
This guide walks you through the complete setup. You will learn how Playwright E2E testing and Behavior Driven Development work together using the playwright-bdd npm package, from writing your first Gherkin feature file to creating TypeScript step definitions, integrating Page Objects, and running everything in CI/CD.
What is Playwright BDD and how does it work?
Playwright BDD is an approach that pairs Microsoft's Playwright browser automation library with Behavior Driven Development methodology. Tests are written as human-readable scenarios in Gherkin syntax (Given/When/Then), then executed as full end-to-end browser tests using the Playwright test runner.
At its core, Playwright BDD does two things:
- It keeps test scenarios readable for everyone on the team (devs, QA, product, and stakeholders).
- It runs those same scenarios as real browser automation using Playwright's engine across Chromium, Firefox, and WebKit.
The most popular way to achieve this is through the playwright-bdd npm package by Vitalets. It converts .feature files written in Gherkin into Playwright test files, so you get all the native Playwright runner benefits like:
-
Auto-waiting for elements
-
Built-in screenshot, video, and trace capture
-
Parallel execution and sharding
-
TypeScript support out of the box
How the workflow looks
Here is the high-level flow of Playwright BDD in practice:
-
A product owner or QA writes a .feature file describing a user scenario.
-
A developer creates step definition functions that map each Gherkin step to Playwright actions.
-
The playwright-bdd package generates Playwright spec files from the feature files.
-
The Playwright test runner executes those generated specs across browsers.
Note: The playwright-bdd package is different from using Cucumber.js directly with Playwright. With playwright-bdd, the Playwright test runner stays in control. With Cucumber.js, Cucumber drives the execution instead, and you lose native fixture/trace support.
The Given/When/Then structure
Every Gherkin scenario follows this pattern:
// features/Example.feature
Feature: User login on TestDino Store

  Scenario: Successful login with valid credentials
    Given the user is on the login page
    When the user enters "[email protected]" and "bat@123"
    And the user clicks the sign in button
    Then the homepage should be visible
Each line maps to a function in your step definitions file. The scenario reads like a spec document, but it actually runs a browser test.

Why combine BDD with Playwright for test automation?
BDD on its own is a collaboration methodology. Playwright on its own is a browser automation tool. Combining them solves problems that neither can fix alone.
The collaboration problem
In most teams, test scripts live in code files that only developers or SDETs can read. Product managers write acceptance criteria in Jira tickets, but there is no direct connection between those requirements and the actual tests.
With Playwright BDD:
-
Business stakeholders write or review .feature files in plain English.
-
QA engineers validate scenario coverage without reading code.
-
Developers implement the step definitions and page objects.
Everyone is looking at the same source of truth. Teams that adopt this pattern often report catching requirement gaps during scenario review, well before any code runs.
The technical advantages
Playwright itself brings several strengths to the BDD workflow that other tools struggle to match:
-
Multi-browser testing across Chromium, Firefox, and WebKit from a single test suite
-
Auto-wait mechanisms that reduce flaky tests by waiting for elements to be actionable before interacting
-
Browser context isolation that keeps each test independent without manual cleanup
-
Parallel execution built right into the test runner with worker-level parallelism
-
Native tracing that captures screenshots, videos, and DOM snapshots when tests fail
If you are already using Playwright assertions and the built-in test runner, adding BDD on top does not require rearchitecting your test infrastructure.
 Tip
Tip
Start with a small pilot. Pick 3–5 critical user flows (like login, checkout, or form submission) and write feature files for those first. Once the team gets comfortable with the workflow, expand to broader coverage.
How do you set up Playwright BDD with Cucumber step by step?
This section walks through the complete setup from an empty folder to a working Playwright BDD project using the playwright-bdd package and TypeScript.
Step 1: Initialize the project
mkdir playwright-bdd-project
cd playwright-bdd-project
npm init -y
Step 2: Install Playwright and playwright-bdd
npm i -D @playwright/test playwright-bdd
npx playwright install
The first command installs the Playwright test runner and the playwright-bdd package as dev dependencies. The second downloads the browser binaries (Chromium, Firefox, WebKit).
Step 3: Configure playwright.config.ts
Create a playwright.config.ts file in the root of your project:
import { defineConfig } from '@playwright/test';
import { defineBddConfig } from 'playwright-bdd';
const testDir = defineBddConfig({
  features: 'features/**/*.feature',
  steps: 'steps/**/*.ts',
});
export default defineConfig({
  testDir,
  reporter: 'html',
  use: {
    screenshot: 'only-on-failure',
    trace: 'on-first-retry',
  },
});
The defineBddConfig function from playwright-bdd takes your feature file paths and step definition paths, and returns a test directory where generated Playwright spec files will be placed. This generated directory is what the Playwright runner reads.
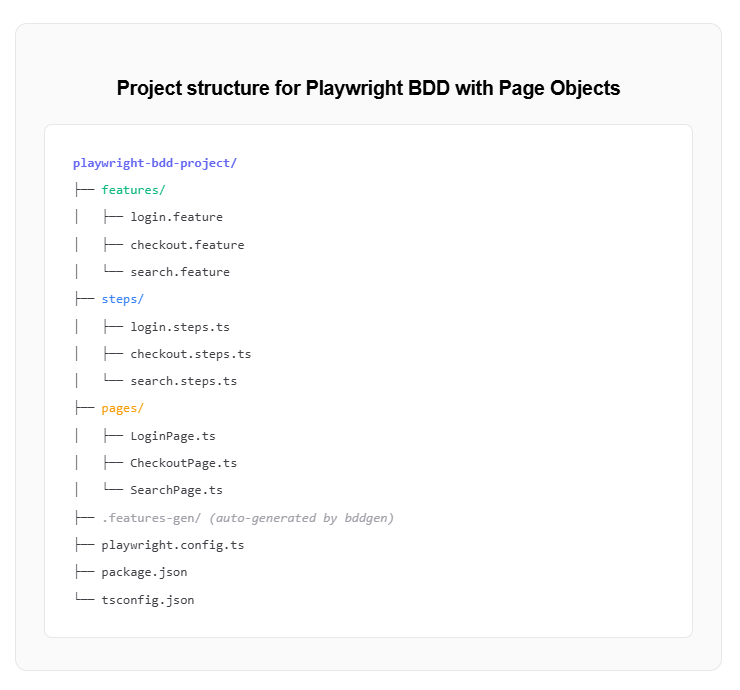
Step 4: Create the folder structure
playwright-bdd-project/
├── features/
│   └── login.feature
├── steps/
│   └── login.steps.ts
├── playwright.config.ts
├── package.json
└── tsconfig.json
Step 5: Add TypeScript config
Create a basic tsconfig.json:
{
  "compilerOptions": {
    "target": "ESNext",
    "module": "NodeNext",
    "moduleResolution": "NodeNext",
    "strict": true,
    "esModuleInterop": true,
    "outDir": "./dist"
  },
  "include": ["steps/**/*.ts", "features/**/*.ts"]
}
Step 6: Generate and run tests
Add these scripts to your package.json:
{
  "scripts": {
    "bddgen": "bddgen",
    "test": "npm run bddgen && npx playwright test"
  }
}
Now run the tests:
npm testThe bddgen command converts your .feature files into Playwright spec files, and playwright test executes them.
Tip
Install the Cucumber (Gherkin) Full Support VS Code extension for syntax highlighting, auto-complete, and step definition navigation in your feature files.
Writing your first Gherkin feature file and step definitions
With the project set up, let's write a real feature file and connect it to Playwright actions through step definitions.
The feature file
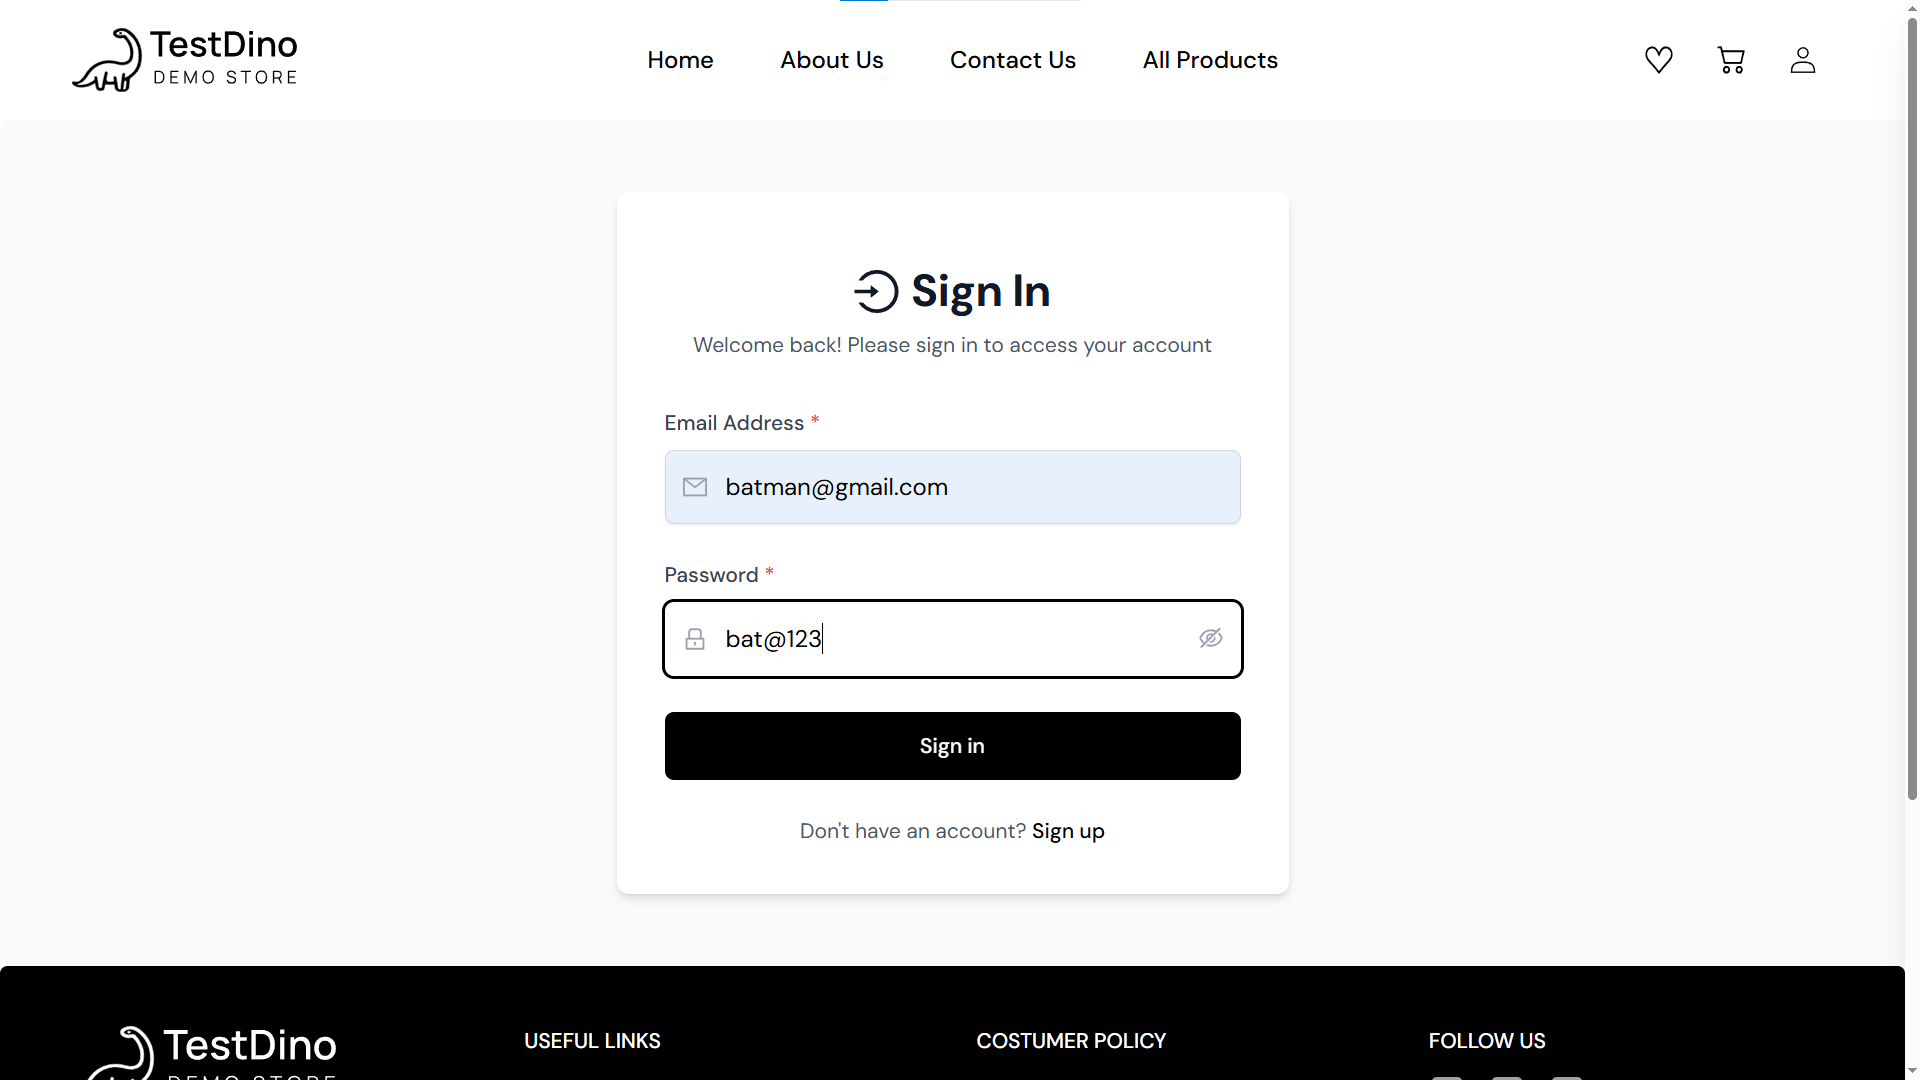
Create features/login.feature:
Feature: User authentication on TestDino Store
  Background:
    Given the user navigates to the login page
  Scenario: Login with valid credentials
    When the user enters email "[email protected]"
    And the user enters password "bat@123"
    And the user clicks the sign in button
    Then the user should see the homepage
  Scenario: Login with invalid credentials
    When the user enters email "[email protected]"
    And the user enters password "wrongpass"
    And the user clicks the sign in button
    Then an error message "Invalid email or password" should appear
The Background block runs before every scenario in the file. It is perfect for shared setup steps.


The step definitions file
Create steps/login.steps.ts:
import { createBdd } from "playwright-bdd";
import { LoginPage } from "../pages/LoginPage";
const { Given, When, Then } = createBdd();
Given("the user navigates to the login page", async ({ page }) => {
  const loginPage = new LoginPage(page);
  await loginPage.navigate();
});
When("the user enters email {string}", async ({ page }, email: string) => {
  const loginPage = new LoginPage(page);
  await loginPage.fillEmail(email);
});
When('the user enters password {string}', async ({ page }, password: string) => {
  await page.getByLabel('Password').fill(password);
});
When("the user clicks the sign in button", async ({ page }) => {
  const loginPage = new LoginPage(page);
  await loginPage.clickSignIn();
});
Then("the user should see the homepage", async ({ page }) => {
  const loginPage = new LoginPage(page);
  await loginPage.expectHomepage();
});
Key things to notice
The { page } fixture is injected automatically by Playwright's test runner through playwright-bdd.
Parameterized steps like {string} let you reuse the same step definition with different data.
Assertions use Playwright's built-in expect() with web-first assertions that auto-retry until the condition is met.
Note: Step definitions should stay thin. Keep Playwright interaction logic in Page Object classes and call those from your step definitions. This keeps your steps reusable and your tests maintainable as the suite grows.
Using data tables for multiple inputs
Gherkin also supports Scenario Outlines for data-driven tests:
// features/Example.feature
Scenario Outline: Login attempts with various credentials
    When the user enters email "<email>"
    And the user enters password "<password>"
    And the user clicks the sign in button
    Then the result should be "<result>"
    Examples:
      | email               | password    | result             |
      | [email protected]    | bat@123     | homepage visible   |
      | [email protected]     | wrongpass   | error message      |
      | [email protected]     | admin@1234  | homepage visible   |
This runs the same scenario three times with different data sets, following the same pattern used in Playwright browser testing parameterized workflows.
Page Object Model integration with Playwright BDD
Raw step definitions that contain all locators and page interactions get messy fast. The Page Object Model (POM) keeps your BDD framework scalable.
Why POM matters in BDD
Without POM, every step definition file carries its own locators. If the UI changes (a button label, a form field ID), you fix it in every step file that touches that element.
With POM, locators live in one place. Step definitions simply call methods on page objects.
Creating a page object
// pages/LoginPage.ts
import { Page, expect } from '@playwright/test';
export class LoginPage {
  constructor(private page: Page) {}
  async navigate() {
    await this.page.goto('https://storedemo.cms.testdino.com/login');
  }
  async fillEmail(email: string) {
    await this.page.getByLabel('Email Address').fill(email);
  }
  async fillPassword(password: string) {
    await this.page.getByLabel('Password').fill(password);
  }
  async clickSignIn() {
    await this.page.getByRole('button', { name: 'Sign in' }).click();
  }
  async expectHomepage() {
    await expect(this.page.getByText('Demo E-commerce Testing Store')).toBeVisible();
  }
  async expectError(message: string) {
    await expect(this.page.getByText(message)).toBeVisible();
  }
}
Updating step definitions to use POM
// steps/login.steps.ts
import { createBdd } from 'playwright-bdd';
import { LoginPage } from '../pages/LoginPage';
const { Given, When, Then } = createBdd();
Given('the user navigates to the login page', async ({ page }) => {
  const loginPage = new LoginPage(page);
  await loginPage.navigate();
});
When('the user enters email {string}', async ({ page }, email: string) => {
  const loginPage = new LoginPage(page);
  await loginPage.fillEmail(email);
});
When('the user clicks the sign in button', async ({ page }) => {
  const loginPage = new LoginPage(page);
  await loginPage.clickSignIn();
});
Then('the user should see the homepage', async ({ page }) => {
  const loginPage = new LoginPage(page);
  await loginPage.expectHomepage();
});
Tip: For larger projects, use Playwright's custom fixtures to inject page objects automatically. This avoids creating new LoginPage instances in every step. The playwright-bdd docs have a dedicated section on custom fixtures with BDD.
Playwright BDD vs Cypress BDD vs Selenium Cucumber
Choosing a BDD framework depends on your team's tech stack, browser requirements, and pipeline setup. Here is how the three most popular options stack up.
| Feature | Playwright BDD | Cypress BDD | Selenium Cucumber |
|---|---|---|---|
| BDD Integration | playwright-bdd generates native Playwright tests | cypress-cucumber-preprocessor | Cucumber.js / Cucumber-JVM drives execution |
| Browser engines | Chromium, Firefox, WebKit | Chromium-based only (Electron, Chrome, Edge) | All via WebDriver |
| Parallel execution | Built-in with workers and sharding | Requires Cypress Cloud or third-party | Depends on test runner (TestNG/JUnit) |
| Language support | TypeScript, JavaScript, Python, Java, C# | JavaScript, TypeScript | Java, JavaScript, Ruby, Python, C# |
| Multi-tab/window support | Yes, native | Yes, via WebDriver | |
| Auto-waiting | Built-in actionability checks | Built-in retry-ability | Requires explicit waits |
| Trace and debug tools | Trace Viewer, screenshots, video | Time-travel debugger, screenshots | Manual setup required |
| Speed (headless) | Fast (out-of-process protocol) | Fast (in-browser execution) | Slower (HTTP-based WebDriver protocol) |
| Community BDD support | Growing (playwright-bdd: 1,100+ GitHub stars) | Mature (cypress-cucumber-preprocessor) | Very mature (10+ years) |
When to pick Playwright BDD
-
Your team needs real cross-browser coverage (especially Safari via WebKit).
-
You want parallel execution and sharding without paying for a cloud service.
-
You are already using Playwright for component testing or API testing and want BDD on top.
When Cypress BDD might be a better fit
-
Your project is purely Chromium-based and your team is already productive with Cypress.
-
The time-travel debugging experience is critical for your dev workflow.
When Selenium Cucumber still makes sense
-
Your organization has years of investment in Selenium infrastructure.
-
You need to test on real mobile devices via Appium integration.
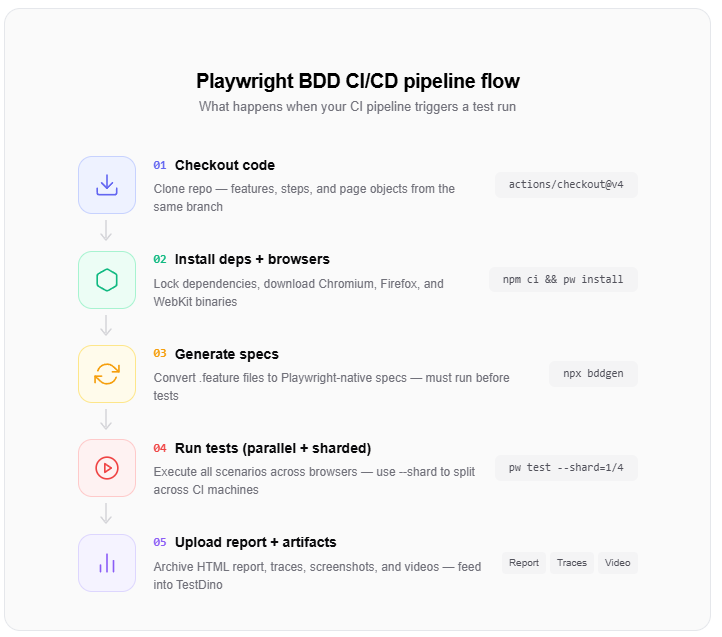
Running Playwright BDD tests in CI/CD pipelines
Writing BDD tests locally is only half the value. The real payoff comes when they run automatically on every pull request.
GitHub Actions example
Here is a workflow file that runs your Playwright BDD tests on every push:
# .github/workflows/playwright-bdd.yml
name: Playwright BDD Tests
on:
  push:
    branches: [main]
  pull_request:
    branches: [main]
jobs:
  test:
    runs-on: ubuntu-latest
    steps:
      - uses: actions/checkout@v4
      - uses: actions/setup-node@v4
        with:
          node-version: 20
      - run: npm ci
      - run: npx playwright install --with-deps
      - run: npm run bddgen
      - run: npx playwright test
      - uses: actions/upload-artifact@v4
        if: always()
        with:
          name: playwright-report
          path: playwright-report/
Key CI considerations
- Browser installation: npx playwright install --with-deps installs system-level dependencies needed for browser binaries in CI.
- Artifact upload: Always upload the report folder so you can inspect failures after the pipeline completes.
- Sharding for speed: For large BDD suites, split execution across multiple CI jobs:
strategy:
  matrix:
    shard: [1/4, 2/4, 3/4, 4/4]
steps:
  - run: npx playwright test --shard=${{ matrix.shard }}
For a deeper guide on pipeline optimizations, check out Playwright CI/CD integrations with GitHub Actions, Jenkins, and GitLab CI.
Note: When using sharding with playwright-bdd, make sure you run bddgen before the shard step so every shard has access to the generated spec files. Put the generation step before the matrix strategy kicks in.
Using tags to control what runs in CI
You can tag Gherkin scenarios and filter them during execution:
// Feature file with tags
@smoke
Scenario: Login with valid credentials
    Given the user navigates to the login page
    When the user enters email "[email protected]"
    ...
@regression
Scenario: Login with expired session
    Given the user has an expired session token
    ...
Then run only smoke tests in your PR pipeline:
npx playwright test --grep "@smoke"This is the same tag-based approach covered in the Playwright annotations and grouping Playwright tests guides, applied through Gherkin tags instead of test.describe labels.
Debugging failures with Trace Viewer
When a BDD scenario fails in CI, trace files give you a step-by-step replay of what happened. Enable tracing in your config:
use: {
  trace: 'on-first-retry',
}
Download the trace artifacts after the pipeline run and open them with:
npx playwright show-trace trace.zipThe Playwright Trace Viewer shows you the exact DOM state, network requests, and console logs at the moment each step executed.
Hooks, fixtures, and advanced patterns
Once the basics are in place, Playwright BDD supports patterns that help at scale.
Before and After hooks
Use hooks to run setup and teardown logic around scenarios:
// tests/example.spec.ts
import { createBdd } from 'playwright-bdd';
const { Before, After } = createBdd();
Before(async ({ page }) => {
  // Runs before each scenario
  await page.goto('https://storedemo.cms.testdino.com');
});
After(async ({ page }, testInfo) => {
  // Capture a screenshot if the scenario failed
  if (testInfo.status !== 'passed') {
    await page.screenshot({ path: `screenshots/${testInfo.title}.png` });
  }
});
Tagged hooks
You can scope hooks to specific tags so they only run for matching scenarios:
Before({ tags: '@auth' }, async ({ page }) => {
  // Login setup only for @auth scenarios
  await page.goto('https://storedemo.cms.testdino.com/login');
  await page.getByLabel('Email Address').fill('[email protected]');
  await page.getByLabel('Password').fill('bat@123');
  await page.getByRole('button', { name: 'Sign in' }).click();
});
Custom fixtures for shared state
For complex setups where multiple step files need shared context (like an authenticated user session), create custom Playwright fixtures:
// fixtures.ts
import { test as base } from 'playwright-bdd';
import { LoginPage } from './pages/LoginPage';
export const test = base.extend<{ loginPage: LoginPage }>({
  loginPage: async ({ page }, use) => {
    const loginPage = new LoginPage(page);
    await use(loginPage);
  },
});
Then reference loginPage directly in your step definitions without creating new instances.
Fixtures in Playwright are reusable setup/teardown blocks that provide dependencies (like page objects, API clients, or test data) to tests automatically. In a BDD context, they let step definitions share state across steps within a scenario without global variables.
Common errors and how to fix them
Here are issues teams run into most often when setting up Playwright BDD:
- "No step definitions found" - Your steps glob in defineBddConfig does not match the actual file paths. Double-check the pattern and folder names.
- bddgen output is stale - You changed a .feature file but forgot to re-run bddgen. Always run it before playwright test, or chain both in your npm script.
- Duplicate step definitions - Two step files define the same Gherkin phrase. Use scoped step definitions (available in playwright-bdd v8+) to isolate steps per feature.
- TypeScript compilation errors - Make sure tsconfig.json includes your steps/ directory and that moduleResolution is set to NodeNext.
Tip
Tip: Run npx bddgen --verbose to see exactly which feature files and step definitions are being matched. This saves significant debugging time when steps silently fail to bind.
TestDino's Playwright AI Codegen workflow can speed up the initial step definition creation. You record a flow in the browser, and AI refactors the generated code into clean, POM-ready step definitions.
Conclusion
Playwright BDD brings human-readable scenarios and real browser automation together in a way that actually works in practice. Business stakeholders see tests they can read. Developers keep the full power of Playwright's engine. And QA engineers get a framework where coverage is visible to everyone.
The setup is straightforward:
-
Install playwright-bdd alongside @playwright/test
-
Write .feature files in Gherkin
-
Create step definitions that map to Playwright actions
-
Use POM to keep things scalable
-
Run everything in CI with sharding and traces
The BDD workflow adds a few minutes of scenario-writing upfront, but it pays back in fewer miscommunication bugs, clearer test coverage, and a test suite that business and engineering teams trust equally.
If you are already using Playwright, adding BDD is not a rewrite. It is a layer that makes your tests readable, reviewable, and connected to the actual requirements your team cares about.
FAQs

Dhruv Rai
Product & Growth Engineer