Playwright Annotations Guide: Advanced Test Control Techniques
Playwright annotations let you label, skip, or mark tests with context so you control what runs and keep reports clean without editing test logic.
Playwright lets you attach small notes to a test, like "run this one first" or "do not run this one right now", and those notes show up in the results.
When your test suite gets bigger, control becomes messy. People start editing tests just to choose what runs, and the report fills with noise from tests everyone already knows are broken.
This guide shows how to use Playwright annotations to control runs without hacks. You will learn how to label tests, skip some safely, and mark expected failures so results stay clean.
What are Playwright Annotations and why care?
Playwright Annotations are metadata markers you attach to tests to control how Playwright Annotations run and what shows up in your reports.
Each annotation takes a type and an optional description, so you can record things like a linked issue or a reason for skipping directly in the test. That keeps the context close to the code, where it is actually useful.
Playwright ships with built in annotations like skip, fail, fixme, and slow, and it also lets you add your own custom annotations that appear in the test report and are accessible to reporters. Tags are part of the same family of ideas, but Playwright Annotations are used primarily for grouping and filtering. Yes, they both show up in reports, and yes, people still misuse them with confidence.
How annotations show up under the hood
Note: The structured tag and annotation fields in the test details object require Playwright Test 1.42 or newer. If you are on an older version, use title tags and runtime testInfo.annotations until you upgrade.
Annotations are available in two places you will care about:
- Test declaration time, via the annotation field on the test details object.
- Runtime, via testInfo.annotations during execution.
Annotations have a type and an optional description. That is it. If you are trying to cram a novel into description, your future self would like a word.
How do Playwright tags work in practice?
Playwright tags are lightweight labels that let you group and filter tests without creating a second test suite. They must start with @, which is Playwright politely stopping you from inventing thirty formats in the same repo.
You can add tags in two ways:
- In the test title using @tag tokens.
- In the test details object using tag, as a string or list.
The tags are shown in the Playwright report and can be filtered during execution using --grep or config grep settings.
The two tag styles, and which one to pick
Title tags are fast and obvious:
- Pro: easy to scan in code review.
- Con: people forget to keep tags at the end, and grep becomes annoying.
Details object tags are cleaner for tooling:
- Pro: structured and easier to standardize.
- Con: slightly more typing, which is apparently a crime in some teams.
Minimal example:
import { test, expect } from '@playwright/test';
test('login works', { tag: ['@smoke', '@auth'] }, async ({ page }) => {
  await page.goto('/login');
  await expect(page).toHaveURL(/login/);
});
That snippet is short because it is meant to be copied, not admired.
Filtering with grep without summoning regex demons
Tags are filtered using regex, because engineers love choosing pain. The good news is Playwright shows the recommended patterns:
- Run @fast: npx playwright test --grep @fast
- Run either @fast or @slow: npx playwright test --grep "@fast|@slow"
- Run both: npx playwright test --grep "(?=.*@fast)(?=.*@slow)"
Two power moves people forget:
- Exclude a tag: npx playwright test --grep-invert @slow
- Skip tests without touching code: put @quarantine on the title, then run with --grep-invert @quarantine
Tag and grep cheat sheet
| What you want | Command | Notes |
|---|---|---|
| Run a tag | npx playwright test --grep @smoke | Simple and fast |
| Run one of many tags | npx playwright test --grep "@smoke|@critical" | Use OR |
| Run tests that have both tags | npx playwright test --grep "(?=.*@api)(?=.*@critical)" | Regex lookahead |
| Exclude a tag | npx playwright test --grep-invert @quarantine | Great for quarantined tests |
| Run everything except slow | npx playwright test --grep-invert @slow | Keeps local runs snappy |
| Target a suite tag | npx playwright test --grep @billing | Works when tags are on describe too |
If your tag system forces people to write lookaheads daily, your tag system is the problem. Keep tags meaningful and few.
A sane tag taxonomy that scales
A good taxonomy is boring on purpose:
-
@smoke for a short, confidence building set
-
@regression for broad coverage
-
@critical for tests that block release
-
@api, @ui, @db for surface area
-
@vrt for visual checks
Pick 6 to 12 tags max. If your list looks like a menu at a 40 page restaurant, nobody is eating there.
Sane tag taxonomy table
| Tag | Meaning | Run cadence | Runtime budget | Owner required |
|---|---|---|---|---|
| @smoke | Quick confidence checks | Every push | Under 5 minutes | |
| @critical | Release blockers | Every pull request | Under 15 minutes | |
| @regression | Broad coverage | Nightly | Flexible | Optional |
| @api | API level tests | PR and nightly | Flexible | Optional |
| @ui | UI flows | PR and nightly | Flexible | Optional |
| @db | Data layer coverage | Nightly | Flexible | Optional |
| @vrt | Visual tests | Nightly or on demand | Flexible | |
| @quarantine | Known unstable tests | Never by default | Not applicable |
Built in annotations you should actually use
Playwright includes built in annotations that control test behavior and timeouts. Use them like circuit breakers, not like confetti.uilt in annotations that control test behavior and timeouts. Use them like circuit breakers, not like confetti.
Focus and skip, the two most abused buttons
- test.only() focuses the test, which is great locally and a disaster if it leaks into CI.
- test.skip() skips the test and does not run it. Use it when the test does not apply to a config.
If you push test.only to main, please do not blame the CI. It is not sentient. Yet.
Fail and fixme, when reality disagrees with your roadmap
These two look similar, but behave differently:
- test.fail() runs the test and expects it to fail. If it passes, Playwright complains.
- test.fixme() does not run the test and marks it as needing attention.
Use fail when you want coverage plus honesty. Use fixme when running the test is slow, crashes, or is currently an emotional hazard.
Slow, the polite way to admit timing is hard
test.slow() triples the test timeout. It is for genuinely slow tests, not for "my locator is flaky so I will just raise timeouts until the heat death of the universe."
Conditional annotations. Yes, you can do that
Conditional skip is one of the most useful patterns for cross browser and environment differences:
import { test } from '@playwright/test';
test('feature works', async ({ browserName }) => {
  test.skip(browserName === 'firefox', 'Known issue on Firefox');
  // test body...
});
This is not cheating. This is documenting reality, with a reason, in the same place the failure would otherwise live forever.
Step by step guide to using Playwright tags in test suites
This is the ## Run the right tests using tags step by step
This is the step by step workflow you can hand to a teammate without them asking you "but why" every 30 seconds. It is optimized for speed, clarity, and not ruining CI.
Step 1: Define a tag contract
Decide what each tag means and when it is allowed:
-
@smoke must run under 5 minutes
-
@critical must be stable and have clear ownership
-
@regression is allowed to be long, but not flaky
Write it down in a short TEST_TAGS.md. Keep it short enough to fit in one screen, or it will become folklore.
Step 2: Add tags where they belong
Add tags to tests that match the contract. Prefer the details object for consistency:
import { test } from '@playwright/test';
test('checkout completes', { tag: ['@critical', '@ui'] }, async ({ page }) => {
  // ...
});
If you choose title tags, keep them at the end, always. Your grep patterns will thank you.
Step 3: Tag suites, not just individual tests
If a whole group shares a tag, apply it at the describe level:
import { test } from '@playwright/test';
test.describe('billing', { tag: '@billing' }, () => {
  test('invoice renders', async ({ page }) => { /* ... */ });
});
This reduces repetition and avoids "oops I forgot the tag on half the tests" syndrome.
Step 4: Run locally with grep like you mean it
Use grep to select the set you want:
- Quick confidence: npx playwright test --grep @smoke
- Only billing: npx playwright test --grep @billing
If you need combinations, do it, but treat complex regex as a smell. If it reads like ancient runes, simplify tags instead.
Step 5: Enforce the contract in CI
In CI, run different groups in different jobs:
-
Smoke on every push
-
Critical on every pull request
-
Regression nightly
If you are using config grep, you can pin a project to only certain tags. That keeps CI fast without turning your test suite into a choose your own adventure book.
Step 6: Audit tags before they rot
Once a month, sample your tags:
-
Are smoke tests still fast?
-
Are critical tests still stable?
-
Are there tags nobody uses?
Tags are like pantry items. If you do not check them, you will eventually find something from 2019 and pretend it is fine.
Quick decision map: tags vs annotations vs hooks
If you are unsure what to use, this is the cheat code.
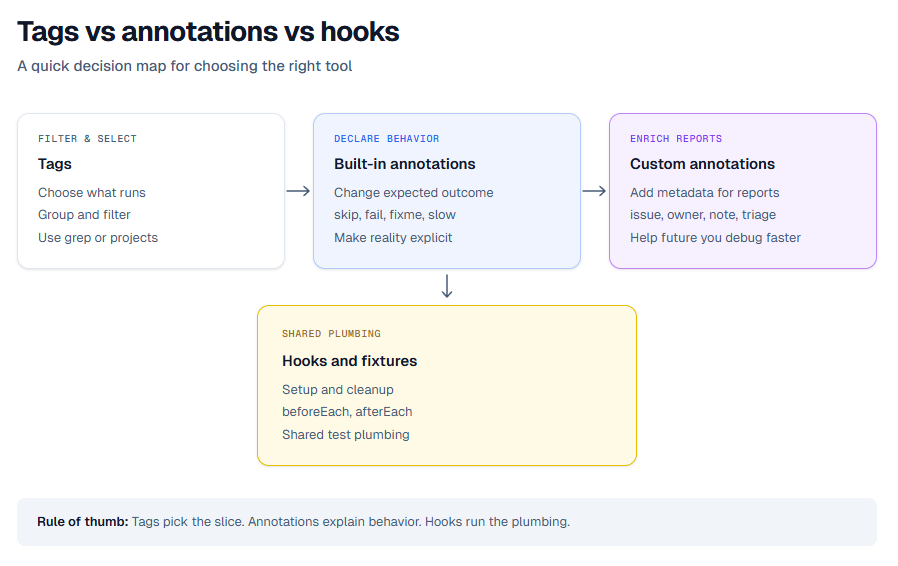
One line summary: tags decide what runs, annotations decide how it runs and what it means, hooks decide what happens around it.
Annotations vs hooks. Pick the right weapon
Annotations and hooks are both powerful. They are also the reason many suites feel haunted.
Hooks are for setup and cleanup around execution. Annotations are for control and metadata about execution. When you use hooks to encode metadata, you create invisible rules. When you use annotations to manage setup, you create chaos with documentation.
Quick comparison
Use this as a quick mental model:
-
Skip based on condition: annotations, with a reason in code
-
Mark expected failures: annotations, test.fail
-
Increase timeout for slow tests: annotations, test.slow
-
Setup data for tests: hooks, beforeEach or fixtures
-
Attach artifacts: often hooks, usually afterEach
One sentence summary: hooks move the stage props, annotations write the playbill.
The two classic mistakes, and how to stop doing them
1. Skipping inside hooks without explanation
- Put the skip where the test is declared or inside the test with a clear message. Otherwise, you will waste time debugging "why did nothing run."
2. Using tags as a substitute for ownership
- @smoke is not an owner. It is a label. Ownership is a person or a team, and it belongs in an annotation like owner or an issue link.
Make annotations visible in reports and CI
A tag or annotation that nobody sees is just a private diary entry. Reporting is where these signals become useful.
Playwright exposes tags and annotations in reports, and it also makes them available to custom reporters. You can add annotations at declaration time, and you can add them at runtime via testInfo.annotations.
Add a custom annotation that connects to reality
This is the "link it to the ticket" pattern. It keeps context attached to the test forever:
import { test } from '@playwright/test';
test('refund flow', {
  annotation: { type: 'issue', description: 'JIRA-1234' },
}, async ({ page }) => {
  // ...
});You can use any type value. Pick a small set like issue, owner, note, and keep it consistent.
Add runtime annotations and attach artifacts
Sometimes you only know what matters after something fails. Runtime annotations and attachments help with that:
import { test } from '@playwright/test';
test.afterEach(async ({}, testInfo) => {
  if (testInfo.status !== testInfo.expectedStatus) {
    testInfo.annotations.push({ type: 'triage', description: 'Needs investigation' });
    await testInfo.attach('env', { body: process.env.CI ?? 'local', contentType: 'text/plain' });
  }
});
This works because testInfo.annotations is a list you can extend, and testInfo.attach() is the supported way to add attachments.
Centralize results when your suite gets big
Once you have hundreds of runs, your "reporting strategy" often becomes "search the CI logs and cry quietly." Centralizing reports is where things get calmer.
If you want to stream Playwright results during execution, TestDino's Node.js CLI provides tdpw test. If you prefer to upload reports after the run, it also supports tdpw upload for the report directory with optional HTML asset.
If you are already producing Playwright traces and HTML reports, you can also level up your debugging workflow by mastering the Playwright trace viewer and by treating your Playwright test report as data, not decoration.
Conclusion. Less chaos, more control
Playwright Annotation is not a fancy feature. It is an agreement between you and your future self about what matters, what should run, and what should be explained.
Use tags to slice execution cleanly. Use built in annotations to make reality explicit, and use custom annotations to keep ownership and context attached to the test where it belongs. Then make those signals visible in reports, so your team stops debugging by archaeology.
FAQs
References
-
Playwright Annotations: Annotations | Playwright
-
Playwright test API: Playwright Test | Playwright
-
Playwright TestInfo API: TestInfo | Playwright
-
TestDino CLI: TestDino CLI - TestDino Documentation
-
TestDino Getting started: Get Started - TestDino Documentation

Dhruv Rai
Product & Growth Engineer