Playwright Locators Guide: Every Locator Type Explained with Examples
Playwright locators are the foundation of stable automation. Learn every locator type, when to use them, and how to debug failures without adding manual waits.


Modern web apps load data late and re-render parts of the page often, so the element you want to click might not be ready or might change between steps.
Playwright locators are built for this and are the core of Playwright's auto waiting and retry behavior.
The pain is flaky tests caused by timing and actionability issues. Click happens too early, element is hidden, moving, disabled, or covered, so the test fails unless people start adding manual waits.
This guide fixes that by teaching a clear locator strategy. You will learn which built in locators to prefer, how to chain and filter for accuracy, and how to debug failures using Inspector and traces so your tests stay stable without timeout hacks.
What Are Locators?
Locators are objects that find elements on a page at the moment of interaction, not at the moment of definition. They automatically wait for elements to become visible, enabled, and stable before acting, which eliminates most timing related flaky tests without a single explicit wait.
How Locators Differ from Selectors
Most engineers start with selectors because every automation tool uses them. In Playwright, selectors still exist, but they are only the raw input. Locators are the modern layer you should build your test suite around.
Selectors are strings.
Locators are lazy, retrying objects built on top of selectors.
Here is the comparison that matters in day to day work.
| Point | Selector | Locator |
|---|---|---|
| Meaning | A text you write to find an element | A Playwright object you use to find and act on an element |
| Waiting | You often add waits yourself | Playwright waits automatically before actions |
| Retry | You handle retry yourself | Playwright retries until the timeout |
| Best for | Quick one time targeting | Stable clicks, fills, and assertions |
| When it finds | Usually when you first try to use it | Right when you click or assert |
| Narrowing | You make the selector longer | You chain and filter to be specific |
| Debug | Harder to understand what matched | Easier with Inspector and traces |
| Example | 'button.add' | page.getByRole('button', { name: 'Add to cart' }) |
Note: ElementHandles still have a place when you need to evaluate a specific node or read properties. For normal user style actions, locators are the default choice.
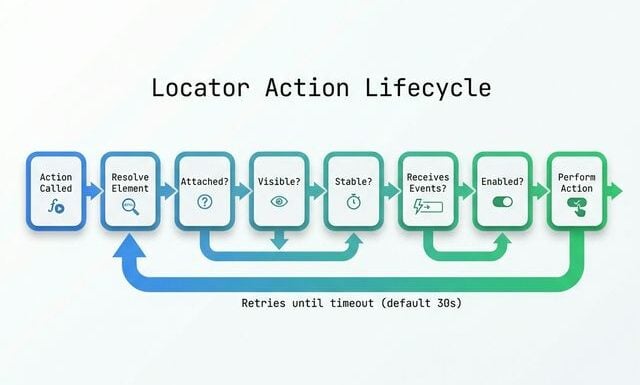
How Auto Waiting and Retry Work Under the Hood
When you call a locator action such as click, Playwright runs a series of actionability checks. This is why well written tests can avoid explicit waits.
You ask to click. Playwright checks whether clicking makes sense right now. If it does not, it waits and retries until it does or until the timeout ends.
Actionability checks you should understand:
Attached to DOM — The element exists and is not detached.
Visible — The element is not hidden and has a visible box.
Stable — The element is not moving due to animations or layout shifts.
Receives events — The element is not covered by another element that intercepts the click.
Enabled — The element is not disabled.
Built in Locator Types in Playwright
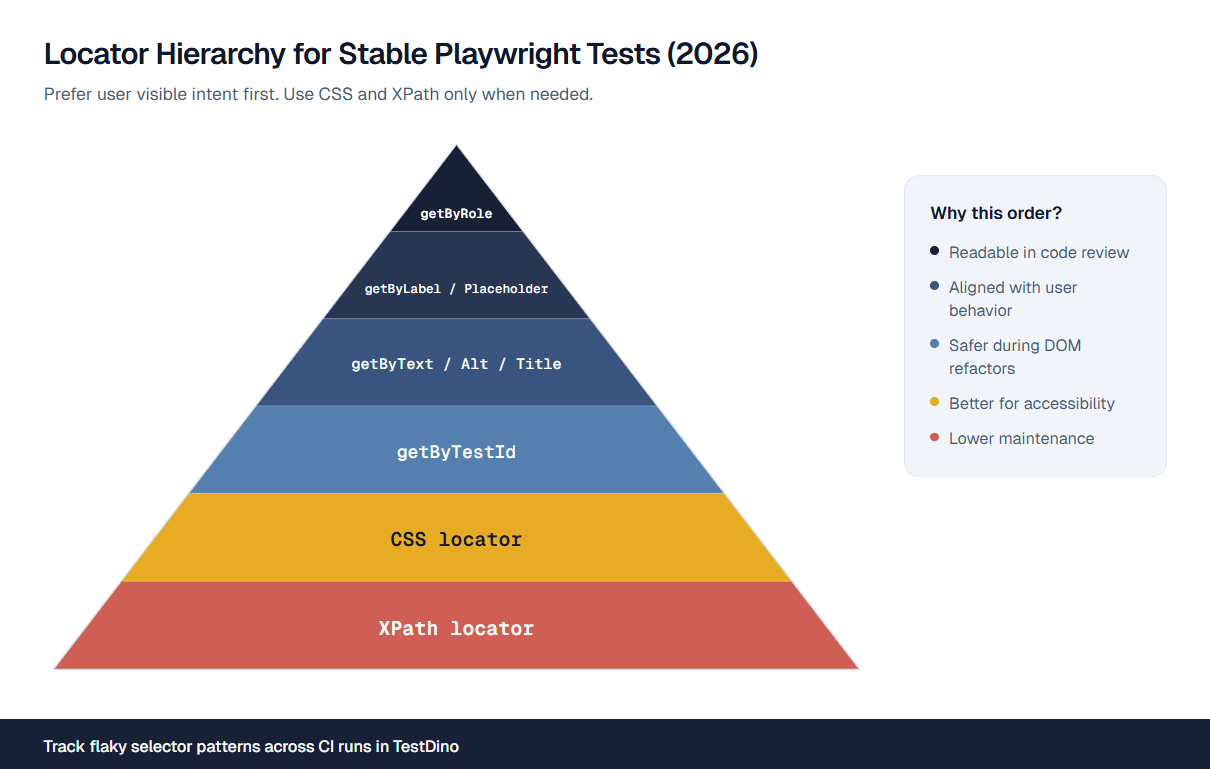
Playwright gives you seven built in locator methods that cover most stable automation needs. You can think of them as a ladder.
Start with the methods that match user intent. Only fall back to lower level targeting when you have a strong reason.
Playwright provides seven built in locator methods: getByRole, getByText, getByLabel, getByPlaceholder, getByAltText, getByTitle, and getByTestId. The official recommendation is to prefer getByRole first, fall back to getByText or getByLabel for form fields, and use getByTestId only when semantic locators are not possible.
All examples below are written to match patterns you will find in an ecommerce UI. If a label differs in storedemo, use Pick Locator to confirm the accessible name and swap it in.
1. getByRole: Locate by Accessibility Role
If you want one locator to standardize across a team, start here. Role based locators are easy to read in code review and hard to break during refactors.
Roles often come for free. A button element has role button even without an explicit role attribute. A link element has role link. Headings have role heading.
Common patterns:
// Product detail page: click Add to Cart button
await page.getByRole('button', { name: /add to cart/i }).click();
// Navigation: click a link by role
await page.getByRole('link', { name: /all products/i }).click();
// Assert a heading is visible
await expect(page.getByRole('heading', { name: /all products/i })).toBeVisible();
If your UI has filters, checkboxes are also easy to target:
const inStock = page.getByRole('checkbox', { name: /in stock/i });
if (await inStock.count()) {
  await inStock.check();
}
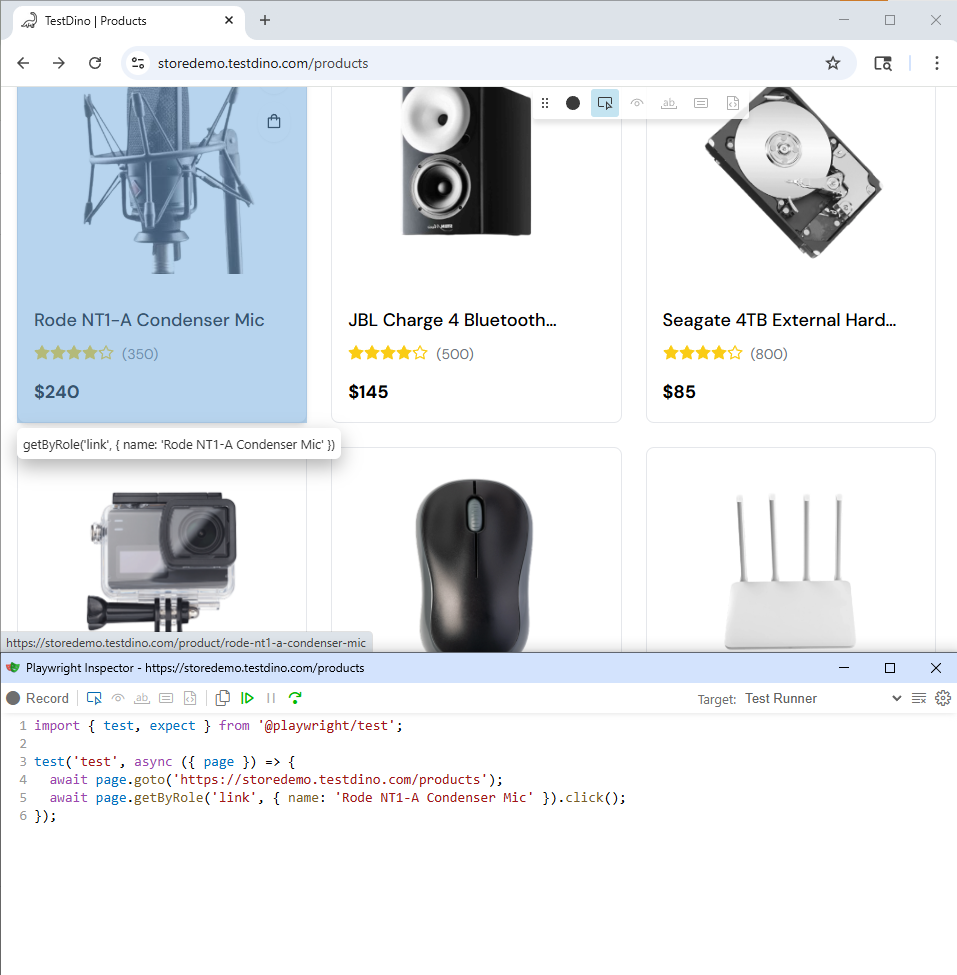
Exact matching matters when the UI contains similar labels:
await page.goto('https://storedemo.testdino.com/products');
await page.getByRole('link', { name: 'Rode NT1-A Condenser Mic' }).click();
2. getByText: Locate by Visible Text Content
Text locators are best for assertions and content checks. They can also be used for clicks, but use them carefully because text changes with localization, A B tests, and product copy edits.
Three matching styles you will use:
await expect(page.getByText('Added to cart', { exact: true })).toBeVisible();
await expect(page.getByText('Added', { exact: false })).toBeVisible();
await expect(page.getByText(/added\s+to\s+cart/i)).toBeVisible();
A common pitfall is matching the wrong element because a parent container includes the text. When this happens, scope first, then match text inside the scope.
const productCard = page.getByRole('listitem').filter({ hasText: 'Dino Plush' });
await expect(productCard.getByText('Dino Plush', { exact: true })).toBeVisible();
await productCard.getByRole('button', { name: /add to cart/i }).click();

Tip: If getByText matches too many elements, do not reach for nth immediately. Scope to a container, then search inside it.
3. getByLabel: Locate Form Controls by Label
If a field has a label, getByLabel is usually the strongest choice because it follows real accessibility relationships.
Playwright can resolve labels through:
- label for and id mapping
- label wrapping the input
- aria labelledby
Login form example:
await page.goto('https://storedemo.testdino.com/contact-us');
await page.getByLabel(/first name/i).fill('qa');
await page.getByLabel(/last name/i).fill('example');
await page.getByLabel(/subject/i).fill('Playwright locators');
await page.getByLabel(/your message/i).fill('Testing getByLabel on storedemo.');
await page.getByRole('button', { name: /send message/i }).click();

4. getByPlaceholder: Locate Inputs by Placeholder Text
Placeholders are a useful fallback, especially for search boxes. They are also less accessible than labels, so treat this as a second choice.
await page.goto('https://storedemo.testdino.com/products');
const search = page.getByPlaceholder(/search products/i);
await search.fill('headphones');
await search.press('Enter');
await expect(page.getByText(/headphones/i).first()).toBeVisible();
5. getByAltText: Locate Images and Areas
Alt text makes images accessible and testable. When alt text is meaningful, image targeting becomes stable.
await page.goto('https://storedemo.testdino.com/products');
// Product images have alt text matching their names
await page.locator('a[href*="/product/"]').first().click();
await expect(page.getByAltText(/rode|condenser|mic/i)).toBeVisible();
6. getByTitle: Locate by Title Attribute
Title attributes appear less often in modern apps, but they still show up in icon buttons and tooltip based UIs.
await page.getByTitle(/cart|open cart|settings/i).click();
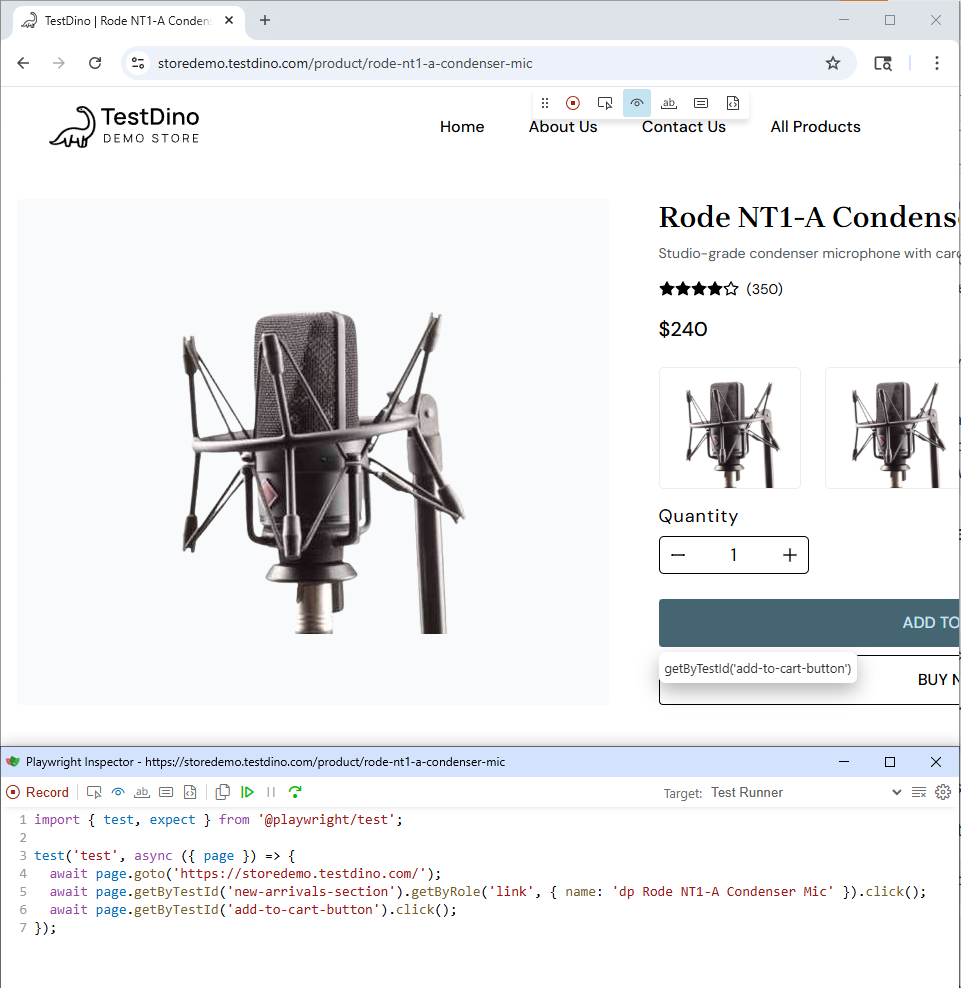
7. getByTestId: The Explicit Testing Contract
When semantic locators are not viable, test ids give you a stable contract. This does require coordination. QA cannot invent stability if the UI has no stable signals.
By default, getByTestId uses data-testid.
<button data-testid="add-to-cart-button">Cart</button>
await page.getByTestId('add-to-cart-button').click();
If your team already uses a different attribute, configure it once.
import { defineConfig } from '@playwright/test';
export default defineConfig({
  use: {
    testIdAttribute: 'data-pw'
  }
});
Note: If you add test ids, make them meaningful. Do not encode layout or styling. Encode intent, like checkout submit, cart open, product card, filter toggle.
CSS and XPath Locators in Playwright
Playwright supports CSS and XPath through page.locator. You can use them, but you should not treat them as equal alternatives to built in locators.
CSS and XPath follow DOM structure. Your users do not.
When the page layout changes but the button still does the same job, role and label locators usually keep working, but CSS or XPath paths often stop working.
Playwright supports CSS and XPath selectors through page.locator(), but the official recommendation is to avoid them as your primary locator strategy. CSS and XPath selectors are tied to DOM structure, which means they break when the UI changes, even if the user facing behavior stays identical.
Same element located three ways, in the order you should prefer:
await page.getByRole('button', { name: /add to cart/i }).first().click();
await page.locator('button:has-text("Add to cart")').first().click();
await page.locator('xpath=//button[contains(., "Add to cart")]').first().click();
1. CSS Selectors: Syntax and Practical Examples
Playwright adds CSS extensions that are worth learning:
-
has-text()
-
has()
-
visible
Examples you can adapt to storedemo:
await page.locator('button:has-text("Add to cart")').first().click();
const card = page.locator('article:has-text("Dino Plush")');
await card.locator('button:has-text("Add to cart")').click();
await page.locator('button:has-text("Add to cart"):visible').first().click();
await page.locator('[data-testid="cart-open"]').click();
2. XPath Selectors: When and Why to Use Them
XPath can traverse up to an ancestor. That can help in legacy markup, but it becomes hard to maintain if it grows into a long path.
A legitimate case:
const xpath =
  'xpath=//h3[contains(., "Dino Plush")]/ancestor::*[self::article or self::div][1]//button[contains(., "Add to cart")]';
await page.locator(xpath).click();
A more maintainable locator chain:
const product = page.locator('article').filter({ hasText: 'Dino Plush' });
await product.getByRole('button', { name: /add to cart/i }).click();
Filtering and Chaining Locators
Once you know each locator type, the next step is precision. Real pages contain repeated elements, similar buttons, and duplicated text. Filtering and chaining lets you stay strict without falling back to layout and index hacks.
Locator chaining in Playwright narrows the search scope by combining multiple locators, first finding a parent container, then locating a specific child within it. This produces precise, readable selectors without fragile CSS or XPath paths.
Filtering by Text and Child Locators
const productName = 'Dino Plush';
const product = page.getByRole('listitem').filter({ hasText: productName });
await product.getByRole('button', { name: /add to cart/i }).click();
await expect(page.getByRole('link', { name: /cart/i })).toBeVisible();
Filter by child locator:
const rowWithRemove = page.locator('tr').filter({
  has: page.getByRole('button', { name: /remove/i })
});
await expect(rowWithRemove).toBeVisible();
Filter by not having text:
const available = page.locator('article').filter({ hasNotText: /out of stock/i });
await expect(available.first()).toBeVisible();
Chaining Locators for Nested Elements
const card = page.locator('article').filter({ hasText: 'Dino Plush' });
await card.getByRole('button', { name: /add to cart/i }).click();
A form example that stays readable:
const checkout = page.getByRole('main');
await checkout.getByLabel(/email/i).fill('[email protected]');
await checkout.getByRole('button', { name: /continue|pay|place order/i }).click();
Which Locator Should You Use?
A good locator strategy is not a list of options. It is a ranked decision you can apply the same way every time.
The recommended Playwright locator priority is: (1) getByRole for interactive elements, (2) getByLabel for form fields, (3) getByText for static content, (4) getByTestId for elements without semantic attributes, (5) CSS and XPath only as a last resort for legacy DOM structures.
If your team wants a broader process around this, connect it to your testing standards. This is where end to end testing best practices helps reviewers enforce the same rules across the suite.
Common UI Elements and Their Best Locators
| UI element | Recommended locator | Example |
|---|---|---|
| Primary button | getByRole | page.getByRole('button', { name: /checkout/i }) |
| Navigation link | getByRole | page.getByRole('link', { name: /cart/i }) |
| Text input with label | getByLabel | page.getByLabel(/email/i) |
| Search input without label | getByPlaceholder | page.getByPlaceholder(/search/i) |
| Toast or banner message | getByText | page.getByText(/added to cart/i) |
| Product image or logo | getByAltText | page.getByAltText(/logo/i) |
| Icon with tooltip | getByTitle | page.getByTitle(/settings/i) |
| Custom widget | getByTestId | page.getByTestId('shipping-method') |
Debugging Locators That Do Not Work
When a locator fails, guessing wastes time. A fast debug loop is systematic. You reproduce, verify what the locator matches, then you fix the root cause.
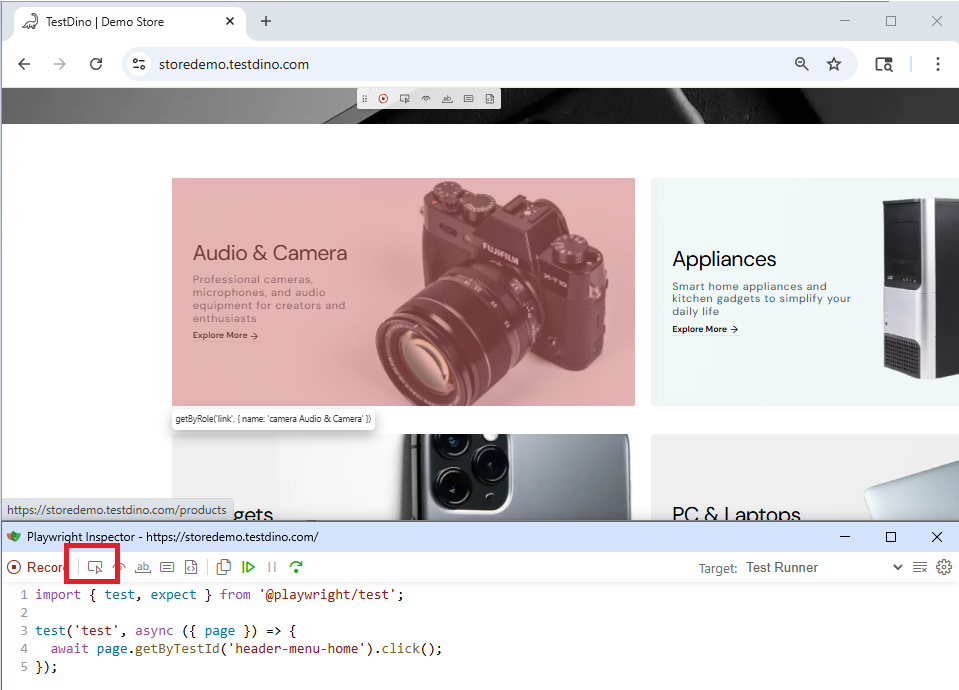
When a Playwright locator fails, use the Playwright Inspector with the debug flag to live edit locators and see which elements they match in real time. For intermittent failures, use the Trace Viewer to replay the exact DOM state at the moment of failure.
In the given below screenshot you can navigate to the Playwright inspector/pick locator
To enable the traces of your tests use the below command:
npx playwright show-trace path/to/trace.zip
At this point in the guide, the reader already understands the pain. If you want to turn every failing run into a quick fix, you need traces and history. TestDino helps teams track failures and rerun trends in one place.

Using Playwright Inspector to Test Locators
Step by step workflow:
1. Run the test in debug mode:
npx playwright test --debug
2. Use Pick Locator and click the element you want to target.
3. Compare the suggested locator with your locator.
4. If the locator matches multiple elements, scope it using a parent container and filter.
5. If the click fails, inspect the actionability log to see whether an overlay blocked it.
6. Use highlight to see exactly what the locator matches.
const addToCart = page.getByRole('button', { name: /add to cart/i });
await addToCart.highlight();
await addToCart.click();
Trace Viewer for Intermittent Locator Failures
Configure tracing and artifacts:
import { defineConfig } from '@playwright/test';
export default defineConfig({
  use: {
    trace: 'on-first-retry',
    screenshot: 'only-on-failure',
    video: 'retain-on-failure'
  }
});
Open the trace after a failure:
npx playwright show-trace test-results
How to read the trace:
-
Click the failing step
-
Inspect the DOM snapshot at that moment
-
Check whether the locator matches zero elements or too many
-
Check whether an overlay blocks the click
-
Update the locator policy, not just this single test
If you are actively reducing flakiness, flaky test detection helps you separate unstable selectors from real regressions.
Playwright Locator Best Practices
Every best practice below includes a wrong pattern and a better pattern.
The three most impactful Playwright locator best practices are:
(1) always prefer getByRole over CSS selectors,
(2) never use first or nth to resolve ambiguous locators, fix the locator instead, and
(3) use getByTestId as a stable fallback when semantic locators are not viable.
Practices That Prevent Flaky Tests
1. Prefer getByRole for interactive elements
Not that:
await page.locator('button.primary').click();
Do this:
await page.getByRole('button', { name: /checkout/i }).click();
2. Fix ambiguity instead of using nth by default
Not that:
await page.getByText('Edit').nth(2).click();
Do this:
const row = page.getByRole('row').filter({ hasText: '[email protected]' });
await row.getByRole('button', { name: /edit/i }).click();
3. Replace fixed waits with state based assertions
Not that:
await page.waitForTimeout(2000);
Do this:
await expect(page.getByText(/added to cart/i)).toBeVisible();
4. Avoid storing broad locators across navigation
Not that:
const button = page.locator('button');
await page.goto('https://storedemo.testdino.com/checkout');
await button.click();
Do this:
await page.goto('https://storedemo.testdino.com/checkout');
await page.getByRole('button', { name: /continue|pay/i }).click();
5. Scope before you click
Not that:
await page.getByText('Add to cart').click();
Do this:
const card = page.getByRole('listitem').filter({ hasText: 'Dino Plush' });
await card.getByRole('button', { name: /add to cart/i }).click();
Practices That Improve Test Maintainability
A maintainable suite is also about where you put locators so the whole suite benefits.
A practical pattern is a small Page Object that exposes intent based actions.
import { Page, Locator } from '@playwright/test';
export class StorePage {
  readonly page: Page;
  readonly cartLink: Locator;
  readonly searchBox: Locator;
  constructor(page: Page) {
    this.page = page;
    this.cartLink = page.getByRole('link', { name: /cart/i });
    this.searchBox = page.getByPlaceholder(/search/i);
  }
  productCard(name: string) {
    return this.page.getByRole('listitem').filter({ hasText: name });
  }
  async addToCart(productName: string) {
    await this.productCard(productName)
      .getByRole('button', { name: /add to cart/i })
      .click();
  }
}
If you want to evaluate stability at the suite level, start with Playwright test reports and keep your review process consistent.
Generating Locators with Playwright Codegen
Codegen is best used as a discovery tool. Use it to learn what Playwright thinks is stable, then refactor the output to match your policy.
Playwright's codegen tool automatically generates locators by analyzing the page and choosing the most stable selector, prioritizing role, text, and test id locators over CSS. Use it as a discovery tool, then refactor the output to follow locator best practices.
Step by step:
1. Launch codegen against the demo store:
npx playwright codegen https://storedemo.testdino.com/
2. Record one realistic flow:
-
Search for a product
-
Add to cart
-
Open cart
-
Start checkout
3. Copy the generated code into a new spec file.
4. Refactor the locators:
-
Replace long CSS chains with getByRole and scoping
-
Replace nth with chaining and filter
-
Move repeated patterns into a Page Object
Before:
await page.locator('text=Cart').click();
await page.locator('button:has-text("Add to cart")').nth(0).click();
After:
await page.getByRole('link', { name: /cart/i }).click();
await page.getByRole('button', { name: /add to cart/i }).first().click();
Conclusion
Your Playwright suite is only as stable as its locators. Treat selectors as a strategy, not strings.
Default to intent based locators: getByRole() for interactive elements, getByLabel() for form fields, and getByText() mostly for assertions. Use getByTestId() when semantics are missing. Keep CSS and XPath last, and keep them scoped.
If a locator is ambiguous, scope and chain it instead of using first() or nth(). Pair it with web first assertions so Playwright waits correctly instead of relying on timeouts.
Debug the same way every time: Inspector, confirm matches, actionability log, then traces for intermittent failures.
Next step: pick one critical flow, rewrite its locators using this order, and make it your team standard.
Frequently Asked Questions
Table of content
Flaky tests killing your velocity?
TestDino auto-detects flakiness, categorizes root causes, tracks patterns over time.
Follow Us