Playwright Test Automation: The Complete Guide for QA Teams
Playwright test automation lets you run fast, reliable E2E tests across Chrome, Firefox, and Safari. This guide covers setup, selectors, auto-wait, POM, parallel execution, CI/CD integration, and debugging strategies with real code examples.


The testing landscape shifted in 2024, when Playwright's weekly npm downloads crossed 33 million and overtook Cypress for the first time, according to npm trends data. That gap has only widened through 2025 and into 2026. QA teams are actively re-evaluating which framework keeps up with their CI/CD speed and cross-browser goals.
The pain point is familiar: E2E tests pass locally, but half of them fail in CI with timeout errors or selector mismatches. Debugging means adding sleep calls, guessing at wait conditions, and running the same pipeline four times.
This guide covers Playwright test automation from project setup to CI/CD deployment with real config files and code examples. Every recommendation is grounded in the official Playwright documentation and validated against real CI pipelines.
Prerequisites: You need Node.js 18+ and npm 8+ installed. All examples use TypeScript and Playwright v1.50+. Prior experience with any E2E testing framework is helpful but not required.
What is Playwright test automation?
Playwright test automation is the practice of using Microsoft's open-source Playwright framework to write, execute, and manage end-to-end tests that run natively across Chromium, Firefox, and WebKit browsers through a single, unified API.
Playwright is an open-source Node.js library created by Microsoft in 2020. It communicates directly with browser engines through native protocols instead of intermediate drivers. As of early 2026, the Playwright GitHub repository has over 70,000 stars.
Playwright communicates directly with browser engines using the Chrome DevTools Protocol (for Chromium) and equivalent internal protocols for Firefox and WebKit. This architecture eliminates entire categories of flaky behavior that plagued older tools.
Key features that set Playwright apart
Playwright meets the needs of modern Agile and DevOps teams through several progressive features:
-
Cross-browser compatibility. Automated testing with Playwright covers Chromium (Chrome, Edge), Firefox, and WebKit (Safari) from a single test script.
-
Cross-platform capability. Tests run locally, on CI, and across Windows, Linux, and macOS without modification.
-
Multi-language support. Write tests in TypeScript, JavaScript, Python, Java, or .NET - the API is consistent across all bindings.
-
Codegen. Run npx playwright codegen to record user actions and output ready-to-run test code in any supported language. Teams using Playwright AI codegen take this further with intelligent test generation.
-
Playwright Inspector. Step through test execution action by action, inspect selectors, view click points, and debug failures visually with npx playwright test --debug.
-
Trace Viewer. Replay failed tests with full DOM snapshots, network logs, and a visual filmstrip of every step.
-
Automatic waiting. Playwright waits for elements to be actionable before performing any interaction, eliminating the Thread.sleep() anti-pattern entirely.
-
Built-in reporting. List, Line, Dot, HTML, JSON, JUnit, and blob reporters ship out of the box. No third-party plugins required.
-
Video and screenshot capture. Record test execution as video or capture screenshots on failure for rapid visual debugging.
-
Parallel execution. Run tests across multiple worker processes and shard across CI agents without any external grid infrastructure.
These features make Playwright the preferred framework for teams automating end-to-end testing of modern web applications. The rest of this guide shows you how to configure each one for production use.
What makes Playwright different from Selenium and Cypress
Most teams compare what they already use against newer tools. Understanding the Playwright architecture explains why the framework behaves differently under pressure.
The architecture that makes cross-browser testing reliable
Selenium uses the WebDriver protocol where each command round-trips through an HTTP layer to a driver binary. Each browser needs its own driver, adding latency and maintenance overhead.
Playwright communicates directly with browser engines through the Chrome DevTools Protocol (for Chromium) and equivalent protocols for Firefox and WebKit. There is no driver binary in between.
This means three things for your Playwright test automation suite:
-
Lower latency per action. No HTTP overhead per click, fill, or assertion.
-
True cross-browser from one API. Chrome, Firefox, and Safari (via WebKit) all ship as part of the Playwright install. No additional driver management.
-
Full control over browser contexts. Each test gets an isolated BrowserContext - lighter than a full browser instance but completely sandboxed for cookies, storage, and permissions.
Cypress runs inside the browser using JavaScript injection, giving it deep DOM access but limiting it to Chromium-based browsers. It cannot natively handle multi-tab, multi-origin, or iframe scenarios the way Playwright can.
| Feature | Playwright | Selenium | Cypress |
|---|---|---|---|
| Browser communication | Direct protocol (CDP/internal) | WebDriver HTTP | In-browser JS injection |
| Cross-browser support | Chromium, Firefox, WebKit | All browsers via drivers | Chromium, limited Firefox |
| Language support | JS/TS, Python, Java, .NET | Java, Python, C#, JS, Ruby | JS/TS only |
| Auto-waiting | Built-in actionability checks | Manual explicit/implicit waits | Built-in retry-ability |
| Multi-tab/multi-origin | Native support | Supported with workarounds | Limited |
| Parallel execution | Built-in workers + sharding | Selenium Grid required | Cypress Cloud or third-party |
| Test isolation | BrowserContext per test | New browser instance | Page reload between tests |
| Native mobile testing | Emulation only | Appium integration | Not supported |
For teams ready to transition from an older framework, the Selenium to Playwright migration guide covers the full phased approach.
When to choose Playwright over alternatives, and when not to
Playwright is the stronger choice when your team:
-
Needs real cross-browser coverage (Chrome, Firefox, Safari)
-
Runs 50+ tests in CI and needs built-in parallel execution
-
Works with multi-tab flows, iframes, or popup-heavy applications
-
Uses TypeScript or Python as their primary language
-
Wants built-in debugging tools (Trace Viewer, Inspector) without third-party setup
Selenium remains the better fit when you need native mobile testing through Appium or must support legacy browsers. Cypress is worth considering if your tests are purely Chromium-based and you value its interactive test runner.

The setup step most guides skip that saves hours later
Most Playwright tutorials stop at npm init playwright@latest. That gets a working project, but it leaves configuration gaps that surface later when your suite grows.
Installing Playwright and configuring your test project
Start with the scaffold command:
npm init playwright@latest
This creates playwright.config.ts, a tests/ folder with a sample spec, and installs browser binaries. Choose TypeScript when prompted.
The config file is where your Playwright test automation setup either scales or breaks down. Here is a production-ready config that covers what the scaffold misses:
import { defineConfig, devices } from '@playwright/test';

export default defineConfig({
  testDir: './tests',
  fullyParallel: true,
  forbidOnly: !!process.env.CI,
  retries: process.env.CI ? 2 : 0,
  workers: process.env.CI ? 4 : undefined,
  reporter: process.env.CI ? 'blob' : 'html',

  use: {
    baseURL: process.env.BASE_URL || 'http://localhost:3000',
    trace: 'retain-on-failure',
    screenshot: 'only-on-failure',
    video: 'on-first-retry',
  },

  projects: [
    { name: 'chromium', use: { ...devices['Desktop Chrome'] } },
    { name: 'firefox', use: { ...devices['Desktop Firefox'] } },
    { name: 'webkit', use: { ...devices['Desktop Safari'] } },
  ],
});

Tip: Set forbidOnly: !!process.env.CI in your config. This prevents accidentally committing test.only() calls that skip your entire suite in CI.
Folder structure and config options that determine CI stability
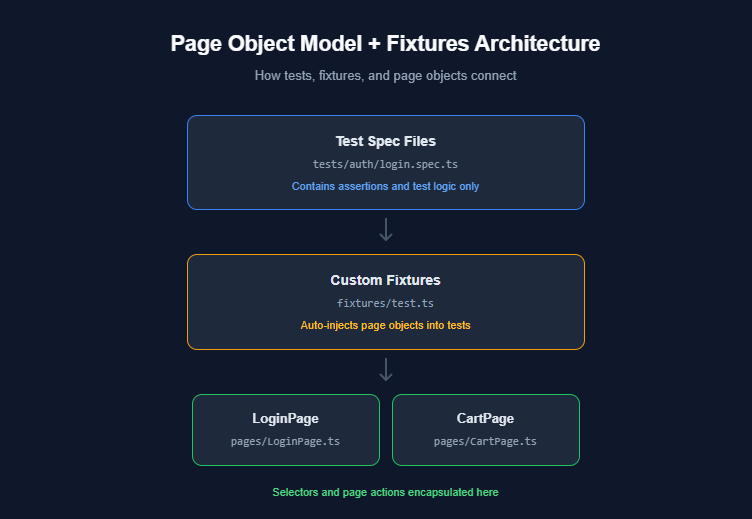
A folder structure that works for 10 tests falls apart at 100. Here is the layout we use for running large Playwright test automation suites:
project-root/
├── tests/
│   ├── auth/
│   │   ├── login.spec.ts
│   │   └── signup.spec.ts
│   ├── checkout/
│   │   ├── cart.spec.ts
│   │   └── payment.spec.ts
│   └── dashboard/
│       └── overview.spec.ts
├── pages/
│   ├── LoginPage.ts
│   ├── CartPage.ts
│   └── DashboardPage.ts
├── fixtures/
│   └── test.ts
├── playwright.config.ts
└── package.json
Group test files by feature, not by page. tests/auth/ makes more sense than tests/login-page/ because multiple tests exercise the same page from different angles. Playwright shards by file, so feature-based grouping keeps related tests on the same worker.
Browser binary management: what to verify before your first run
Playwright downloads browser binaries to a cache directory during npx playwright install. On CI runners, this cache is empty on every run unless you persist it.
Two things to verify:
- Run npx playwright install --with-deps on CI. The --with-deps flag installs OS-level dependencies (like libgbm on Ubuntu) that Playwright's browsers need. Without it, you will see browserType.launch: Executable doesn't exist errors.
- Check browser versions match your config. If you only test on Chromium, use npx playwright install chromium to save download time and disk space.
Understanding the Playwright CLI commands for browser management, test execution, and report generation is essential for maintaining a stable project.
5 selector strategies that keep your Playwright tests stable under UI changes
Selectors break more tests than bugs do. A single CSS class name change during a UI refactor can fail 40 tests simultaneously. Playwright offers multiple locator strategies, but their reliability differs dramatically.
Role-based locators vs CSS vs XPath: a practical ranking
The official Playwright locators documentation recommends a clear priority order. Here is how each strategy ranks in practice:
1. Role-based locators (most resilient)
await page.getByRole('button', { name: 'Submit' }).click();
await page.getByRole('heading', { name: 'Dashboard' }).isVisible();
await page.getByLabel('Email address').fill('[email protected]');
These mirror how screen readers and real users perceive the page. They survive CSS changes, component library upgrades, and class name refactors. Switching to role-based locators reduced our selector-related failures by over 60%.
2. Text-based locators
await page.getByText('Welcome back').isVisible();
await page.getByPlaceholder('Search products...').fill('laptop');
Reliable as long as the visible text does not change. Best for headings, labels, and placeholder text.
3. Test ID locators
await page.getByTestId('checkout-button').click();
Resilient to any UI change, but requires developers to add data-testid attributes. Works well when QA and dev collaborate on test contracts.
4. CSS selectors
await page.locator('.btn-primary.submit').click();
Fragile. Breaks when class names change, which happens frequently in component-library updates and CSS-in-JS migrations.
5. XPath selectors (least resilient)
await page.locator('//div[@class="form"]//button[1]').click();
Brittle and hard to read. Position-based XPath breaks when the DOM structure changes even slightly.
Note: Per the Playwright docs, use role-based locators first, then text, then test-id. Reserve CSS and XPath for cases where semantic locators are not possible.
When to use data-testid and how to enforce it across your team
Test IDs work best for interactive elements without accessible roles or labels, such as custom dropdowns, canvas components, or dynamically generated widgets.
To enforce them, add a custom ESLint rule or a PR review checklist item:
export default defineConfig({
  use: {
    testIdAttribute: 'data-testid',
  },
});
You can change the attribute name globally. Some teams use data-qa or data-cy (if migrating from Cypress). Pick one convention and document it in your team's contributing guide.

Why auto-wait eliminates 80% of flaky Playwright test automation failures
According to the flaky test benchmark report, timing issues account for the majority of flaky test root causes. Playwright's auto-wait mechanism directly addresses this and is the top reason teams cite for migrating from Selenium.
How Playwright's actionability model works under the hood
When you call locator.click(), Playwright enters a polling loop and checks six conditions before acting. Per the official actionability documentation:
- Attached: the element exists in the DOM
- Visible: the element has a non-zero bounding box and is not hidden by CSS
- Stable: the element is not mid-animation (bounding box is consistent across two animation frames)
- Enabled: no disabled attribute or aria-disabled="true"
- Receives events: no overlay, modal, or spinner blocking the click target
- Editable (for fill actions): the element accepts text input
If all six checks pass, the action executes. If any check fails within the timeout (default: 30 seconds), Playwright throws a TimeoutError specifying exactly which check failed.
Teams migrating from Selenium see their Playwright flaky tests drop significantly. No more Thread.sleep(3000) or WebDriverWait. The framework handles timing automatically.
Definition: Actionability checks are six conditions Playwright validates before any user action: attached, visible, stable, enabled, non-obscured, and editable. This runs automatically on every action call with no configuration needed.
Explicit wait strategies for dynamic content and edge cases
Auto-wait covers most scenarios, but some situations need explicit handling:
// Wait for a specific network response before asserting
await page.waitForResponse(resp =>
  resp.url().includes('/api/orders') && resp.status() === 200
);

// Wait for a loading spinner to disappear
await page.locator('.loading-spinner').waitFor({ state: 'hidden' });

// Wait for an element to appear after a dynamic render
await expect(page.getByRole('alert')).toBeVisible({ timeout: 10000 });
The key rule from the Playwright best practices guide: never use page.waitForTimeout(). Use web-first assertions (expect(locator).toBeVisible()) or waitFor() with an explicit state condition instead.
How we structured 200+ E2E tests using Page Object Model
At around 50 tests, copy-pasted selectors start causing maintenance pain. The Page Object Model (POM) pattern solves this by moving selectors and actions into reusable classes. It is the pattern we rely on for every Playwright test automation project.
Page Object Model pattern with full code example
Here is a login page object that encapsulates all selectors and actions:
import { type Page, type Locator } from '@playwright/test';

export class LoginPage {
  readonly page: Page;
  readonly emailInput: Locator;
  readonly passwordInput: Locator;
  readonly submitButton: Locator;
  readonly errorMessage: Locator;

  constructor(page: Page) {
    this.page = page;
    this.emailInput = page.getByLabel('Email');
    this.passwordInput = page.getByLabel('Password');
    this.submitButton = page.getByRole('button', { name: 'Sign in' });
    this.errorMessage = page.getByRole('alert');
  }

  async goto() {
    await this.page.goto('/login');
  }

  async login(email: string, password: string) {
    await this.emailInput.fill(email);
    await this.passwordInput.fill(password);
    await this.submitButton.click();
  }
}
And the test that uses it:
import { test, expect } from '@playwright/test';
import { LoginPage } from '../../pages/LoginPage';

test('successful login redirects to dashboard', async ({ page }) => {
  const loginPage = new LoginPage(page);
  await loginPage.goto();
  await loginPage.login('[email protected]', 'password123');
  await expect(page).toHaveURL('/dashboard');
});

test('invalid credentials show error', async ({ page }) => {
  const loginPage = new LoginPage(page);
  await loginPage.goto();
  await loginPage.login('[email protected]', 'badpassword');
  await expect(loginPage.errorMessage).toContainText('Invalid credentials');
});
Two things to notice: assertions stay in the test file, not in the page object. The page object describes what can be done; the test decides what should happen.
Fixtures and test hooks for scalable test organization
Once you have 10+ page objects, manually creating them in every test becomes boilerplate. Playwright fixtures solve this:
import { test as base } from '@playwright/test';
import { LoginPage } from '../pages/LoginPage';
import { CartPage } from '../pages/CartPage';

type TestFixtures = {
  loginPage: LoginPage;
  cartPage: CartPage;
};

export const test = base.extend<TestFixtures>({
  loginPage: async ({ page }, use) => {
    await use(new LoginPage(page));
  },
  cartPage: async ({ page }, use) => {
    await use(new CartPage(page));
  },
});

export { expect } from '@playwright/test';
Now tests import from your fixture file instead of the base @playwright/test:
import { test, expect } from '../../fixtures/test';

test('login works via fixture', async ({ loginPage, page }) => {
  await loginPage.goto();
  await loginPage.login('[email protected]', 'password123');
  await expect(page).toHaveURL('/dashboard');
});
No more new LoginPage(page) in every test. The fixture creates it automatically and ensures proper teardown. This pattern is covered in the reduce test maintenance guide.
Parallel execution: the 4 config settings that cut pipeline time in half
Running 200 tests sequentially on CI can take 30+ minutes. Parallel execution brings that under 15. Here are the four config settings that matter most, with advanced patterns in the Playwright parallel execution guide.
Worker configuration and sharding across CI agents
Setting 1: fullyParallel
export default defineConfig({
  fullyParallel: true,
});
Without this, tests within the same file run sequentially. With it, every test runs independently. We enable this by default and only disable it for specific serial flows.
Setting 2: workers
export default defineConfig({
  workers: process.env.CI ? 4 : undefined,
});
Controls how many parallel worker processes Playwright spawns. On CI, start with 4 and optimize Playwright workers based on your runner's CPU and memory profile.
Setting 3: reporter set to blob for sharding
export default defineConfig({
  reporter: process.env.CI ? 'blob' : 'html',
});
When sharding across multiple CI agents, each produces a partial report. The blob reporter outputs a binary format that merges into a unified HTML report.
Setting 4: the --shard CLI flag
npx playwright test --shard=1/4
npx playwright test --shard=2/4
npx playwright test --shard=3/4
npx playwright test --shard=4/4
Each command runs one quarter of the test suite. Combined with CI matrix builds, this splits work across four parallel agents, reducing our 200-test suite from 28 minutes to under 9 minutes.
Test isolation patterns that make parallelism safe
Parallel tests fail when they share state. These three patterns prevent it:
-
Use baseURL + unique routes instead of hardcoded URLs
-
Seed data via API calls per test instead of relying on a shared database state
-
Use test.describe.configure({ mode: 'serial' }) only when tests truly depend on each other (like a multi-step checkout flow)
import { test, expect } from '@playwright/test';

test.describe.configure({ mode: 'serial' });

test.describe('checkout flow', () => {
  test('add item to cart', async ({ page }) => {
    // step 1
  });

  test('proceed to payment', async ({ page }) => {
    // step 2 - depends on step 1
  });
});
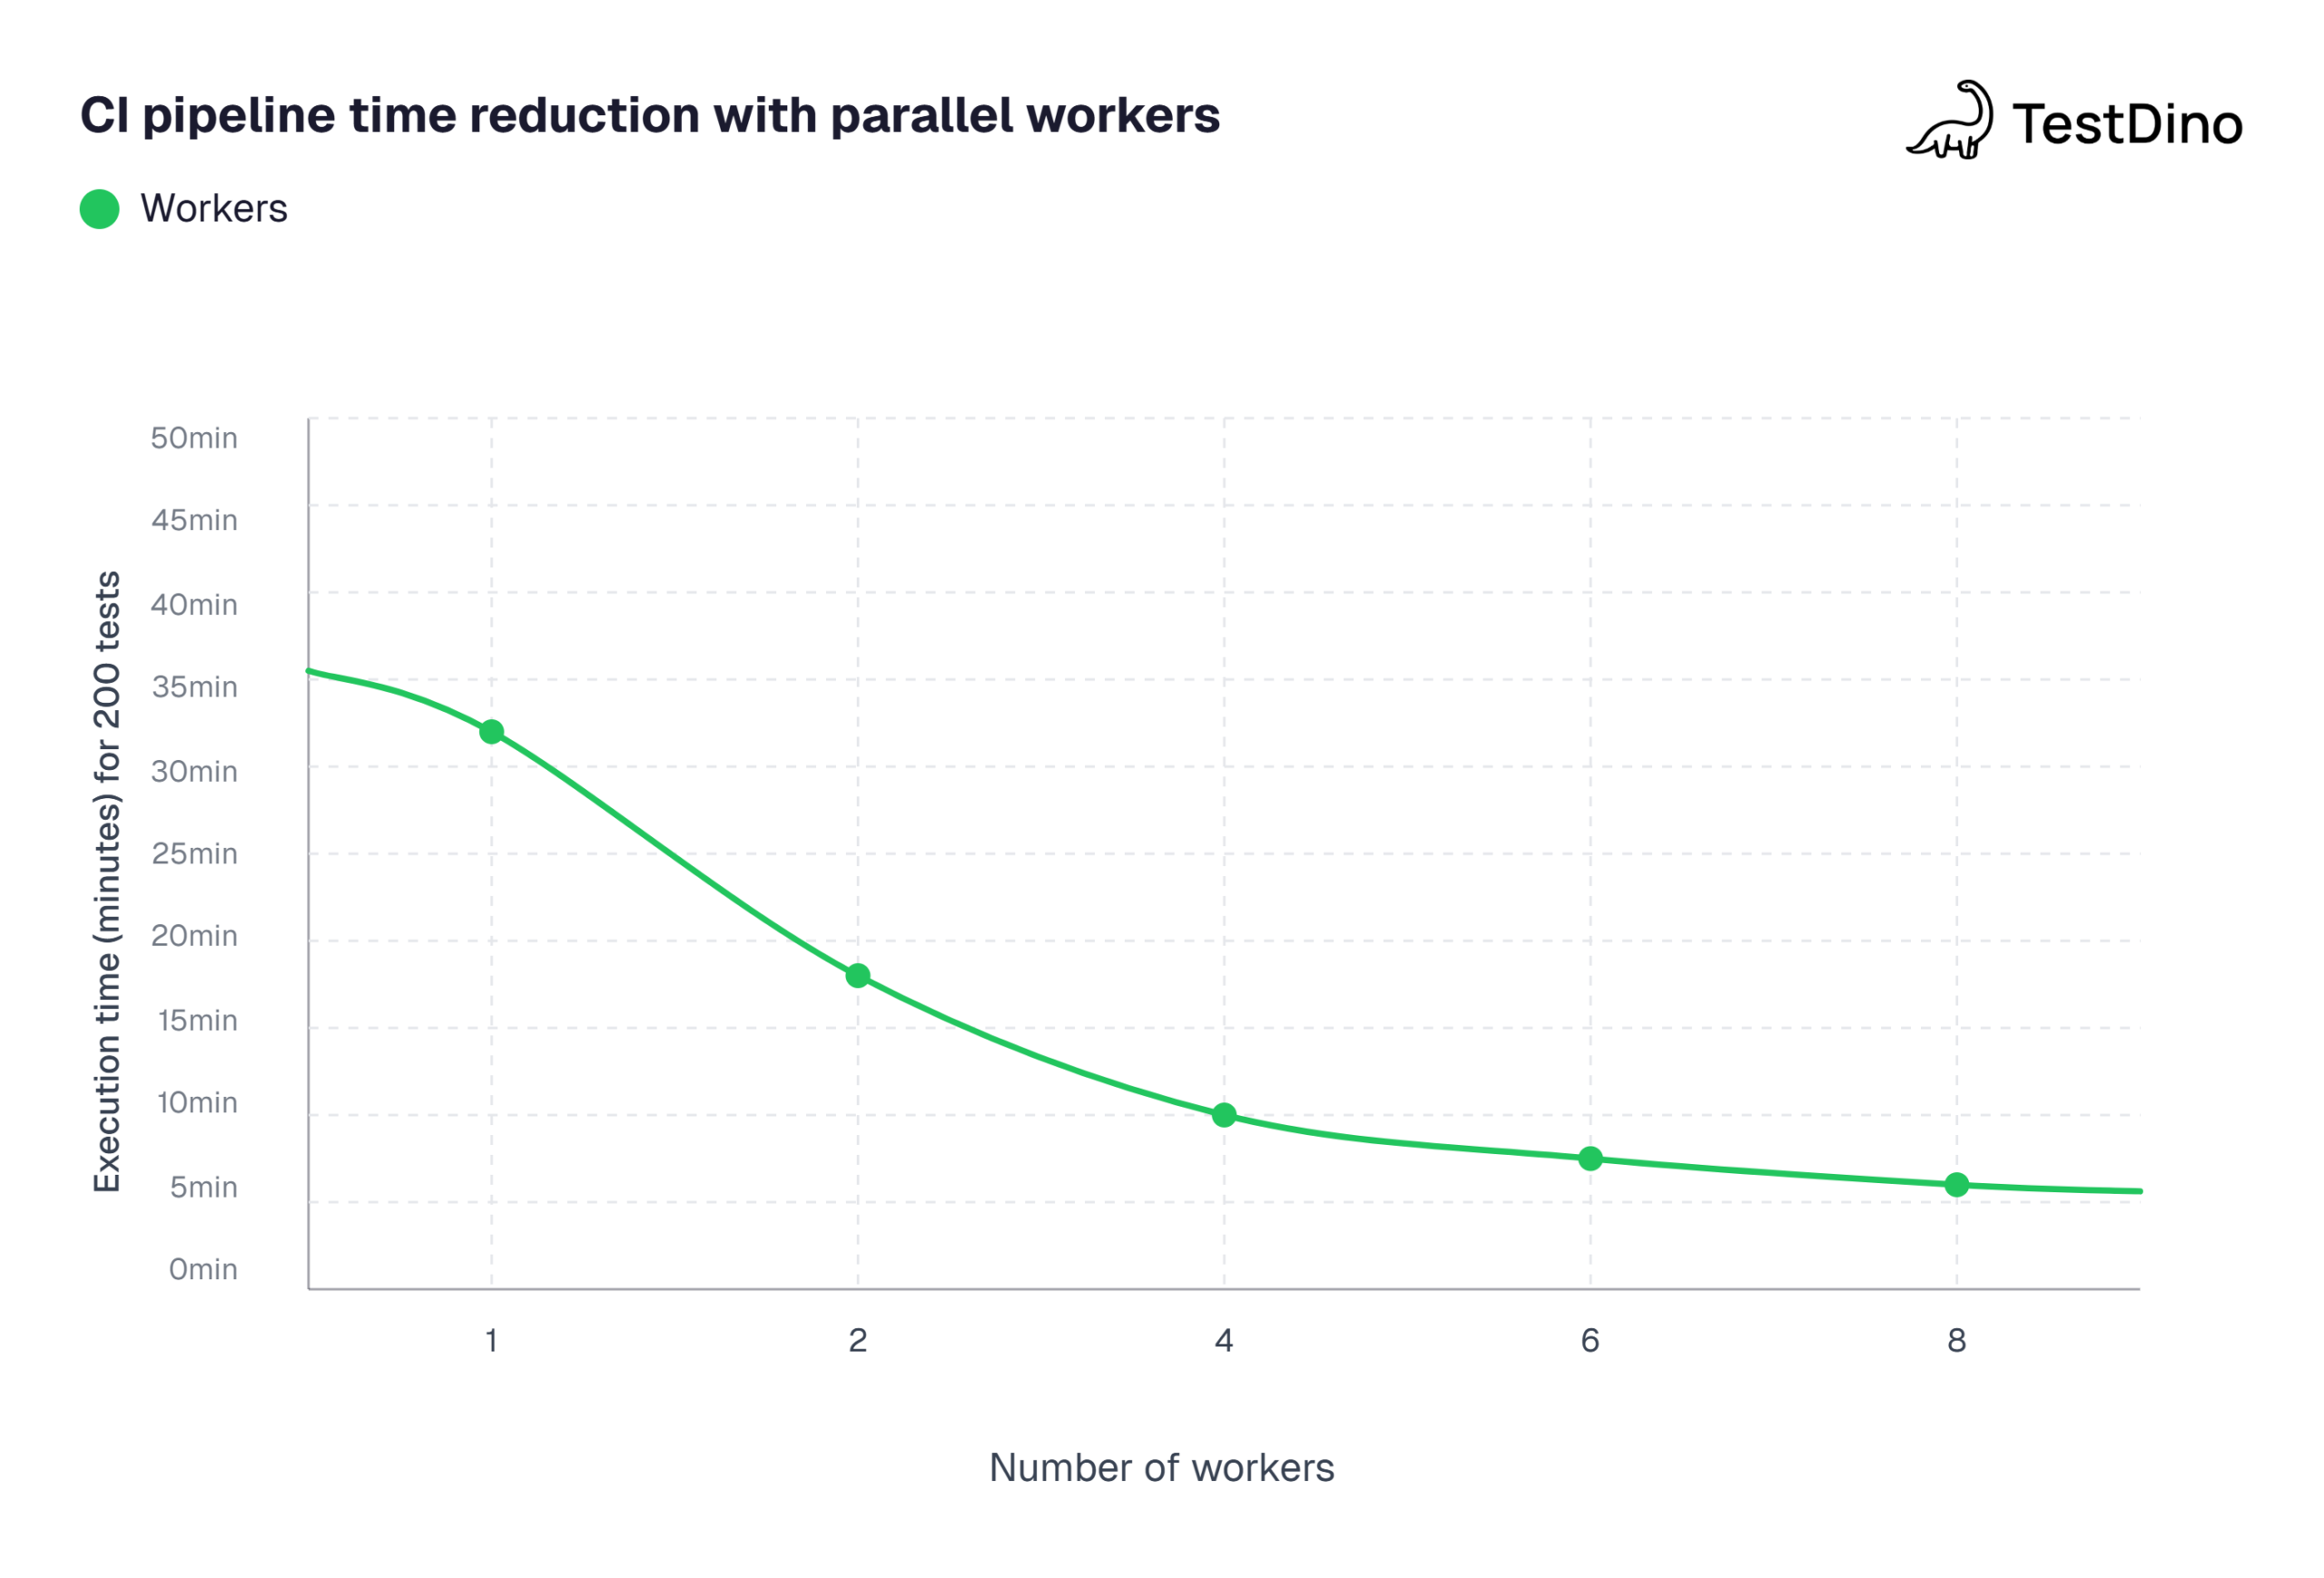
Source: Aggregated benchmarks from Playwright GitHub Discussions and community-shared CI performance reports (2025-2026). Test suite: 200 E2E tests on GitHub Actions ubuntu-latest runners. Note: actual times vary by test complexity and runner specs.
Integrating Playwright test automation into GitHub Actions and Jenkins
Tests that only run locally do not catch regressions. CI integration is where Playwright test automation delivers its real value by catching failures before production.
Full GitHub Actions workflow with artifact upload
Here is a complete workflow handling installation, test execution, sharding, and artifact collection:
name: Playwright Tests

on:
  push:
    branches: [main, develop]
  pull_request:
    branches: [main]

jobs:
  test:
    timeout-minutes: 30
    runs-on: ubuntu-latest
    strategy:
      fail-fast: false
      matrix:
        shardIndex: [1, 2, 3, 4]
        shardTotal: [4]

    steps:
      - uses: actions/checkout@v4

      - uses: actions/setup-node@v4
        with:
          node-version: 20

      - name: Install dependencies
        run: npm ci

      - name: Install Playwright browsers
        run: npx playwright install --with-deps

      - name: Run Playwright tests
        run: npx playwright test --shard=${{ matrix.shardIndex }}/${{ matrix.shardTotal }}

      - name: Upload blob report
        if: always()
        uses: actions/upload-artifact@v4
        with:
          name: blob-report-${{ matrix.shardIndex }}
          path: blob-report
          retention-days: 7

  merge-reports:
    if: always()
    needs: [test]
    runs-on: ubuntu-latest
    steps:
      - uses: actions/checkout@v4
      - uses: actions/setup-node@v4

      - name: Install dependencies
        run: npm ci

      - name: Download blob reports
        uses: actions/download-artifact@v4
        with:
          path: all-blob-reports
          pattern: blob-report-*
          merge-multiple: true

      - name: Merge reports
        run: npx playwright merge-reports --reporter html ./all-blob-reports

      - name: Upload HTML report
        uses: actions/upload-artifact@v4
        with:
          name: playwright-report
          path: playwright-report
          retention-days: 14
Tip: The if: always() condition on the upload step is critical. Without it, GitHub Actions skips uploads when tests fail and you lose all debugging artifacts.
Handling headless mode, retries, and environment variables in CI
Three CI-specific considerations that affect your Playwright test automation reliability:
- Headless mode: Playwright runs headless by default. On CI, always run headless. The headless vs headed comparison explains when to use the --headed flag.
- Retries: Set retries: 2 on CI to catch flaky tests while keeping pipeline time manageable. Combine with trace: 'on-first-retry' to capture traces only on second attempts.
- Environment variables: Pass BASE_URL through CI secrets to avoid hardcoding staging or production URLs:
      - name: Run Playwright tests
        run: npx playwright test
        env:
          BASE_URL: ${{ secrets.STAGING_URL }}
Teams focused on test automation analytics use reporting dashboards to track pass rates, flakiness, and execution time trends across branches.
Debugging Playwright failures without guessing: trace viewer and screenshots
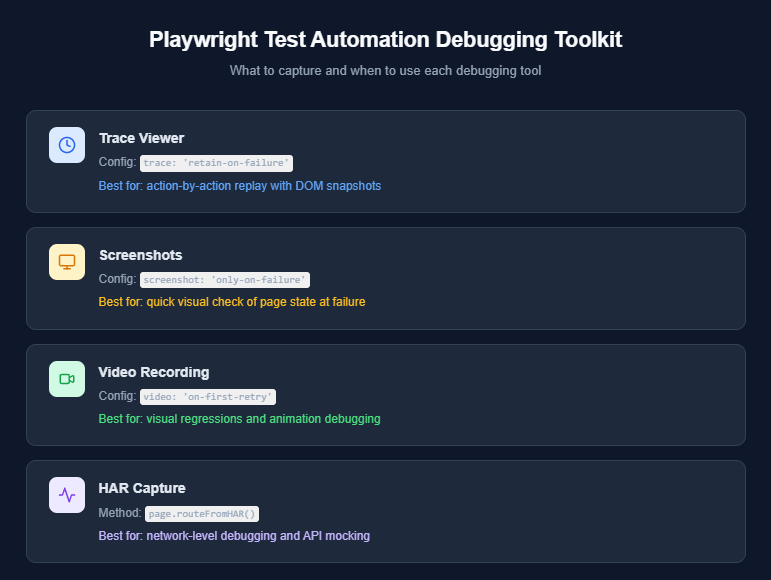
When a test fails in CI, the error message alone rarely tells you enough. Playwright provides three built-in debugging tools that eliminate guesswork entirely.
Using Playwright Trace Viewer to replay failures step by step
The Trace Viewer records every action during a test run, capturing DOM state, network requests, console messages, and a visual filmstrip.
Enable tracing in your config:
export default defineConfig({
  use: {
    trace: 'retain-on-failure',
  },
});
After a test fails, open the trace locally:
npx playwright show-trace test-results/checkout-flow/trace.zip
Or drag the trace.zip file into trace.playwright.dev, which loads entirely in your browser without transmitting data externally.
The Trace Viewer shows four tabs:
-
Actions tab: every click, fill, and navigate with the locator used and the time taken
-
Network tab: all HTTP requests sorted by status, duration, and content type
-
Console tab: browser logs and test-level logs with source indicators
-
Errors tab: the failed assertion with the exact line of test code that triggered it
Teams running Playwright test automation at scale use the Playwright observability platform from TestDino to automatically store and link trace artifacts for every CI run.
Video recording and HAR capture for network-level debugging
For deeper debugging, enable video recording alongside traces:
export default defineConfig({
  use: {
    video: 'on-first-retry',
    trace: 'retain-on-failure',
  },
});
Videos capture a continuous browser recording during the test. They are most useful for catching visual glitches or layout shifts that DOM snapshots miss.
For network-level issues, HAR (HTTP Archive) capture is built into the Trace Viewer's Network tab. You can also record HAR files explicitly:
import { test } from '@playwright/test';

test('capture HAR for API debugging', async ({ page }) => {
  await page.routeFromHAR('tests/fixtures/api.har', {
    url: '**/api/**',
    update: true,
  });
  await page.goto('/dashboard');
  // HAR file is updated with real network data
});
Record real API responses once and replay them in subsequent test runs, making tests faster and independent of backend availability.
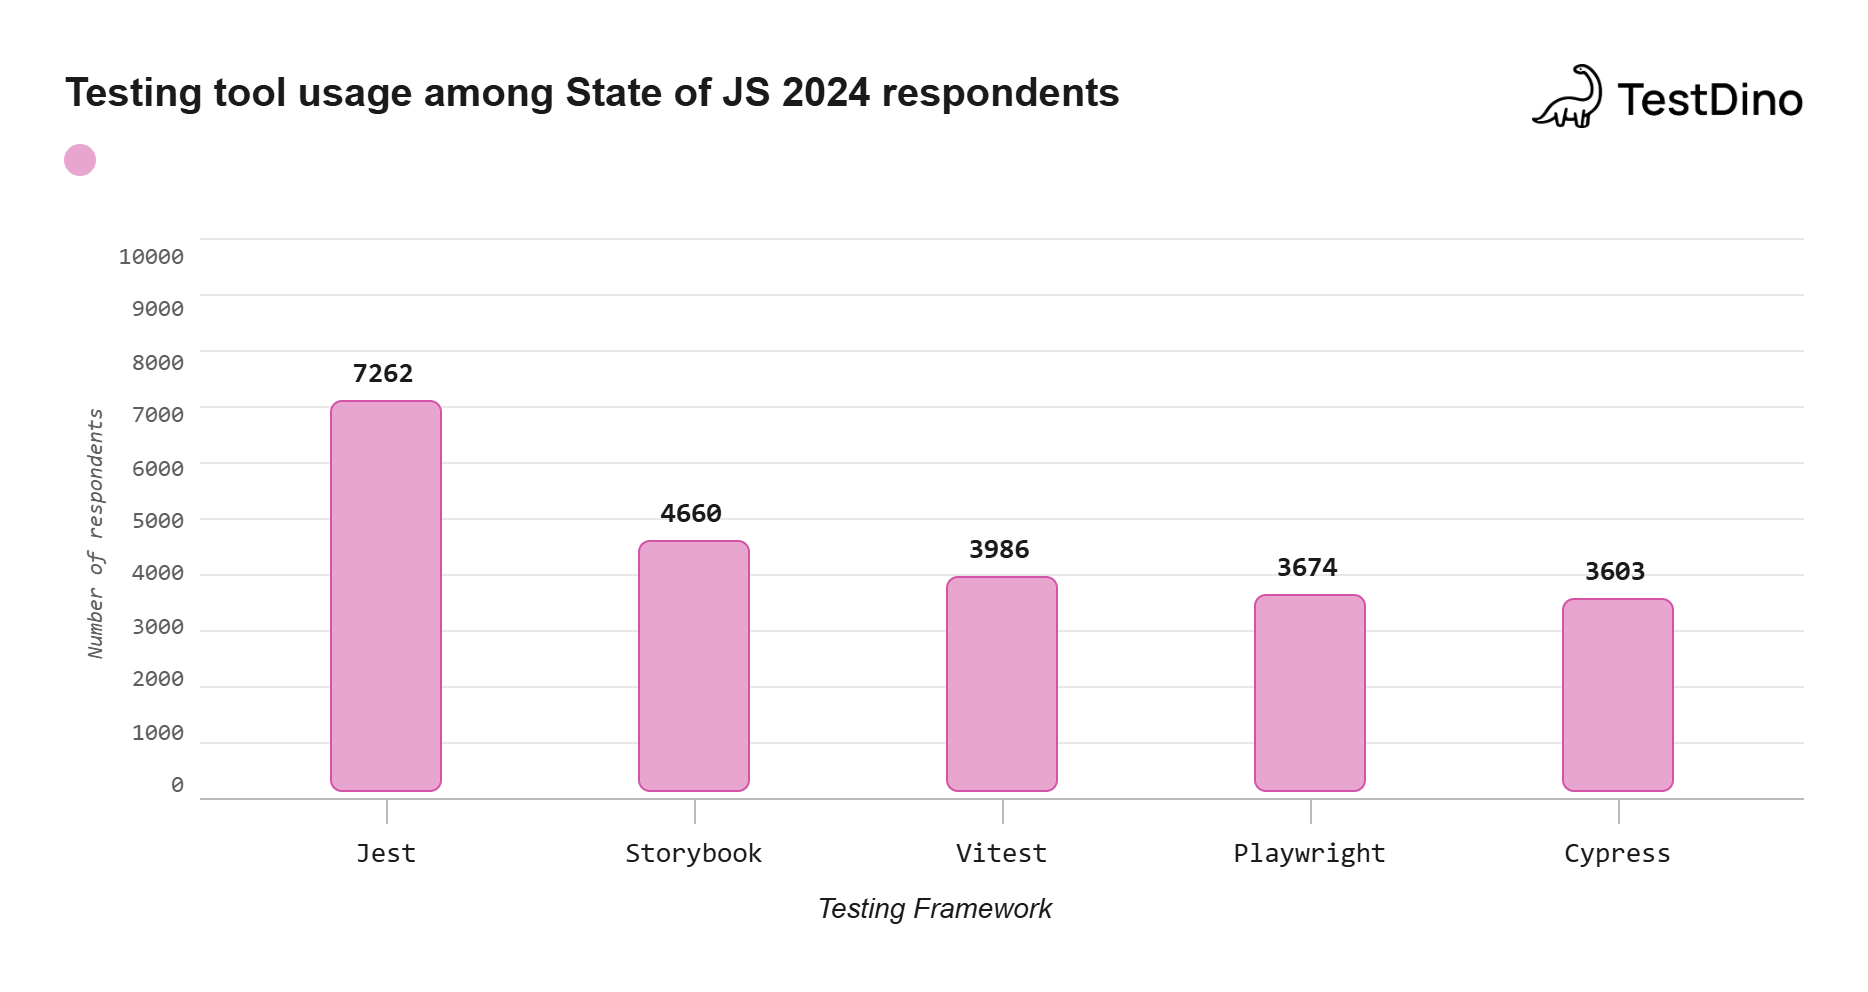
Source: State of JavaScript 2024 survey (stateofjs.com), "Testing" section, respondent usage counts.
API testing and mocking inside Playwright: what most teams overlook
Playwright is not just a browser automation tool. Its page.route() API lets you intercept, mock, and modify network requests directly within your E2E tests.
Route interception and response mocking with examples
Instead of relying on a live backend for every test, mock specific API responses:
import { test, expect } from '@playwright/test';

test('displays products from mocked API', async ({ page }) => {
  await page.route('**/api/products', async (route) => {
    await route.fulfill({
      status: 200,
      contentType: 'application/json',
      body: JSON.stringify([
        { id: 1, name: 'Laptop', price: 999 },
        { id: 2, name: 'Keyboard', price: 79 },
      ]),
    });
  });

  await page.goto('/products');
  await expect(page.getByText('Laptop')).toBeVisible();
  await expect(page.getByText('$999')).toBeVisible();
});
You can also simulate error states to verify your application handles failures gracefully:
test('shows error UI when API returns 500', async ({ page }) => {
  await page.route('**/api/products', (route) =>
    route.fulfill({ status: 500, body: 'Internal Server Error' })
  );
  await page.goto('/products');
  await expect(page.getByText('Something went wrong')).toBeVisible();
});
Note: Always define page.route() calls before page.goto(). Routes registered after navigation may bypass the mock and hit the real API.
Combining API setup with UI test flows for faster, lighter tests
The most effective pattern mixes API calls for setup with UI interactions for the actual test:
import { test, expect } from '@playwright/test';

test('verify order appears in dashboard after API creation', async ({ page, request }) => {
  // Setup: create order via API (skip the slow UI flow)
  const response = await request.post('/api/orders', {
    data: { product: 'Laptop', quantity: 1 },
  });
  const order = await response.json();

  // Test: verify in UI
  await page.goto('/dashboard/orders');
  await expect(page.getByText(order.id)).toBeVisible();
});
This pattern keeps tests fast by skipping repetitive UI setup while still validating end-to-end rendering. It is one of the most impactful optimizations for scaling Playwright test automation.
Troubleshooting common Playwright test automation issues
Even well-configured Playwright projects hit common problems. Here are the issues we see most often and their fixes:
browserType.launch: Executable doesn't exist
This means Playwright cannot find browser binaries, usually on CI when binaries are not installed or versions are mismatched.
# Fix: install browsers with OS dependencies
npx playwright install --with-deps
Tests pass locally but fail on CI with TimeoutError
CI runners are slower than developer machines. Increase the default action timeout for CI:
export default defineConfig({
  use: {
    actionTimeout: process.env.CI ? 15000 : 10000,
  },
});
Tests interfere with each other during parallel runs
This indicates shared state. Use Playwright's BrowserContext isolation so each test gets a fresh context with its own cookies and storage. Seed data per test via API calls instead of shared fixtures.
Traces are not generated for failed tests
Verify your trace config is set to 'retain-on-failure' or 'on-first-retry', and ensure your CI workflow includes if: always() on the artifact upload step.
Key takeaways
Here is a summary of the decisions that determine whether your Playwright test automation scales smoothly:
- Start with production-ready config. Set fullyParallel, forbidOnly, retries, and trace from day one.
- Use role-based locators first. They are the most resilient to UI changes and align with accessibility best practices.
- Never use page.waitForTimeout(). Replace every hard sleep with web-first assertions or explicit waitFor() conditions.
- Adopt POM + fixtures early. The upfront investment in page objects and custom fixtures pays back exponentially as your suite grows past 50 tests.
- Shard on CI. Four shards across a GitHub Actions matrix can cut pipeline time by 60-70%.
- Capture traces on failure. retain-on-failure gives you full debugging context without the storage overhead of tracing every test.
- Mock APIs for speed and isolation. Use page.route() to decouple your E2E tests from backend availability.
- Track flakiness trends. Integrate with a test automation analytics dashboard to catch regressions before they compound.
FAQ
Table of content
Flaky tests killing your velocity?
TestDino auto-detects flakiness, categorizes root causes, tracks patterns over time.
Follow Us