Playwright CLI: Every Command, Real Benchmarks, and Setup Guide
Complete Playwright CLI reference with 50+ commands, real token benchmarks, installation steps, session management, troubleshooting, and CI integration
Looking for Smart Playwright Reporter?


I have been using Playwright MCP with coding agents for months. It works. Until step 12 of a 20-step browser flow, when the agent starts losing its place. Selectors get hallucinated. Earlier instructions vanish. And you are 115,000 tokens deep with nothing to show for it.
The problem is architectural: MCP streams the entire page state into the model's context window on every interaction. Full accessibility tree, console output, screenshot bytes. All of it, every time.
Microsoft's answer is playwright-cli (@playwright/cli) -- a standalone command-line tool that saves snapshots to disk instead of stuffing them into context. Same flow, roughly 25,000 tokens. That is a 4.6x reduction, and the agent actually finishes the job.
This guide covers everything you need to start using Playwright CLI today: architecture, 50+ commands, real token benchmarks I ran myself, session management, configuration, troubleshooting, and how it fits into a CI pipeline alongside Playwright Test and reporting tools.
There are 2 Playwright CLIs and they solve different problems
This trips people up constantly. When you search "playwright cli" today, you could be looking for 2 completely different tools.
The standard Playwright Test CLI is npx playwright. It runs test suites, generates HTML reports, captures traces, and integrates with CI/CD pipelines. The official docs at playwright.dev/docs/test-cli cover it thoroughly.
The new Microsoft playwright-cli is @playwright/cli, a separate npm package. It launched in early 2026, built from the ground up for AI coding agents like Claude Code, GitHub Copilot, Cursor, and Windsurf.

Tip: If you landed on this page looking for npx playwright test commands, the official Playwright docs are your best source. This guide focuses on @playwright/cli, which is what most developers searching "playwright cli" in 2026 actually want.
Here is how the 2 CLIs compare at a glance:
| Standard CLI (npx playwright) | New CLI (playwright-cli) | |
|---|---|---|
| Built for | Human developers | AI coding agents |
| Primary use | Run tests, debug, generate reports | Browser exploration, test code generation |
| Works with | Terminal, CI/CD pipelines | Claude Code, Copilot, Cursor, Goose |
| Output | Test results, HTML reports | YAML snapshots, screenshots to disk |
| Context impact | N/A (human-driven) | Low (saves to disk, not context) |
Standard vs new Playwright CLI commands:
# Standard CLI - running tests
npx playwright test
npx playwright test tests/login.spec.ts --headed
npx playwright test --project=chromium --reporter=html
npx playwright codegen https://example.com

# New CLI - AI agent exploration
playwright-cli open https://your-app.com --headed
playwright-cli snapshot
playwright-cli click e21
playwright-cli screenshot
How the Playwright CLI architecture keeps tokens low
Understanding the architecture makes everything else click. Here is what actually happens when you run a playwright-cli command.
Playwright CLI uses a client-daemon architecture. When you run playwright-cli click e21, 3 things happen:
1. The CLI parses the command and figures out which session to target. It checks for an explicit -s=name flag, the PLAYWRIGHT_CLI_SESSION environment variable, or falls back to default.
2. The command travels over a Unix socket to a background daemon process. The daemon stays running between commands, so the browser does not relaunch every time. This is why sequential commands feel instant.
3. The daemon resolves the element ref and executes the action. Element references like e21 or f0e2 (frame-scoped) map to locators from the most recent accessibility snapshot. After execution, a fresh snapshot is automatically captured.
The design decision that matters: snapshots are written to disk, not streamed into the model's context.
CLI command flow:
Agent sends:     playwright-cli click e21
Daemon executes: Browser click → captures new snapshot
Daemon writes:   .playwright-cli/page-2026-03-15T10-22-42.yml
Agent receives:  "[Snapshot](.playwright-cli/page-...yml)" , a 40-char file path

With MCP, that same interaction returns the entire accessibility tree, often thousands of tokens per response. Over a 20-step flow, the difference compounds dramatically.
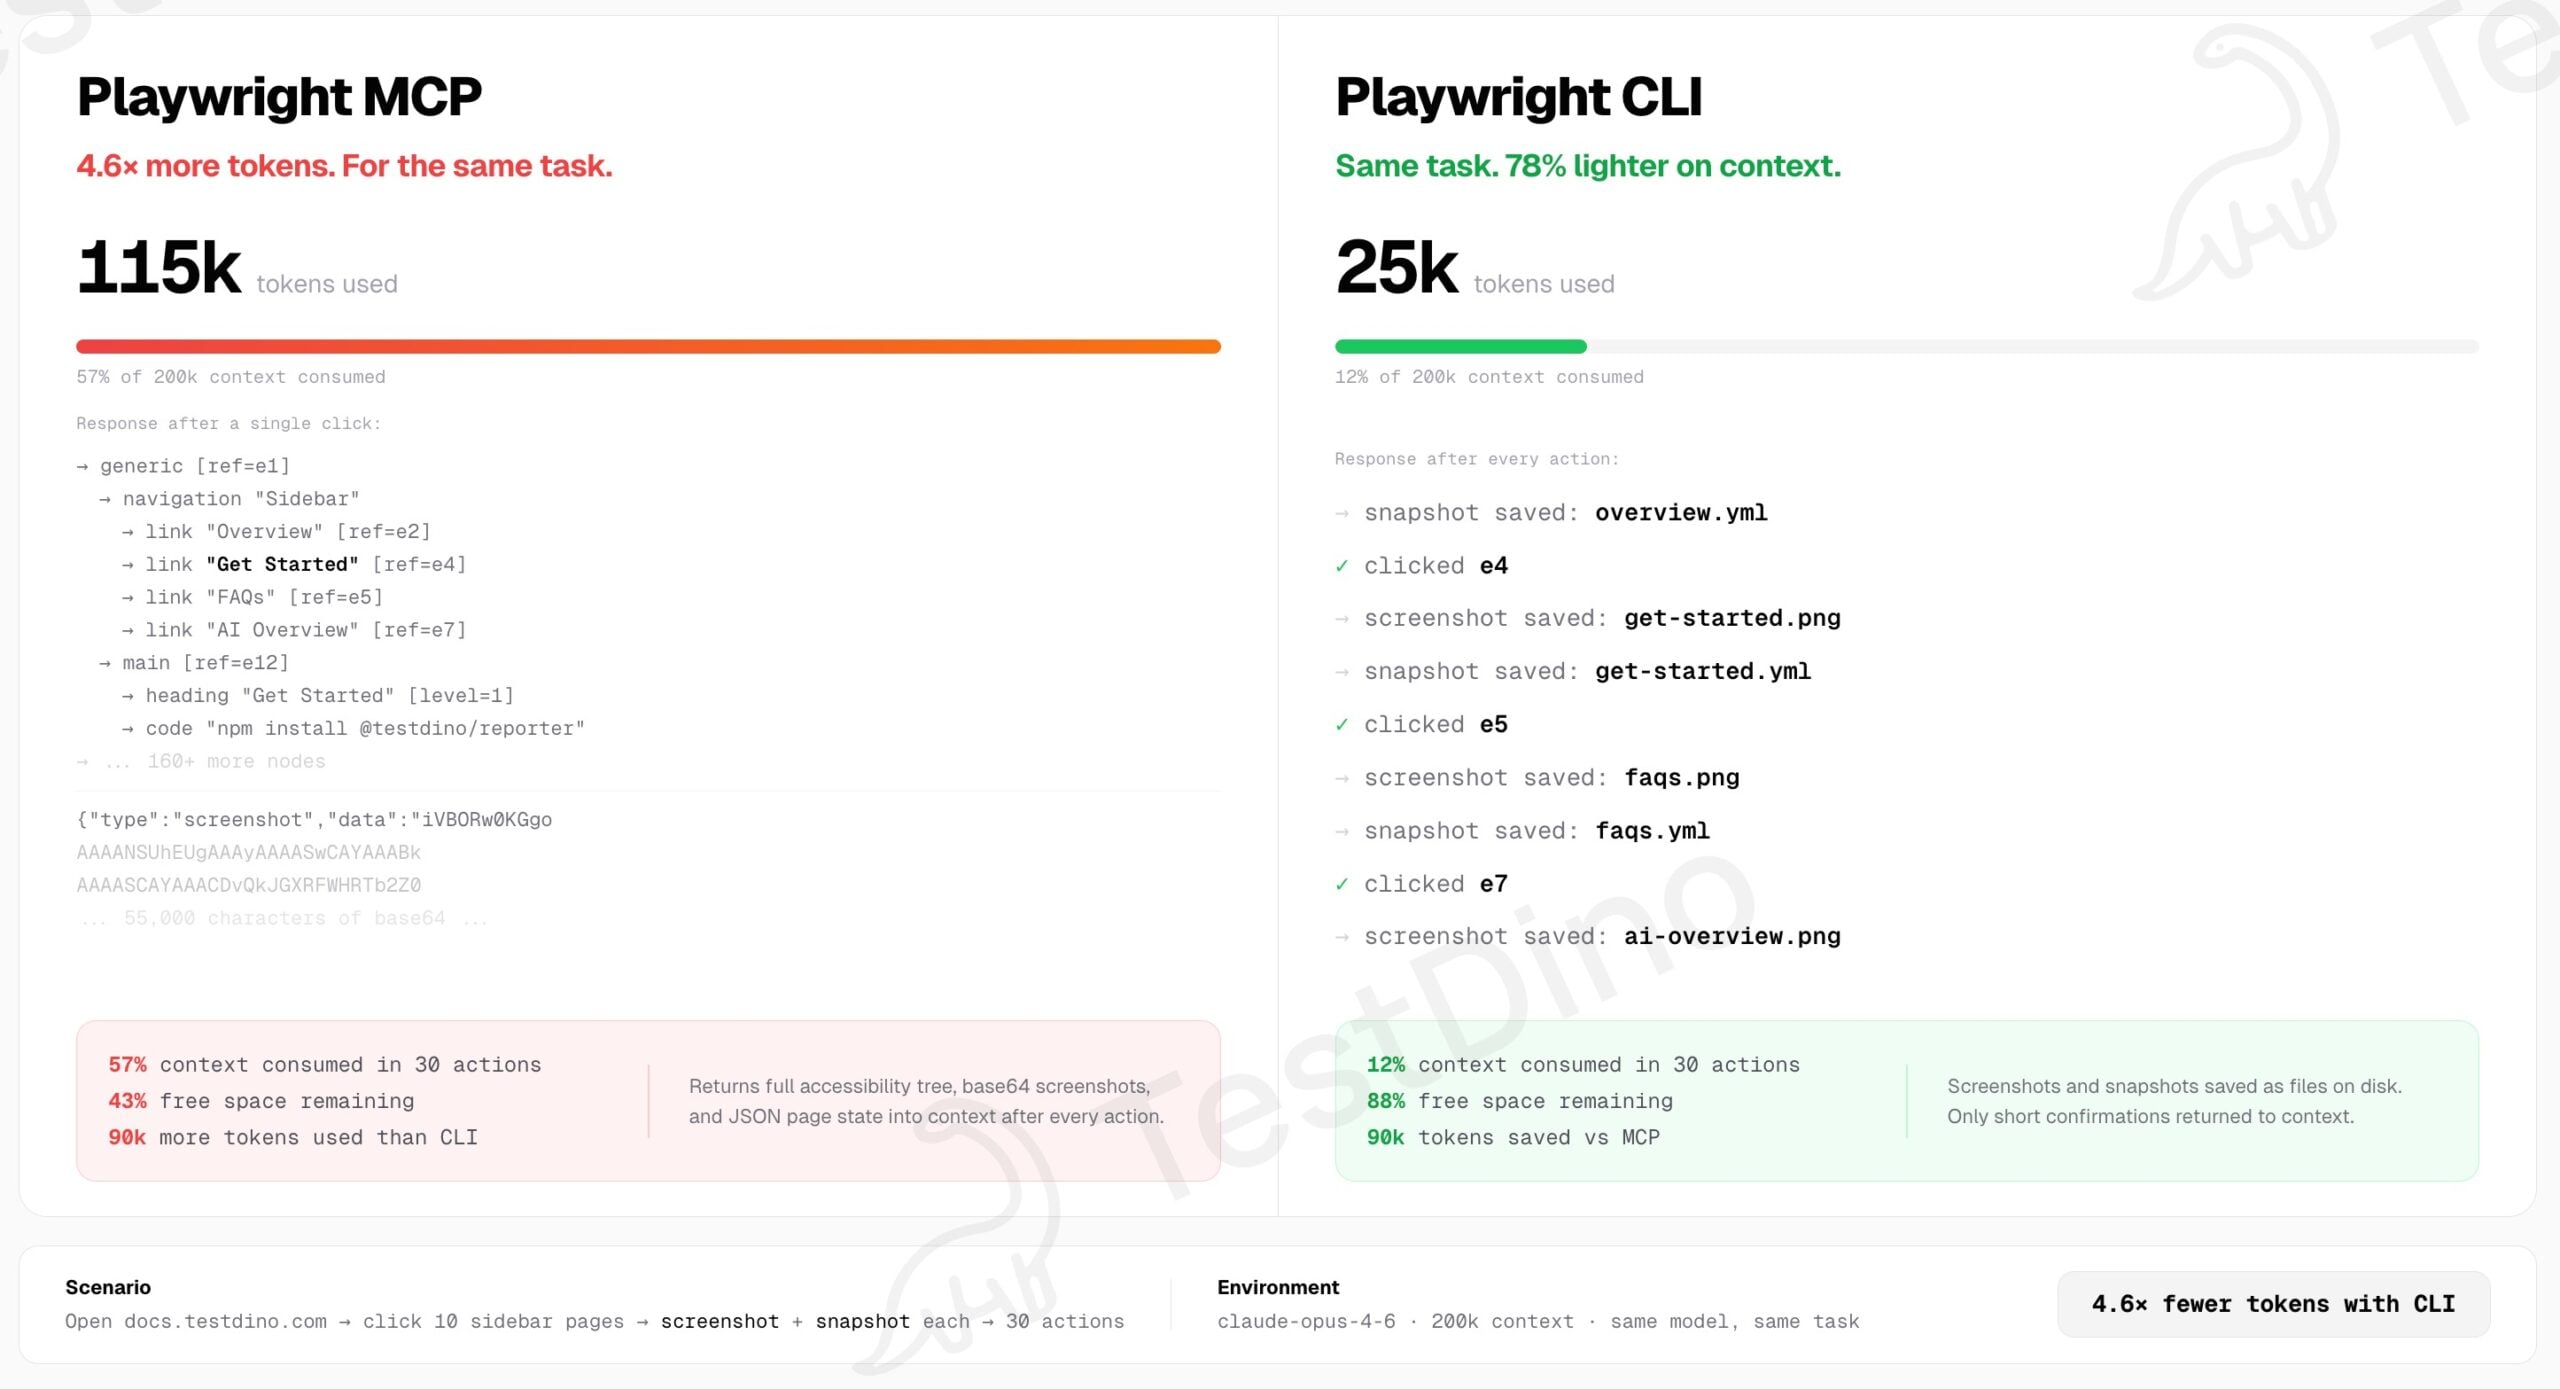
Real token numbers: 115,000 vs 25,000 for the same task
I tested identical browser automation tasks using both approaches. Same hardware, same model (Claude Opus), same 30-action flow on docs.testdino.com: open the site, click 10 sidebar pages, take a screenshot and snapshot at each stop.
| Metric | Playwright MCP | Playwright CLI | Difference |
|---|---|---|---|
| Total tokens consumed | ~115,000 | ~25,000 | 4.6x fewer with CLI |
| Context window used | 57% of 200K | 12% of 200K | 45 percentage points freed |
| Per-interaction cost | ~3,800 tokens | ~830 tokens | 4.6x less per step |
| Free context remaining | 43% | 88% | CLI leaves 2x more room |
| Agent completion rate | Degraded by step 20 | Completed all 30 | CLI finished the job |
Where the real gap shows up: screenshots and snapshots
Here is something I noticed from actual hands-on use that nobody else seems to talk about.
The 4.6x token difference is an average across all actions. But the gap is not uniform. When the agent requests screenshots or page snapshots, that is where MCP token usage spikes the hardest. MCP streams the full image bytes and accessibility tree directly into context. CLI writes them to disk and returns a file path.
For other regular actions like clicking, typing, or navigating, the token usage between MCP and CLI is actually pretty similar. Both return a confirmation message. The gap stays narrow.
But the moment you ask for a snapshot or screenshot, MCP balloons. A single screenshot on a content-heavy page can add 5,000-8,000 tokens to MCP context. The CLI? About 50 tokens for the file path.
Over a real testing session where you take screenshots at every major step (which is standard practice), MCP eats through your context window while CLI barely touches it. That is the practical reality.
Note: Why this matters for your budget: If you are running an AI agent through a 30-page site taking screenshots, the MCP approach can consume your entire 200K context window. CLI does the same job using 12%. The remaining 88% stays available for reasoning, code generation, and conversation history.
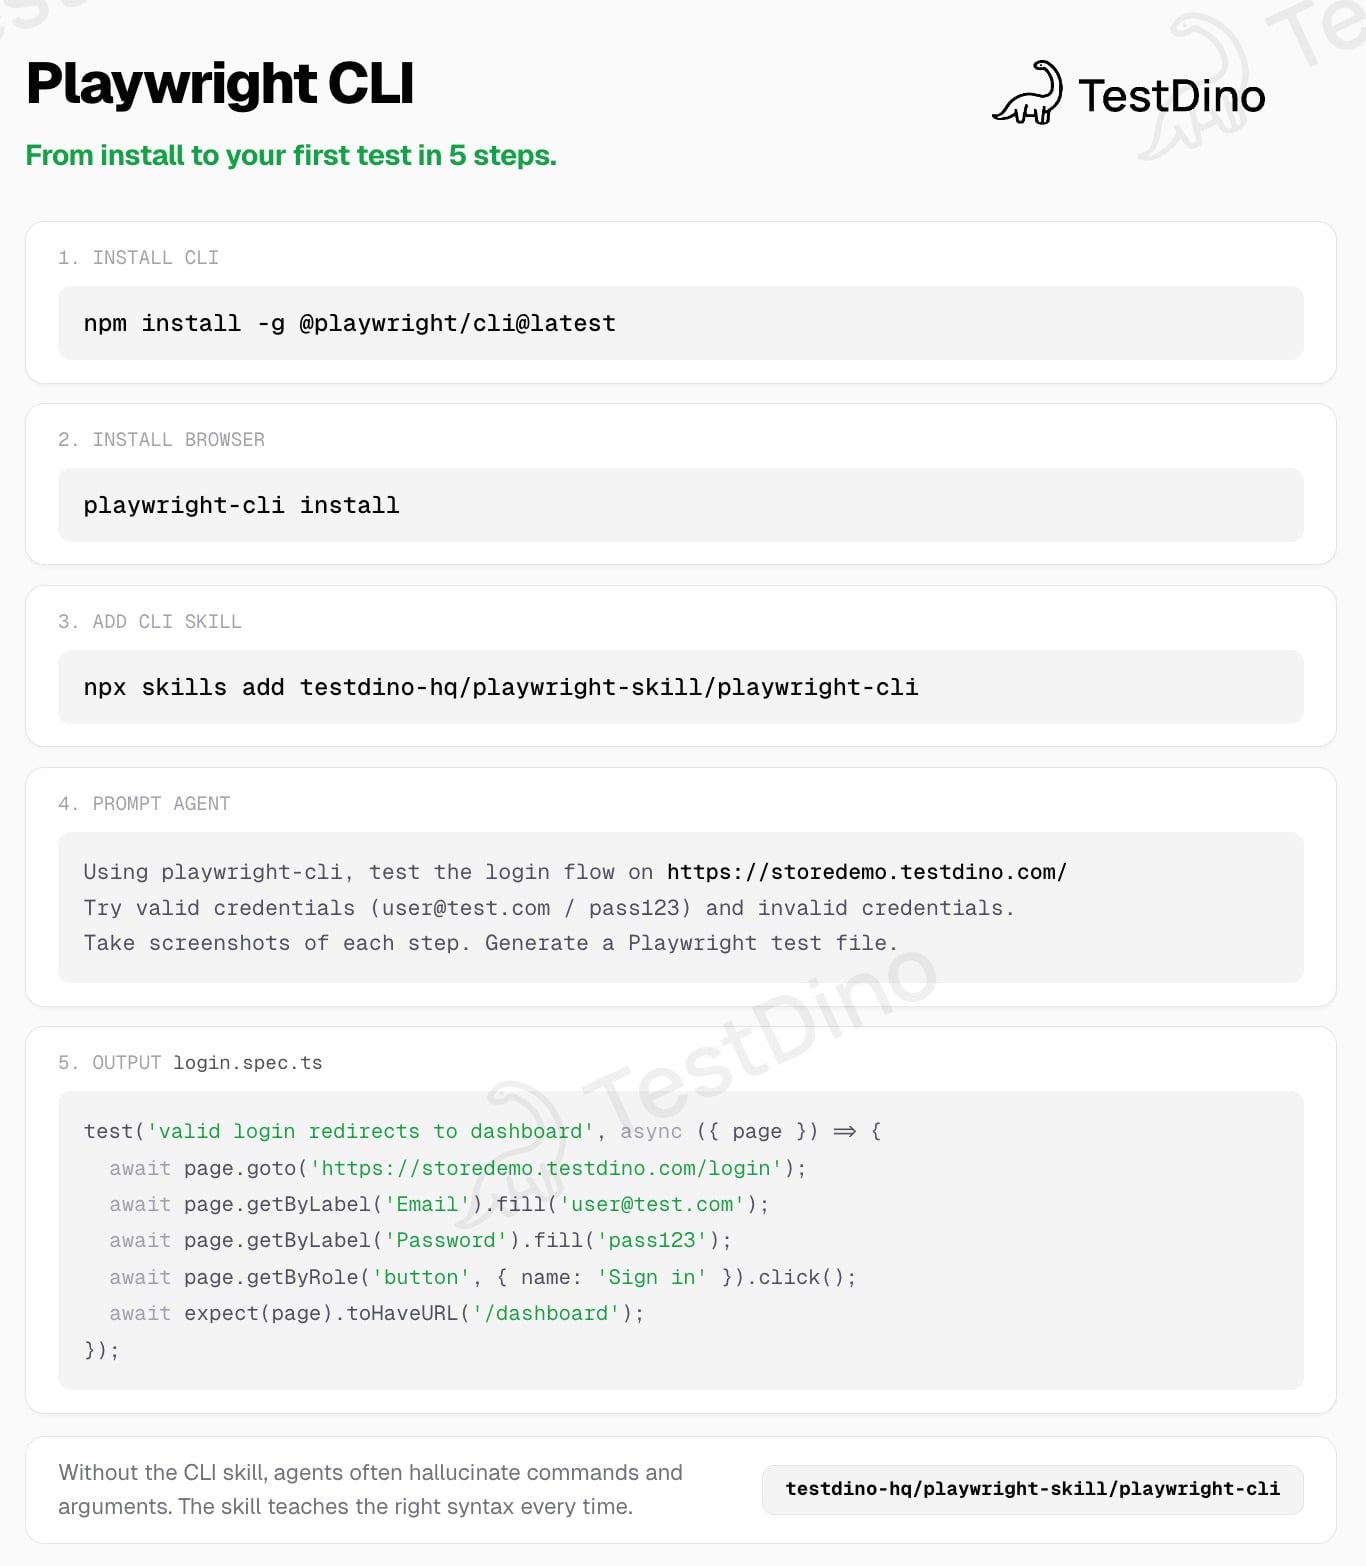
How to install Playwright CLI in under 2 minutes
Playwright CLI requires Node.js 18+ and installs globally via npm. The latest version is available on the @playwright/cli npm package.
Step 1: Install the CLI
# Install globally
npm install -g @playwright/cli@latest

# Verify installation
playwright-cli --version

# Initialize your workspace (creates .playwright-cli/ directory)
playwright-cli install
Step 2: Install browser binaries
If Chrome is on your system, it gets used as the default. For standalone browsers:
# Install default browser (Chromium)
playwright-cli install-browser

# Install a specific browser
playwright-cli install-browser --browser=firefox
playwright-cli install-browser --browser=webkit
Step 3: Install skills for AI coding agents
Skills give AI agents structured documentation about available commands. Without skills, agents hallucinate commands because they were not trained on this particular CLI.
playwright-cli install --skills
This creates a .claude/skills/playwright-cli/ directory containing:
- SKILL.md -- the main capability manifest agents read on startup
- references/ -- 7 detailed guides covering session management, storage state, test generation, tracing, video recording, and more
Once installed, Claude Code and other agents auto-discover these files and stop guessing at command syntax.
Step 4: Add the TestDino Playwright skill (optional)
For broader Playwright guidance beyond CLI syntax -- covering locators, assertions, fixtures, CI integration, and migration from Cypress or Selenium:
# Install all 5 skill packs (core, playwright-cli, ci, pom, migration)
npx skills add testdino-hq/playwright-skill

# Or only the playwright-cli pack
npx skills add testdino-hq/playwright-skill/playwright-cli
This adds 70+ guides across 5 packs:
| Pack | Guides | Covers |
|---|---|---|
| core | 46 | Locators, assertions, fixtures, auth, API testing, visual regression |
| playwright-cli | 11 | CLI commands, snapshots, sessions, test generation, tracing |
| ci | 9 | GitHub Actions, GitLab CI, CircleCI, Azure DevOps, Docker, sharding |
| pom | 2 | Page Object Model patterns |
| migration | 2 | Migrating from Cypress or Selenium |
Read more about the Playwright skill system.
Every playwright-cli command in 1 table (50+ commands)
This is the complete @playwright/cli command reference as of March 2026. Bookmark this section.
| Category | Command | What it does |
|---|---|---|
Browser  |
||
| Interaction |
||
| Page state |
||
| Keyboard |
||
| Mouse |
||
| Tabs |
||
| Storage |
||
| Network |
||
| DevTools |
||
| Dialogs |
||
| Session |
||
| Window |
||
Tip: Elements can be targeted by snapshot refs (e15), CSS selectors ("#main > button"), role selectors ("role=button[name=Submit]"), or chained selectors ("#footer >> role=button[name=Submit]"). Snapshot refs are the most token-efficient approach because they are the shortest string.
Automating a real shopping flow in 8 commands
Theory is one thing. Let me walk through a practical e-commerce flow on storedemo.testdino.com to show how playwright-cli actually works on a real site.
E-commerce checkout flow:
# Step 1: Open the demo store in a visible browser
playwright-cli open https://storedemo.testdino.com/ --headed

# Step 2: Capture page state and get element reference IDs
playwright-cli snapshot

# Step 3: Add 3 products to cart
playwright-cli click e255    # Product 1 - Add to Cart
playwright-cli click e291    # Product 2 - Add to Cart
playwright-cli click e327    # Product 3 - Add to Cart

# Step 4: Snapshot again (cart state changed)
playwright-cli snapshot

# Step 5: Navigate to checkout
playwright-cli click e2609   # Checkout tab

# Step 6: Confirm navigation landed
playwright-cli snapshot

# Step 7: Close the browser
playwright-cli close
8 commands. The agent knows exactly what happened at every step because each snapshot produces a fresh YAML file with current element references. No stale selectors, no guessing.
Warning: Always run snapshot after any action that changes page state (navigation, AJAX updates, form submissions). Old element refs become invalid the moment the DOM changes. This is the single most common mistake people make with playwright-cli.
What the YAML flow file looks like
As these commands run, playwright-cli automatically records every interaction into a YAML file. This is where the real power sits for test generation.
- action: snapshot
  timestamp: "2026-02-04T10:15:22Z"
  file: ".playwright-cli/page-2026-02-04T10-15-22.yml"

- action: click
  ref: e255
  element: "Add to Cart button - Product 1"
  playwright_code: |
    await page.getByRole('button', { name: 'Add to Cart' }).click()

- action: snapshot
  timestamp: "2026-02-04T10:15:25Z"
  file: ".playwright-cli/page-2026-02-04T10-15-25.yml"
  reason: "page state changed - cart updated"
Each entry logs the action, the element reference, and the corresponding Playwright code using getByRole locators. Because it is structured YAML, it can be replayed to reproduce the exact flow or converted into a .spec.ts test file.
From CLI commands to production Playwright test code
Every CLI command auto-generates equivalent Playwright code using resilient getByRole locators:
Command:   playwright-cli click e255
Generates: await page.getByRole('button', { name: 'Add to Cart' }).click()

Command:   playwright-cli fill e15 "[email protected]"
Generates: await page.getByRole('textbox', { name: 'Email' }).fill('[email protected]')

Command:   playwright-cli check e21
Generates: await page.getByRole('checkbox', { name: 'Agree to terms' }).check()
These locators don't break when class names change or IDs get refactored. The agent explores your app once, interactions get logged, and the generated code goes straight into a Playwright test file with minimal editing.
Session management: stop re-authenticating every time
Every non-trivial web app has a login page. Without session management, your AI agent re-authenticates every single time it starts a new browser. That wastes tokens on the same login flow over and over.
Playwright CLI fixes this with named sessions and state persistence:
# Default session
playwright-cli open https://your-app.com

# Named session for a different user role
playwright-cli -s=admin open https://your-app.com/admin --headed

# List all active sessions
playwright-cli list

# Save authentication state after logging in
playwright-cli state-save logged-in.json

# Restore it later (skip login entirely)
playwright-cli state-load logged-in.json
Named sessions let you run multiple browsers at the same time. Useful when testing what happens when an admin and a regular user interact with the same feature simultaneously.
3 persistence methods compared
| Method | Persists across restarts? | What it saves | Best for |
|---|---|---|---|
| Default (in-memory) | No | Nothing -- lost on browser close | Quick exploration |
| --persistent | Yes | Entire browser profile | Full profile preservation |
| state-save / state-load | Yes (portable JSON) | Cookies + localStorage | Sharing auth across sessions |
# Full browser profile preservation
playwright-cli open https://your-app.com --persistent

# Environment variable for CI pipelines
PLAYWRIGHT_CLI_SESSION=checkout claude .
Tip: state-save and state-load are the most portable option. Log in once, save the state, and restore it in every future session. Your agent skips straight to the feature under test.
4 config options that control every session
Playwright CLI loads configuration from playwright-cli.json in your project root. Set it once and all invocations in that workspace use these defaults.
{
  "browser": {
    "browserName": "chromium",
    "launchOptions": { "headless": true, "channel": "chrome" }
  },
  "network": {
    "allowedOrigins": ["https://your-app.com"],
    "blockedOrigins": []
  },
  "timeouts": {
    "action": 5000,
    "navigation": 60000
  },
  "outputDir": "./test-output",
  "testIdAttribute": "data-testid"
}
| Option | Default | What it controls |
|---|---|---|
| browser.browserName | chromium | Browser engine (chromium, firefox, webkit) |
| browser.launchOptions.headless | true | Visible browser vs background |
| browser.isolated | false | Keep profile in memory only |
| browser.cdpEndpoint | -- | Connect to existing Chromium via CDP |
| browser.remoteEndpoint | -- | Connect to remote Playwright server |
| timeouts.action | 5000ms | Wait time for click, fill, etc. |
| timeouts.navigation | 60000ms | Wait time for page loads |
| outputDir | ./test-output | Where screenshots, PDFs, traces, videos save |
| testIdAttribute | data-testid | Custom attribute for test ID selectors |
| allowUnrestrictedFileAccess | false | File upload path restrictions |
Tip: Check this config file into version control alongside your playwright.config.ts. It keeps behavior consistent across local development and pipeline runs.
Video recording and tracing from the CLI
The video and tracing commands are worth learning from day 1. When an AI agent explores your app and something goes wrong, you want to watch what happened.
Terminal - video recording:
# Start recording the browser session
playwright-cli video-start

# Do your exploration
playwright-cli open https://your-app.com --headed
playwright-cli snapshot
playwright-cli click e21
playwright-cli fill e15 "[email protected]"

# Stop and save the video
playwright-cli video-stop demo.webm
Video files save as .webm. For deeper debugging, use tracing:
Terminal - trace recording:
# Start a Playwright trace
playwright-cli tracing-start

# Do your exploration
playwright-cli snapshot
playwright-cli click e21

# Stop and save
playwright-cli tracing-stop
Traces can be inspected in the Playwright Trace Viewer with full DOM snapshots, network requests, and console logs. This is particularly useful when an AI agent does something unexpected -- you can step through every action it took.
When to choose CLI vs MCP vs standard Playwright
These 3 tools are not competing. They each serve a distinct role. The decision depends on who is driving the browser and what constraints exist.
| Scenario | Best tool | Why |
|---|---|---|
| Running test suites in CI | Standard CLI (npx playwright test) | Full reporting, sharding, parallel execution |
| Human debugging a test failure | Standard CLI + Inspector | Trace viewer, breakpoints, step-through |
| AI agent exploring a web app | playwright-cli | Token-efficient, deterministic, long session support |
| AI agent without filesystem access | Playwright MCP | Works without shell access |
| Generating test code from exploration | playwright-cli | Auto-generates .spec.ts with resilient locators |
| Token cost is a top concern | playwright-cli | 4.6x less token consumption |
For a deep-dive comparison between CLI and MCP specifically, see our Playwright CLI vs MCP comparison.
Tip: These tools are not mutually exclusive. The workflow most teams are adopting: explore with playwright-cli, execute with npx playwright test, analyze with a reporting tool.
The 5 errors you will hit first (and exact fixes)
After setting up playwright-cli across multiple projects, these are the errors that come up most often. Every fix is copy-pasteable.
Error 1: "Element ref not found"
Error output:
Error: Element ref "e255" not found in current snapshot
Why: Page state changed since your last snapshot. Old refs are stale.
Fix:
playwright-cli snapshot    # Get fresh refs
playwright-cli click e255  # Use the new ref
Error 2: "Browser not installed"
Error output:
Error: Chromium is not installed. Run: playwright-cli install-browser
Fix:
playwright-cli install-browser
# Or for a specific browser:
playwright-cli install-browser --browser=firefox
Error 3: "Session already exists"
Error output:
Error: Session "default" already has an active browser
Why: Previous session was not closed properly (crashed agent, killed terminal).
Fix:
playwright-cli close-all   # Graceful close
# If that fails:
playwright-cli kill-all    # Force kill all browser processes
Error 4: "Navigation timeout"
Error output:
Error: Navigation timeout of 60000ms exceeded
Why: Target page takes longer than configured timeout to load.
Fix: Increase navigation timeout in playwright-cli.json:
{
  "timeouts": {
    "navigation": 120000
  }
}
Error 5: "Permission denied on output files"
Error output:
Error: EACCES: permission denied, open './test-output/screenshot.png'
Fix:
mkdir -p ./test-output
chmod 755 ./test-output
Tip: If you are running playwright-cli inside a Docker container or CI environment, ensure the output directory is mounted with write permissions. See our CI integration guide for environment-specific setup.
The complete CI pipeline: exploration to test execution to reporting
Here is how all 3 tools work together in a real CI pipeline. This is the workflow pattern that makes the most sense for teams adopting AI-driven test generation.
CI pipeline flow:
┌─────────────────────────────────────────────────────────────────┐
│ DEVELOPMENT                                                     │
│                                                                 │
│  AI Agent + playwright-cli                                      │
│  ├── Explores app, generates .spec.ts files                     │
│  ├── Uses snapshot refs for reliable locators                   │
│  └── Token-efficient: 25K vs 115K per session                   │
│                                                                 │
├─────────────────────────────────────────────────────────────────┤
│ CI/CD (GitHub Actions, GitLab CI, Azure DevOps)                 │
│                                                                 │
│  npx playwright test                                            │
│  ├── Executes generated tests across browsers                   │
│  ├── Captures HTML reports, traces, screenshots                 │
│  └── Shards across workers for parallel execution               │
│                                                                 │
├─────────────────────────────────────────────────────────────────┤
│ ANALYSIS                                                        │
│                                                                 │
│  npx tdpw upload ./playwright-report --token="YOUR_API_KEY"     │
│  ├── TestDino groups failures by root cause                     │
│  ├── Detects flaky tests across runs                            │
│  ├── Posts AI summary on GitHub PR                              │
│  └── Embedded trace viewer for debugging                        │
│                                                                 │
└─────────────────────────────────────────────────────────────────┘
Each tool plays a distinct role:
- playwright-cli -- Token-efficient browser exploration and AI-assisted code generation
- Playwright Test CLI -- Executes tests, captures traces and videos, generates reports
- TestDino -- Tracks results across CI runs, explains failure patterns, manages test history
Terminal - upload to TestDino:
# Upload results to TestDino after CI run
npx tdpw upload ./playwright-report --token="YOUR_API_KEY"
TestDino groups failures by root cause instead of just test name, flags flaky tests that pass on retry, and posts AI summaries directly on your GitHub PRs. It fills the gap between "tests ran" and "we understand what broke." Try it free.
How playwright-cli works with different AI agents
Playwright CLI is agent-agnostic. It works with any coding agent that can execute shell commands. Here is how setup differs per agent:
| Agent | How to set up CLI | Skill discovery |
|---|---|---|
| Claude Code | Install globally + playwright-cli install --skills | Auto-discovers .claude/skills/ |
| GitHub Copilot | Install globally + playwright-cli install --skills | Reads skill files automatically |
| Cursor | Install globally + playwright-cli install --skills | Reads SKILL.md from workspace |
| Windsurf | Install globally + playwright-cli install --skills | Agent reads --help output |
| Goose | Install + enable Summon extension | Uses Playwright CLI skill |
The workflow is the same across all agents: install the CLI, install skills, then point the agent at your app with a natural language prompt.
Example agent prompt:
Using playwright-cli, test the login flow on https://your-app.com.
Try valid credentials ([email protected] / pass123) and invalid credentials.
Take screenshots of each step. Generate a Playwright test file.
The agent reads the SKILL.md file, understands available commands, and drives the browser without hallucinating syntax.
Important: Without the SKILL.md file, agents will guess at commands. They were not trained on @playwright/cli specifically. The hallucination rate drops to near-zero once skills are installed.
Network mocking and interception
Playwright CLI can intercept network requests during a browser session. This is useful for testing error states, mocking API responses, or blocking third-party scripts.
# Block analytics scripts
playwright-cli route "**/*google-analytics*" --fulfill='{"status":200,"body":""}'

# Mock an API response
playwright-cli route "https://api.your-app.com/users" --fulfill='{"status":200,"body":"{\"users\":[]}"}'

# List active route overrides
playwright-cli route-list

# Remove all overrides
playwright-cli unroute
Combined with network (which shows all captured requests since page load) and console (which shows console messages), you get a lightweight debugging toolkit without leaving the CLI.
FAQs
Table of content
Flaky tests killing your velocity?
TestDino auto-detects flakiness, categorizes root causes, tracks patterns over time.
Follow Us