Write Playwright Tests with Antigravity: Setup Guide (2026)
Struggling to write reliable Playwright tests quickly? This step-by-step guide walks you through setting up Google Antigravity IDE for AI-powered Playwright test generation, from MCP configuration to CI reporting with TestDino and fixing flaky tests with Playwright agents.

If you want to write Playwright tests with Antigravity, you are in the right place. AI coding agents now write, run, and even fix browser tests without you touching a single selector. Teams that once spent days scaffolding Playwright suites can now generate entire test files from a plain English prompt.
But most AI-generated tests still break on the first CI run. The model often guesses selectors and skips waits. It produces tests that look correct in the editor but time out in headless mode. In our experience, fixing these AI hallucinations can sometimes take longer than writing the test yourself. The gap is not about speed; it is about giving the AI enough context to write tests that actually pass.
This guide closes that gap. You will connect Playwright's MCP server to Google Antigravity, configure agents, and pick the best model for test generation. Then, you will wire everything into CI with real reporting. Every step includes the exact config, prompt, or command you need to succeed.
Why Antigravity for Playwright tests?
Antigravity is not just another code editor with an AI chatbot bolted on. It is built from day one around the idea that AI agents should do the heavy lifting, not just offer autocomplete.
Here is what makes it different for testing:
- Agent Manager. Spawn multiple agents in parallel. One can generate tests while another runs your existing suite. You monitor everything from a single dashboard.
- Built-in browser agent. The agent can literally open a browser, click through your app, take screenshots, and verify layouts. No screenshot API hacks needed.
- Artifact system. Every agent produces reviewable artifacts: task lists, implementation plans, code diffs, and browser recordings. You see exactly what it did before accepting anything.
- Multi-model support. Antigravity runs Gemini 3.1 Pro by default but also supports Claude Sonnet 4.6, Claude Opus 4.6, and GPT-OSS-120B. You pick the model per conversation.
For test automation, this matters because the agent does not rely on screenshots or guessed CSS selectors. It reads the same accessibility tree Playwright uses internally, which means generated Playwright locators are stable by default.
Prerequisites
Before starting, make sure you have these installed:
-
Node.js 18+ (LTS recommended)
-
Playwright latest (v1.50+ for agent support)
-
Google Antigravity IDE (free public preview, available at antigravity.google)
-
A Playwright project (existing or new)
node --version # should show v18 or higher
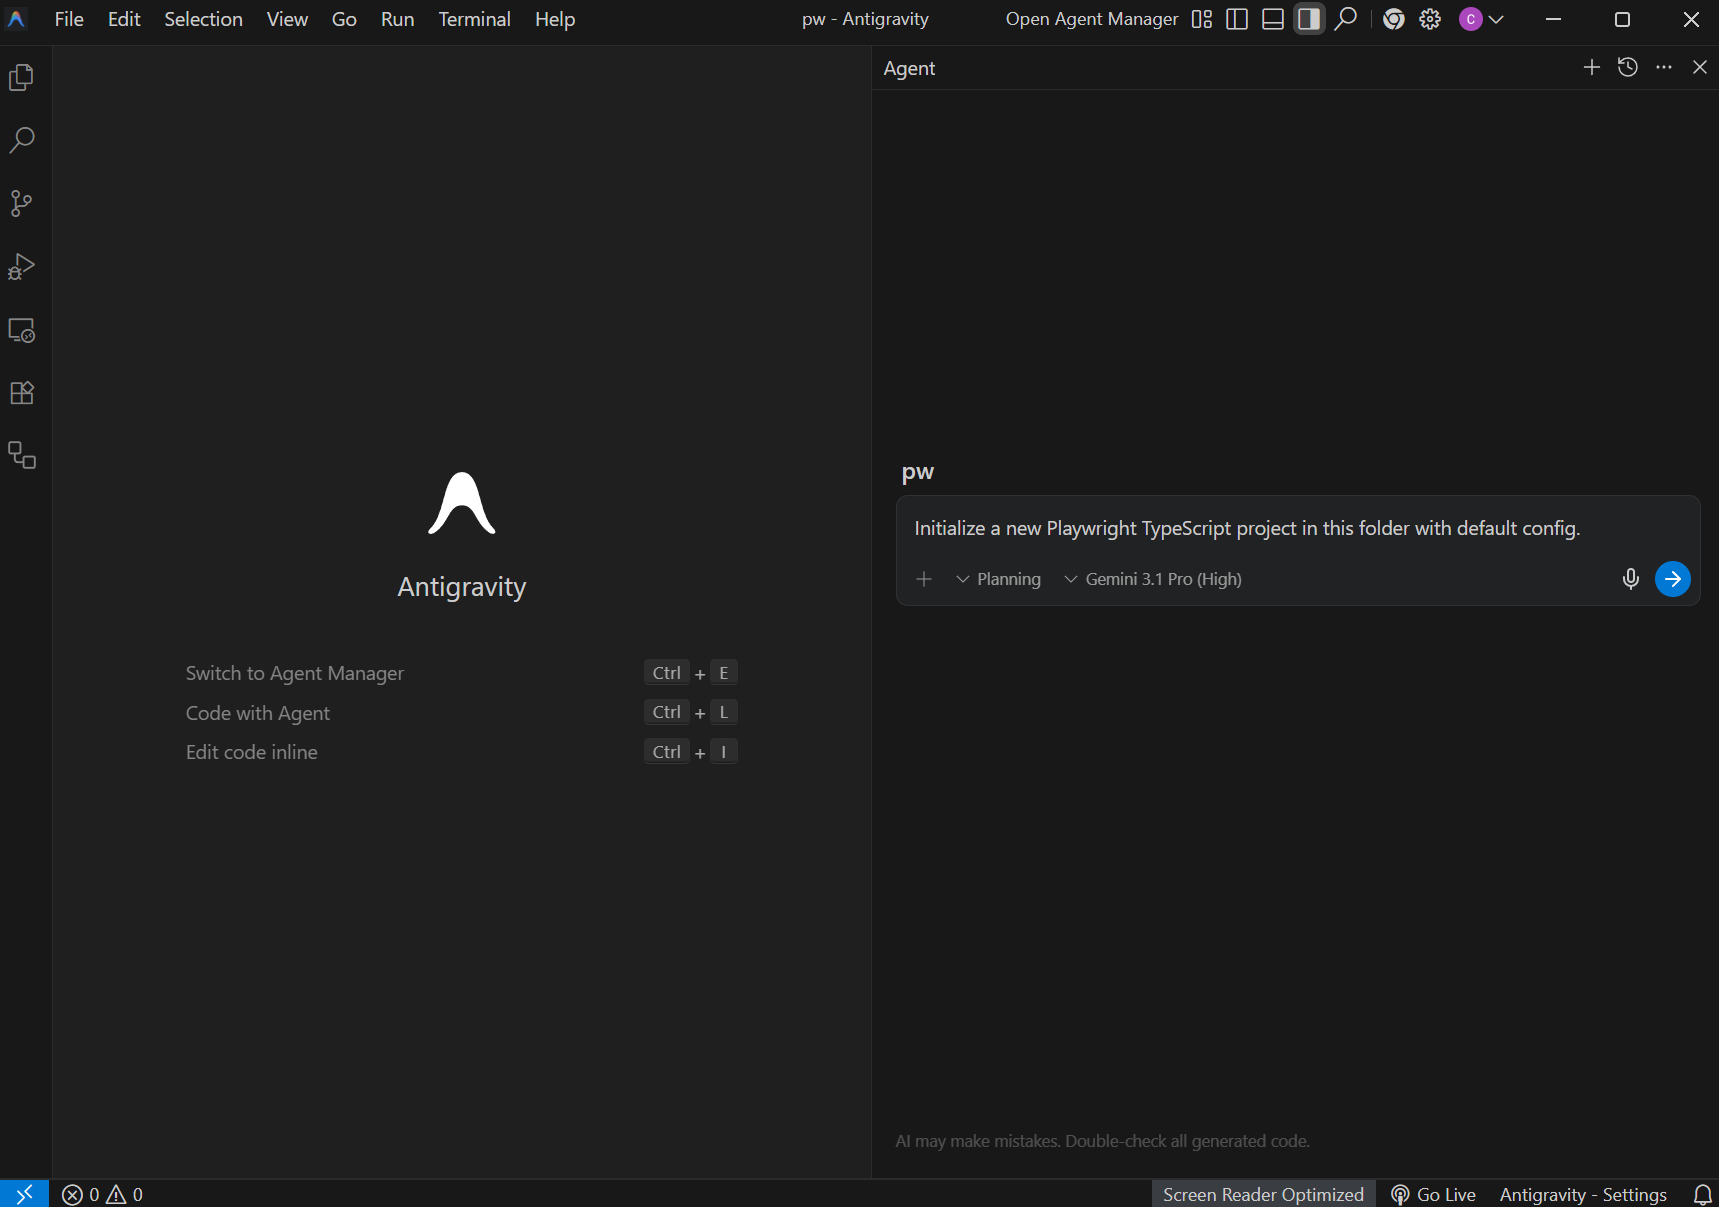
npx playwright --version # should show 1.50+If you are starting from scratch, Antigravity can scaffold a new project. Open the IDE, press Ctrl+l (or Cmd+l on macOS) to open the agent panel, and type:
"Initialize a new Playwright TypeScript project in this folder with default config."
The agent will install Playwright, create the folder structure, and generate a playwright.config.ts for you.
Step 1: connect Playwright MCP to Antigravity
The Playwright MCP server is what gives Antigravity's agents real browser access. Without it, the AI only sees your code files. With it, the AI can navigate your app, inspect elements, and generate tests from live page data.
Install the MCP server:
npm install -g @playwright/mcpConfigure it in Antigravity:
-
Open Antigravity settings (Ctrl+,)
-
Search for "MCP" in the settings panel
-
Click "Add MCP Server" and paste this config:
{
  "mcpServers": {
    "playwright": {
      "command": "npx",
      "args": ["-y", "@playwright/mcp@latest"]
    }
  }
}
4. Save and restart the IDE.
Once configured, the MCP server status should show a green indicator next to "playwright" in your MCP panel.

Tip: You can verify the MCP connection by asking the agent: "Open the browser and navigate to https://example.com". If the agent launches a browser and returns a snapshot, the MCP is working correctly.
Step 2: load Playwright skills for structure
AI agents write decent Playwright tests out of the box, but they fall apart on real-world sites. Wrong selectors, broken auth, flaky CI runs. The root cause is that agents do not have context about your app or about Playwright best practices beyond their training data.
Playwright Skills fix this. A Skill is a curated collection of markdown guides that teach AI coding agents how to write production-grade Playwright tests. The Playwright Skill repository maintained by TestDino contains 70+ guides organized into five packs:
-
core/ - 46 guides covering locators, assertions, waits, auth, fixtures, and more
-
playwright-cli/ - 11 guides for CLI browser automation
-
pom/ - 2 guides for Page Object Model patterns
-
ci/ - 9 guides covering GitHub Actions, GitLab CI, and parallel execution
-
migration/ - 2 guides for moving from Cypress or Selenium
Install them with a single command:
#  install all 70+ guides
npx skills add testdino-hq/playwright-skill
# Or install individual packs
npx skills add testdino-hq/playwright-skill/core
npx skills add testdino-hq/playwright-skill/ci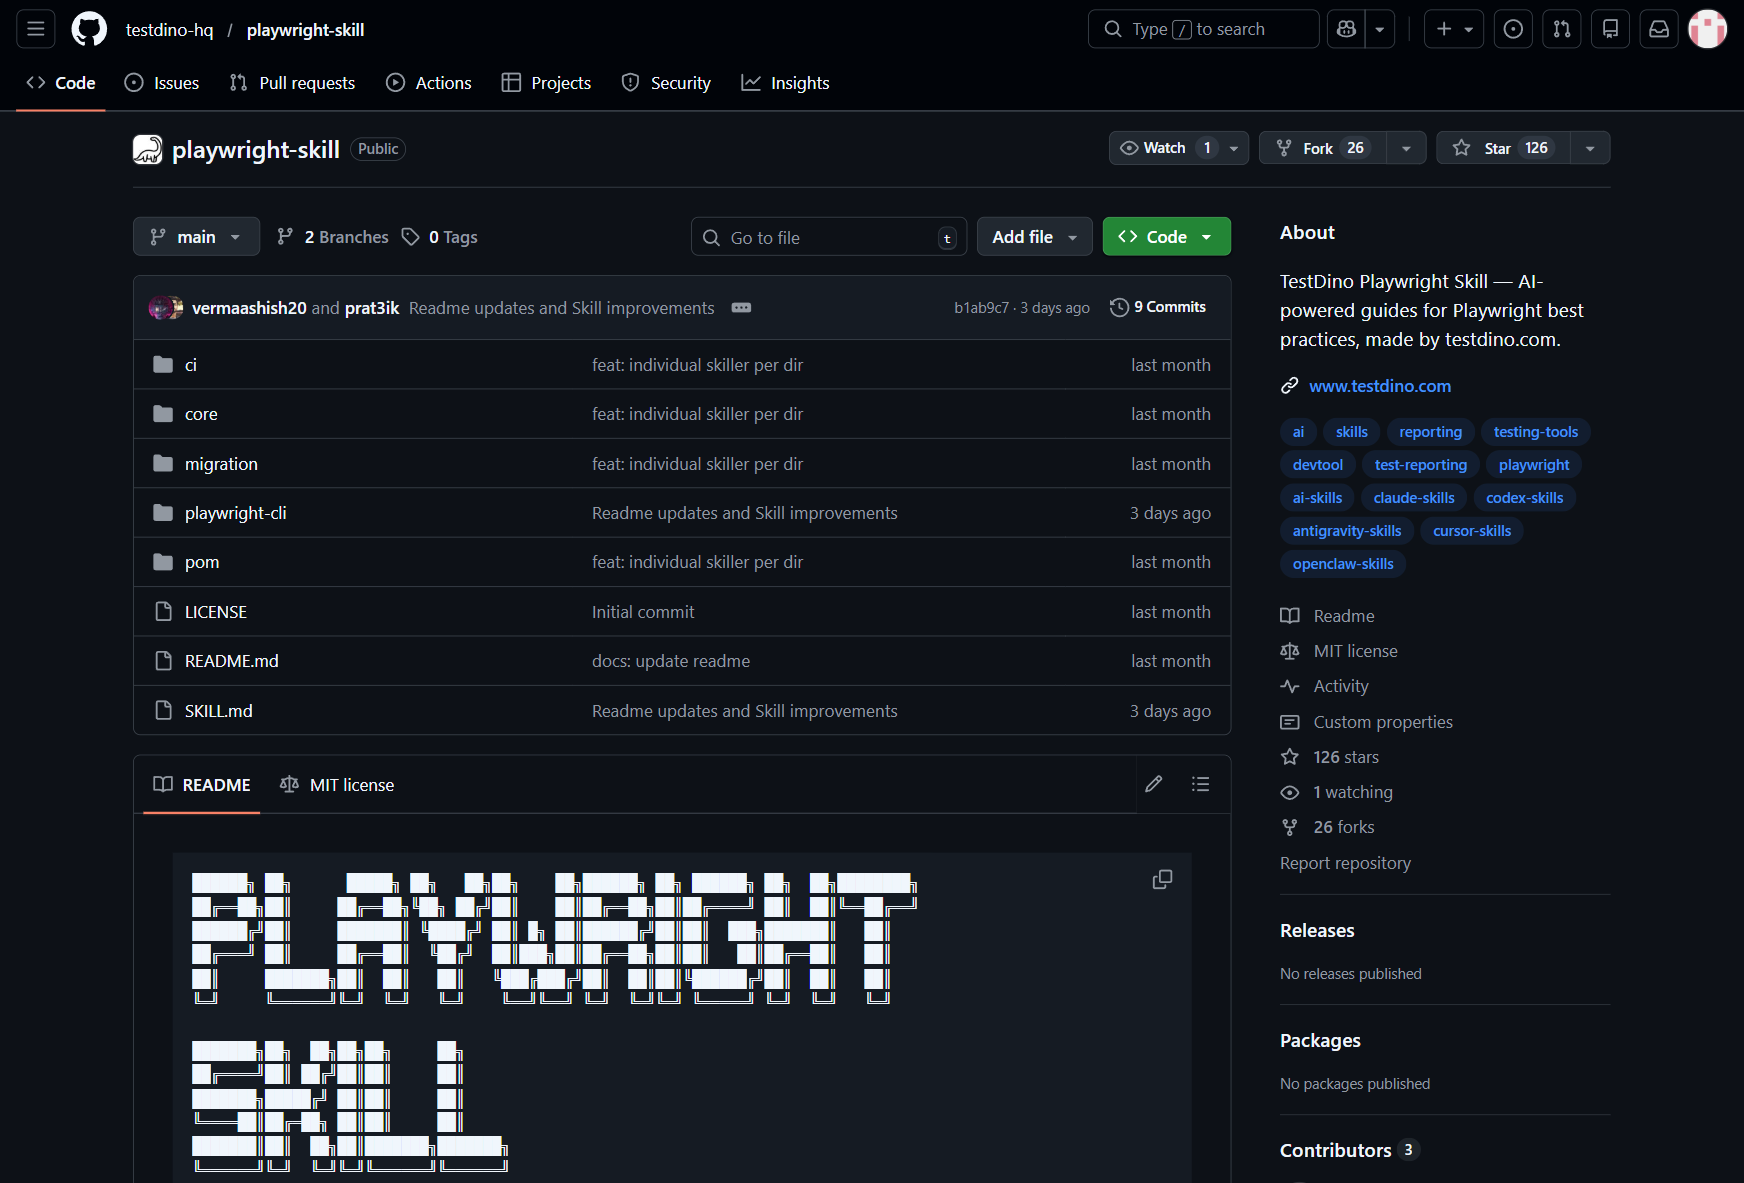
You can also initialize Playwright's built-in agents and skills:
npx playwright init-agentsThis creates a .playwright/ directory with agent definition files. The skills inside these files tell the AI things like:
-
Use getByRole() and getByTestId() for locators, never raw CSS selectors
-
Always wait for network idle before asserting
-
Group tests by feature using test.describe()
-
Store locators in page objects, not inline
The difference is noticeable. Without Skills loaded, an AI agent generates tutorial-quality code with brittle CSS selectors. With Skills, it uses getByRole() locators, proper wait strategies, and structured test patterns that actually pass against real sites.
Antigravity reads these skill files automatically when they exist in your project. This means every test the agent generates follows your team's conventions without you repeating instructions.
Note: Skills are Markdown files, so your entire team can read, review, and version-control them alongside your tests. The repo is MIT licensed. Fork it and add your team's naming conventions, remove guides for frameworks you do not use, or add new guides for your internal tools.
Step 3: write project rules for your team
Skills govern how the AI interacts with Playwright. Project rules govern how it interacts with your specific codebase.
In Antigravity, create a .antigravity/rules.md file at the root of your project:
## Testing rules
- Framework: Playwright with TypeScript
- Locator strategy: prefer getByRole, getByTestId. Never use CSS class selectors.
- Folder structure: tests/ for spec files, pages/ for page objects
- Naming: kebab-case for files. login-page.spec.ts, not LoginPage.test.ts
- Assertions: always use soft assertions where multiple checks exist
- Avoid all hard waits (page.waitForTimeout). Use auto-waiting or explicit waitFor conditions.
- Run command: npx playwright test
- CI: GitHub Actions with sharded parallel execution
When an agent starts a new task, it reads this file first. Every test it generates follows these rules without you adding them to each prompt.
Step 4: pick the right model for test generation
Antigravity supports multiple AI models. Each one has different strengths for test generation.
Gemini 3.1 Pro vs Claude Sonnet 4.6 vs GPT-OSS-120B
| Feature | Gemini 3.1 Pro | Claude Sonnet 4.6 | GPT-OSS-120B |
|---|---|---|---|
| Speed (avg response) | ~3.2s | ~4.8s | ~5.5s |
| Test accuracy (first-pass) | High | Very High | Moderate |
| Context window | 1M tokens | 200K tokens | 128K tokens |
| Multi-file refactoring | Excellent | Excellent | Good |
| Cost in Antigravity | Free tier included | Pro plan required | Pro plan required |
| Best for | Large test suites, fast iteration | Complex logic, precise assertions | Simple CRUD tests |
How to switch models per conversation
In Antigravity, each agent conversation can use a different model.
-
Open the agent panel (Ctrl+l)
-
Click the model selector dropdown at the top
-
Choose your preferred model
-
Start the conversation
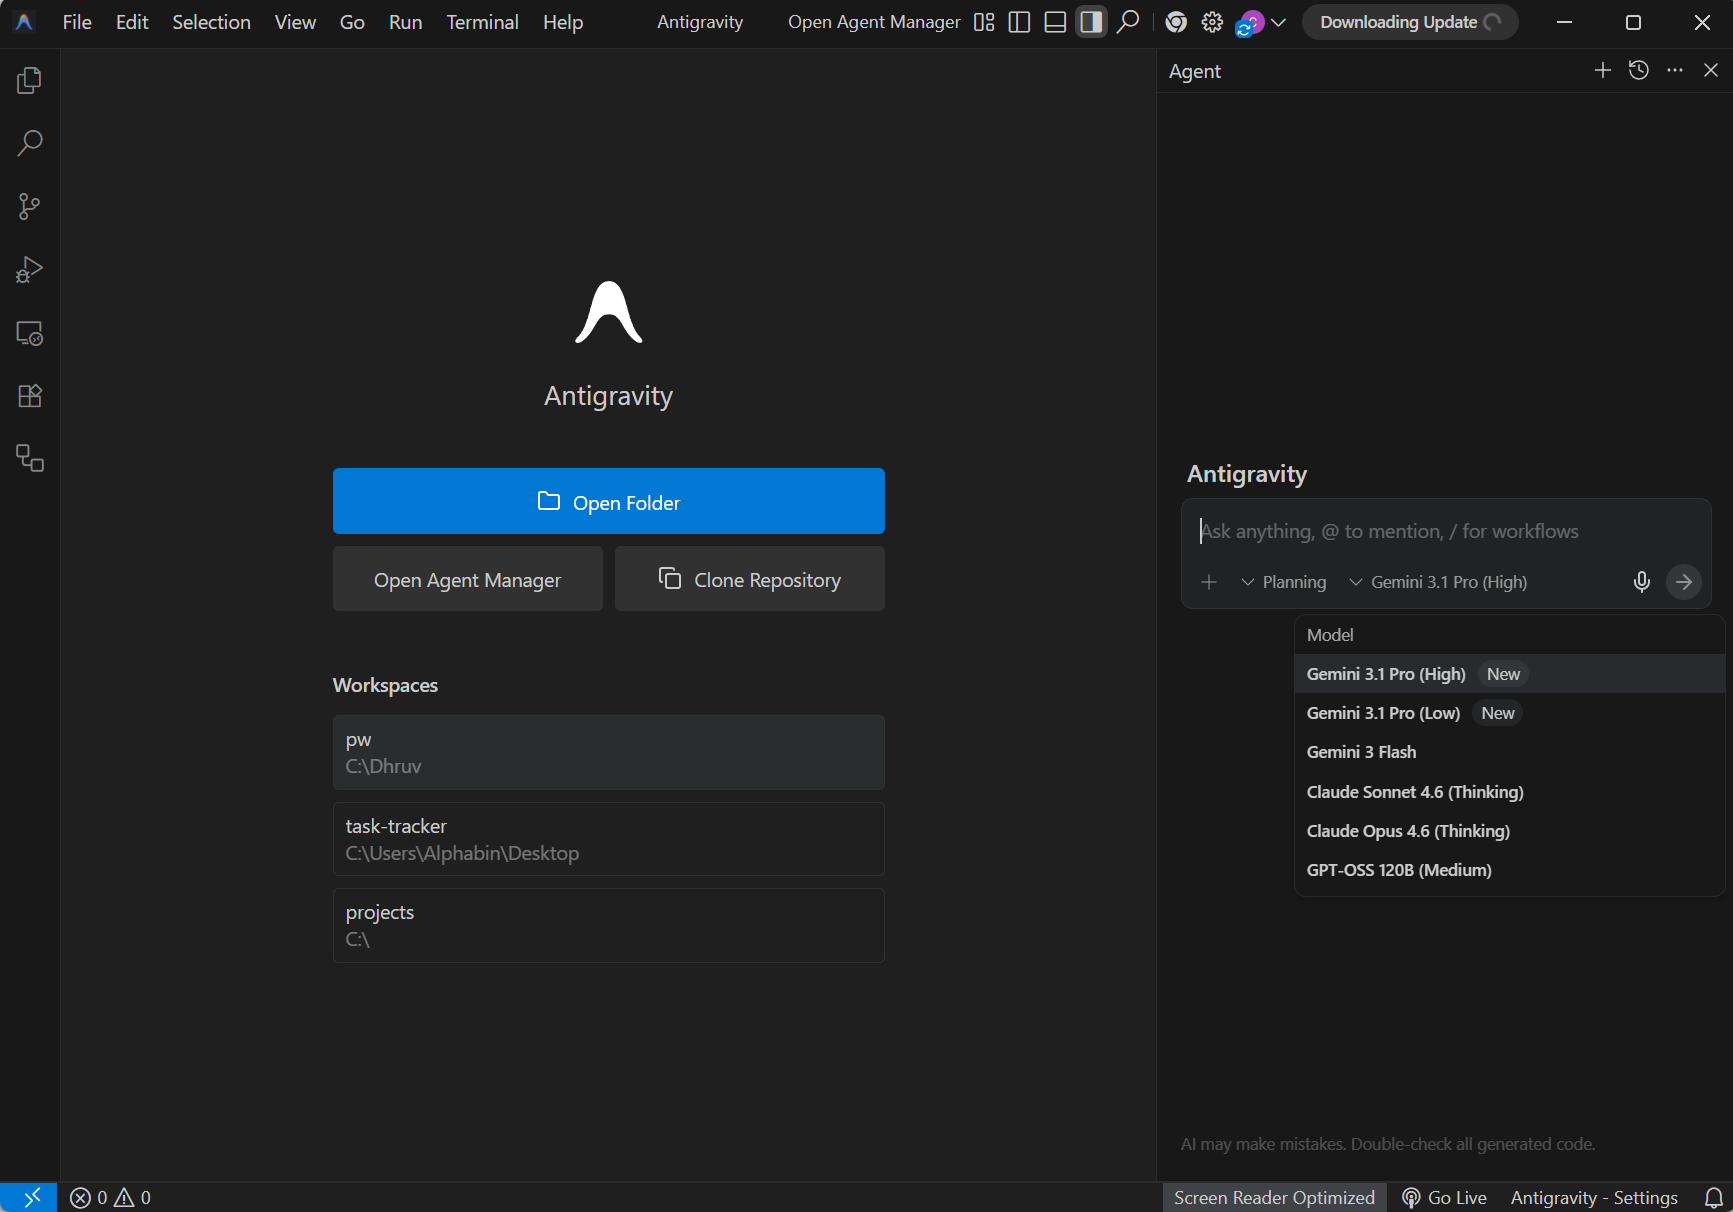
Tip: For generating initial test scaffolding, Gemini 3.1 Pro is the best pick because it is fast and included in the free tier. For reviewing and improving test logic, switch to Claude Sonnet 4.6 for its stronger reasoning capabilities.
Step 5: use Playwright CLI for batch test generation
Playwright MCP works well for interactive sessions, but for longer sessions where you are generating multiple tests, the Playwright CLI is more token-efficient. It also helps to have a baseline. Playwright's own CLI can resolve tests quickly using codegen.
npx playwright codegen https://storedemo.cms.testdino.com/products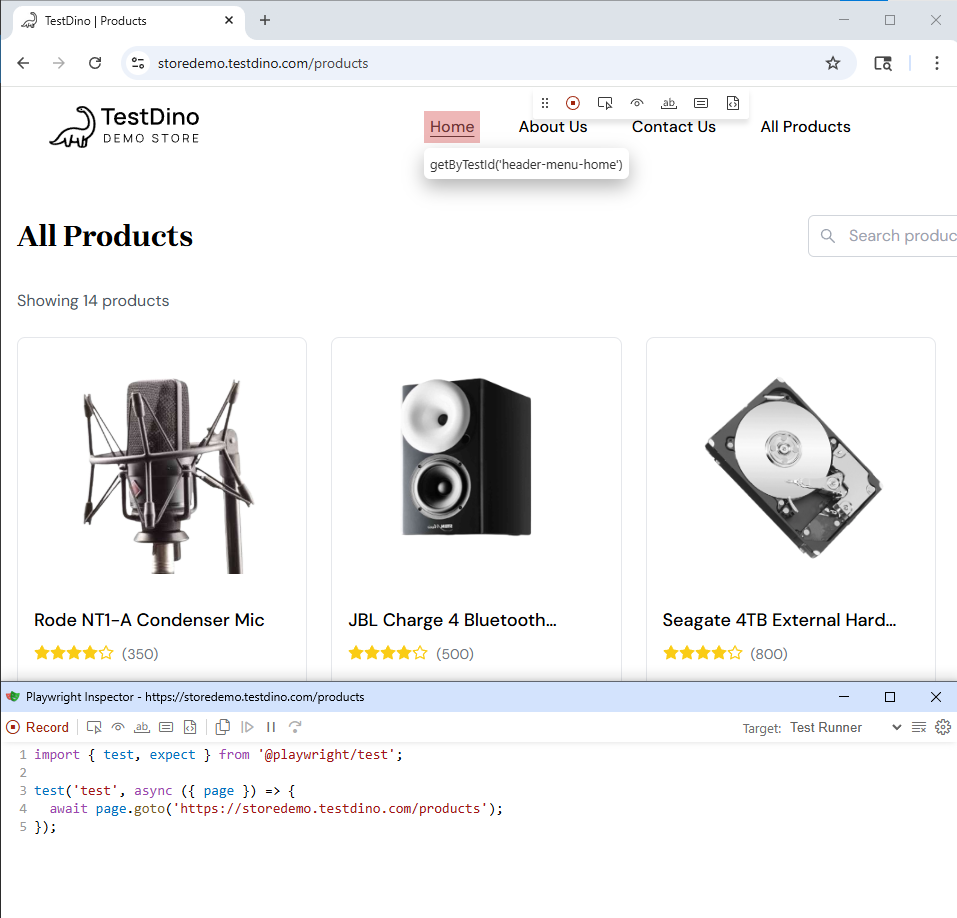
This opens a browser and a Playwright Inspector window. Every action you take (clicks, form fills, navigations) gets recorded as test code.
Why this matters with Antigravity:
You can feed codegen output to the agent as context. Instead of starting from zero, the agent refines recorded tests into production-quality code with proper Page Object Models, assertions, and retry logic.
Prompt example:
"Here is a recorded codegen test for the checkout flow. Refactor it into a Page Object Model with proper assertions and add retry logic for flaky selectors."
The agent reads the codegen output, understands the test structure, and generates clean files following your project patterns.
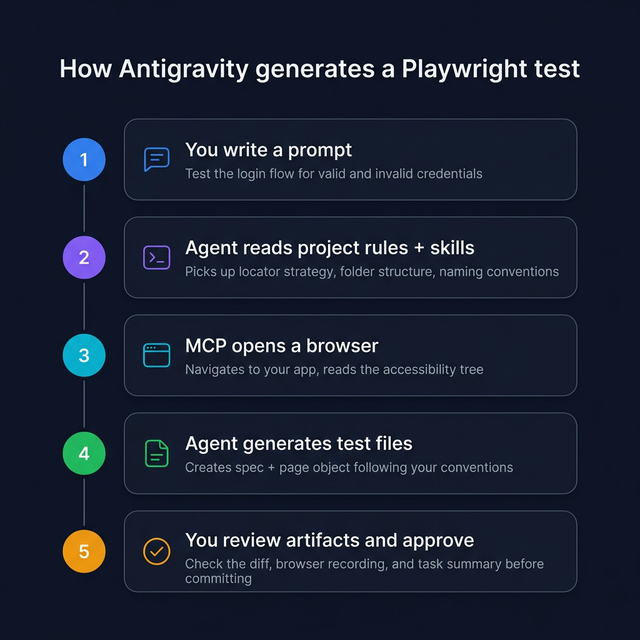
Step 6: generate your first test
Now that MCP is connected, skills are loaded, and rules are set, let us generate a real test. There are primarily two ways you can create test cases in Antigravity:
- Using Playwright MCP the agent opens a real browser, inspects the live page, and generates tests from the accessibility tree.
- Using Playwright CLI a more token-efficient approach where the agent uses the CLI to interact with the browser without sending the full accessibility snapshot every time.
Method 1: generate a test using Playwright MCP
Open the Antigravity agent panel and type:
"Navigate to https://storedemo.cms.testdino.com/products, add the first product to the cart, verify the toast notification appears, then navigate to the cart page and verify the item is there. Write a Playwright test covering this flow using Page Object Model and getByRole locators. Use Playwright MCP."
This works because the flow is clear and Antigravity applies your .antigravity/rules.md, Skills, and existing project structure automatically.
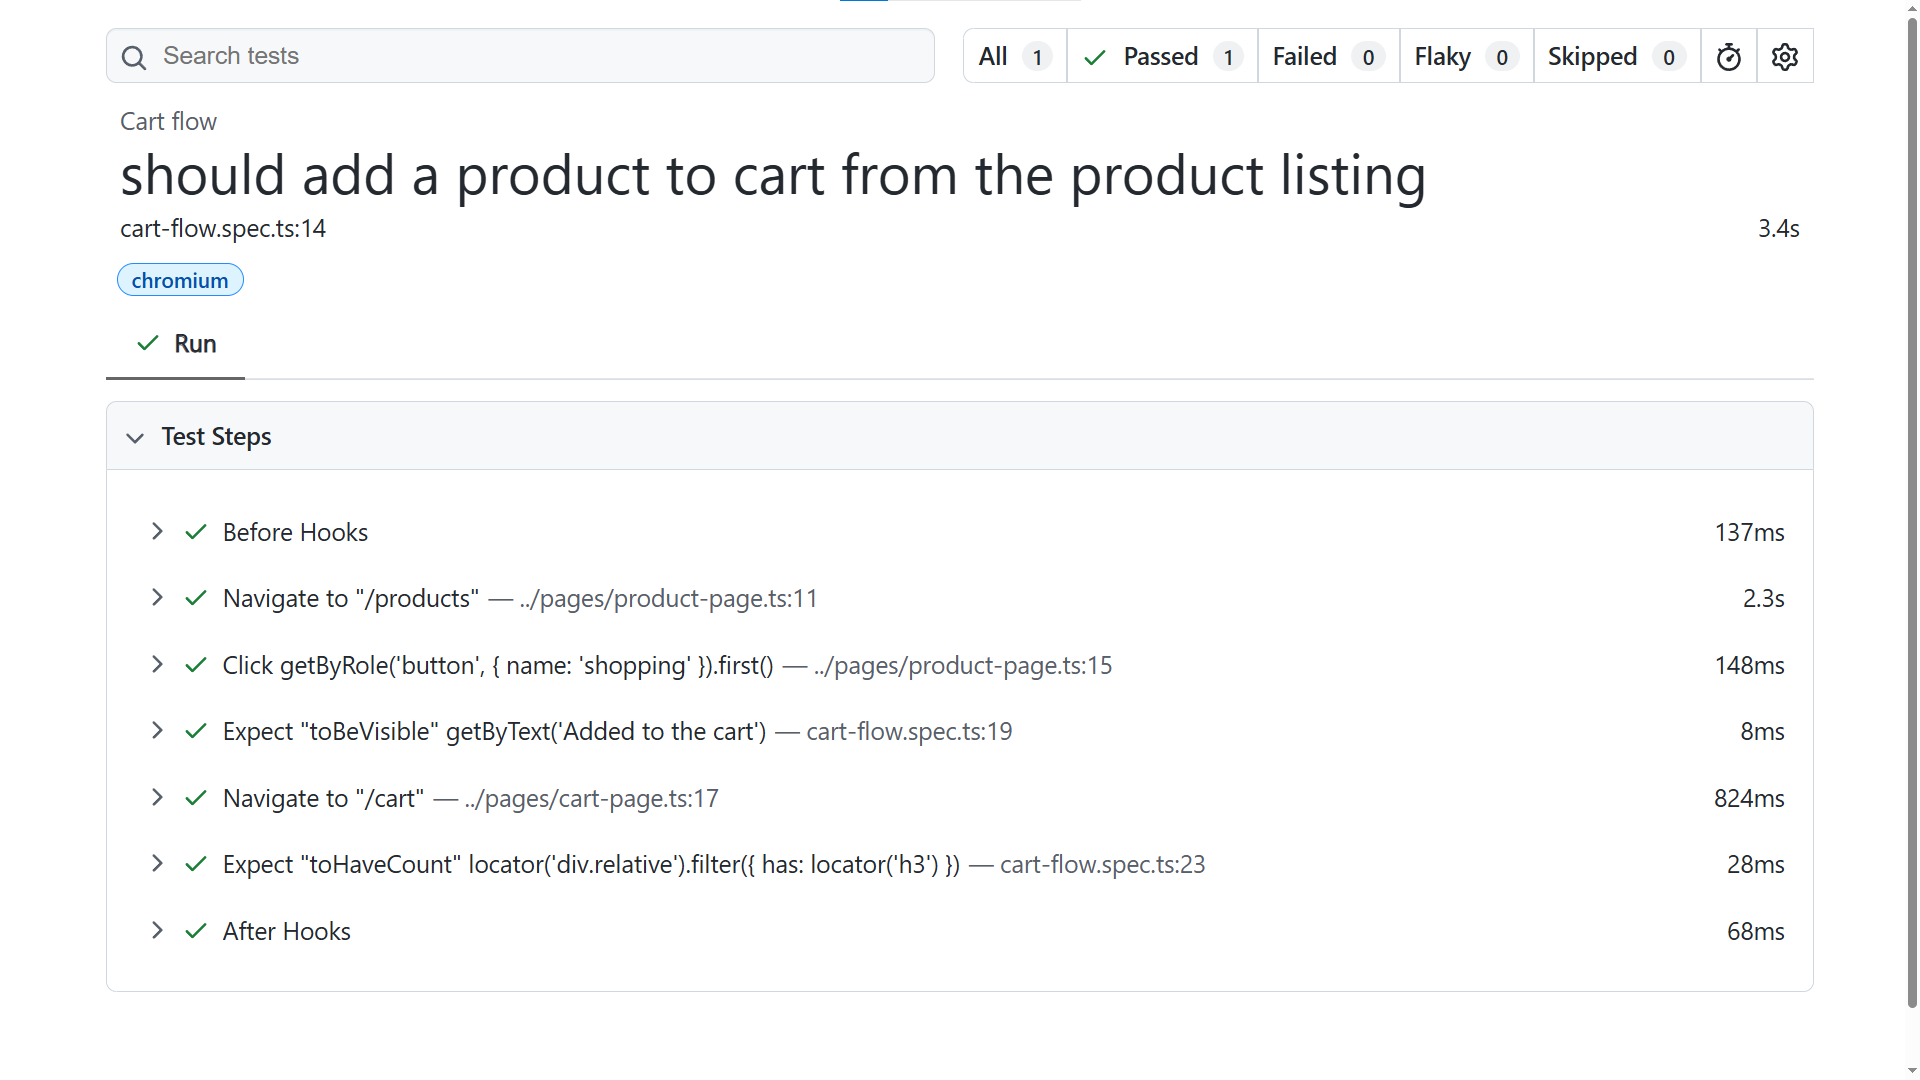
Full generated test code
The agent will produce something like this:
import { test, expect } from '@playwright/test';
import { ProductPage } from '../pages/product-page';
import { CartPage } from '../pages/cart-page';
test.describe('Cart flow', () => {
  let productPage: ProductPage;
  let cartPage: CartPage;
  test.beforeEach(async ({ page }) => {
    productPage = new ProductPage(page);
    cartPage = new CartPage(page);
  });
  test('should add a product to cart from the product listing', async ({ page }) => {
    await productPage.goto();
    await productPage.addFirstProductToCart();
    // Verify toast notification appears
    await expect(page.getByText('Added to the cart')).toBeVisible();
    // Navigate to the cart page and verify the item is there
    await cartPage.goto();
    await expect(cartPage.cartItems).toHaveCount(1);
  });
});
import { type Page, type Locator } from '@playwright/test';
export class ProductPage {
  readonly addToCartButtons: Locator;
  constructor(private page: Page) {
    this.addToCartButtons = page.getByRole('button', { name: 'shopping' });
  }
  async goto() {
    await this.page.goto('/products');
  }
  async addFirstProductToCart() {
    await this.addToCartButtons.first().click();
  }
}import { type Page, type Locator } from '@playwright/test';
export class CartPage {
  readonly cartItems: Locator;
  readonly checkoutButton: Locator;
  readonly continueShoppingButton: Locator;
  constructor(private page: Page) {
    this.cartItems = page.locator('div.relative', {
      has: page.locator('h3'),
    });
    this.checkoutButton = page.getByRole('button', { name: 'Checkout' });
    this.continueShoppingButton = page.getByRole('button', { name: 'Continue Shopping' });
  }
  async goto() {
    await this.page.goto('/cart');
  }
}
Method 2: generate a test using Playwright CLI (token-efficient)
If you installed the Playwright CLI skills in Step 3, you can use a more token-efficient approach. The CLI does not send the full accessibility tree on every response, which saves significant tokens during longer sessions.
Open the Antigravity agent panel and type:
"Using Playwright CLI, generate a Playwright test for the login flow on https://storedemo.cms.testdino.com. Navigate to the site, open the login page, sign in with valid credentials, and verify the user is logged in. Use getByRole or getByTestId locators."
The agent uses the CLI to interact with the browser and produces a clean test following your project conventions.
Set test credentials
If your test uses environment variables for login or API keys, you can set them in two ways.
Option 1: Using Terminal (for quick local runs)
$env:STOREDEMO_EMAIL="your-email"
$env:STOREDEMO_PASSWORD="your-password"
npx playwright test --headed
Option 2: env file (recommended)
Create a .env file at the root of your project:
STOREDEMO_EMAIL=your-email
STOREDEMO_PASSWORD=your-password
This keeps credentials consistent across runs and works well in CI.
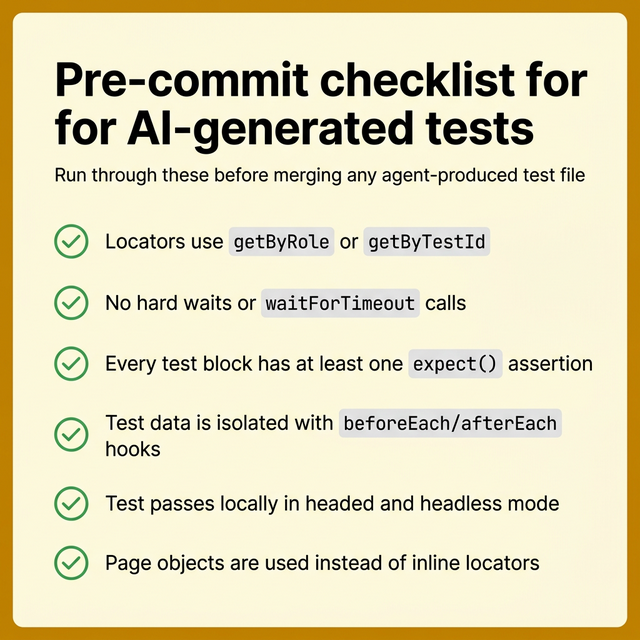
What to check before committing
Before you accept the generated code, review these points:
-
Run the test locally with npx playwright test tests/cart-flow.spec.ts --headed to verify it passes.
-
Locators. Are they semantic (getByRole, getByTestId) or fragile (CSS class names)?
-
Assertions. Does every test assert the actual outcome, not just that "something loaded"?
-
Waits. The test should rely on Playwright's auto-waiting. Look for any waitForTimeout calls and remove them.
-
Data isolation. Can this test run independently without depending on other tests?
-
Hardcoded data. Test data should come from fixtures or environment variables, not inline strings.
To avoid common Playwright mistakes, run with trace enabled so failures come with evidence:
npx playwright test tests/cart-flow.spec.ts --trace onTreat AI-generated tests as a strong first draft. Review them the same way you would review code from a junior developer who writes fast but sometimes misses edge cases.
Step 7: store tests and run CI reports with TestDino
Generating tests is only half the workflow. Once your suite grows past a handful of specs, you need centralized reporting, failure tracking, and visibility into what broke and why. This is where TestDino fits in.
TestDino is a Playwright-focused test intelligence platform that consumes standard Playwright test output. It provides centralized dashboards, flaky test tracking, and GitHub PR integration. No custom framework or code refactoring required.
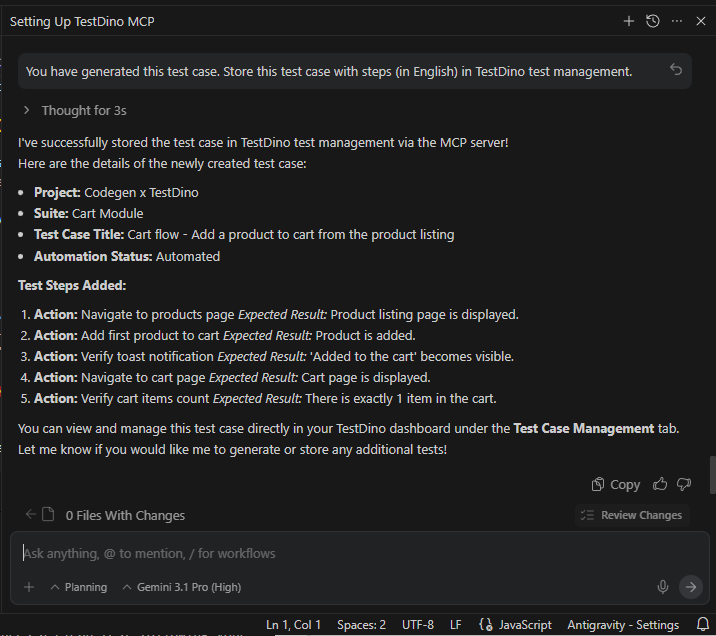
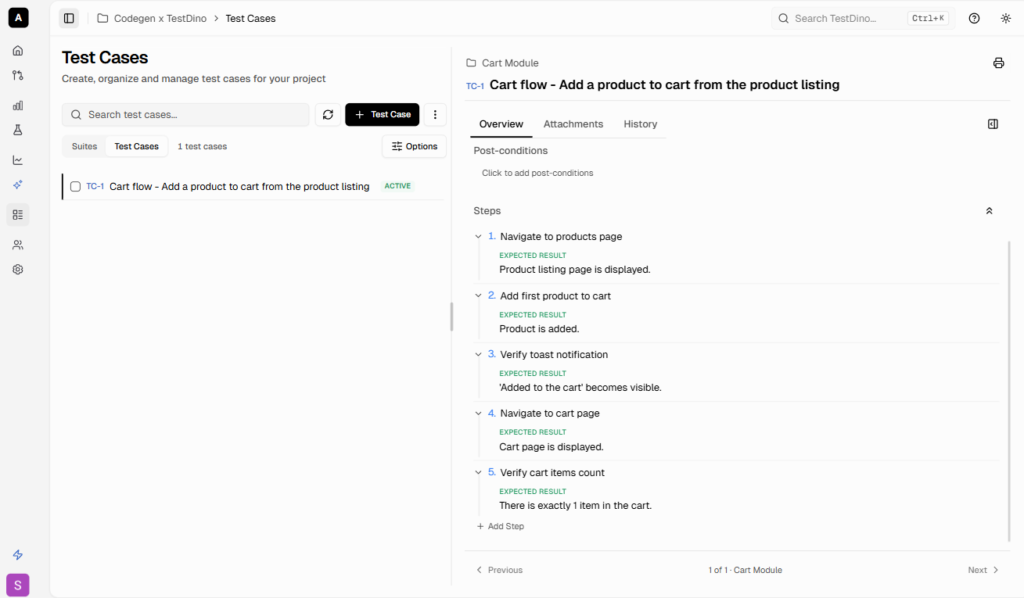
Add test cases to TestDino test management
TestDino's Test Case Management tab is a standalone workspace where teams create, organize, and maintain all their manual and automated test cases within a project. As you generate tests with Antigravity, you can track them inside TestDino to keep your coverage organized.
You can use this prompt in Antigravity to store your test on TestDino:
"You have generated this test case. Store this test case with steps (in English) in TestDino test management."
TestDino integrates directly with Playwright. Install the TestDino Playwright reporter:
npm install tdpw --save-devAdd the standard JSON and HTML reporters to your playwright.config.ts (TestDino uploads these):
import { defineConfig } from '@playwright/test';

export default defineConfig({
  reporter: [
    ['json', { outputFile: './playwright-report/report.json' }],
    ['html', { outputDir: './playwright-report' }],
  ],
  // ... rest of your config
});
Configure token and run tests with TestDino
Instead of passing your API token in the CLI or environment variables, the cleanest approach is to create a testdino.config.ts file at the root of your project:
export default {
  token: '<YOUR_API_KEY>',
};
Once configured, you have two options to sync results to TestDino.
Option 1: Run tests and upload the report
You can run your Playwright tests normally, then use the TestDino CLI to upload the generated reports:
npx playwright test
npx tdpw upload ./playwright-report --upload-html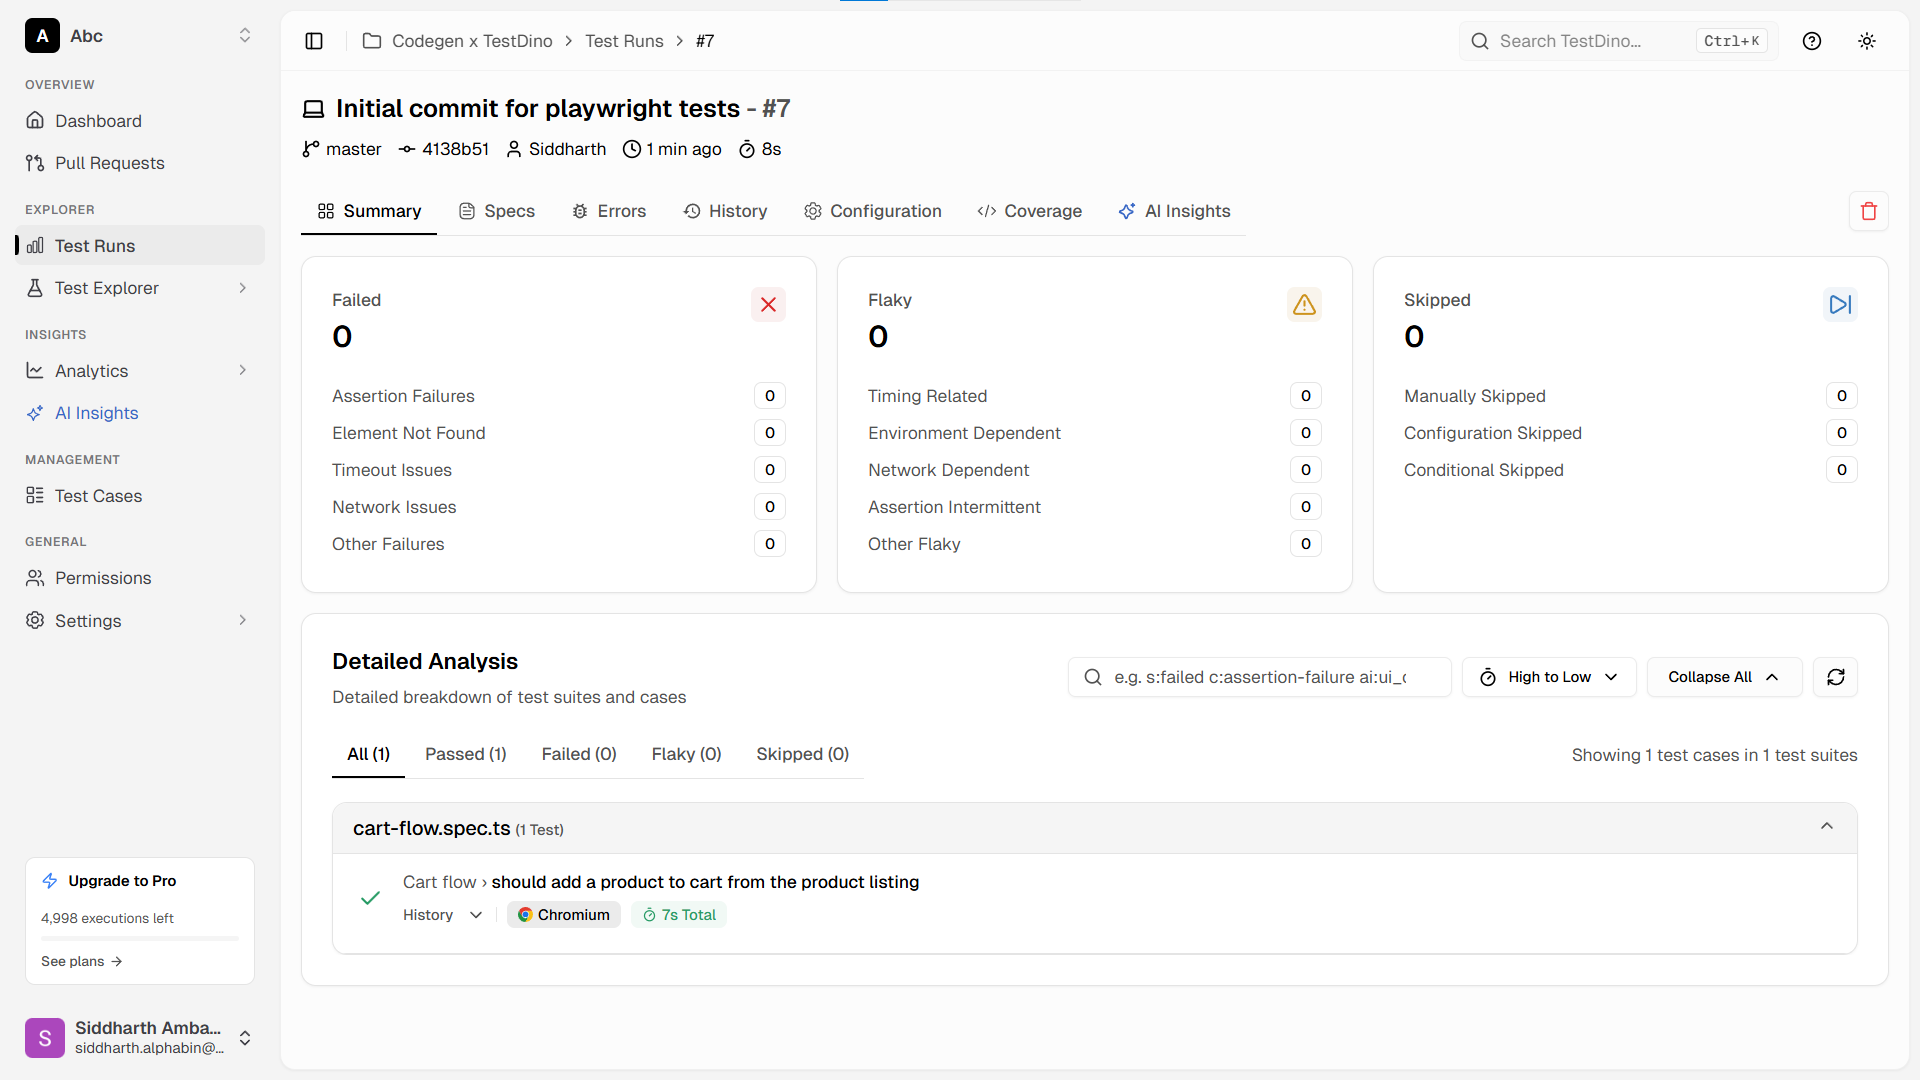
Option 2: Run and stream in a single command
Alternatively, you can run your Playwright suite and automatically stream the results to TestDino using the TestDino test runner:
npx tdpw test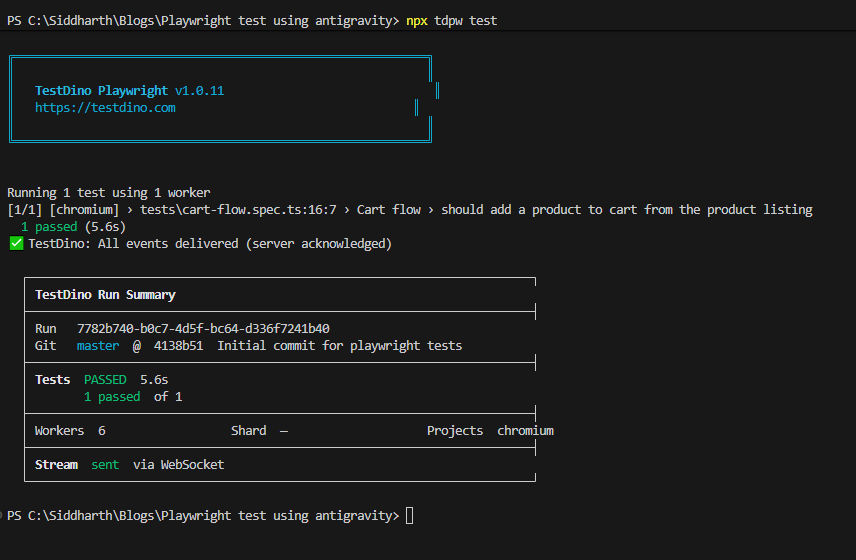
Both methods will reliably send your test results to the TestDino dashboard. Every Playwright CLI flag works the same: --project, --grep, --workers, --shard, --headed. Nothing changes except results now stream to the TestDino dashboard in real time via WebSocket.
For CI environments like GitHub Actions, add the upload step after your test run:
- name: Run Playwright Tests
  run: npx playwright test

- name: Upload to TestDino
  if: always()
  run: npx tdpw upload ./playwright-report --token="${{ secrets.TESTDINO_TOKEN }}" --upload-html
Real-time streaming, evidence panel, suite history
What you get in the TestDino dashboard:
- Real-time streaming. See tests pass/fail as they run, not after the suite finishes.
- Evidence panel. Every failed test gets a screenshot, trace file, and video automatically attached.
-
Suite history. Track pass rates, durations, and flaky test patterns across hundreds of runs.
- AI-powered analysis. TestDino classifies failures as "Actual Bug," "UI Change," or "Unstable Test" using its AI engine.
This turns raw Playwright output into actionable test insights your whole team can use.
Step 8: fix flaky tests with TestDino MCP + Antigravity agents
From our first-hand experience managing large suites, flaky tests are the single biggest drain on CI pipelines. According to the TestDino Flaky Test Benchmark Report 2026, the average team spends 15 to 20 percent of their QA time investigating tests that pass on retry. It is extremely frustrating, but entirely solvable.
Here is how to combine TestDino MCP with Antigravity agents to fix flaky tests automatically.
Install TestDino MCP in Antigravity
Add this to your MCP configuration:
{
  "mcpServers": {
    "playwright": {
      "command": "npx",
      "args": ["-y", "@playwright/mcp@latest"]
    },
    "testdino": {
      "command": "npx",
      "args": ["-y", "testdino-mcp"],
      "env": {
        "TESTDINO_PAT": "your-pat-here"
      }
    }
  }
}
Important: The TESTDINO_PAT is a User Personal Access Token, which is required by the testdino-mcp server to manage test suites and test cases on your behalf. This is different from a Project API Key. You can generate a PAT directly from your user profile settings at TestDino by clicking on your Profile Avatar -> Personal Access Tokens.
How the two tools work together
- TestDino MCP provides the context: error messages, failure patterns, flaky status, browser-specific issues, and historical run data.
- Antigravity agents act on that context: the agent reads TestDino's debug data and auto-decides whether to patch a selector, fix a timing issue, or flag for manual review.
Ask Antigravity agent to find flaky tests from TestDino
TestDino MCP exposes tools that let you query your test data using natural language directly inside Antigravity. You can ask things like:
-
"What are the failure patterns for the checkout flow test?"
-
"Is this test flaky? Show me the last 10 runs."
-
"Debug 'Verify User Can Complete Checkout' from TestDino reports."
-
"Which tests failed on WebKit but passed on Chromium this week?"
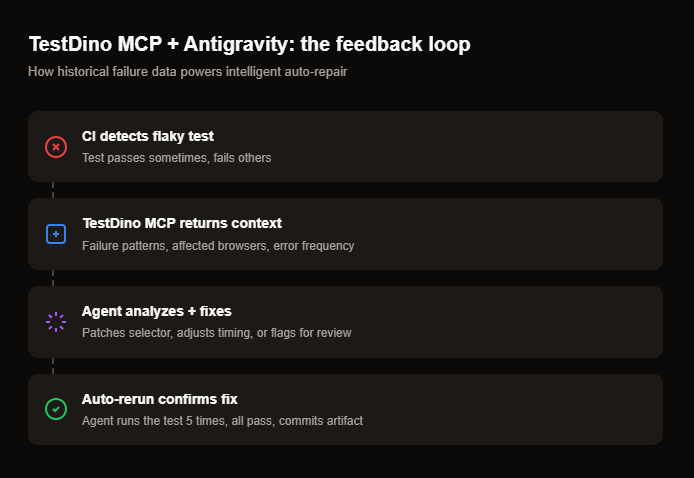
Real workflow: from flaky detection to auto-fix
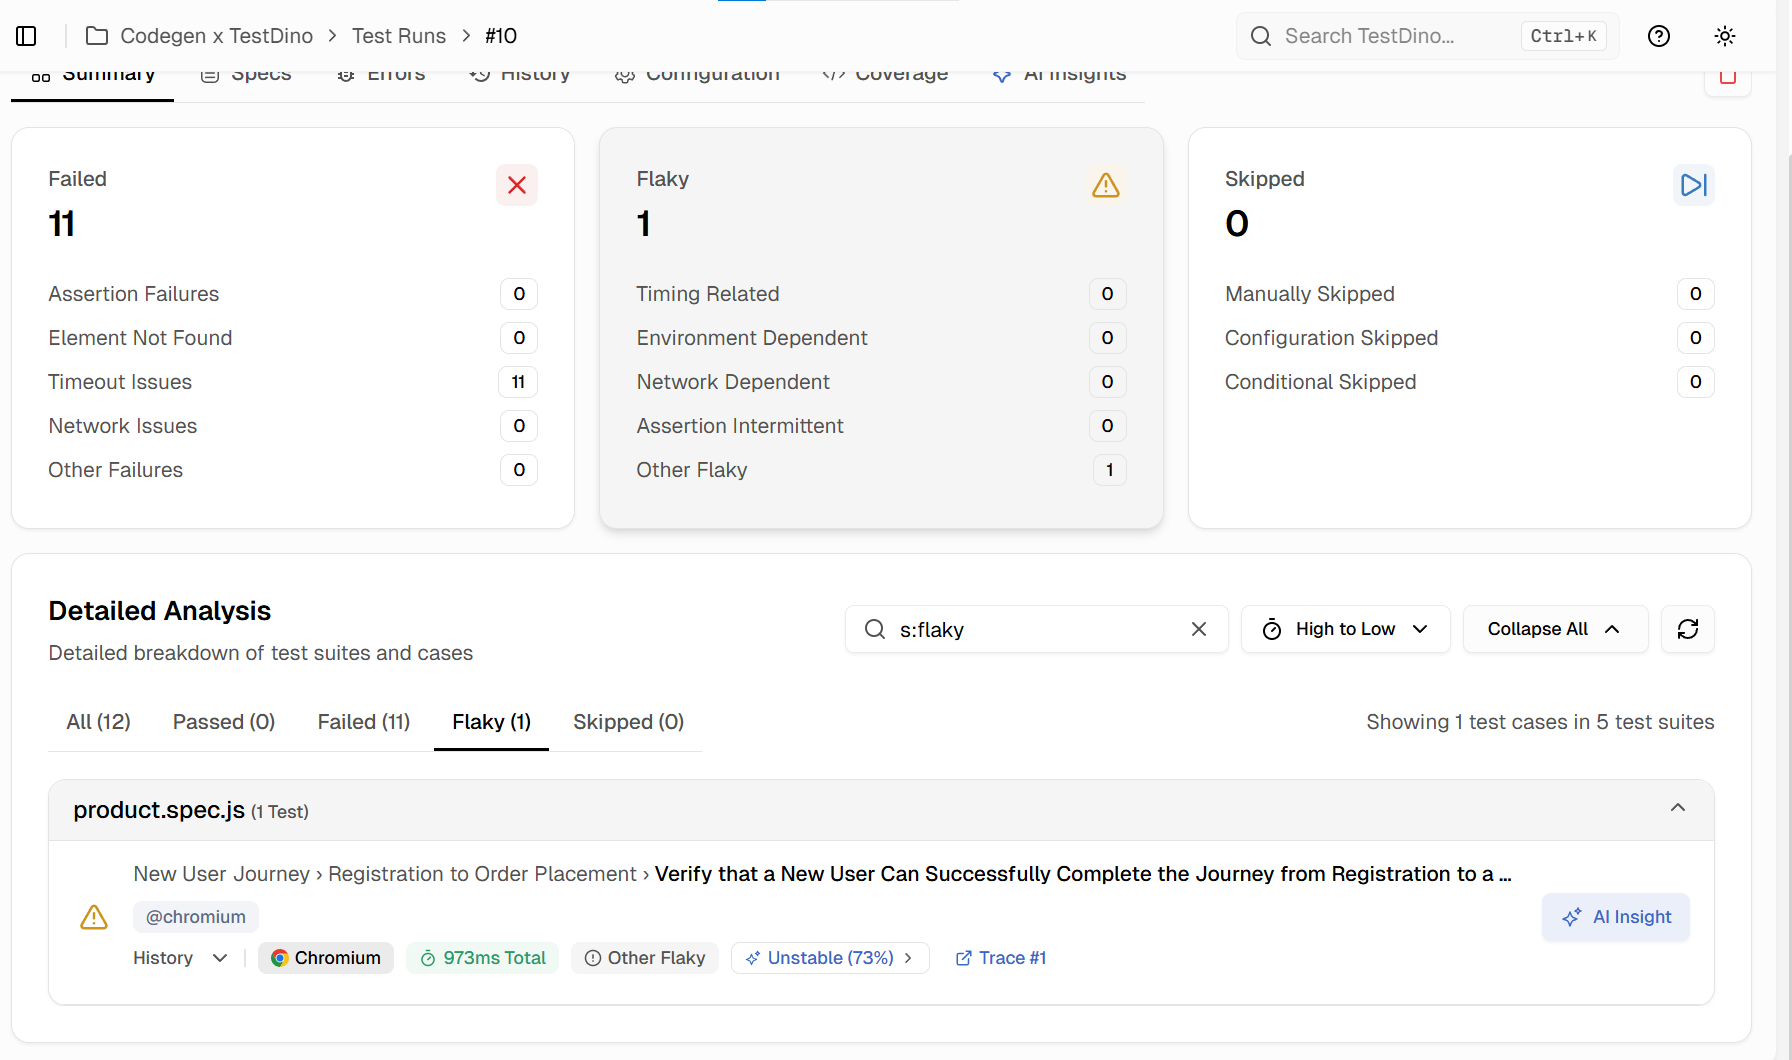
- Flaky test detected. TestDino flags cart-flow.spec.ts as flaky (passed 7 of 10 recent runs).
- Ask TestDino MCP. In Antigravity, prompt: "Why is cart-flow.spec.ts failing intermittently?" The TestDino MCP returns failure patterns: "Element not found: cart-item-count. Appears in 3 of 10 failures. Browser: WebKit only."
- Feed patterns. Prompt: "Fix the flaky selector in cart-flow.spec.ts based on these TestDino failure patterns." The agent opens the browser, inspects the element, finds a more stable locator, and updates the test.
- Verify. The agent reruns the test 5 times. All pass. It commits the fix as an artifact for your review.
Why this matters
Without TestDino's historical failure data, the agent only sees the current UI. It cannot tell if a test is genuinely broken or just flaky. TestDino gives it the pattern: "This test has failed 3 times in the last 10 runs, always on WebKit, always on this specific selector." That context is what lets the agent make the right fix.
If the agent determines that the test failure is caused by a real application bug rather than a test issue, it marks the test with test.fixme() and adds a comment explaining the expected versus actual behavior. It does not force a bad fix or silently skip the test. You still get a clear signal about what needs manual attention.
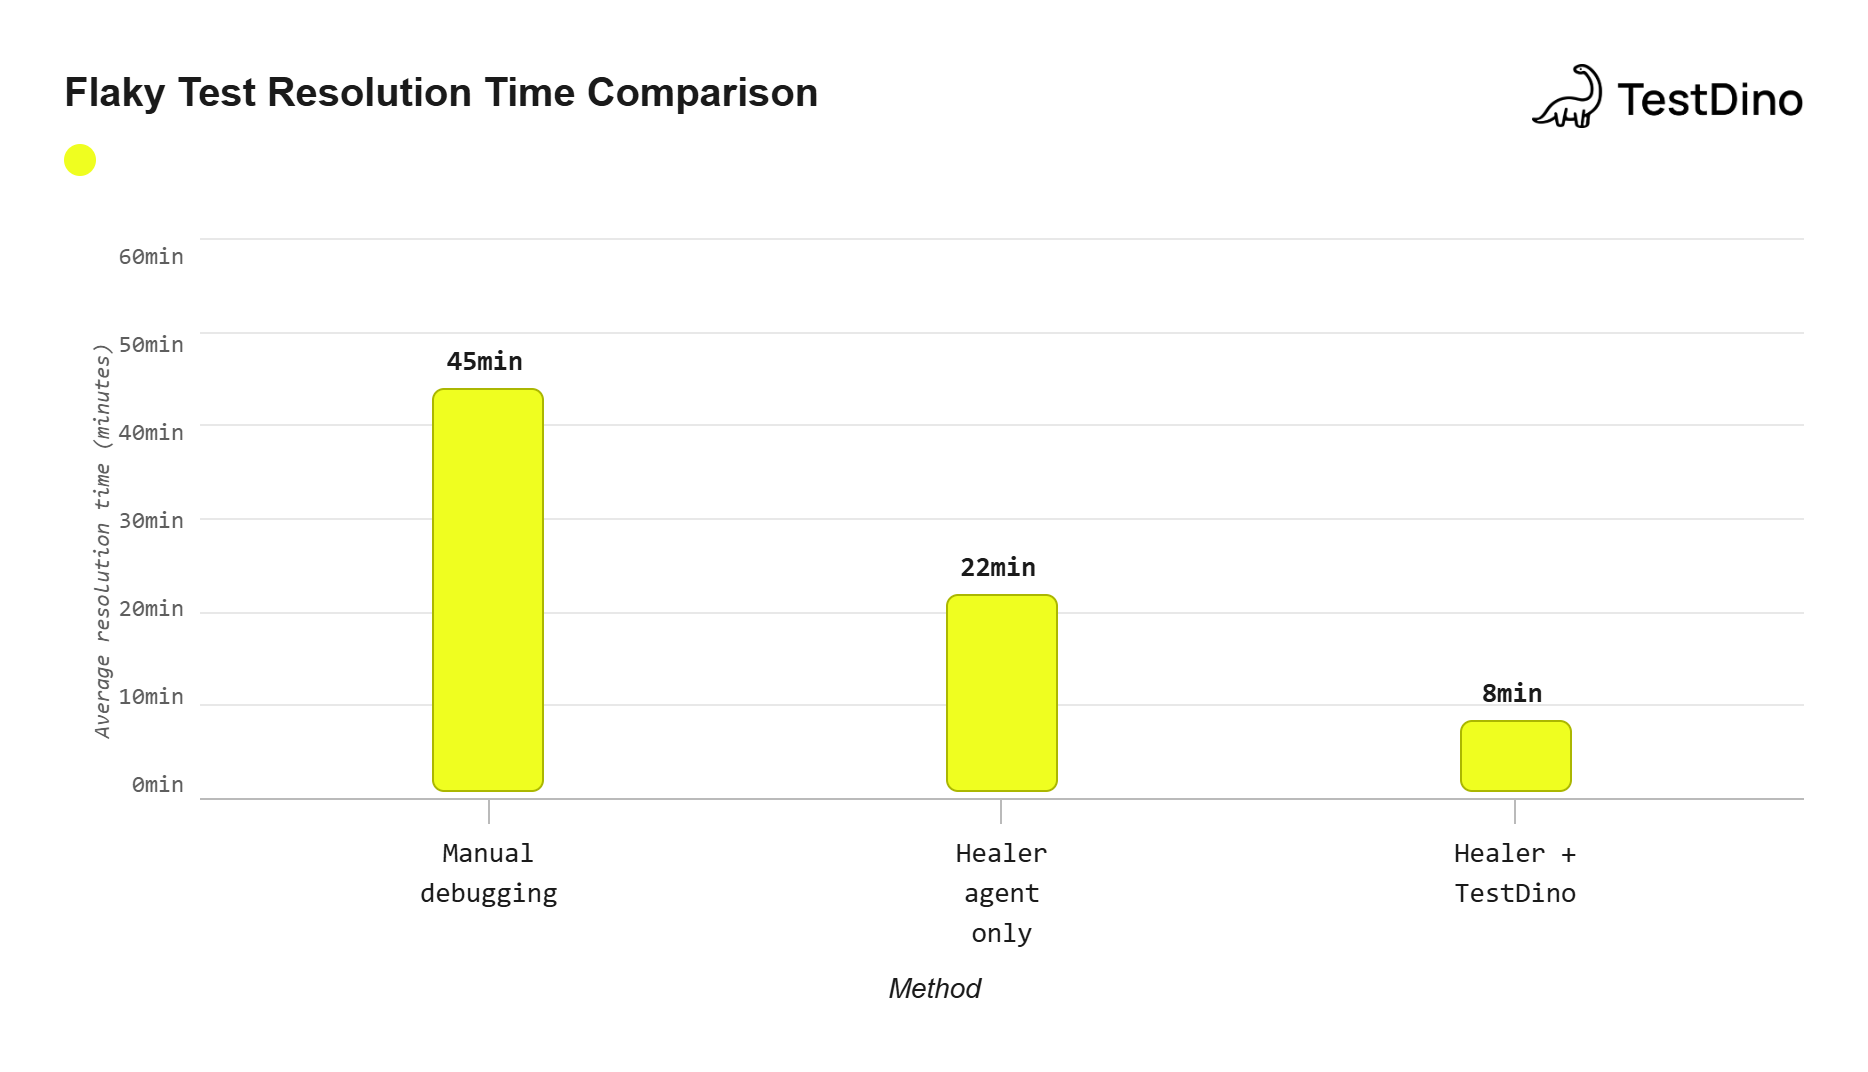
Source: TestDino Flaky Test Benchmark Report 2026
Antigravity vs other AI agents (2026)
How does Antigravity compare to other AI coding tools for Playwright testing?
| Capability | Antigravity | Cursor | Claude Code | GitHub Copilot |
|---|---|---|---|---|
| Core approach | Agent-first IDE | AI-assisted editor | Terminal-based agent | Inline suggestions |
| Built-in browser agent | Yes (native) | Via MCP only | Via MCP only | |
| Parallel agents | Yes (Agent Manager) | Yes (sub-agents) | ||
| Artifact review system | Full (diffs, recordings, plans) | Code diffs only | Terminal output | Inline suggestions |
| MCP support | Limited | |||
| Default AI model | Gemini 3.1 Pro | Claude / GPT (choice) | Claude 4.6 | GPT-4o / Claude |
| Free tier | Yes (generous limits) | Limited free tier | Paid only | Free for individuals |
| Self-healing tests | Via AI agents | Via AI agents | Via AI agents | Not supported |
| Best for Playwright | Full lifecycle (generate + run + heal) | Writing + refactoring tests | Debugging + complex logic | Quick completions |
Note: All four tools support Playwright MCP, but Antigravity is the only one with a native browser agent built into the IDE. This means it can open, click, and verify your app without any external MCP server for basic browser interactions. The MCP server adds structured accessibility tree access on top of that.
Antigravity's key advantage is the agent-first workflow. While Cursor and Copilot help you write faster, Antigravity's agents can plan entire test suites, execute them, and iterate on failures without constant prompting. For Playwright parallel execution and large-scale test generation, this autonomous approach saves significant time.
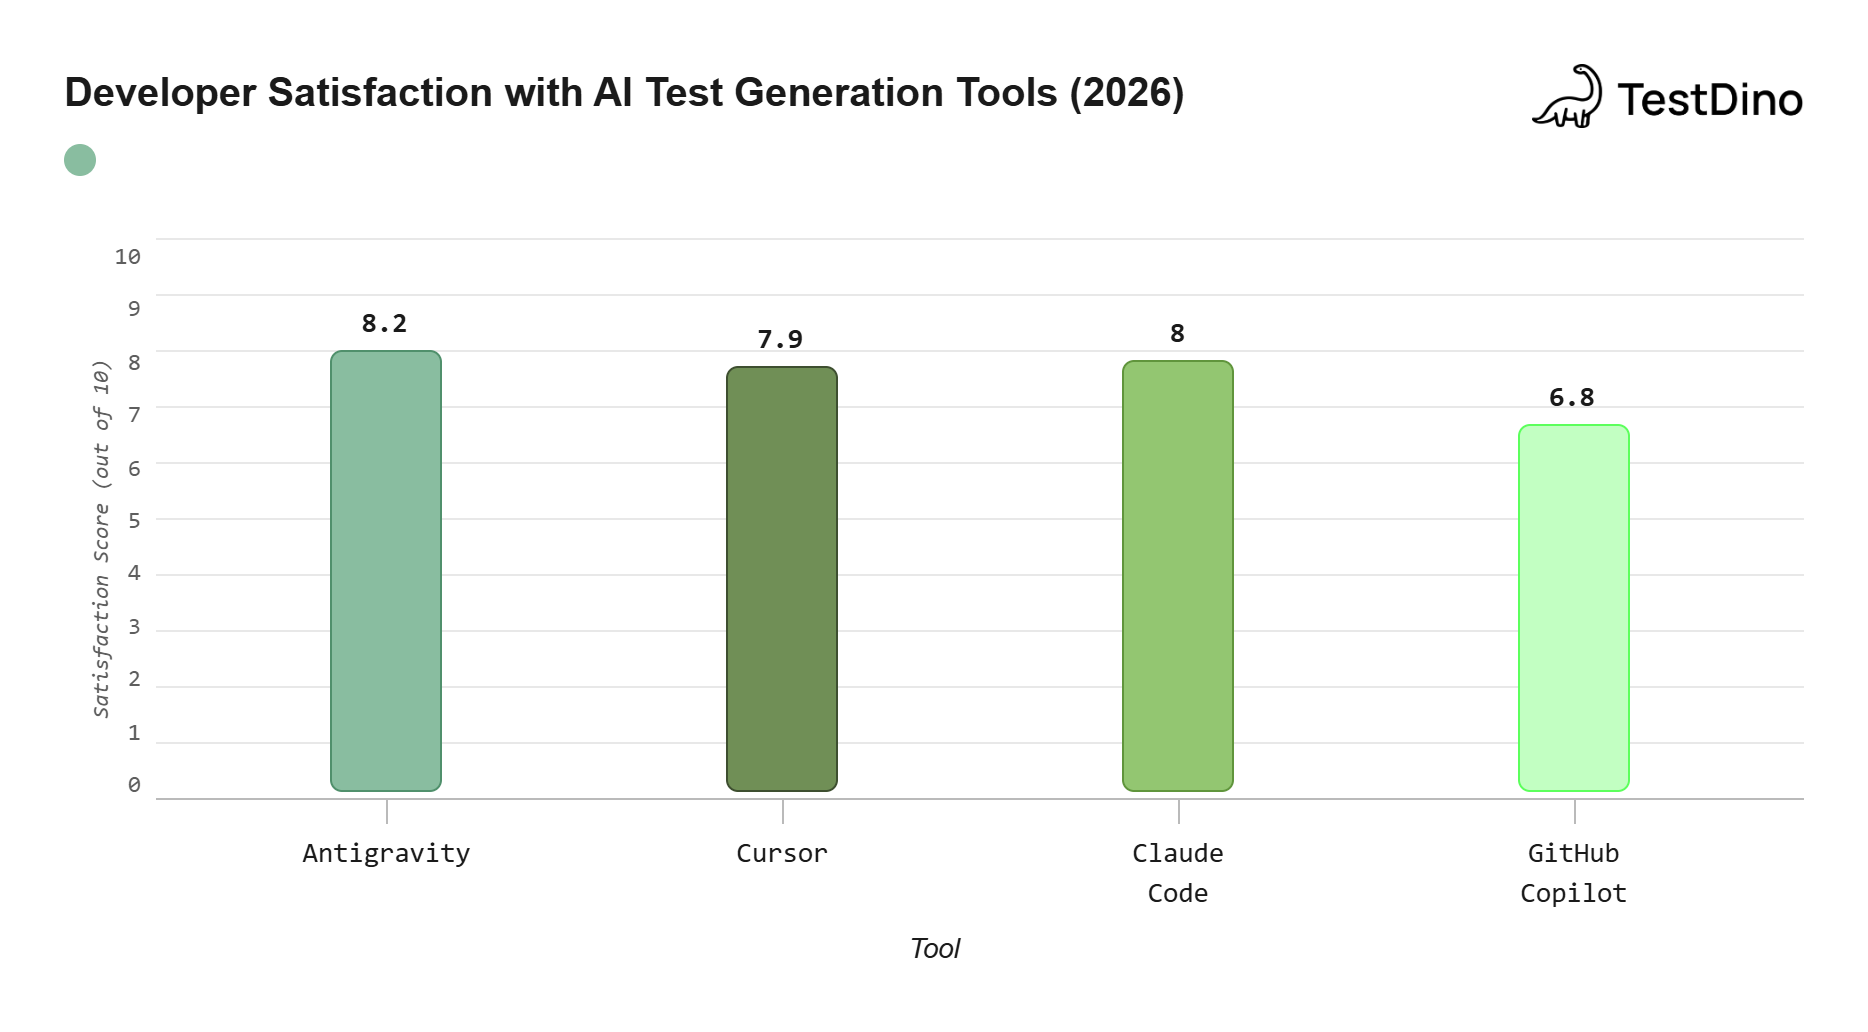
Source: Stack Overflow Developer Survey 2026
Conclusion
Writing Playwright tests with Antigravity is not about replacing your testing skills. It is about removing the tedious parts (scaffolding, boilerplate, selector hunting) so you can focus on what matters: test logic and coverage strategy.
The setup takes about 15 minutes. First, install the MCP server and load Playwright skills. Next, write your project rules. You are then ready to generate tests from natural language prompts. Antigravity's agent-first approach means the AI does not just suggest code. It actively plans, executes, and verifies entire test flows.
When you pair it with TestDino for CI reporting and flaky test analysis, you get a complete workflow. Tests get generated, tracked, and auto-repaired. Your dashboard shows real trends, not just the last run.
If you are already using Playwright, Antigravity gives your existing workflow a significant boost without changing how your tests run. If you are just starting with Playwright, this combination gets you from zero to a production-ready test suite in hours, not weeks.
FAQs
Related reading
Here are five resources to deepen your understanding:

Dhruv Rai
Product & Growth Engineer