Write Playwright Tests with Codex: Cloud Agent Guide (2026)
Learn how to write Playwright tests with OpenAI Codex, the cloud-based coding agent. This guide covers environment setup, AGENTS.md configuration, effective task prompts, async test generation workflow, and connecting TestDino for real-time test reporting and failure analysis.
OpenAI Codex runs in a cloud sandbox.
You describe a task, it spins up an isolated container, writes the code, runs it, and opens a PR, all without touching your local machine.
For Playwright testing, that means you can hand Codex a test plan and come back to a finished test file with results.
The tradeoff: Codex can't see your live app the way MCP-based tools can, so prompt structure matters more.
This guide covers Codex setup, AGENTS.md configuration for Playwright projects, effective task prompts, and connecting TestDino for failure analysis on generated tests.
What is OpenAI Codex and why does it matter for testing?
OpenAI Codex is a cloud-based software engineering agent that reads your repository, runs tasks in an isolated sandbox, and delivers results as code changes or pull requests. It is powered by the codex-1 model, a variant of OpenAI's o3 reasoning model optimized for code.
Unlike IDE-based assistants (Copilot, Cursor, Cline), Codex does not live inside your editor. You access it through ChatGPT at codex, connect a GitHub repo, and give it tasks in plain English. Each task gets its own sandboxed environment with your full codebase loaded.
Here is what makes it relevant for Playwright testing:
- Async execution. You assign a task, close the tab, and come back later. No sitting and watching.
- Full repo context. Codex clones your entire repo, so it reads your page objects, configs, and existing specs before writing new ones.
- Sandboxed runs. Each task spins up a container where Codex can install dependencies and run npx playwright test to verify the generated code.
- PR output. When done, it opens a pull request on your repo with the new or fixed test files.
This means you can batch multiple test-writing tasks, fire them off in parallel, and review the PRs when you're ready.
Note: Codex is available on ChatGPT Plus, Pro, and Team plans. Enterprise and Edu plans also have access. The codex-1 model is specifically tuned for agentic coding tasks and differs from the GPT-4o model used in regular ChatGPT conversations.
How the Codex cloud agent works (the async workflow)
The biggest mental shift with Codex is that it is not a copilot. It is a coworker. You hand it a task, and it works on its own.
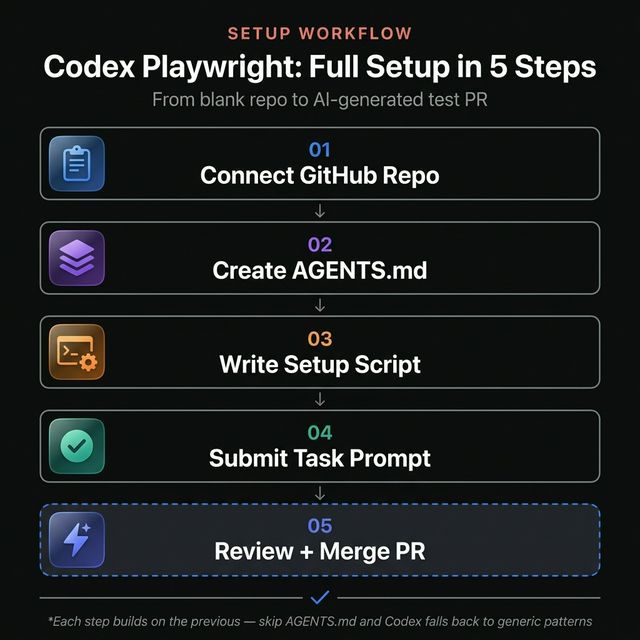
Here is the flow:
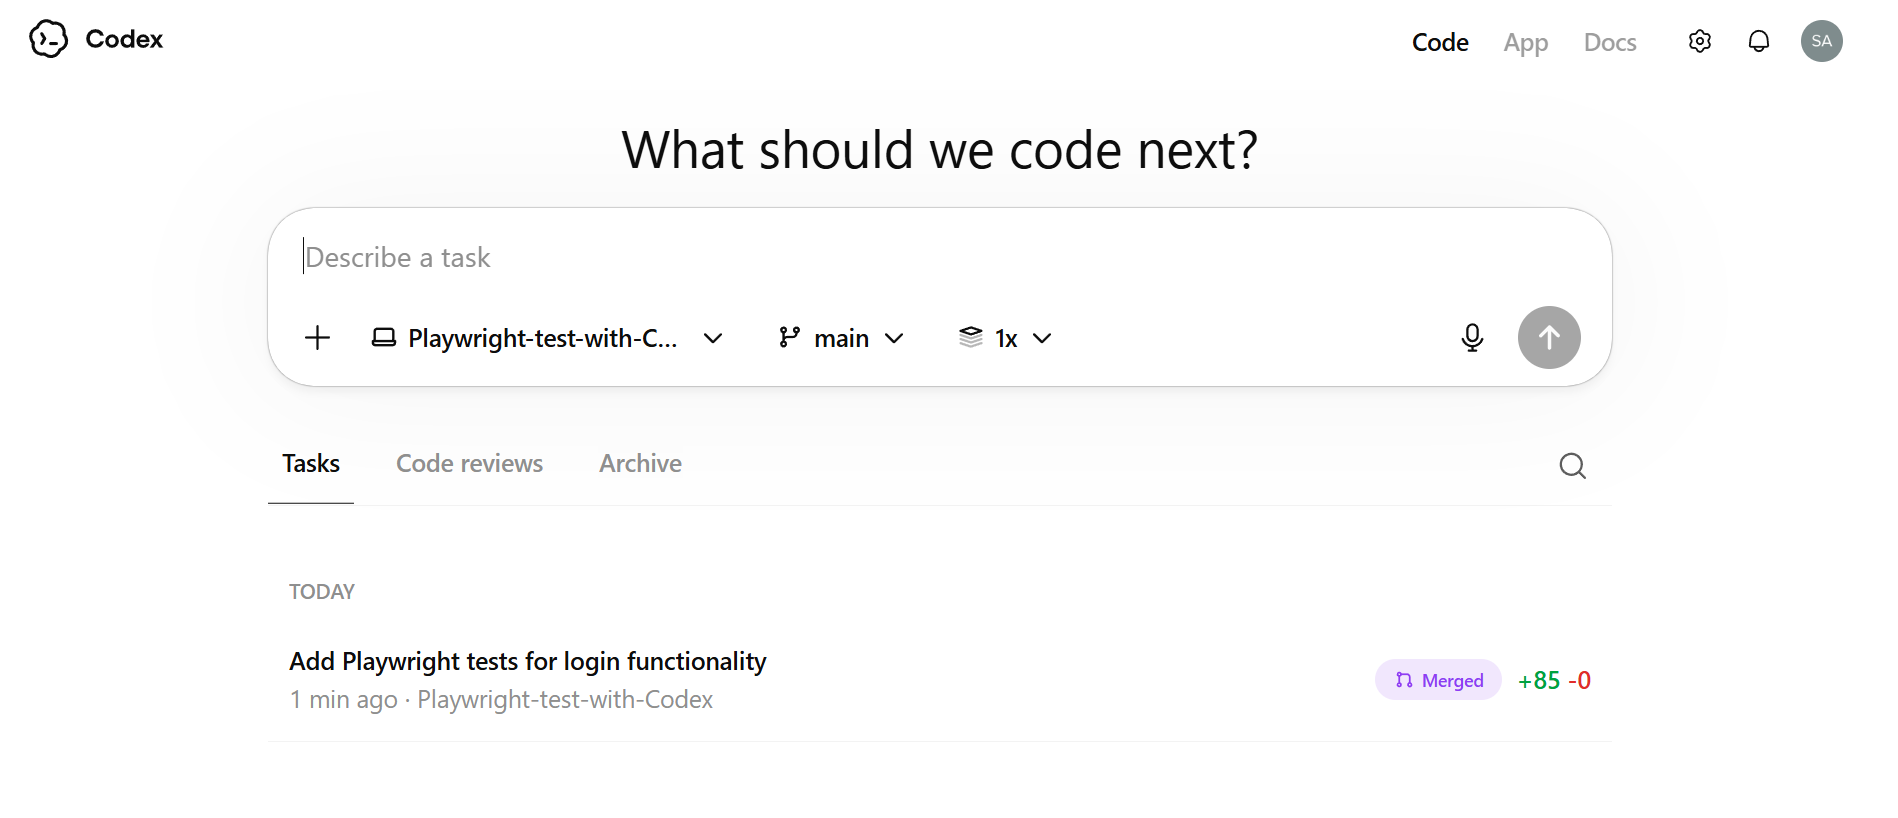
- Connect your repo. Go to chatgpt.com/codex and link your GitHub account. Select the repository and the branch you want Codex to work on.
- Write a task prompt. Describe what you need in plain English. Be specific about file paths, test patterns, and the behavior you expect.
- Codex boots a container. It clones the repo at the selected branch, runs any setup scripts, and installs dependencies like @playwright/test.
- Codex writes code. It reads your existing codebase for patterns and generates the new files. It can also modify existing files.
- Codex verifies. It runs the tests inside the sandbox. If tests fail, it reads the error output and tries to fix them autonomously.
- Output. You get a PR with the code changes, plus a terminal log showing every command it ran and every file it touched.

Tip: You can fire off multiple Codex tasks at the same time. Each one runs in its own sandbox. Use this to parallelize test generation across different features or flows.
The sandbox environment is network-disabled by default after setup. This means Codex cannot make outbound API calls during task execution. It works entirely with what is already in the repo and the packages installed during setup.
This is a key difference from IDE-based agents. Tools like Playwright MCP let agents interact with a live browser. Codex cannot do this. It relies on your existing test infrastructure and Playwright's headless mode to run tests.
Setting up your repository for Codex
Before you send tasks to Codex, prepare your repository so it can work effectively.
Install Playwright in the project
If you do not already have Playwright configured, set it up first:
npm init playwright@latestThis creates playwright.config.ts, a tests/ folder, and installs the necessary browsers. Codex will use your existing config, so make sure it reflects your actual project needs. If you need background on structuring your test setup, the Playwright e2e testing guide covers the full configuration.
Create an AGENTS.md file
This is the most important step. Codex reads AGENTS.md in the root of your repository to understand project conventions.
# Testing Guidelines

## Framework

- We use Playwright with TypeScript for all e2e tests.
- Tests live in the `tests/` directory.
- Page objects are in `tests/pages/`.

## Conventions

- Use `test.describe` blocks to group related tests.
- Use role-based locators (`getByRole`, `getByLabel`, `getByTestId`) over CSS selectors.
- Every test must have a meaningful name describing the user action and expected result.
- Use `test.beforeEach` for common navigation and setup.

## Running tests

- Run all tests: `npx playwright test`
- Run specific file: `npx playwright test tests/checkout.spec.ts`
- Run in headed mode: `npx playwright test --headed`

## Dependencies

- Run `npm ci` to install all dependencies.
- Run `npx playwright install --with-deps` to install browser binaries.
Codex checks the rules defined in AGENTS.md before writing any code.
You can also place AGENTS.md files in subdirectories. Codex reads the most specific one relative to the files it is editing. This is useful for monorepos where frontend tests and API tests follow different conventions.
Set up a setup script (optional)
Codex allows you to configure a setup command that runs every time it boots a new sandbox. Navigate to the Codex settings in ChatGPT and define it:
npm ci && npx playwright install --with-deps chromiumThis ensures every task starts with dependencies installed and at least the Chromium browser available for headless tests.
How to write Playwright tests with Codex (step by step)
Now that your repo is ready, here is how to actually generate tests.
Step 1: write a clear task prompt
The quality of the generated test depends entirely on how well you describe the task. Be specific.
Weak prompt:
"Write tests for the login page."
Strong prompt:
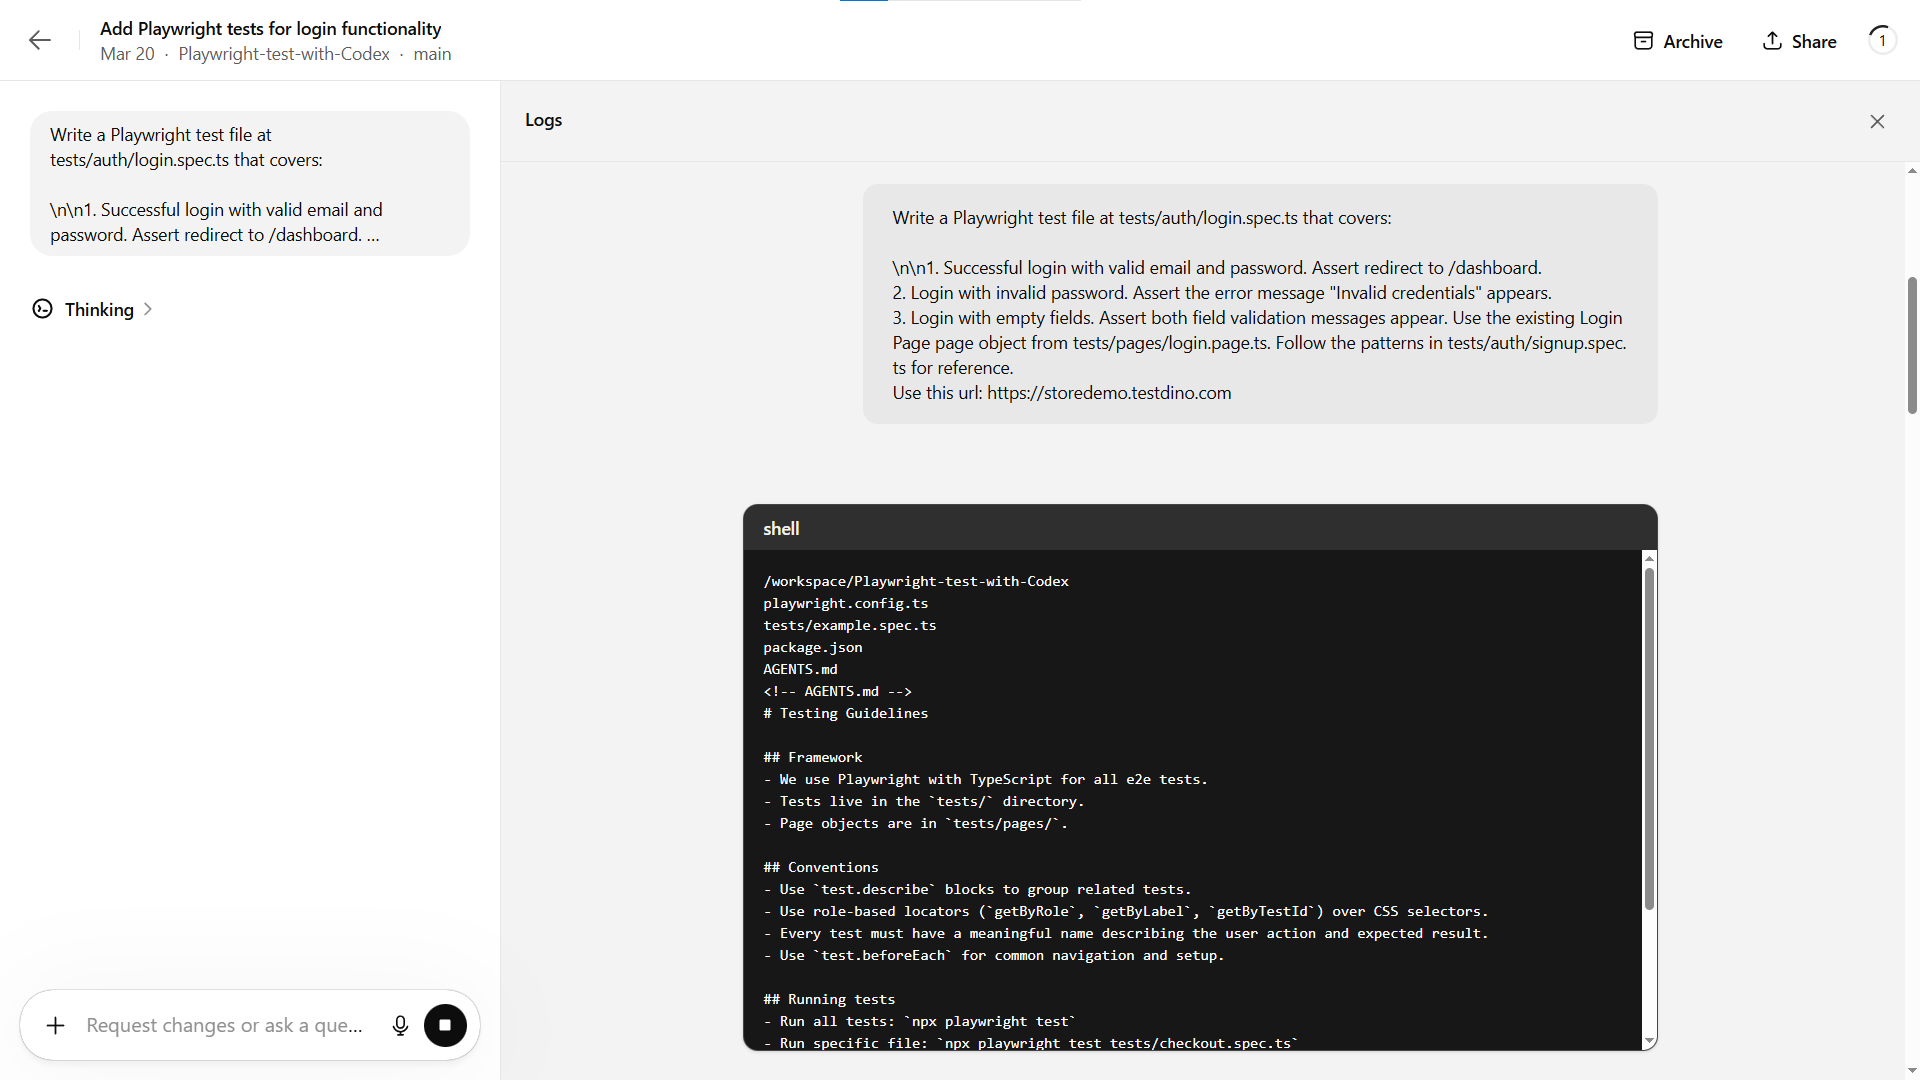
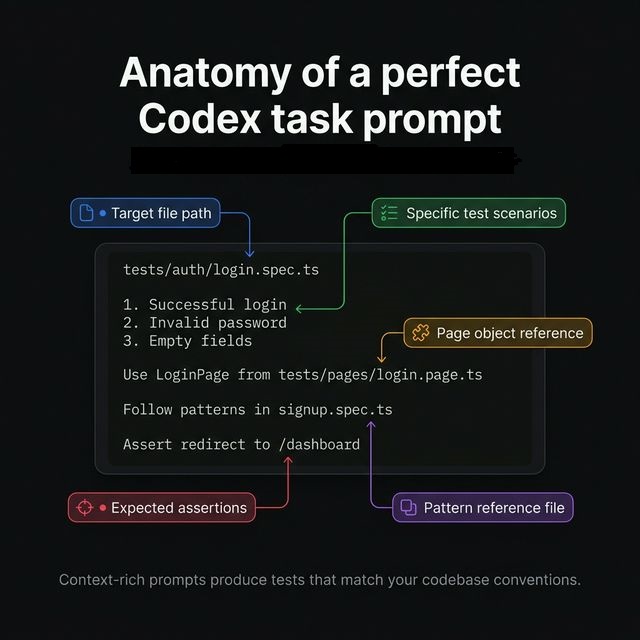
"Write a Playwright test file at tests/auth/login.spec.ts that covers:
- Successful login with valid email and password. Assert redirect to the home page.
- Login with invalid password. Assert the error message "Invalid credentials" appears.
- Login with empty fields. Assert both field validation messages appear. Use the existing LoginPage page object from tests/pages/login.page.ts. Follow the patterns in tests/auth/signup.spec.ts for reference."
The difference is context. When you tell Codex which files to reference, which page objects to use, and what assertions to make, it produces code that fits your project.
Tip: Reference existing spec files in your prompt. Codex will read those files and mirror the patterns, including import styles, describe block structure, and assertion methods. This is the fastest way to get consistent output.
Step 2: select the right branch and model
In the Codex dashboard, select the branch you want changes committed to. Codex creates a new branch off of your selected base branch and opens a PR against it.
The model is codex-1 by default. It is optimized for agentic tasks where the model needs to plan multiple steps, edit files, and run commands. This is different from GPT-4o which handles conversations well but is not tuned for long-running code tasks.
Step 3: submit and wait
Click Start coding. Codex will:
- Clone your repo
- Run the setup script
- Read AGENTS.md and any files referenced in your prompt
- Generate the test file(s)
- Run npx playwright test to verify
You will see a progress indicator. For a typical single-file test task, expect 2 to 8 minutes depending on complexity.
Step 4: review the output
Once done, Codex shows you:
- The full terminal log with every command it ran
- A diff view of all file changes
- Test results showing pass/fail status
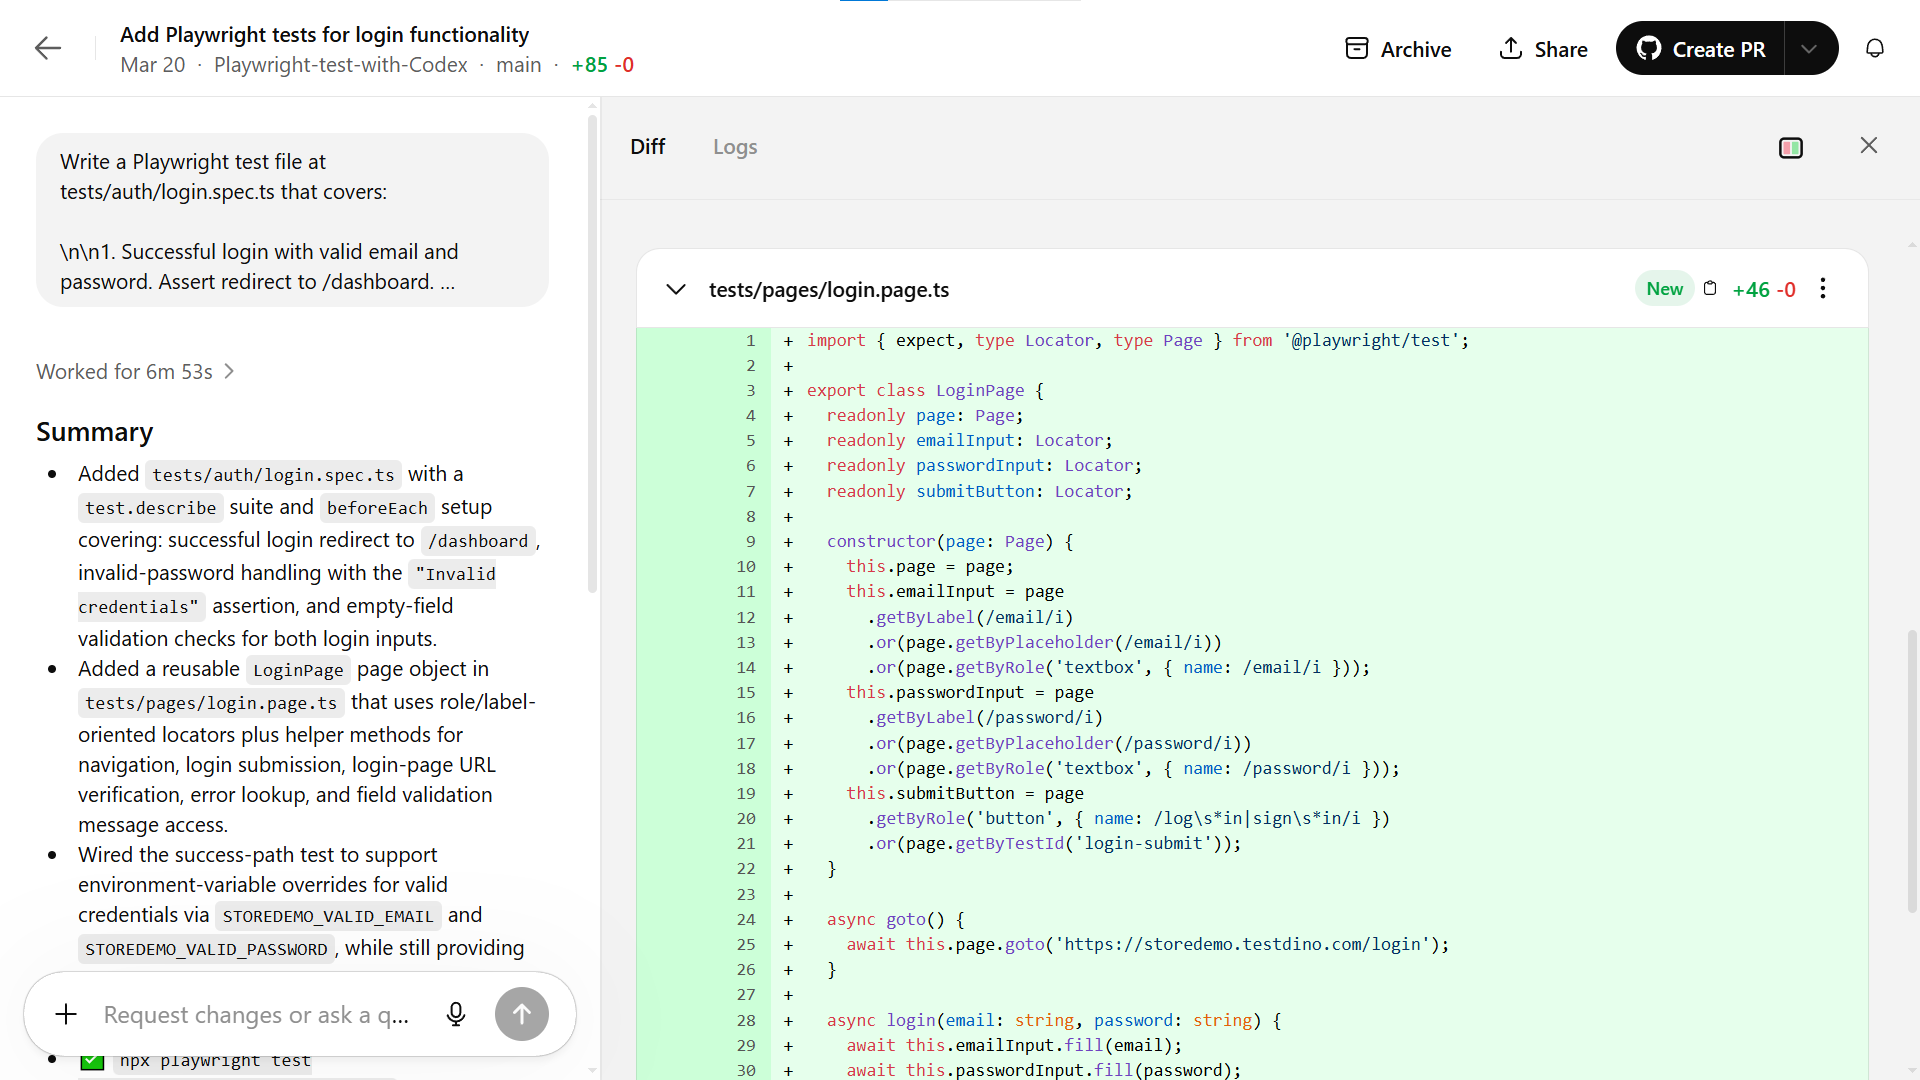
If the tests passed in the sandbox, you can create the PR directly. If something failed, you can give follow-up instructions in the same task thread.
Here is an example of what a Codex-generated test looks like:
import { test, expect } from "@playwright/test";

import { LoginPage } from "../pages/login.page";
const validEmail = process.env.STOREDEMO_VALID_EMAIL ?? "[email protected]";
const validPassword = process.env.STOREDEMO_VALID_PASSWORD ?? "Password123!";
test.describe("Login", () => {
  let loginPage: LoginPage;
  test.beforeEach(async ({ page }) => {
    loginPage = new LoginPage(page);
    await loginPage.goto();
    await loginPage.expectOnLoginPage();
  });
  test("logs in successfully with valid credentials and redirects to the home page", async ({
    page,
  }) => {
    await page.route("**/api/login", (route) =>
      route.fulfill({
        status: 200,
        headers: {
          "Access-Control-Allow-Origin": "*",
          "Content-Type": "application/json",
        },
        body: JSON.stringify({ token: "mock-jwt-token", user: { id: 1 } }),
      }),
    );
    await loginPage.login(validEmail, validPassword);
    await expect(page).toHaveURL("https://storedemo.cms.testdino.com/");
  });
  test("shows an invalid credentials error when the password is incorrect", async () => {
    await loginPage.login(validEmail, "wrong-password");
    await expect(loginPage.errorMessage("Invalid credentials")).toBeVisible();
    await loginPage.expectOnLoginPage();
  });
  test("shows required validation messages when email and password are empty", async () => {
    await loginPage.submitButton.click();
    await expect(loginPage.errorMessage(/email.*required/i)).toBeVisible();
    await expect(loginPage.errorMessage(/password.*required/i)).toBeVisible();
  });
});
Notice how it used Playwright assertions like toHaveURL and toHaveText, followed the test.describe grouping pattern, and used the page object from the prompt. This is the result of proper context in both the prompt and the AGENTS.md.
Codex vs Cursor for Playwright test generation
Both tools can generate Playwright tests, but they work in fundamentally different ways. If you have used Playwright AI codegen tools before, this comparison will help you understand where each fits.
| Feature | OpenAI Codex | Cursor |
|---|---|---|
| Execution model | Cloud sandbox (async) | Local IDE (real-time) |
| User interaction | Fire and forget | Interactive editing |
| Browser access | Headless in sandbox only | Full via Playwright MCP |
| Context source | Full repo clone + AGENTS.md | Open files + .cursorrules + MCP |
| Parallel tasks | Yes (multiple sandboxes) | One at a time |
| Output | Pull request on GitHub | Direct file edits |
| Test verification | Runs tests in sandbox | Runs tests locally via terminal |
| Network during tasks | Disabled after setup | Full network access |
When Codex is the better fit
- You have a backlog of test specs to write and want to batch them.
- You prefer a PR-based workflow where tests go through code review.
- Your team has strong conventions in AGENTS.md that the AI should follow.
- You want parallel execution across multiple features at once.
When Cursor is the better fit
- You need the AI to interact with a live browser to explore the UI. Playwright test agents like the Planner and Generator work well through Cursor's MCP integration
- You want real-time back-and-forth while writing a complex test.
- You are debugging a specific test failure and need the agent to see the page.
For teams that already write and automate Playwright tests with AI, Codex adds a layer on top. You use Cursor for interactive work and Codex for batch generation.
| Codex | Cursor |
|---|---|
| Batch test generation | Interactive test writing |
| PR-based review flow | Live browser via MCP |
| Parallel sandbox tasks | Real-time debugging |
| No IDE required | In-editor file edits |
| AGENTS.md-driven context | .cursorrules context |
Source: TestGuild 2025 AI Testing Survey
Running and reporting tests with TestDino
Codex can run tests inside its sandbox, but those results disappear once the task is done. For persistent tracking, failure analysis, and trend data across test runs, you need a reporting layer.
TestDino integrates directly with Playwright to capture test results from every run, whether it happens in Codex's sandbox, your local machine, or CI.
Connect TestDino to your Playwright project
Install the TestDino package:
npm install @testdino/playwright --save-devCreate a testdino.config.ts in your project root with your token:
export default {
  token: process.env.TESTDINO_TOKEN,
};
The tdpw CLI reads this config file automatically. You can also pass the token directly via CLI flag or environment variable, but the config file approach keeps things clean and version-controllable (just make sure not to commit hardcoded tokens).
Run tests with reporting
Once configured, every npx playwright test run uploads results to TestDino automatically. You can also use the TestDino CLI for more control:
npx tdpw test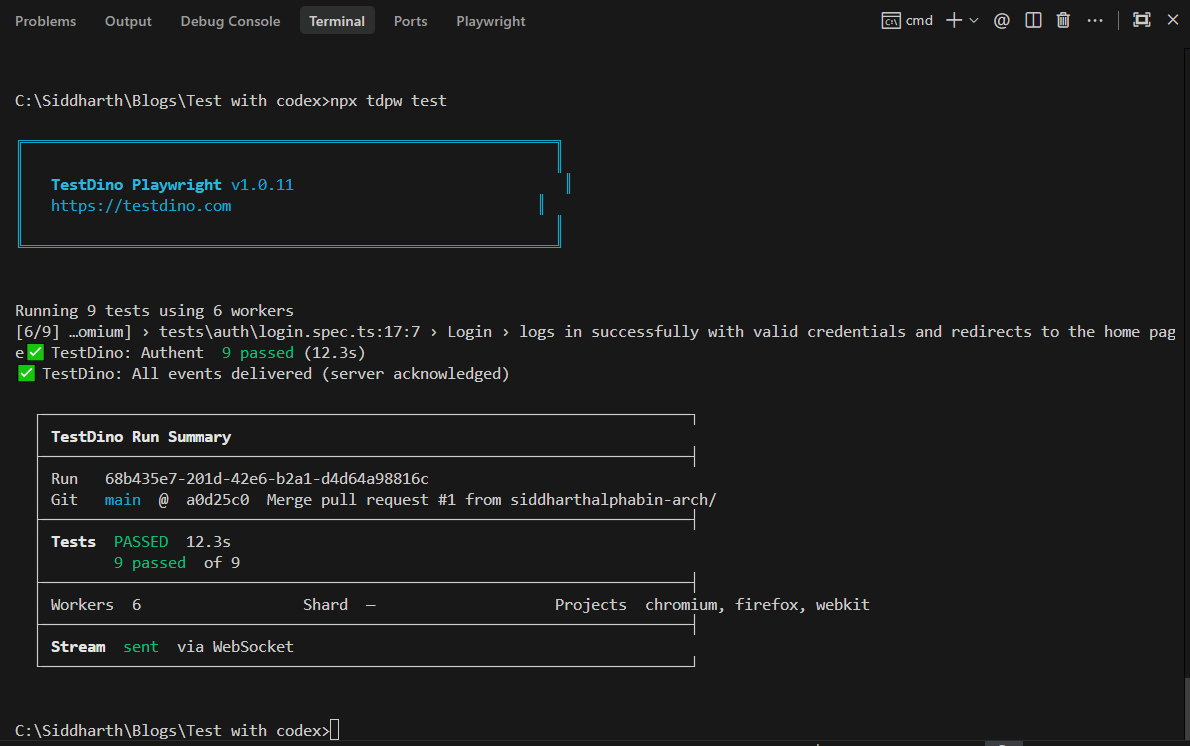
This command runs your Playwright suite and sends results to the TestDino dashboard where you get:
- Real-time dashboards showing pass/fail rates per test, per file, per suite
- Failure trends that surface which tests fail most often
- Flaky test detection that flags tests with inconsistent results across runs
- Execution timelines showing how long each test takes over time
For teams running Playwright parallel execution, TestDino aggregates results from all workers into a single view. It is the missing Playwright observability platform that connects your CI runs with actionable data.
Update AGENTS.md for TestDino integration
Add the reporting setup to your AGENTS.md so Codex knows about it:
## Test reporting
- We use TestDino for test result reporting.
- Reporter is configured in playwright.config.ts.
- Environment variable TESTDINO_TOKEN must be set before running tests.
- Use `npx tdpw test` to run tests with reporting enabled.
When Codex generates new tests and runs them in the sandbox, the reporter will attempt to upload results. If the sandbox has network disabled, the tests still run and pass/fail locally. The real reporting happens when the PR is merged and tests run in CI with the token set.
Fixing flaky and failing tests with Codex
Once your tests are running and reporting into TestDino, you will inevitably find tests that fail intermittently. These flaky tests are the most time-consuming part of test maintenance.
Codex can help fix them. Here is the workflow:
Identify the flaky test
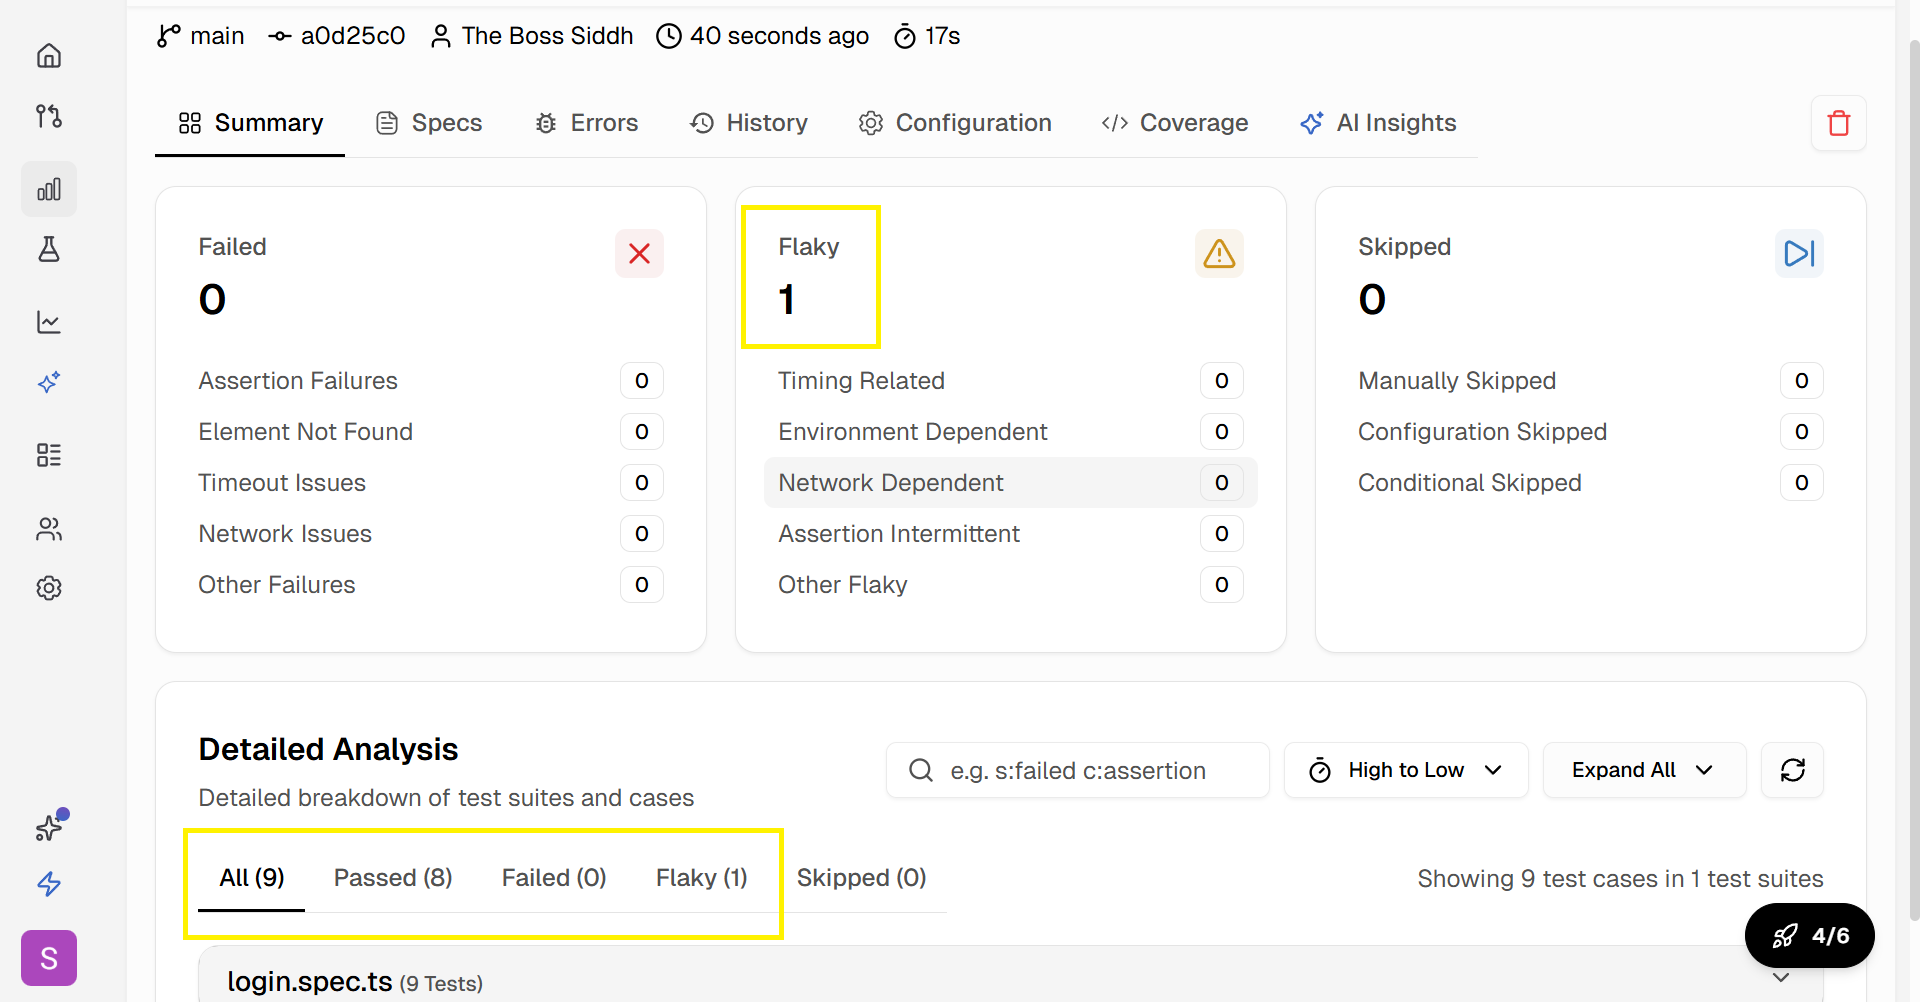
Open TestDino and check the flaky test panel. It shows:
- Which tests flap between pass and fail across runs
- The failure frequency (e.g., fails 3 out of 10 runs)
- The error message and stack trace from each failure
Write a fix task for Codex
Use the information from TestDino to write a specific Codex task:
Fix the flaky test in tests/auth/login.spec.ts:- Test name: "shows an invalid credentials error when the password is incorrect"
- It fails intermittently with: "Error: expect(locator).toBeVisible() failed... Locator: getByText('Wrong credentials')"
- The likely issue is a conditional wait that asserts an incorrect text string during the error display.
- Standardize the error message assertion to always use 'Invalid credentials' and remove any browser-specific conditional logic.
- Run the test 3 times to verify stability.
Tip: When asking Codex to fix a flaky test, always include the exact error message and the failure pattern. Generic prompts like "fix the flaky test" produce generic fixes. Specific error details lead to targeted solutions.
Let Codex iterate
Codex will:
- Read the failing test file
- Analyze the error pattern
- Apply a fix (better waits, more resilient locators, retry logic)
- Run the test multiple times in the sandbox
- Open a PR with the fix
This is where following Playwright best practices in your codebase pays off. When Codex sees consistent patterns across your test files, its fixes align with your team's style.
For reducing ongoing maintenance, the test maintenance in Playwright guide covers patterns that make tests more resilient from the start, reducing the number of fixes Codex needs to make later.
Improve test reliability over time
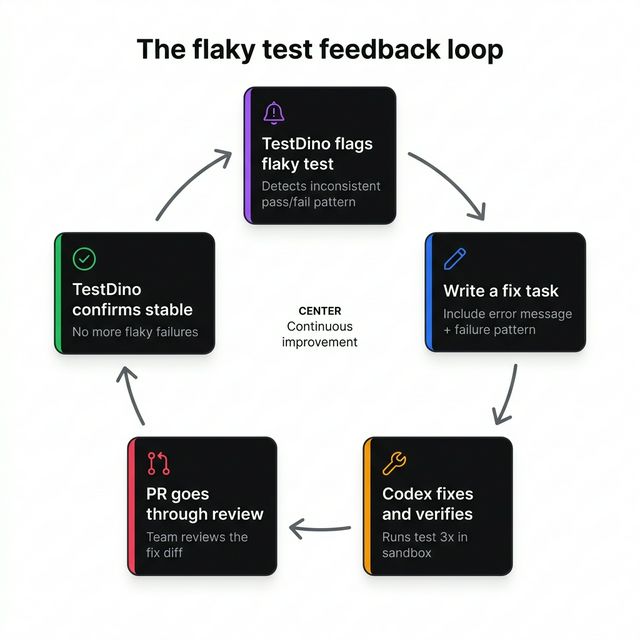
By combining TestDino's flaky test benchmark data with Codex's fix capabilities, you create a feedback loop:
- TestDino flags the flaky test
- You send the fix task to Codex
- Codex fixes and verifies
- The fix goes through PR review
- TestDino confirms the test is stable after merge
This beats manually debugging flaky tests one by one, which is the workflow most teams are stuck in.
Conclusion
Writing Playwright tests with Codex changes the dynamic from "sit with the AI and iterate" to "assign the task and review the PR." The async, cloud-based model allows you to generate tests at scale without blocking your local environment or your workday.
The key to making it work well comes down to three things:
- AGENTS.md. Give Codex clear project rules so it generates tests that match your conventions.
- Specific prompts. Reference existing spec files, page objects, and expected assertions. Vague prompts produce vague tests.
- A reporting layer. Codex can verify tests in its sandbox, but TestDino gives you the long-term visibility needed to track what passes, what fails, and what flakes.
For teams already using AI-assisted testing through AI test generation tools, Codex adds a powerful batch processing layer. Pair it with TestDino for end-to-end visibility, from the moment a test is generated to every run it completes in production CI.
FAQs

Ayush Mania
Forward Development Engineer