Playwright Test Agents: Planner, Generator and Healer Guide
Playwright test agents are AI helpers that plan, generate, and repair tests automatically, reducing manual test creation and maintenance.

Playwright agents are AI-powered helpers built into Playwright v1.56+ that plan test scenarios, generate executable test code, and repair broken tests by interacting with a real browser session. There are 3 agents: Planner (discovers what to test), Generator (writes the code), and Healer (fixes what breaks).
If you have worked with end-to-end tests long enough, you know the real cost is not writing the first test. It is keeping the next 100 alive.
A small UI change breaks selectors. CI turns red. Instead of shipping features, you spend the morning fixing tests that passed yesterday.
Playwright v1.56 introduced Playwright test agents to handle the repetitive parts of test planning, writing, and maintenance. You stay in control. The AI handles the grunt work.
In this guide, you'll learn:
-
What Playwright agents are and how each one works
-
How to set them up in your project step by step
-
A live, working example where we used these agents to generate 67 test scenarios and a fully passing E2E test for a real e-commerce app
-
How to run agent-generated tests safely in CI/CD
-
What they can't do, and where the technology is headed next
Live demo repository: All the code and test plans referenced in this guide are available in our open-source GitHub repo. Clone it and run the tests yourself.
What are Playwright agents?
Playwright agents are AI-driven components built into Playwright starting from v1.56. They assist with planning test scenarios, generating Playwright test code, and repairing broken tests. Unlike generic AI code generators that predict what your page might look like, Playwright agents interact with a real browser session and make decisions based on live DOM state.
There are 3 agents, each responsible for a different stage of the testing lifecycle:
-
Planner - Explores the application and creates structured test plans in markdown
-
Generator - Converts test plans into executable Playwright .spec.ts files
-
Healer - Detects and fixes failing tests caused by UI or locator changes
| Agent | Primary role | Input | Output | Best used for |
|---|---|---|---|---|
| Planner | Scenario discovery | Seed test + running app | Markdown test plan | New features, coverage mapping |
| Generator | Test code creation | Markdown test plan | .spec.ts files | Building automation fast |
| Healer | Test maintenance | Failing test suite | Updated, stabilized tests | UI changes, locator drift |
Together, these agents automate the plan-write-fix cycle while keeping your standard Playwright setup unchanged.
How Playwright agents work under the hood
Playwright agents use the Model Context Protocol (MCP) to connect a large language model with a real browser. The AI doesn't guess what the page looks like. It interacts with the actual application, observes live DOM state, and makes decisions based on real behavior.
The 3 layers
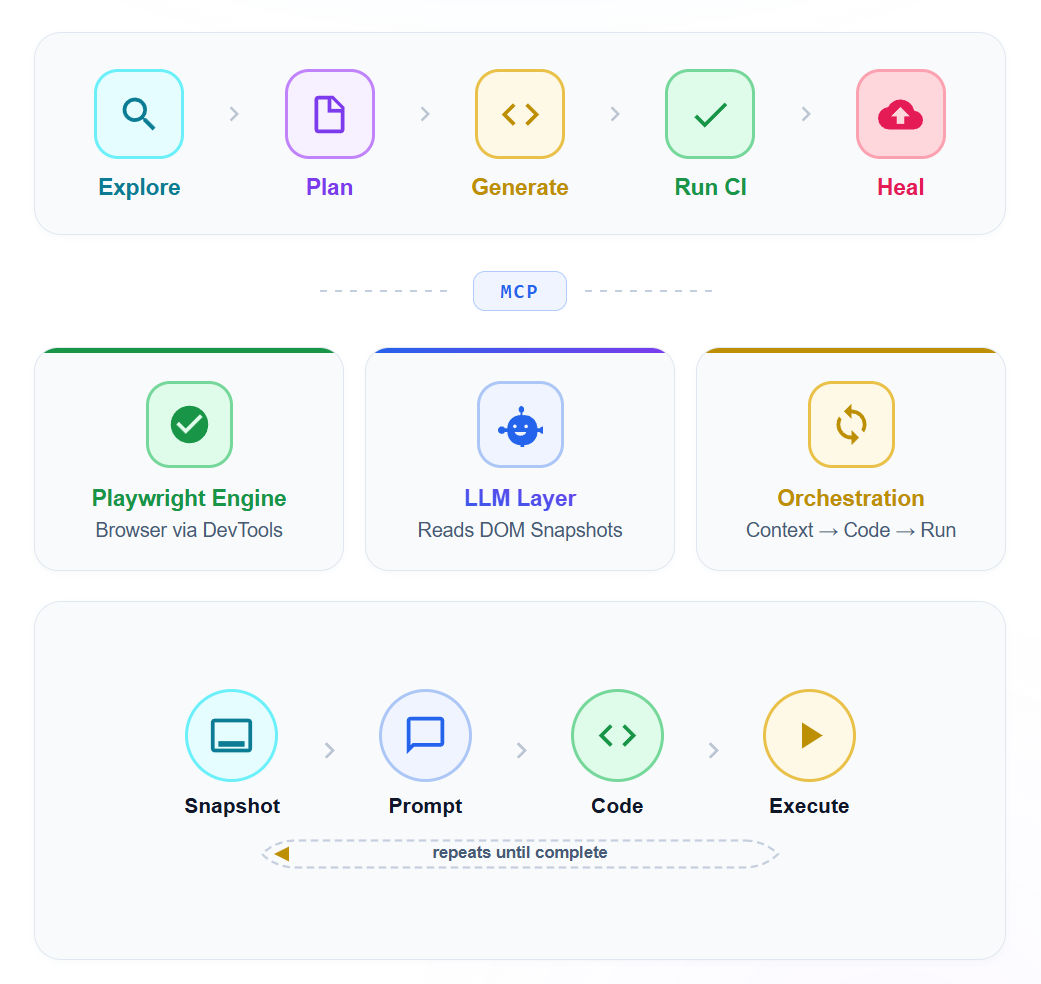
Playwright engine handles browser automation through the Chrome DevTools Protocol. This is the same foundation that powers every standard Playwright test.
LLM layer uses a large language model (GPT, Claude, or similar) to interpret DOM structure, page routes, and application behavior. The model receives structured accessibility snapshots rather than raw screenshots. This is a critical design choice. The Accessibility Object Model (AOM) gives the LLM clean, semantic information about every element: its role, name, state, and position in the hierarchy. An agent targeting Role: button, Name: Checkout is far more stable than one using div.checkout-btn-v3.
Orchestration loop coordinates the exchange between the engine and the LLM. It sends page context to the model, receives instructions back, executes browser actions, and repeats until the task is complete.
This is what separates Playwright agents from generic AI code generators. A code generation tool predicts what your page might look like. Playwright test agents interact with what your page actually does.
Why accessibility trees beat screenshots
Most older AI testing tools relied on screenshots. The AI would look at a rendered image and try to figure out what to click. This approach suffers from visual ambiguity. The AI might see a "Submit" button but not know if it's disabled, hidden behind a modal, or part of a different form.
MCP eliminates this by providing semantic context: the role, label, state, and hierarchy of every element. ARIA roles and labels were designed for assistive technology, but they turn out to be perfect for AI agents too.
Planner agent: how it discovers test scenarios from a single seed
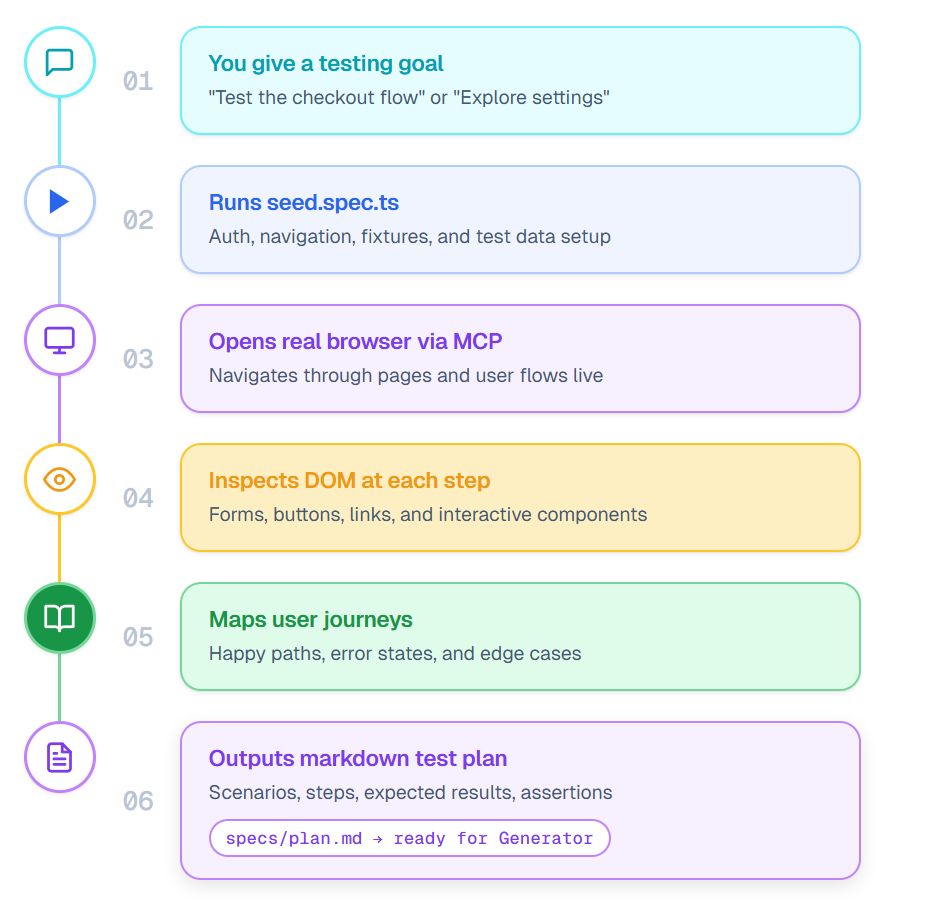
The Planner doesn't ask you to list every test case upfront. It explores your application the way a QA engineer would during an exploratory session, except it does it systematically and documents everything.
The process:
- Planner runs your seed test (tests/seed.spec.ts) to set up the base environment
- It opens the application in a real browser and begins navigating through pages and user flows
- At each step, it inspects the DOM to identify interactive elements, forms, navigation links, and key UI components
- It maps out user journeys: happy paths, error states, boundary conditions, and edge cases
- It writes a structured markdown test plan in the specs/ folder with scenarios, steps, expected results, and assertions
- Each scenario is detailed enough for the Generator to convert directly into executable test code
Real output: what the planner produced for our demo store
When we pointed the Planner at the TestDino demo store, it explored the entire application and produced 2 comprehensive test plans.
Registration test plan (30 scenarios):
-
Happy path registration (TS-REG-001)
-
Every required field missing individually (TS-REG-003 through TS-REG-007)
-
Invalid email formats: missing @, missing domain, spaces (TS-REG-008 through TS-REG-011)
-
Password mismatch and strength validation (TS-REG-012, TS-REG-013)
-
Duplicate email registration (TS-REG-014)
-
Security testing: SQL injection and XSS in name fields (TS-REG-019, TS-REG-020)
-
Accessibility and keyboard-only navigation (TS-REG-027)
-
Mobile viewport testing (TS-REG-028)
Checkout test plan (37 scenarios):
-
Complete purchase as guest and logged-in user (TC-001, TC-002)
-
Cart operations: add, remove, update quantity, persistence (TC-003 through TC-008)
-
Checkout form validation: empty fields, invalid emails, ZIP codes (TC-009 through TC-013)
-
Payment: valid card, declined card, expired card, invalid CVV (TC-015 through TC-019)
-
Cash on Delivery option (TC-020)
-
Price accuracy and tax calculation (TC-021, TC-022)
-
Security: XSS and SQL injection in address fields (TC-029)
-
Mobile checkout (TC-037)
That's 67 test scenarios discovered automatically, including edge cases and security tests that manual planning often misses.
The key advantage here is coverage. A human tester might focus on the obvious happy paths. The Planner systematically works through the application's UI, identifying scenarios that manual planning overlooks. Like what happens when you set cart quantity to 0, or press the browser back button after order confirmation.
Generator agent: from markdown plan to passing tests
When the Generator receives a spec file, it doesn't produce code from a template. It opens your application in a real browser and validates every step.
The process:
- Generator reads a spec file (for example, specs/checkout-tests.md)
- It launches the app using your seed test as the base
- For each scenario, it navigates to the correct page and inspects the DOM
- It selects locators using Playwright's preferred strategies: data-testid, role-based, and text-based selectors
- It writes test code with proper assertions, waits, and error handling
- Each output file maps to scenarios in the spec
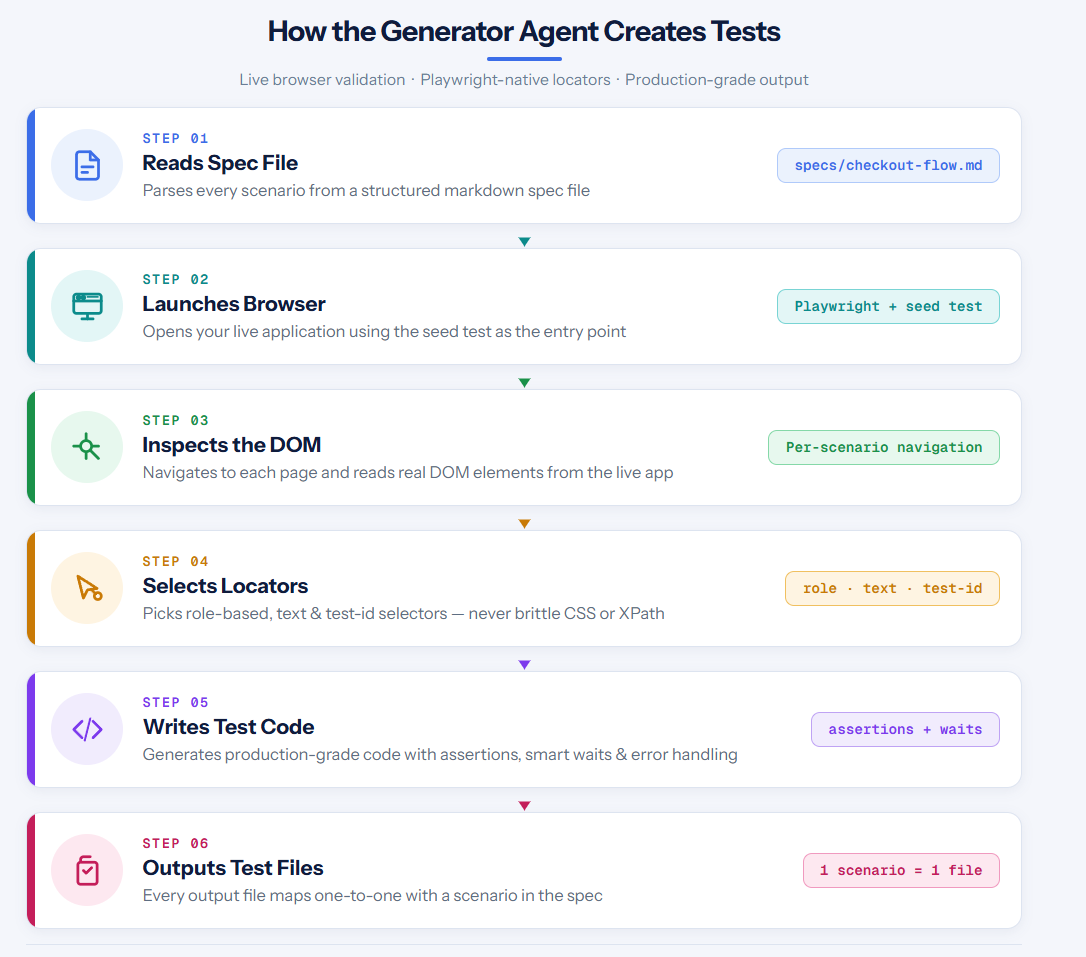
The result is code that reads like it was written by a senior SDET. Not brittle CSS selectors. Not XPath chains that break when someone moves a div. Actual production-grade locators.
The generated test code (runs in CI)
Here's the actual test the Generator created for the TestDino checkout flow. This test runs and passes:
complete-purchase.spec.ts (shortened — full test in the GitHub repo)
// Shortened for readability — full test in the GitHub repo
test('should register, add product to cart, checkout and place order', async ({ page }) => {
  const uniqueEmail = `testuser.${Date.now()}@mailtest.com`;

  // Register a new account
  await page.goto('/');
  await page.getByTestId('header-user-icon').click();
  await page.getByTestId('login-signup-link').click();
  await page.getByTestId('signup-firstname-input').fill('Test');
  await page.getByTestId('signup-lastname-input').fill('User');
  await page.getByTestId('signup-email-input').fill(uniqueEmail);
  await page.getByTestId('signup-password-input').fill('Secure@Pass123');
  await page.getByTestId('signup-submit-button').click();

  // Login
  await page.getByTestId('login-email-input').fill(uniqueEmail);
  await page.getByTestId('login-password-input').fill('Secure@Pass123');
  await page.getByTestId('login-submit-button').click();

  // Add product to cart
  await page.getByTestId('header-menu-all-products').click();
  await page.getByRole('link', { name: 'Rode NT1-A Condenser Mic' }).first().click();
  await page.getByTestId('add-to-cart-button').click();

  // Checkout
  await page.getByTestId('header-cart-icon').click();
  await page.getByTestId('checkout-button').click();

  // Fill shipping address
  await page.getByTestId('checkout-first-name-input').fill('Test');
  await page.getByTestId('checkout-email-input').fill(uniqueEmail);
  await page.getByTestId('checkout-street-input').fill('123 Main Street');
  await page.getByTestId('checkout-city-input').fill('New York');
  // ... full address and payment details
  await page.getByTestId('checkout-place-order-button').click();
});
Notice how every selector uses data-testid attributes. The AI agent discovered these by inspecting the live DOM. It didn't rely on CSS classes or fragile XPath paths.
Selector map the AI agent discovered
One of the most valuable outputs is a map of stable selectors. Here's what the agent discovered for the TestDino demo store:
| UI element | AI-discovered selector |
|---|---|
| User icon (header) | getByTestId('header-user-icon') |
| Login email field | getByTestId('login-email-input') |
| Login submit button | getByTestId('login-submit-button') |
| Sign up link | getByTestId('login-signup-link') |
| Registration fields | getByTestId('signup-firstname-input'), etc. |
| All Products menu | getByTestId('header-menu-all-products') |
| Add to Cart button | getByTestId('add-to-cart-button') |
| Cart icon | getByTestId('header-cart-icon') |
| Checkout button | getByTestId('checkout-button') |
| Shipping form fields | getByTestId('checkout-first-name-input'), etc. |
| Place Order button | getByTestId('checkout-place-order-button') |
| Cash on Delivery | getByTestId('checkout-cod-button') |
This selector map becomes a shared reference for the entire team. New tests can reuse these selectors with confidence.
Healer agent: how it diagnoses and fixes broken tests
The Healer is where teams with large existing suites get the most value.
What happens when a test fails:
- The Healer runs the failing test in debug mode
- It checks console logs, network requests, and page snapshots at the failure point
- It performs root cause analysis: is this a selector issue, a timing problem, or an actual application bug?
- If the test is the problem, the Healer updates the code with better selectors, adjusted waits, or modified assertions
- It re-runs the test to confirm the fix works
- If the application itself is broken (not the test), it marks the test as skipped
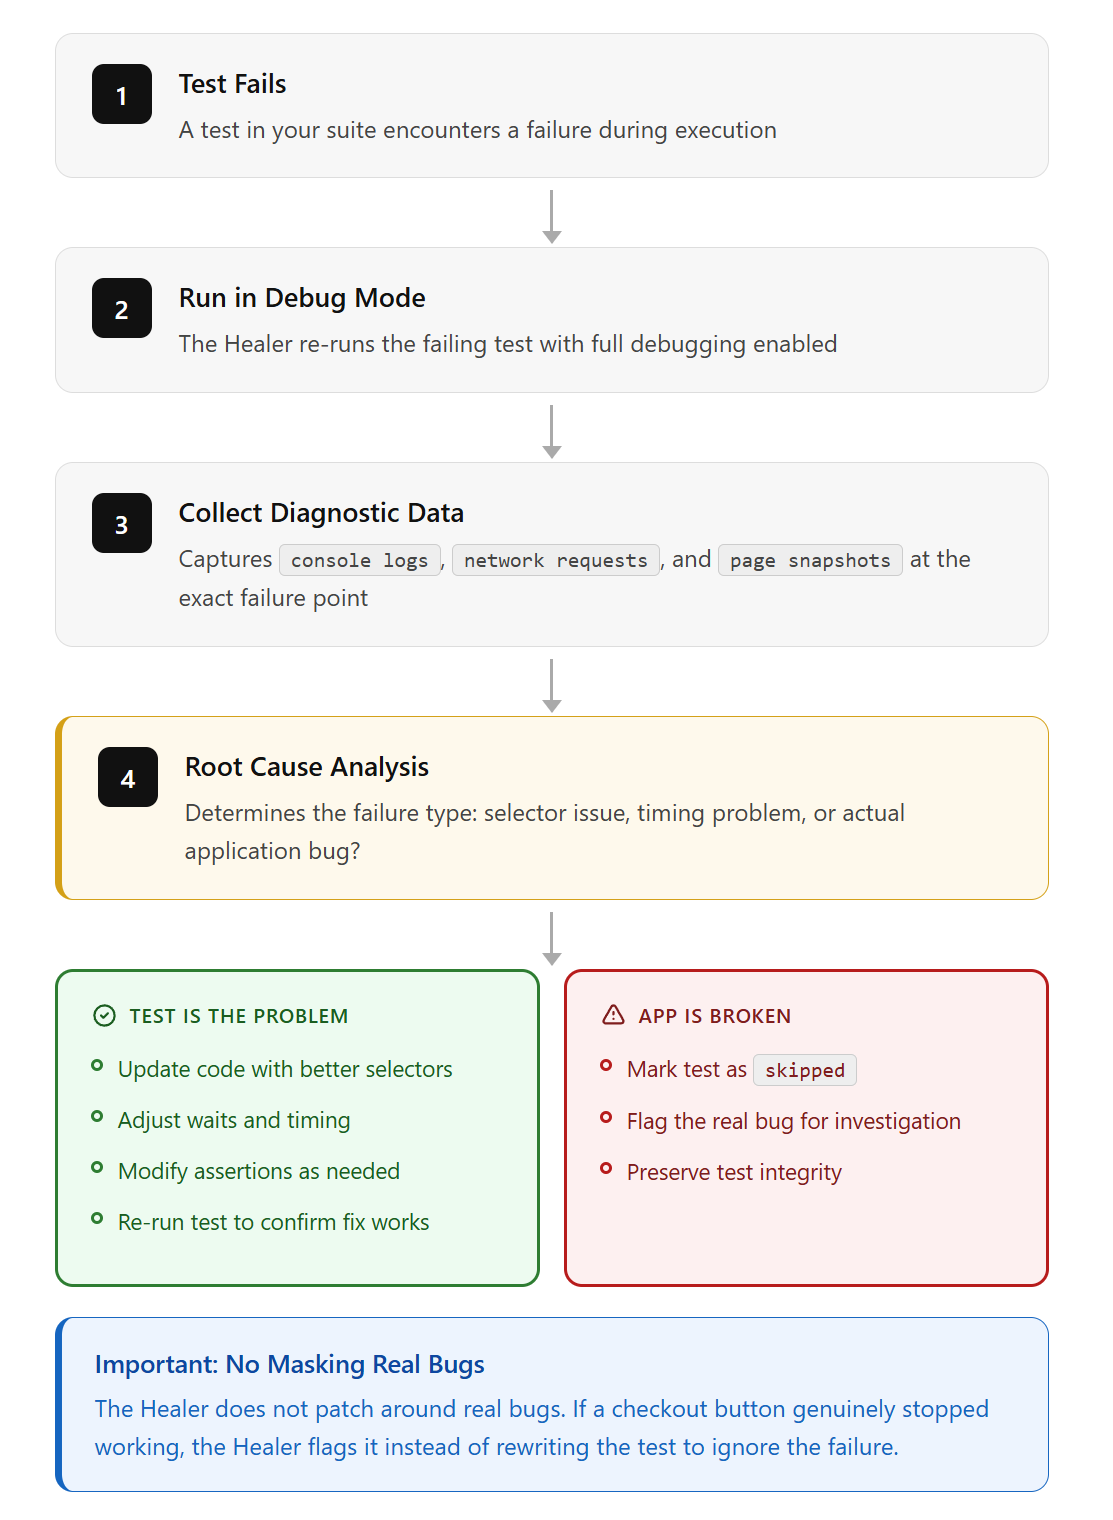
That last point is important. The Healer doesn't patch around real bugs. If a checkout button genuinely stopped working, the Healer flags it instead of rewriting the test to ignore the failure.
5 selectors the healer fixed (with before/after)
During the development of our example test, the initial code had several broken selectors that the AI iteratively fixed:
| What broke | Root cause | How the healer fixed it |
|---|---|---|
| page.locator('header img').last().click() timed out | Site uses SVG icons, not <img> inside <header> | Changed to page.getByTestId('header-user-icon').click() |
| page.fill('#username', 'myuser') not found | Login form uses email field with data-testid, no #username ID | Changed to page.getByTestId('login-email-input').fill(email) |
| page.getByLabel('First Name').fill(...) timed out on checkout | Checkout form uses <div> labels, not proper <label> elements | Changed to page.getByTestId('checkout-first-name-input').fill(...) |
| "All Products" click matched 2 elements | Both header and footer have "All Products" links | Changed to page.getByTestId('header-menu-all-products').click() |
| waitForURL('**/dashboard') timed out | Post-login redirects to /, not /dashboard | Changed to page.waitForURL(/\/$/) |
Each fix was discovered by the agent inspecting the live page DOM, not by guessing. It opened the browser, saw what the actual page looked like, and chose the most stable selector available.
Setting up Playwright agents step by step
Getting started requires Playwright v1.56 or later and a compatible AI tool. The setup takes about 5 minutes.
Step 1: Install the latest Playwright
npm install -D @playwright/test@latest
npx playwright install chromium
Step 2: Initialize the agents
Run the init command with your preferred AI loop:
# For VS Code with Copilot
npx playwright init-agents --loop=vscode

# For Claude Code
npx playwright init-agents --loop=claude

# For OpenCode
npx playwright init-agents --loop=opencode
This generates agent definition files and a seed test. The definitions are markdown-based configuration files that describe each agent's behavior, instructions, and available tools.
Note: VS Code v1.105 or later is required for the agentic experience to work in VS Code.
Step 3: Configure your seed test
The seed test (tests/seed.spec.ts) is the starting point for all agent activity:
import { test } from '@playwright/test';

test('seed', async ({ page }) => {
  await page.goto('https://your-app.com');
  // Add login or setup logic here
});
The Planner runs this seed test before it starts exploring. If your app needs authentication, add the login flow here. Everything the agents do builds on this starting point.
Step 4: Run the Planner
Open your AI tool's chat, select planner mode, and prompt:
Explore the app and generate a test plan for user
registration and checkout flows. Use seed.spec.ts as base.
The Planner navigates your app, discovers UI elements and user flows, and produces a markdown file in the specs/ folder.
Step 5: Generate tests
Switch to generator mode and point it to the plan:
Use the test plan in specs/checkout-flow.md to generate
Playwright tests. Save them in tests/checkout/
Step 6: Heal and validate
Run the Healer against your new or existing suite:
Run the playwright test healer on the test suite in /tests.
Fix any failing tests and verify your fixes.
Customizing agent definitions for your project
The agent definitions are just markdown files in your project's .github/ or .claude/ directory. You can edit them to:
-
Adjust the planner's exploration strategy (add project-specific user flows to prioritize)
-
Customize the generator's code style (enforce naming conventions, comment patterns, or fixture usage)
-
Fine-tune the healer's fix strategies (add rules like "always check for loading spinners before assertions")
Regenerate agent definitions whenever you update Playwright by running npx playwright init-agents again to pick up new tools and instructions.
Project structure after setup
your-project/
├── .claude/                    # Agent configs (or .github/ for VS Code)
├── specs/                      # Markdown test plans (AI-generated)
│   ├── checkout-tests.md       # 37 checkout scenarios
│   ├── registration-tests.md   # 30 registration scenarios
│   └── README.md
├── tests/                      # Playwright tests (AI-generated)
│   ├── complete-purchase.spec.ts
│   └── seed.spec.ts
├── playwright.config.ts
├── seed.spec.ts                # Base environment setup
└── .mcp.json                   # MCP server configuration
Try it yourself: clone the live demo
We published a complete working example so you can see Playwright agents in action:
Repository: github.com/dhruv-r3010/pw-agent-
git clone https://github.com/dhruv-r3010/pw-agent-.git
cd pw-agent-
npm install
npx playwright install chromium
npx playwright test| File | What it contains |
|---|---|
| tests/complete-purchase.spec.ts | Full E2E test: register, login, browse, add to cart, checkout, place order |
| specs/registration-tests.md | 30 AI-generated registration test scenarios |
| specs/checkout-tests.md | 37 AI-generated checkout test scenarios |
| playwright.config.ts | Config pointing to https://storedemo.cms.testdino.com |
| seed.spec.ts | Seed file for the Playwright MCP test generator |
| .mcp.json | MCP server config connecting Claude Code to Playwright |
The test creates a new user account with a unique email on every run, adds a product to the cart, fills in shipping details, and places an order against the live TestDino demo store. It completes in under 18 seconds.
Running Playwright agent tests in CI/CD
The agents themselves are interactive tools designed for use through VS Code Copilot, Claude Code, or OpenCode. But the tests they produce are standard Playwright tests. Your CI pipeline runs them the same way it runs any other suite.
name: Playwright Tests
on: [push, pull_request]
jobs:
  test:
    runs-on: ubuntu-latest
    steps:
      - uses: actions/checkout@v4
      - uses: actions/setup-node@v4
        with:
          node-version: 18
      - run: npm ci
      - run: npx playwright install --with-deps
      - run: npx playwright test
      - uses: actions/upload-artifact@v4
        if: always()
        with:
          name: playwright-report
          path: playwright-report/
The if: always() on artifact upload is critical. Without it, failed test reports don't get saved, and those are exactly the reports you need.
Multi-agent orchestration: running specialized agents in parallel
The Planner/Generator/Healer loop is the beginning. In 2026, teams are running agent teams: multiple specialized agents testing the same flow at the same time.
Picture a checkout flow. A Functional Agent clicks through the happy path. A Security Agent runs alongside it, probing for XSS vulnerabilities and auth bypasses. An Accessibility Agent checks WCAG compliance at each step. A Performance Agent measures Core Web Vitals.
Same user flow. 4 different test perspectives. Running in parallel.
This works because of MCP's architecture. Each agent connects to Playwright through MCP, shares the same browser context, and logs to the same trace. You get a unified view of functional correctness, security posture, accessibility compliance, and performance without maintaining 4 separate test suites.
The observer-driver pattern
The coordination problem is real. Agents can step on each other if they're modifying state. The emerging solution is the observer-driver pattern:
-
Driver agents own all write-actions and state transitions. They click, fill forms, navigate, and mutate application state. Only 1 driver runs per flow to prevent conflicts.
-
Observer agents run asynchronously to perform specialized audits (security, accessibility, performance) without disrupting the execution flow. They consume the trace stream in real-time, flagging issues as the driver progresses.
The driver pushes state changes; observers consume them without causing race conditions.
Multi-agent testing is still early. But for teams that want comprehensive coverage without the combinatorial explosion of traditional test matrices, this is the direction things are moving.
What running Playwright agents at scale actually costs
Running an agent loop on every PR isn't free. Each healing cycle, each planning step, each code generation pass burns tokens. You need to factor this into your testing budget.
Rough token costs per agent action:
| Action | Approx. tokens per run | Approx. cost (GPT-4o / Claude Sonnet) |
|---|---|---|
| Planner exploring 10 pages | 50,000-80,000 | $0.15-0.30 |
| Generator creating 5 test files | 30,000-50,000 | $0.10-0.20 |
| Healer fixing 1 broken test | 15,000-25,000 | $0.05-0.10 |
| Full loop (plan + generate + heal) | 100,000-150,000 | $0.30-0.60 |
For a team running 200 PRs a week with healing on every run, that's $10-20/week in LLM costs. Not huge, but it adds up.
When to use agents vs traditional tests:
-
Use agents for new feature coverage and initial test generation. Let them explore and write the first pass.
-
Use traditional test authoring for business-critical paths where you want deterministic, human-reviewed assertions.
-
Use the healer on a weekly schedule rather than every PR. Catching locator drift early is cheaper than debugging a wall of failures after a major release.
Where Playwright agents fall short
Being honest about the limits helps you use them well.
Context window limits on long flows
A 50-step checkout flow with dynamic pricing, coupons, and shipping calculations can exceed what the LLM can hold in context. The agent forgets what happened in step 12 by the time it reaches step 40. Some teams work around this with hierarchical context compression: the agent summarizes completed steps into condensed checkpoints, keeping recent actions in full detail while older steps become a summary like "user logged in and added 3 items to cart."
Security: handling credentials with AI agents
When using Playwright agents with credentials, API keys, or database connection strings, think carefully about how the AI accesses sensitive information. The agent definitions are markdown files that get processed by the LLM. Don't put secrets directly in seed tests or spec files. Use environment variables and Playwright's built-in .env support.
Model variance
2 identical requests can produce tests with different assertion styles, variable names, or flow structures. This creates noise in code reviews and can cause flaky CI results if tests aren't deterministic. Always review generated code before merging.
TypeScript and JavaScript only
Playwright test agents currently support the JS/TS test runner. Python support is not available yet, though it's a requested feature on GitHub.
Selectors aren't always right
The AI picks good locators most of the time, but it can still choose unstable ones. A text locator works great until someone changes the button copy. Always review generated code before merging. The Playwright Trace Viewer can help you inspect exactly what the agent saw during test execution.
Complex UI changes need a human
If a redesign changes the entire user flow, not just a selector, the Healer can't redesign the test. It fixes locators. It doesn't rewrite test logic.
Playwright agents vs traditional tests vs intent-based testing
| Feature | Traditional Playwright | Playwright agents (2025+) | Intent-based testing (emerging) |
|---|---|---|---|
| Maintenance | Manual, high effort | Semi-auto (Healer) | Autonomous + human review |
| Setup time | Days to weeks | Hours | Minutes |
| Reliability | Deterministic | Variable (LLM-dependent) | High (human-in-the-loop) |
| UI change tolerance | Breaks on any change | Handles minor changes | Adapts to major changes |
| Token cost | None | Medium to high | Optimized (selective agents) |
| Best for | Stable, critical paths | Growing test suites | Fast-moving products |
Traditional Playwright tests are still the right choice for your most critical paths. They're deterministic and predictable. Playwright agents fill the gap between "we need 200 more tests" and "we have 1 SDET." Intent-based testing, where you describe what should happen and the AI figures out the rest, is where the industry is headed.
Tracking agent-generated test stability across CI builds
Running agent-generated tests in CI is the easy part. Knowing whether those tests are actually stable across builds is harder.
When you're producing tests with the Generator and repairing them with the Healer, you need answers that raw CI logs can't give you:
-
Which tests were healed, and how often do they break again?
-
Are healing events increasing or decreasing over time?
-
Is a failure a new regression, or the same flaky test from last week?
This is where a reporting layer becomes necessary. TestDino tracks test stability patterns across CI runs, classifies failures into categories (actual bug, flaky test, UI change), and gives you historical context for every failure.
The workflow that works
- Planner discovers scenarios and writes specs
- Generator creates test files from specs
- Tests run in CI on every push
- Failures get classified and tracked in a reporting tool
- Healer runs periodically to fix locator drift and unstable tests
- Reporting confirms whether healed tests stay stable or keep breaking
That feedback loop is what turns Playwright agents from a cool experiment into a reliable part of your pipeline.
What comes next: semantic selectors, vision models, and multi-modal testing
Semantic selectors
The 2026 direction is moving from data-testid="checkout-btn" to the agent finding "the primary checkout button" by meaning. When you tell a QA engineer to "click the submit button," they don't ask for a CSS selector. They look at the page, identify the button that submits the form, and click it.
Semantic selectors work the same way. The agent understands that a green button labeled "Complete Purchase" at the bottom of a cart page is probably the checkout action, regardless of its id, class, or data-testid. We're not fully there yet. Semantic selectors are slower, less deterministic, and require more sophisticated models. But for teams tired of updating data-testid attributes every sprint, this is where testing is headed.
Vision models and multi-modal testing
Agents aren't just reading the DOM anymore. They're looking at the screen. Vision models like GPT-4o and Claude can take a screenshot, understand what they're seeing, and make decisions based on visual context.
That modal button with the dynamic class name? The agent doesn't care about the selector. It sees "a confirmation dialog with a red Cancel button and a green Confirm button" and clicks the right one.
This catches things code-based selectors miss entirely: a CSS change that makes your CTA invisible on mobile, a z-index bug that hides your checkout button behind a banner, a font that renders illegibly on certain browsers. DOM-based tests pass. Visual tests fail. The agent sees what your users see.
The tradeoff is speed. Vision model inference is slower and more expensive than DOM parsing. For critical paths where "looks right" matters as much as "works right," multi-modal testing is becoming practical. But you'll want to be selective about where you pay the latency cost.
Agent trace observability
Every decision an agent makes gets logged: what it saw in the DOM, what it sent to the LLM, what the LLM returned, and what action it took. You can replay the agent's "thought process" step by step.
The trace viewer shows you the agent's context at each decision point. You can see exactly why the Planner chose to test "user login" instead of "user registration," or why the Healer decided to change a selector. For teams building on agents, this is non-negotiable. Without observability, you're trusting a black box.
This is where the QA role is evolving. Senior QA engineers are becoming agent supervisors: they don't write scripts, they calibrate agents. The accumulated prompt refinements, constraint rules, and pattern libraries become the team's institutional intelligence.
FAQs
npx playwright init-agents --loop=claude (or --loop=vscode), configure your seed test, and start prompting the Planner to explore your application. Clone our live example repo to see a working setup.
Dhruv Rai
Product & Growth Engineer