Testing Browser Extensions with Playwright: A Step-by-Step Tutorial
Browser extensions are hard to test manually. This Playwright tutorial shows you how to load and validate Chrome extensions in real Chromium, step by step.


The Chrome Web Store hosts over 178,000 active extensions as of early 2026, and that number keeps growing. Teams building ad blockers, password managers, developer tools, and productivity add-ons ship extensions alongside regular web apps.
The problem? Most of these extensions are still tested by hand. A developer clicks the popup, checks the options page, refreshes a tab, and hopes nothing broke. That workflow does not scale, and it misses regressions that only surface under real browser conditions.
This guide walks you through playwright browser extension testing from scratch. You will learn how to load your extension into Chromium, write reliable end-to-end tests for every component, and run those tests in CI. Every code snippet here is working and ready to copy.
What is playwright browser extension testing?
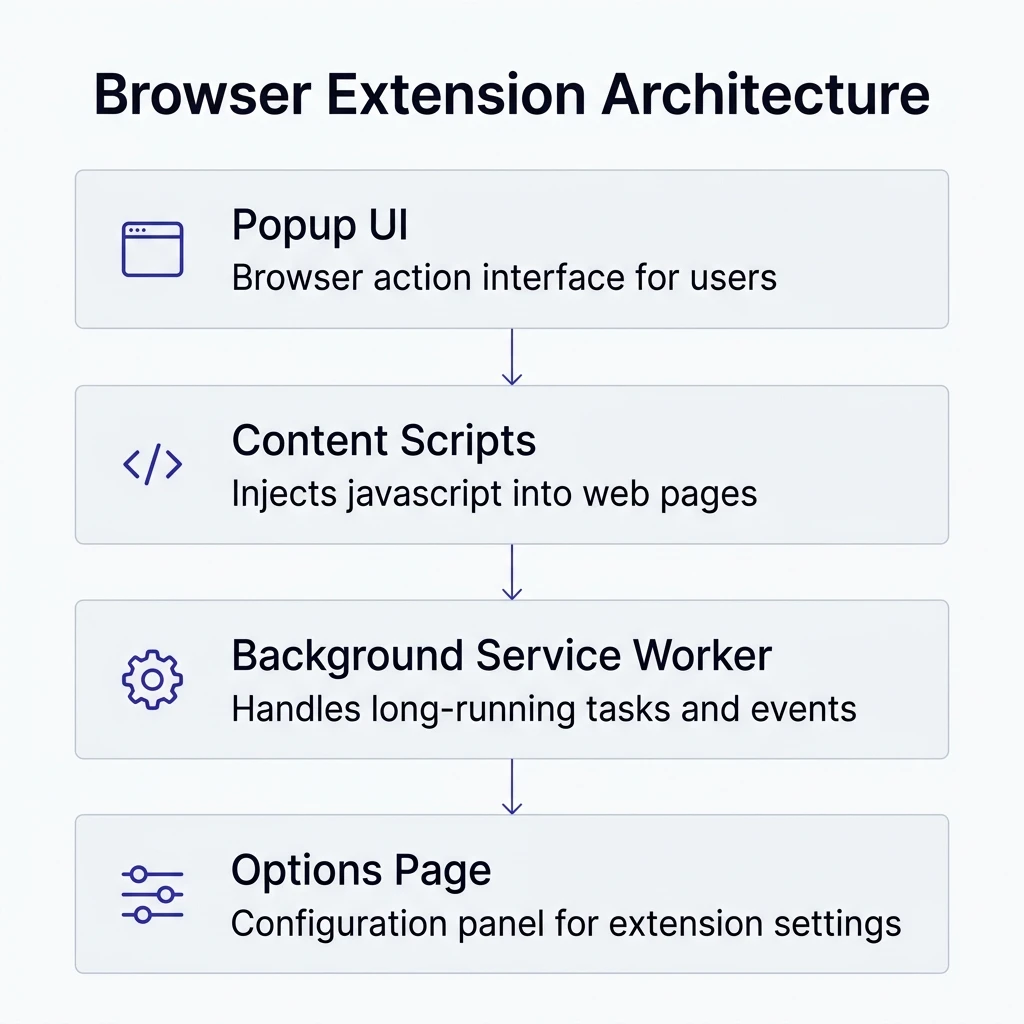
Playwright browser extension testing is the practice of loading a Chrome extension into a real Chromium browser instance controlled by Playwright, and then writing automated tests against the extension's popup, options page, content scripts, and background service worker.
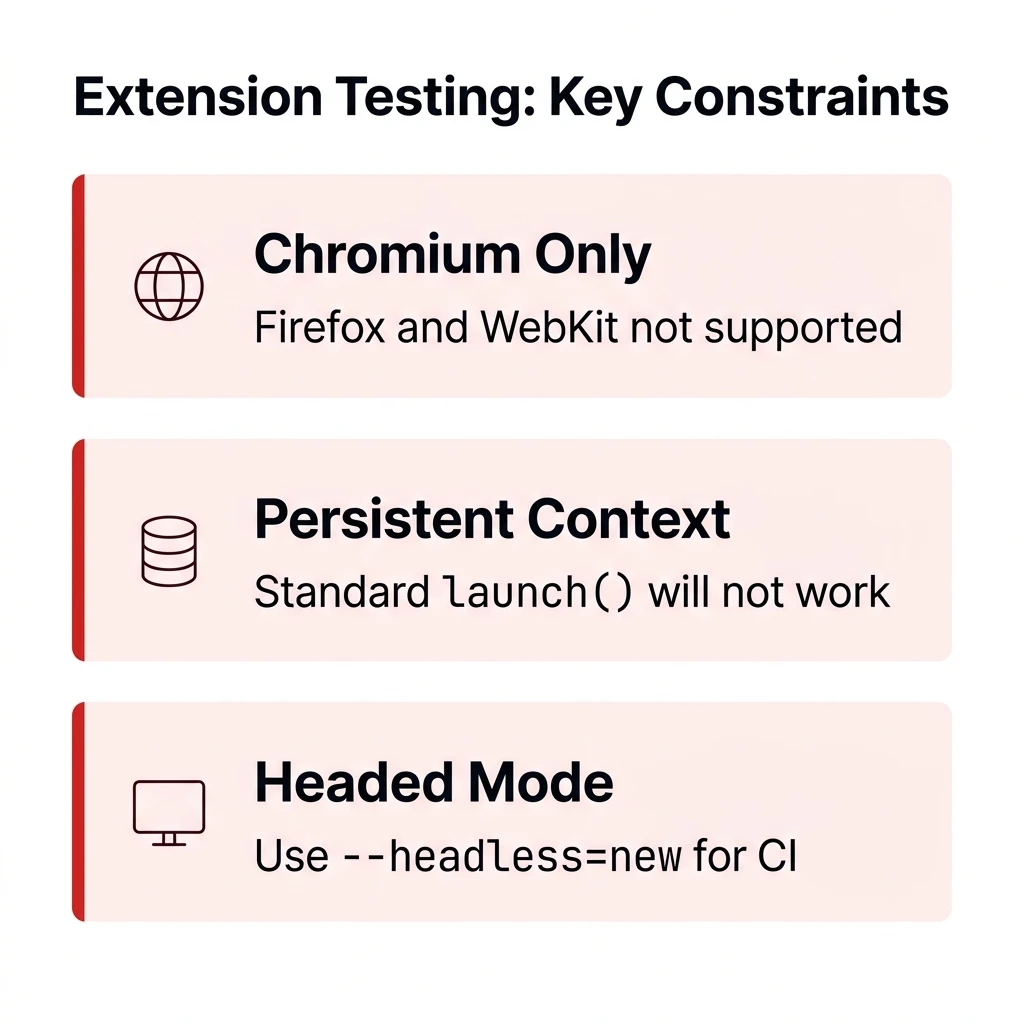
Unlike standard page testing where you simply call browser.newPage(), extension testing requires a persistent browser context. This is because extensions attach to the browser profile at launch time, not to individual tabs.
Playwright supports this through chromium.launchPersistentContext(), a method that creates a full user profile directory, loads your unpacked extension via Chrome command-line flags, and keeps it available to every page in that session.
Here is what makes it different from regular Playwright e2e testing:
- You must use the Chromium browser specifically. Firefox and WebKit do not support extension loading in this context.
- You need to pass --disable-extensions-except and --load-extension flags pointing to your built extension directory.
- The extension ID is generated dynamically at runtime. You cannot hardcode it.
Why browser extensions need automated testing
Manual testing might work when your extension has 2 features and 1 contributor. But once it starts interacting with external websites, managing user settings, or communicating over chrome.runtime.sendMessage, things break in ways you cannot predict.
Here are the specific risks of skipping automated tests:
- Content script regressions. A site you inject into updates their DOM, and your selector breaks silently.
- Popup state bugs. An event listener in the popup fails after a Chrome update changes sandbox restrictions.
- Storage conflicts. Two features write to chrome.storage.local with overlapping keys, and neither developer knows.
According to research on why Playwright tests fail, timing issues and stale selectors are the top root causes. Extension testing amplifies both because you are dealing with multiple execution contexts (popup, content script, background worker) that communicate asynchronously.
Automated extension tests catch these issues before your users do. And when tests fail, tools like TestDino surface the exact failure context, including traces and screenshots, so you do not spend hours digging through CI logs.

Prerequisites and project setup
Before writing any tests, make sure your local environment has the following:
- Node.js 18+ installed
- A built (unpacked) extension in a local directory (e.g., ./my-extension/) with a valid manifest.json
- Playwright installed as a dev dependency

Tip: Always test against the built version of your extension (the dist/ or build/ folder), not the raw source. This ensures your tests reflect exactly what gets shipped to users.
Step 1: initialize your test project
If you are starting fresh, create a new directory and install Playwright:
mkdir extension-tests && cd extension-tests
npm init -y
npm install -D @playwright/test
npx playwright install chromium
You only need Chromium here. Installing Firefox or WebKit is unnecessary since extensions are Chromium-only. If you need a refresher on how Playwright handles different browser engines, the Playwright browser testing guide covers Chromium, Firefox, and WebKit in detail.
Step 2: set up the extension
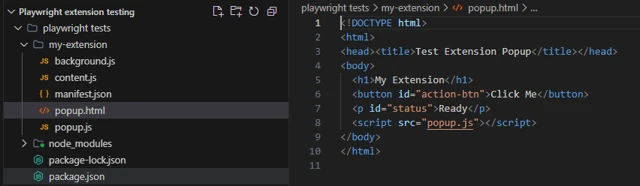
For this tutorial, we will use a simple Manifest V3 extension that modifies page content and has a popup. Create a folder called my-extension with this structure:
my-extension/
├── manifest.json
├── popup.html
├── popup.js
├── content.js
└── background.js
Here is the manifest:
{
  "manifest_version": 3,
  "name": "Test Extension",
  "version": "1.0",
  "description": "A sample extension for Playwright testing",
  "action": {
    "default_popup": "popup.html"
  },
  "background": {
    "service_worker": "background.js"
  },
  "content_scripts": [
    {
      "matches": ["https://example.com/*"],
      "js": ["content.js"]
    }
  ],
  "permissions": ["storage"]
}
The popup HTML:
<!DOCTYPE html>
<html>
<head><title>Test Extension Popup</title></head>
<body>
  <h1>My Extension</h1>
  <button id="action-btn">Click Me</button>
  <p id="status">Ready</p>
  <script src="popup.js"></script>
</body>
</html>
The content script that modifies example.com:
const banner = document.createElement('div');
banner.id = 'extension-banner';
banner.textContent = 'Modified by Test Extension';
banner.style.cssText = 'background:#4338CA;color:#fff;padding:8px;text-align:center;';
document.body.prepend(banner);

Loading a Chrome extension into Playwright
This is the core step. Playwright does not support extensions through its standard browser.launch() API. You must use chromium.launchPersistentContext() with specific Chrome flags.
Creating the test fixture
The recommended pattern from the official Playwright documentation is to create a custom test fixture that handles context creation and extension ID retrieval. This approach aligns with Playwright best practices for test organization.
Create a file called fixtures.ts:
import { test as base, chromium, type BrowserContext } from '@playwright/test';
import path from 'path';
export const test = base.extend<{
  context: BrowserContext;
  extensionId: string;
}>({
  context: async ({}, use) => {
    const pathToExtension = path.join(__dirname, 'my-extension');
    const context = await chromium.launchPersistentContext('', {
      channel: 'chromium',
      args: [
        `--disable-extensions-except=${pathToExtension}`,
        `--load-extension=${pathToExtension}`,
      ],
    });
    await use(context);
    await context.close();
  },
  extensionId: async ({ context }, use) => {
    let [serviceWorker] = context.serviceWorkers();
    if (!serviceWorker) {
      serviceWorker = await context.waitForEvent('serviceworker');
    }
    const extensionId = serviceWorker.url().split('/')[2];
    await use(extensionId);
  },
});
export const expect = test.expect;
Let's break down what each part does:
- chromium.launchPersistentContext('') creates a temporary user data directory. An empty string tells Playwright to auto-generate one.
- channel: 'chromium' uses the Chromium channel bundled with Playwright. Google Chrome and Microsoft Edge removed the flags needed to side-load extensions, so you must use Playwright's own Chromium.
- --disable-extensions-except prevents any default extensions from loading while allowing yours.
- --load-extension passes your unpacked extension directory to Chromium.
- context.serviceWorkers() retrieves the background service worker, from which we extract the dynamically assigned extension ID.
Tip: If your extension requires specific browser permissions (like clipboard or geolocation), pass a permissions: ['clipboard-read'] array to the launchPersistentContext configuration to prevent tests from hanging on permission prompts.
This fixture pattern is the same concept covered in the Playwright test automation guide. Fixtures encapsulate setup and teardown, keeping your actual test files clean.
Understanding persistent context vs standard context
Here is a quick comparison to clarify why launchPersistentContext is required:
| Feature | browser.launch() | chromium.launchPersistentContext() |
|---|---|---|
| Extension loading | Not supported | Supported via --load-extension |
| User data directory | Ephemeral (in-memory) | Persistent (on disk) |
| Browser type | Chromium, Firefox, WebKit | Chromium only |
| Service workers | Limited access | Full access via context.serviceWorkers() |
| Isolation | Full isolation per context | Shared profile state across pages |
If you want to understand the difference between headless and headed modes in this context, the headless vs headed in Playwright guide covers it in detail.
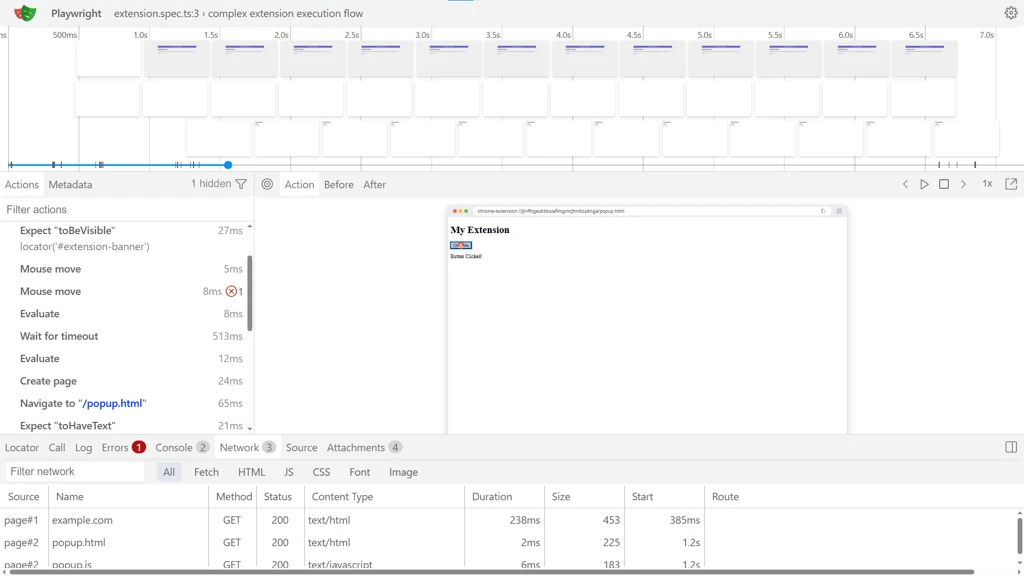
Writing your first extension test
Now that the fixture is in place, create a test file called extension.spec.ts and import the custom test and expect from your fixtures.
import { test, expect } from './fixtures';
test('content script injects banner on example.com', async ({ context }) => {
  const page = await context.newPage();
  await page.goto('https://example.com');
  const banner = page.locator('#extension-banner');
  await expect(banner).toBeVisible();
  await expect(banner).toHaveText('Modified by Test Extension');
});
This test does three things:
- Opens a new page inside the persistent context (which has the extension loaded).
- Navigates to example.com, where the content script should fire.
- Asserts that the injected banner element exists and contains the expected text.
Notice that we use context.newPage() instead of the default page fixture. That is because the default page fixture comes from the standard Playwright setup, but our custom context fixture is what holds the extension. Using Playwright locators like page.locator('#extension-banner') keeps the selector strategy aligned with best practices.
Run the test:
npx playwright test extension.spec.ts
Tip: If the test fails with a timeout, make sure your extension's content script matches the URL pattern you are navigating to. Check the "matches" field in manifest.json.

Testing popups, content scripts, and service workers
A real extension has multiple moving parts. Let's write tests for each one.
Testing the popup UI
Extension popups are just HTML pages served from the chrome-extension:// protocol. Because popups close automatically when they lose focus, you should not try to click the extension icon in your tests. Instead, navigate directly to the popup URL.
test('popup renders correctly', async ({ context, extensionId }) => {
  const page = await context.newPage();
  await page.goto(`chrome-extension://${extensionId}/popup.html`);
  await expect(page.locator('h1')).toHaveText('My Extension');
  await expect(page.locator('#action-btn')).toBeVisible();
  await expect(page.locator('#status')).toHaveText('Ready');
});
test('popup button updates status', async ({ context, extensionId }) => {
  const page = await context.newPage();
  await page.goto(`chrome-extension://${extensionId}/popup.html`);
  await page.click('#action-btn');
  await expect(page.locator('#status')).not.toHaveText('Ready');
});
The extensionId fixture resolves the dynamic ID automatically. You can then treat the popup like any standard web page and use all the Playwright assertions you would normally use.
Testing content scripts
Content scripts inject into real web pages. To test them, navigate to a page that matches the content script's matches pattern from your manifest.
test('content script modifies target page', async ({ context }) => {
  const page = await context.newPage();
  await page.goto('https://example.com');
  // Verify the content script injected the banner
  const banner = page.locator('#extension-banner');
  await expect(banner).toBeVisible();
  await expect(banner).toHaveCSS('background', /rgb\(67, 56, 202\)/);
});
test('content script does NOT inject on non-matching pages', async ({ context }) => {
  const page = await context.newPage();
  await page.goto('https://playwright.dev');
  const banner = page.locator('#extension-banner');
  await expect(banner).toHaveCount(0);
});
The second test is just as important. It confirms that your content script does not accidentally run on pages it should not touch.
Testing the background service worker
Manifest V3 extensions use service workers instead of persistent background pages. Playwright gives you direct access to the service worker through the context.
test('service worker is active', async ({ context }) => {
  let [serviceWorker] = context.serviceWorkers();
  if (!serviceWorker) {
    serviceWorker = await context.waitForEvent('serviceworker');
  }
  // Evaluate code in the service worker context
  const result = await serviceWorker.evaluate(() => {
    return 'worker is alive';
  });
  expect(result).toBe('worker is alive');
});
This is an important detail. If your service worker uses setTimeout or relies on persistent global variables, those will be lost during suspension. Your tests should account for this by verifying state through chrome.storage rather than in-memory variables.
Running extension tests in CI/CD pipelines
Getting extension tests to pass locally is one thing. Running them in CI is a different challenge because most CI environments do not have a display server.
The headless mode problem
By default, Chrome extensions do not load in traditional headless mode. But Playwright offers a workaround using the chromium channel, which supports extensions even without a visible display.
According to the official Playwright documentation, using channel: 'chromium' in your persistent context configuration enables extension loading in headless environments.
Here is the updated fixture for CI:
context: async ({}, use) => {
  const pathToExtension = path.join(__dirname, 'my-extension');
  const context = await chromium.launchPersistentContext('', {
    channel: 'chromium',
    args: [
      `--disable-extensions-except=${pathToExtension}`,
      `--load-extension=${pathToExtension}`,
    ],
  });
  await use(context);
  await context.close();
},
Note: Using channel: 'chromium' is the officially recommended approach per the Playwright docs. It allows extensions to run in headless mode. Alternatively, you can set headless: false and use Xvfb on Linux CI runners.
GitHub Actions configuration
Here is a working GitHub Actions workflow that runs extension tests. This integrates with the practices described in Playwright CI/CD integrations.
name: Extension Tests
on: [push, pull_request]
jobs:
  test:
    runs-on: ubuntu-latest
    steps:
      - uses: actions/checkout@v4
      - uses: actions/setup-node@v4
        with:
          node-version: 20
      - name: Install dependencies
        run: npm ci
      - name: Install Playwright Chromium
        run: npx playwright install chromium --with-deps
      - name: Build extension
        run: npm run build:extension
      - name: Run extension tests
        run: npx playwright test
      - name: Upload test artifacts
        if: failure()
        uses: actions/upload-artifact@v4
        with:
          name: test-results
          path: test-results/
Playwright config for extension testing
Your playwright.config.ts should be tuned for the specific needs of extension testing:
import { defineConfig } from '@playwright/test';
export default defineConfig({
  testDir: './tests',
  timeout: 30000,
  retries: process.env.CI ? 2 : 0,
  workers: 1,
  reporter: [
    ['html'],
    ['json', { outputFile: 'test-results/results.json' }],
  ],
  use: {
    trace: 'on-first-retry',
    screenshot: 'only-on-failure',
    video: 'retain-on-failure',
  },
});
Tip: Set workers: 1 for extension tests. Because each test uses a persistent context with a shared user data directory, running tests in parallel can cause conflicts. If you need parallelism, set up separate user data directories per worker.
The workers: 1 setting is critical. Unlike standard Playwright tests where parallel execution works seamlessly with isolated browser contexts, extension tests share the persistent context's state. Running them in parallel without isolation leads to flaky tests.
Debugging and best practices for stable extension tests
Extension tests can be trickier to debug than regular page tests because you are dealing with multiple execution contexts. Here are the strategies that work.
Use the Playwright debugger
Run your tests with the --debug flag to step through every action:
npx playwright test extension.spec.ts --debug
This opens the Playwright Inspector where you can pause, step through, and inspect the browser state at every point. You can see whether your extension loaded correctly by checking the extensions page at chrome://extensions.
Enable tracing
Traces give you a complete replay of what happened during a test run. The config we set up earlier uses trace: 'on-first-retry', which captures evidence specifically when a test needs to be retried. This is the approach recommended in the Playwright test automation guide.
To view a trace:
npx playwright show-trace test-results/extension-test-retry1/trace.zip
Per-test debugging with custom fixtures
When a single test is failing, you might want to run it visually or in slow motion without altering the suite configuration. Standard test.use() overrides do not apply automatically to launchPersistentContext. Instead, you can extend your custom fixture to accept isHeaded and isSlowMo options, passing them to the context launch arguments:
test.use({ isHeaded: true, isSlowMo: true });
test('debug visual state', async ({ context }) => {
  // This test now runs visibly and slower while others remain headless
});
Common pitfalls and how to avoid them
Here are mistakes that come up repeatedly:
- Hardcoding the extension ID. It changes every run. Always extract it from the service worker URL.
- Using page fixture directly. The default page fixture does not come from your persistent context. Use context.newPage() instead.
- Testing against source code. If your extension has a build step (Webpack, Vite, Rollup), point your tests to the output directory, not the source files. This is one of the simplest ways to reduce test maintenance long-term.
- Ignoring service worker suspension. After 30 seconds of inactivity, MV3 service workers suspend. Test state through chrome.storage, not global variables.
- Skipping negative tests. Verify that content scripts do NOT inject on non-matching URLs.
- Ignoring the extension welcome page. Extensions often open an onboarding page on install. Your fixture should expect and handle this using context.waitForEvent('page'), otherwise your first test navigation might steal focus or hang.
- Collisions during parallel execution. Persistent contexts lock their userDataDir. To run tests in parallel, your fixture must generate a unique temporary directory (e.g., using crypto.randomUUID()) for each worker to use.
When your test suite grows, tracking which tests are stable vs. flaky becomes essential. Running dozens of extension tests in CI without visibility into failure patterns leads to the same debugging cycle over and over.
Testing the options page
If your extension has an options page, test it the same way as the popup:
test('options page loads and saves settings', async ({ context, extensionId }) => {
  const page = await context.newPage();
  await page.goto(`chrome-extension://${extensionId}/options.html`);
  // Interact with options UI
  await page.fill('#setting-input', 'new value');
  await page.click('#save-btn');
  // Verify the setting persisted
  await page.reload();
  await expect(page.locator('#setting-input')).toHaveValue('new value');
});
Testing chrome.storage interactions
You can use serviceWorker.evaluate() to read or write extension storage directly:
test('storage stores user preference', async ({ context }) => {
  let [sw] = context.serviceWorkers();
  if (!sw) sw = await context.waitForEvent('serviceworker');
  // Write to storage from the service worker
  await sw.evaluate(() => {
    return chrome.storage.local.set({ theme: 'dark' });
  });
  // Read it back
  const stored = await sw.evaluate(() => {
    return chrome.storage.local.get('theme');
  });
  expect(stored.theme).toBe('dark');
});
This pattern is useful for verifying that your popup, content script, and background worker all agree on the same stored state. If you are building a more complex extension, the Playwright automation course covers advanced fixture composition patterns that can help structure these tests.
Summary of the complete test file structure
| File | Purpose |
|---|---|
| fixtures.ts | Custom fixture: launches persistent context, extracts extension ID |
| extension.spec.ts | All extension tests (popup, content scripts, service worker, options page, storage) |
| playwright.config.ts | Configuration: single worker, retry strategy, trace and screenshot capture |
| .github/workflows/extension-tests.yml | CI pipeline: installs deps, builds extension, runs tests, uploads artifacts on failure |
Conclusion
Playwright browser extension testing follows the same principles as regular Playwright testing, just with a different launch method. Once the persistent context fixture is in place, everything else works the same: locators, assertions, traces, and screenshots.
Start with popup and content script tests since those cover the most visible user behavior. Then layer in service worker and storage tests for internal logic. If you are already running a Playwright test automation suite, adding extension tests is a natural next step using the same CI pipeline, reporting, and debugging tools.
FAQs
Table of content
Flaky tests killing your velocity?
TestDino auto-detects flakiness, categorizes root causes, tracks patterns over time.
Follow Us