How to Learn Playwright in 2026: The Complete Roadmap
10-step roadmap to learn Playwright from zero to production. Working code, time estimates, and clear checkpoints at every step of the way.
Playwright has 84K+ GitHub stars and 33 million weekly NPM downloads. Tutorials exist everywhere. And yet most learners stall after writing 2 tests.
The problem isn't the framework. It's the order. People jump to Page Objects before they understand locators. Or skip CI/CD and wonder why their suite falls apart at 50 tests.
This guide is the 10-step sequence, from JavaScript basics to the AI ecosystem (MCP, test agents, skill packs) that shipped in 2025-2026.
Every step has a time estimate, working code against a live demo app, and a clear checkpoint so you know when to move on.
If you already know some steps, skip ahead. The roadmap works whether you're starting from zero or filling gaps.
Prerequisites before you start
You don't need a CS degree. But you do need a few basics.
|
Prerequisite |
Why it matters |
Time to learn |
|---|---|---|
|
JavaScript/TypeScript basics |
Playwright tests are JS/TS code |
1-2 weeks if new |
|
HTML/CSS fundamentals |
You're finding elements on web pages |
3-5 days |
|
VS Code |
Playwright has a dedicated extension |
1 day |
|
Node.js 18+ |
Playwright runs on Node |
30-minute install |
|
Command line basics |
You'll run tests from the terminal |
1 day |
Quick check:
node -v # Should be 18+
npm -v
If node -v returns nothing, install Node.js first.
Can you skip JavaScript? Playwright supports Python, Java, and C#. But the TypeScript/JavaScript ecosystem has the most tutorials, community support, and the fastest feature adoption. This roadmap uses TypeScript.
For a full Playwright automation overview, including how it compares to Selenium and Cypress, check our guides.
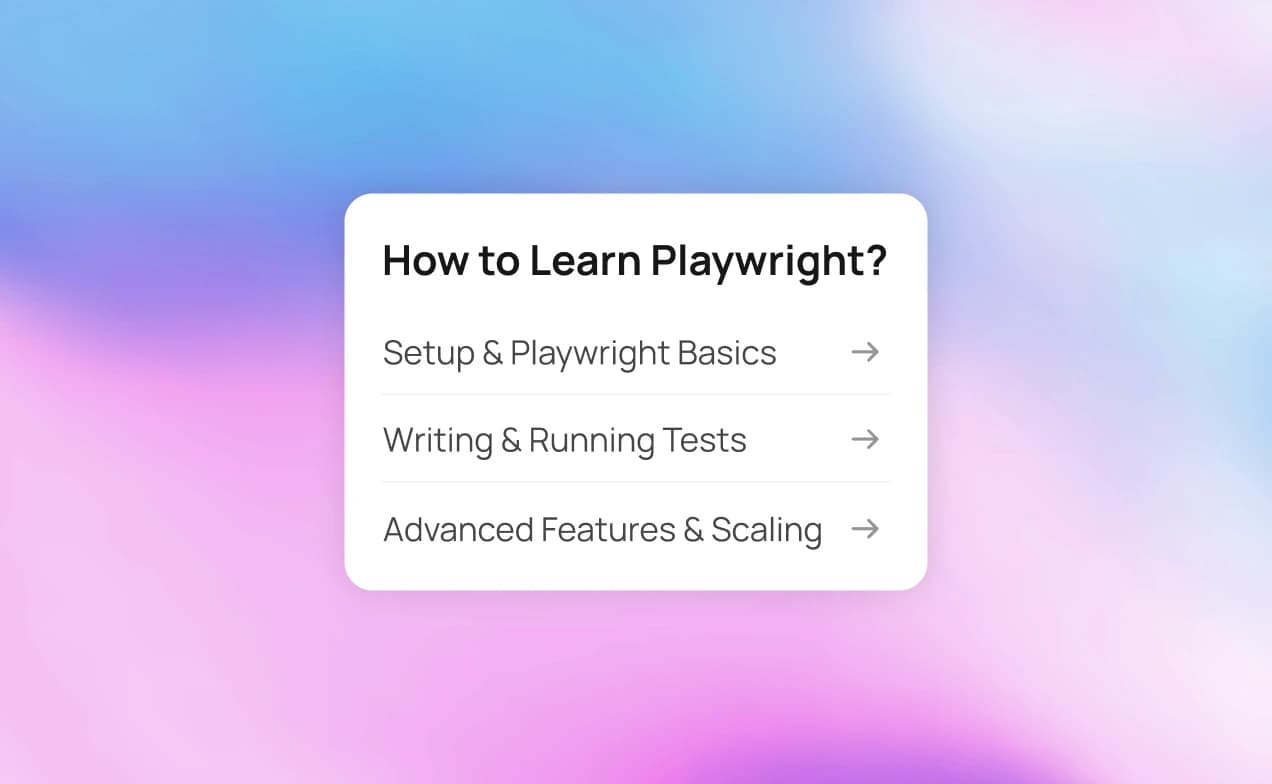
The 10-step Playwright roadmap
To learn Playwright from scratch, follow this sequence: JavaScript basics, project setup, first test, locators and assertions, Page Object Model, API testing, CI/CD pipelines, debugging with Trace Viewer, advanced patterns like sharding, and the AI ecosystem including MCP and test agents.
Each step below has a time estimate, working code, a clear outcome, and a link to go deeper.
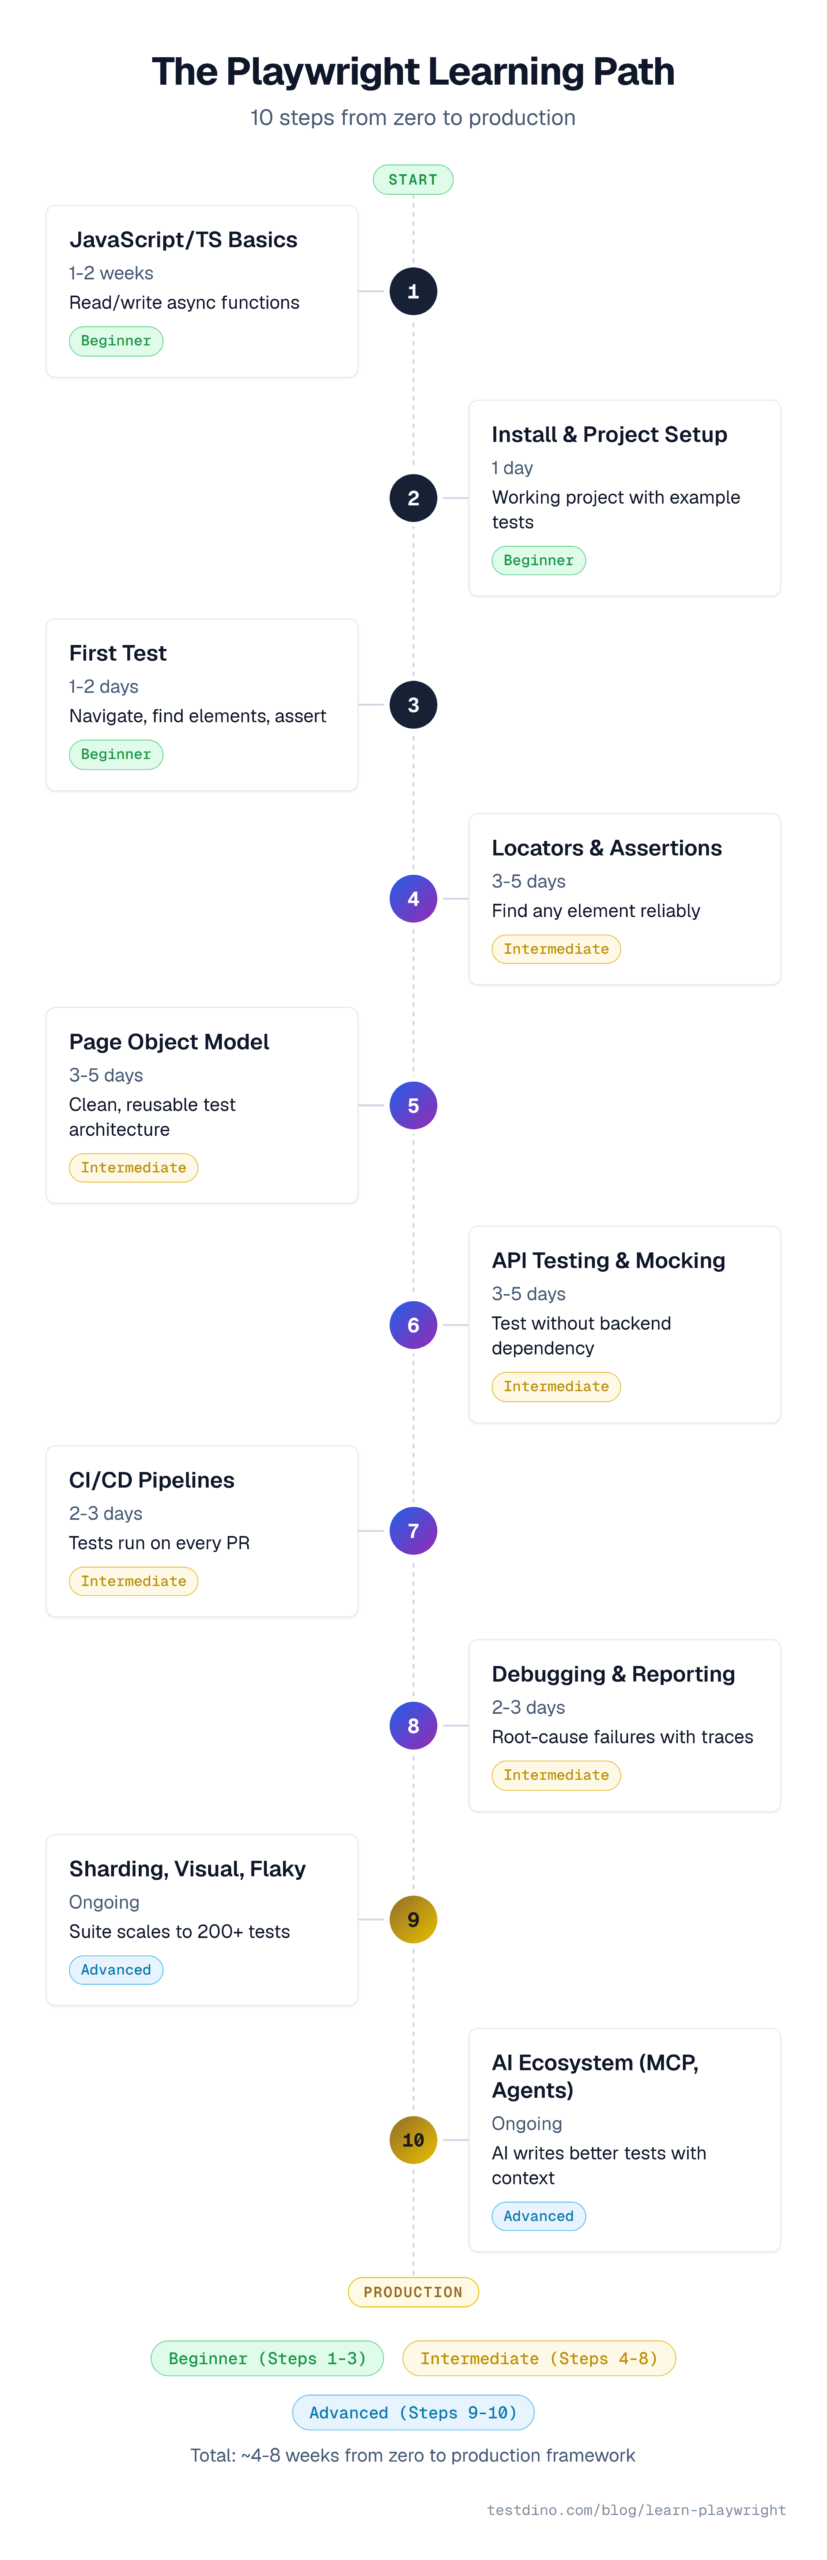
Step 1: Learn JavaScript/TypeScript basics
Time: 1-2 weeks (skip if you already know JS)
What you'll learn: Variables, functions, async/await, promises. This is the language Playwright tests are written in.
The single most important concept? async/await. Every Playwright command is asynchronous. If you don't understand this pattern, every test will confuse you.
// async/await is the #1 concept for Playwright
async function fetchData() {
  const response = await fetch('https://api.example.com/data');
  const data = await response.json();
  return data;
}
// Without async/await, Playwright tests won't work
// Every page action returns a Promise
After this step: You can read and write basic JavaScript functions with async/await.
Go deeper: Playwright scripts cover the JavaScript patterns that appear most in Playwright tests.
Step 2: Install Playwright and understand project structure
Time: 1 day
What you'll learn: npm init playwright@latest, folder structure, playwright.config.ts, and the tests/ directory.
# Create a new Playwright project
npm init playwright@latest
# This creates:
# ├── tests/            ← your test files go here
# ├── playwright.config.ts  ← configuration
# ├── package.json
# └── .github/workflows/   ← optional CI config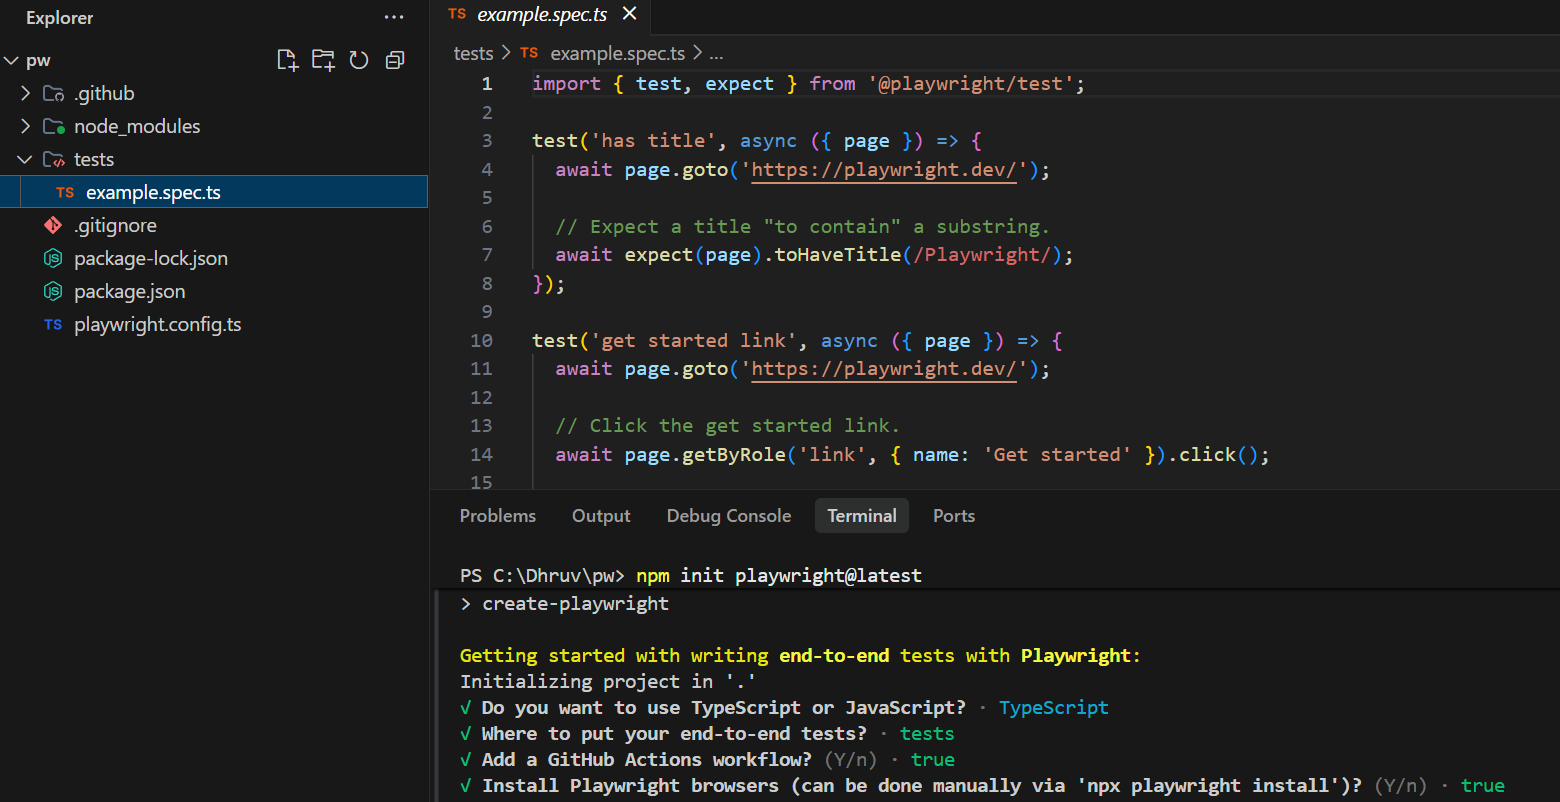
Run the example tests immediately:
npx playwright testOpen the built-in HTML report:
npx playwright show-report
Tip: Install the Playwright VS Code extension. It lets you run and debug tests directly in your editor. The Playwright best practices docs recommend it as the starting point..
After this step: You have a working Playwright project with example tests that run and produce a report.
Go deeper: Playwright framework setup has the full project structure walkthrough.
Step 3: Write and run your first test
Time: 1-2 days
What you'll learn: test(), expect(), page.goto(), basic assertions, running tests and reading results.
Here's a real test against the StoreDemo app:
// tests/homepage.spec.ts
import { test, expect } from '@playwright/test';
test.describe('Test group', () => {
  test('homepage loads and displays header', async ({ page }) => {
    // Navigate to the store demo
    await page.goto('https://storedemo.cms.testdino.com/');
    // Verify the page loaded by checking for the user icon
    await expect(page.getByTestId('header-user-icon')).toBeVisible();
    // Verify the cart icon exists
    await expect(page.getByTestId('header-cart-icon')).toBeVisible();
  });
});
Run it:
npx playwright test tests/homepage.spec.ts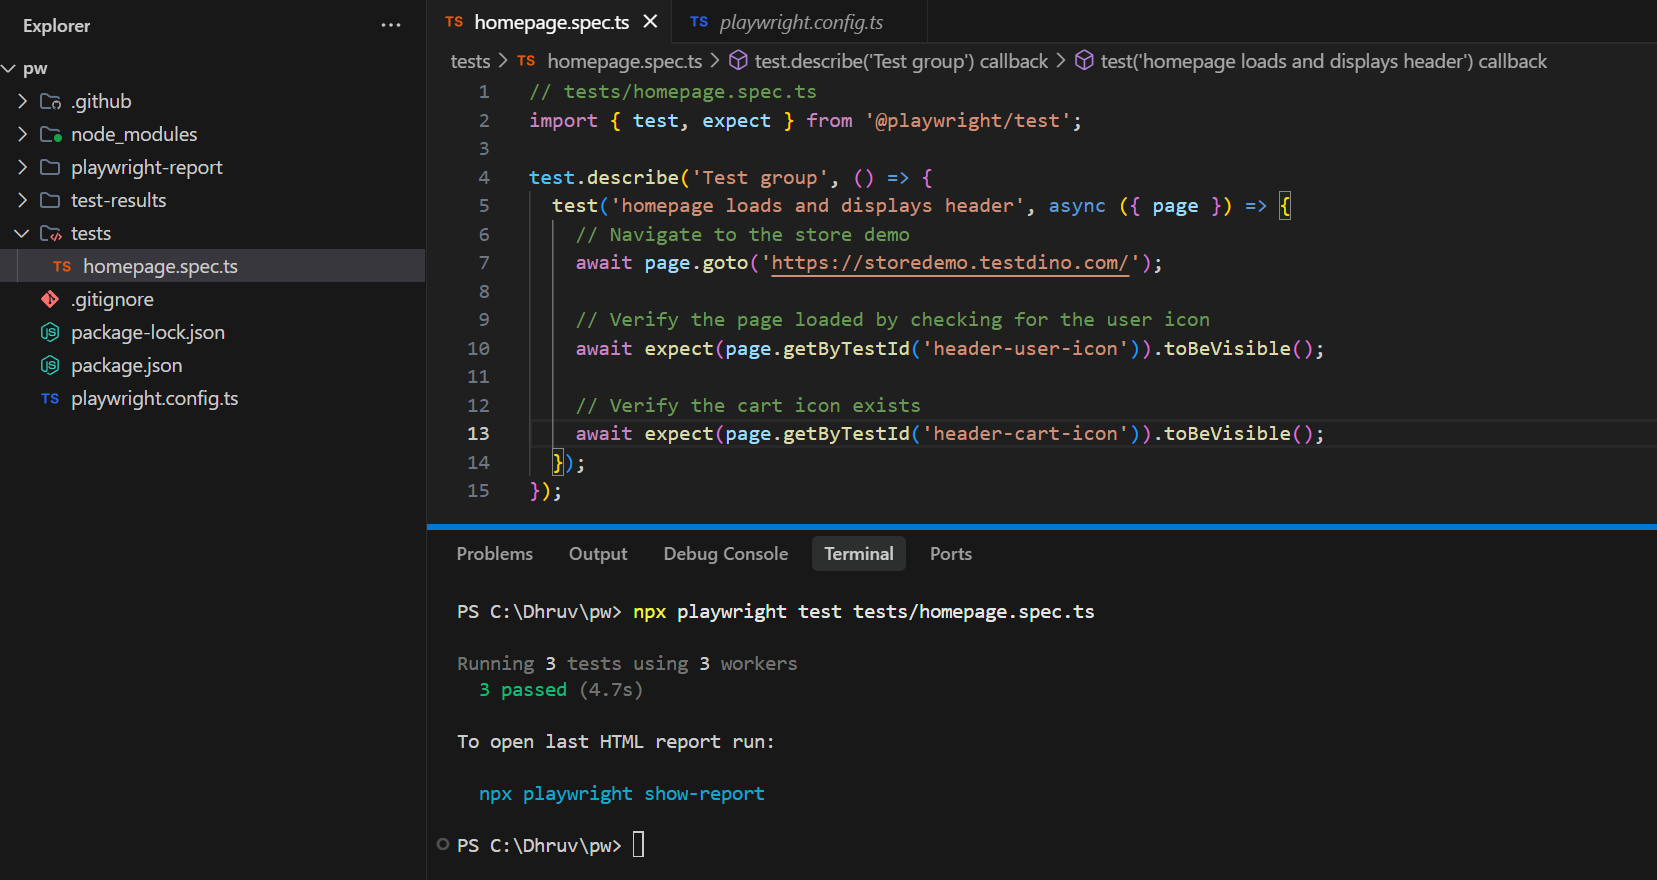
The test uses getByTestId() to find elements. This is one of Playwright's built-in locator methods, and it's the most resilient approach when data-testid attributes exist on the page.
After this step: You can write a test that navigates to a page, finds elements, and verifies they exist.
Go deeper: Playwright e2e testing shows more patterns for full user-flow tests.
Step 4: Master locators, assertions, and auto-wait
Time: 3-5 days
What you'll learn: getByRole(), getByText(), getByTestId(), web-first assertions, and how auto-wait eliminates flakiness.
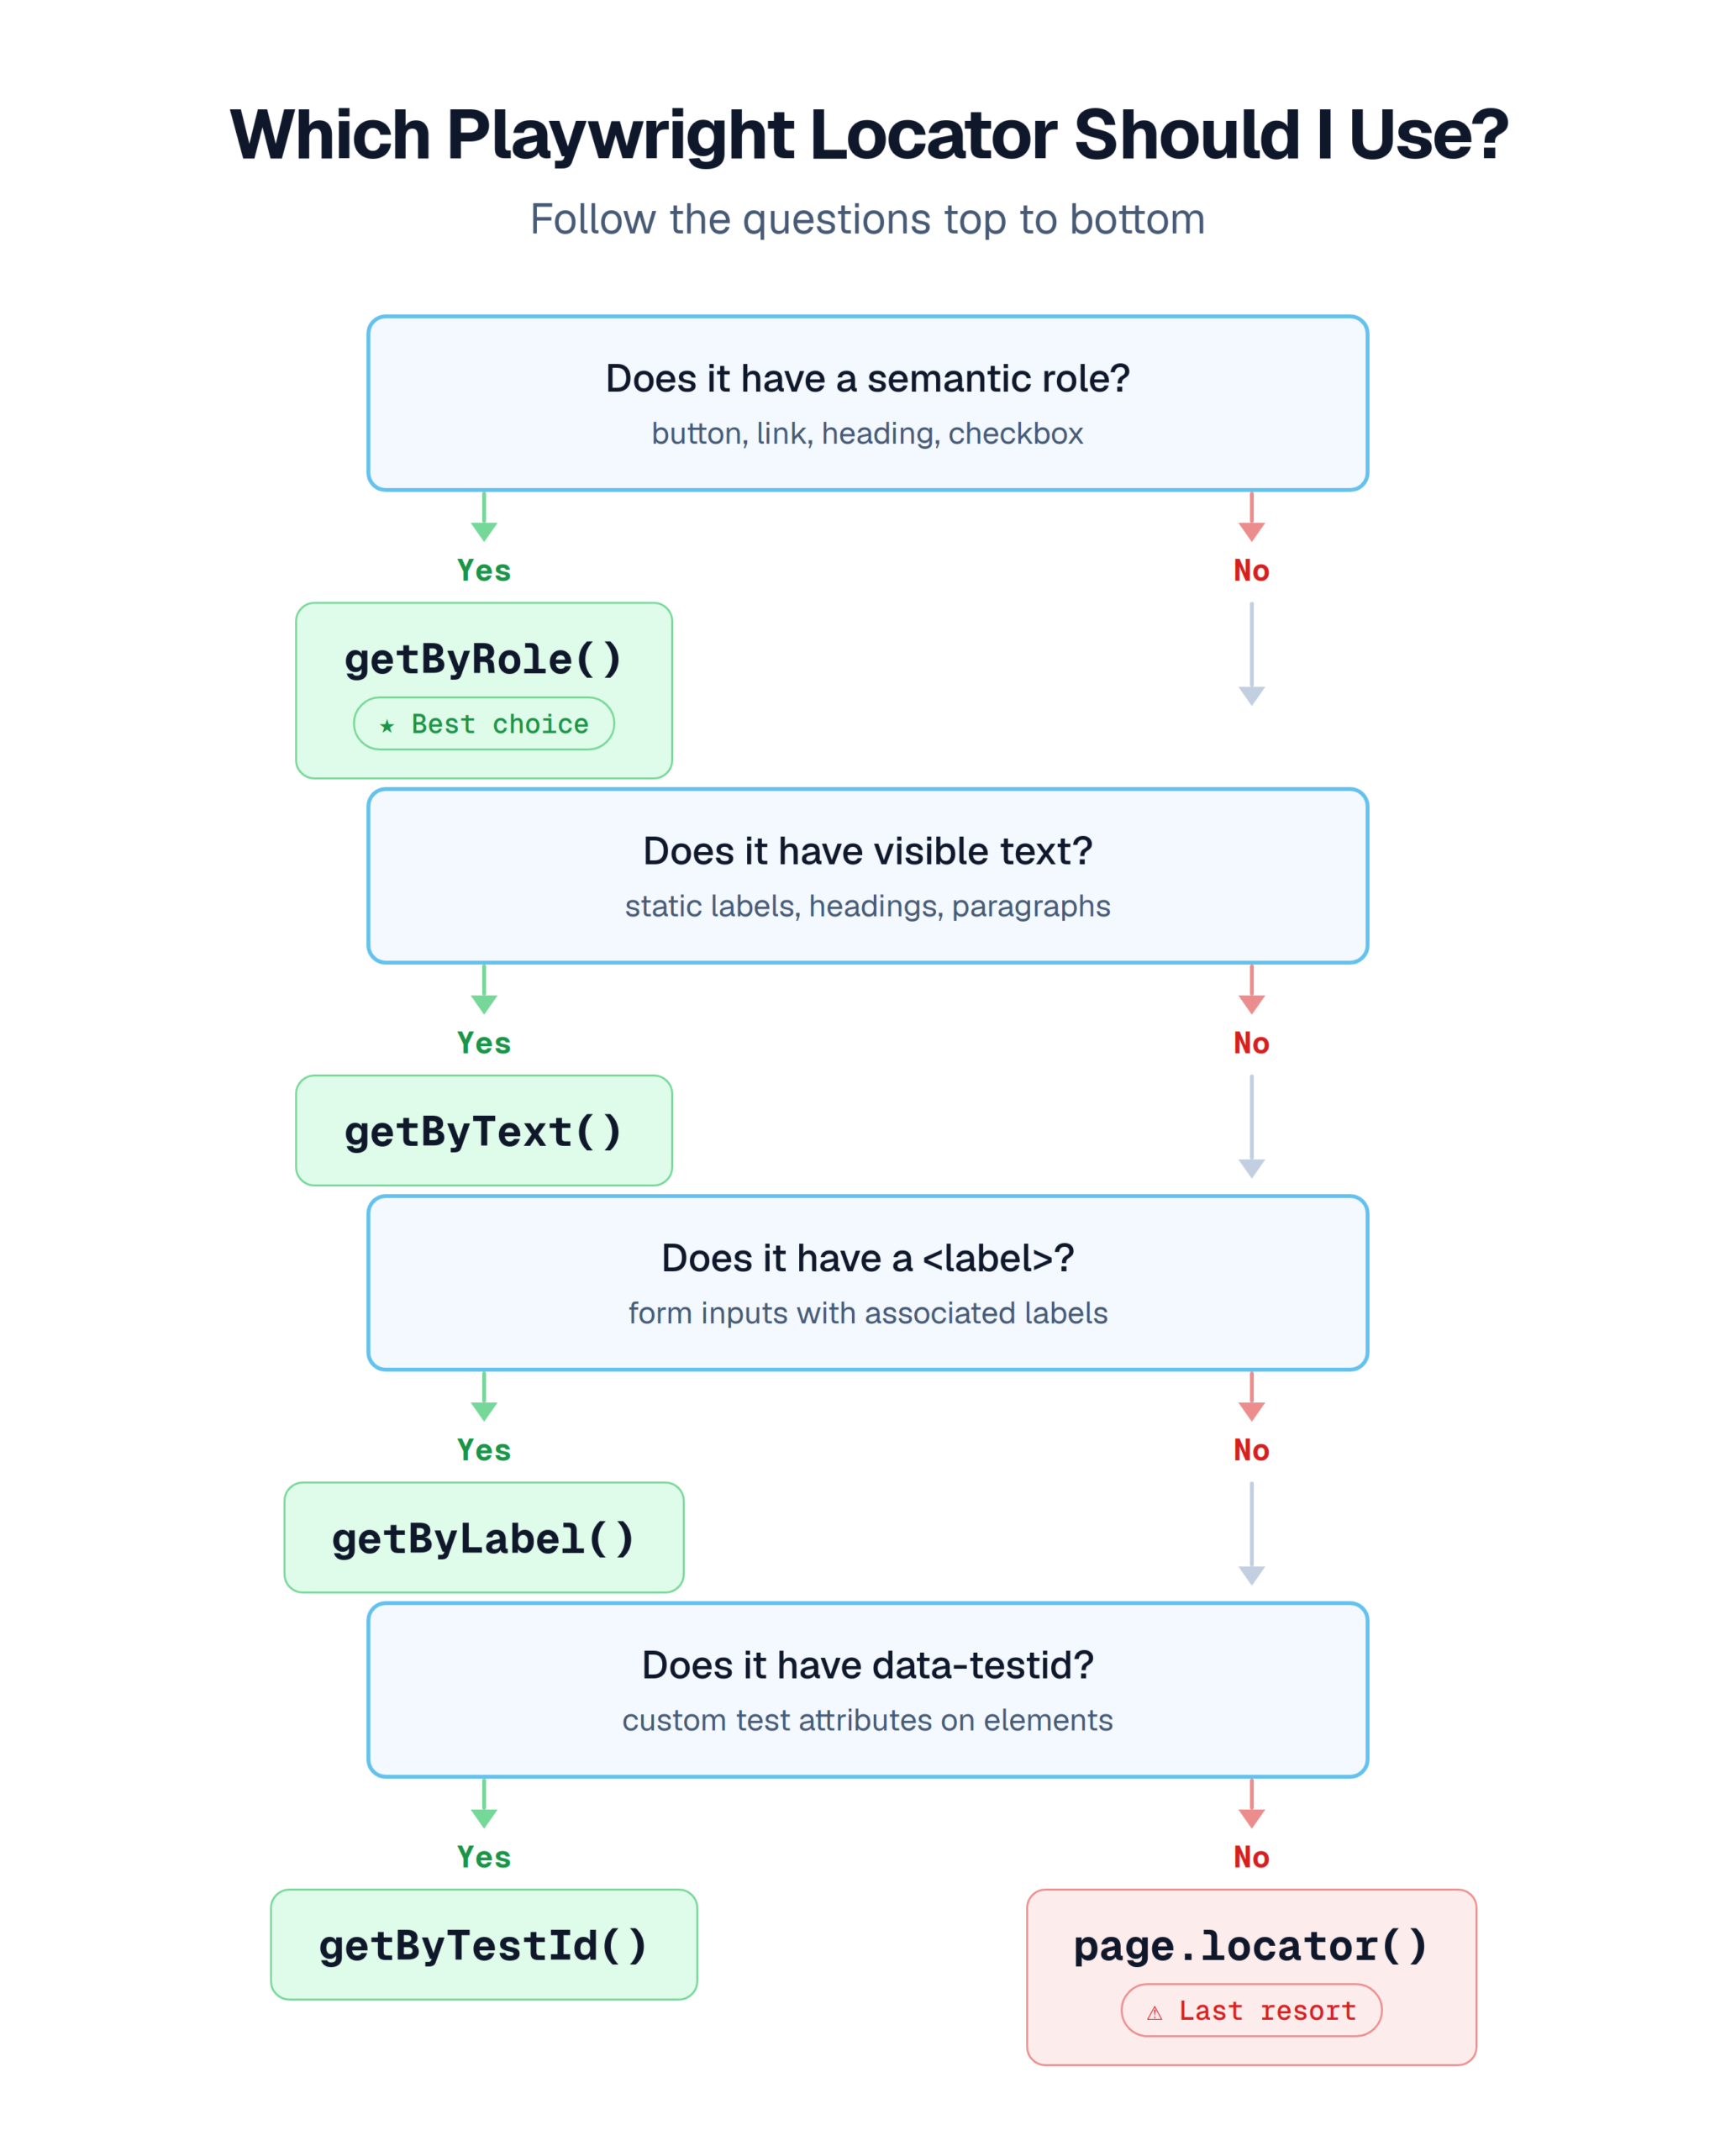
This is the step that separates shaky tests from reliable ones. Playwright's locator documentation recommends this priority order:
|
Priority |
Locator |
When to use |
|---|---|---|
|
1st |
getByRole() |
Buttons, links, headings, form elements |
|
2nd |
getByText() |
Visible text content |
|
3rd |
getByLabel() |
Form inputs with labels |
|
4th |
getByTestId() |
When no semantic locator works |
|
Last |
page.locator('css=...') |
Only as a fallback |
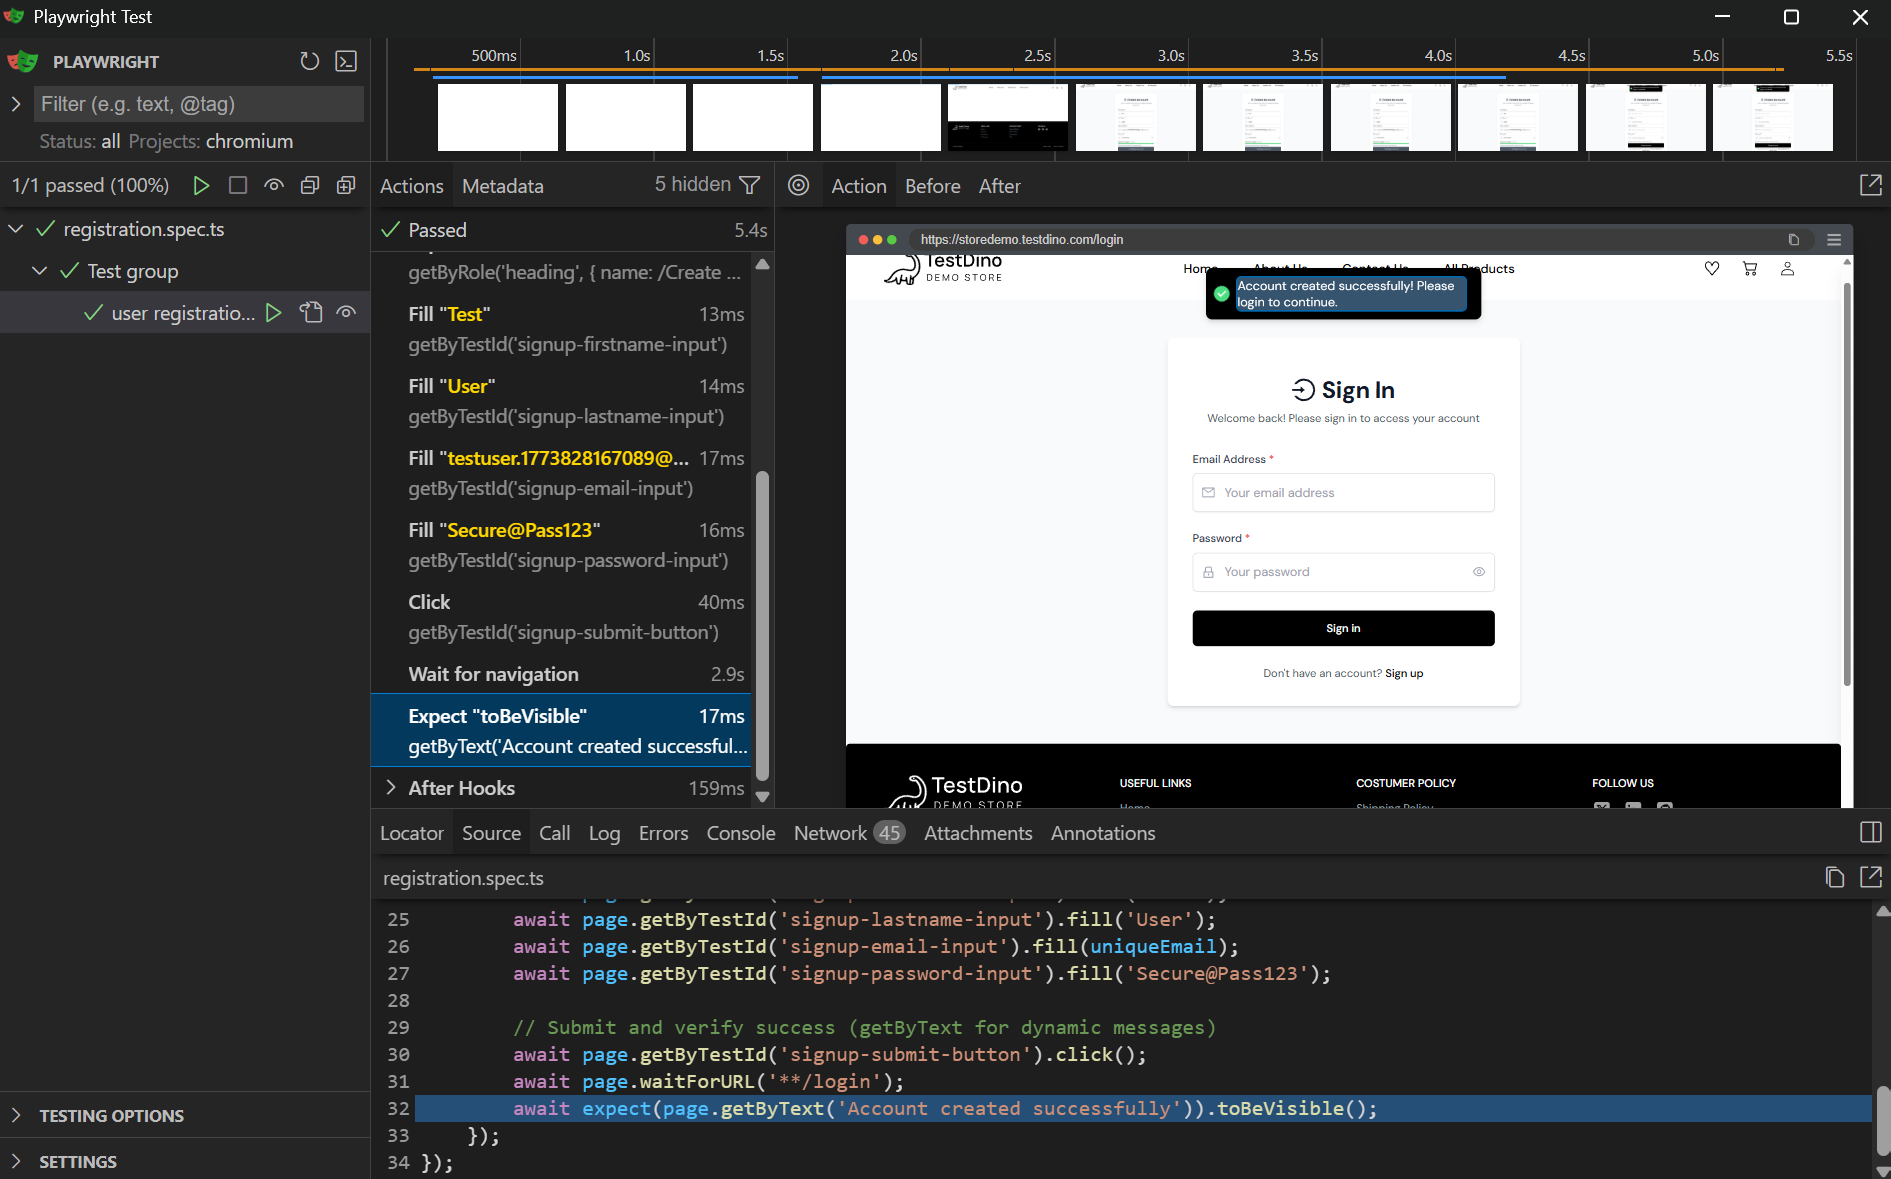
Here's a registration flow using multiple locator types on the StoreDemo app:
// tests/registration.spec.ts
import { test, expect } from '@playwright/test';
test.describe('Test group', () => {
  test('user registration flow', async ({ page }) => {
    const timestamp = Date.now();
    const uniqueEmail = `testuser.${timestamp}@mailtest.com`;
    await page.goto('https://storedemo.cms.testdino.com/');
    // Click user icon to navigate to login
    await page.getByTestId('header-user-icon').click();
    await page.waitForURL('**/login');
    // Click sign up link
    await page.getByTestId('login-signup-link').click();
    await page.waitForURL('**/signup');
    // Verify registration heading (getByRole for semantic elements)
    await expect(
      page.getByRole('heading', { name: /Create Account/i })
    ).toBeVisible();
    // Fill form fields (getByTestId for form inputs)
    await page.getByTestId('signup-firstname-input').fill('Test');
    await page.getByTestId('signup-lastname-input').fill('User');
    await page.getByTestId('signup-email-input').fill(uniqueEmail);
    await page.getByTestId('signup-password-input').fill('Secure@Pass123');
    // Submit and verify success (getByText for dynamic messages)
    await page.getByTestId('signup-submit-button').click();
    await page.waitForURL('**/login');
    await expect(page.getByText('Account created successfully')).toBeVisible();
  });
});
Important: Playwright's getByRole() locator is the recommended first choice because it matches how users and assistive technologies see the page. The Playwright best practices docs explicitly state this. Avoid CSS selectors unless no semantic alternative exists.
Notice there's no sleep() or waitForTimeout() in the code. Playwright's auto-wait feature handles timing automatically. Every action like click() and fill() waits for the element to be visible, enabled, and stable before interacting.
After this step: You can find any element on a page and verify its state without manual waits.
Go deeper: Playwright locators guide has the full locator strategy breakdown.
Step 5: Organize tests with Page Object Model
Time: 3-5 days
What you'll learn: POM pattern, separating selectors from test logic, reusable page classes.
Without POM, your tests end up with duplicated selectors everywhere. When a single data-testid changes, you fix it in 15 files instead of 1.
// pages/login.page.ts
import { Page, expect } from '@playwright/test';
export class LoginPage {
  constructor(private page: Page) {}
  async goto() {
    await this.page.goto('https://storedemo.cms.testdino.com/');
    await this.page.getByTestId('header-user-icon').click();
    await this.page.waitForURL('**/login');
  }
  async login(email: string, password: string) {
    await this.page.getByTestId('login-email-input').fill(email);
    await this.page.getByTestId('login-password-input').fill(password);
    await this.page.getByTestId('login-submit-button').click();
  }
  async verifyLoggedIn() {
    await this.page.waitForURL(/\/$/ );
  }
}
Now your test file stays clean:
// tests/login.spec.ts
import { test } from '@playwright/test';
import { LoginPage } from '../pages/login.page';
test.describe('Test group', () => {
  test('user can log in', async ({ page }) => {
    const loginPage = new LoginPage(page);
    await loginPage.goto();
    await loginPage.login('[email protected]', 'Secure@Pass123');
    await loginPage.verifyLoggedIn();
  });
});
The page object owns the selectors. The test file owns the assertions and flow. When the UI changes, you update one file.
After this step: Your test files are clean, selectors live in one place, and you can reuse page objects across tests.
Go deeper: Grouping Playwright tests covers test organization. Playwright annotations shows how to tag and filter tests.
Step 6: API testing and network mocking
Time: 3-5 days
What you'll learn: request.get(), page.route(), mocking API responses, testing without real backends.
Playwright isn't just for UI tests. It has a built-in API testing module that runs requests without opening a browser.
// tests/api.spec.ts
import { test, expect } from '@playwright/test';
test.describe('Test group', () => {
  test('API returns product list', async ({ request }) => {
    // Direct API call, no browser needed
    const response = await request.get('https://storedemo.cms.testdino.com/api/products');
    expect(response.ok()).toBeTruthy();
    const products = await response.json();
    expect(products.length).toBeGreaterThan(0);
  });
});
For UI tests that depend on APIs, mock the backend to eliminate flakiness:
// tests/mock-cart.spec.ts
import { test, expect } from '@playwright/test';
test.describe('Test group', () => {
  test('displays cart items from mocked API', async ({ page }) => {
    // Intercept the cart API and return mock data
    await page.route('**/api/cart', route =>
      route.fulfill({
        status: 200,
        contentType: 'application/json',
        body: JSON.stringify({
          items: [{ name: 'Rode NT1-A Condenser Mic', price: 229, qty: 1 }]
        }),
      })
    );
    await page.goto('https://storedemo.cms.testdino.com/');
    // Cart behavior is now deterministic, regardless of backend state
  });
});
Note: Network mocking makes tests faster and more reliable. Your test doesn't fail because a staging server is down. It fails only when your frontend code is wrong.
After this step: You can test APIs directly and mock backend responses for reliable UI tests.
Go deeper: Playwright API testing and network mocking patterns go into advanced setups.
Step 7: Set up CI/CD pipelines
Time: 2-3 days
What you'll learn: GitHub Actions workflow, running tests on every PR, installing browsers in CI.
Local tests are a start. But real confidence comes from tests that run on every code change, automatically.
# .github/workflows/playwright.yml
name: Playwright Tests
on: [push, pull_request]
jobs:
  test:
    runs-on: ubuntu-latest
    steps:
      - uses: actions/checkout@v4
      - uses: actions/setup-node@v4
        with:
          node-version: 20
      - run: npm ci
      - run: npx playwright install --with-deps chromium
      - run: npx playwright test
      - uses: actions/upload-artifact@v4
        if: ${{ !cancelled() }}
        with:
          name: playwright-report
          path: playwright-report/
          retention-days: 30
That workflow installs only Chromium (not all 3 browsers) to keep CI fast. Add Firefox and WebKit when you need cross-browser coverage.
Tip: The upload-artifact step saves your HTML report even when tests fail. You'll need it for debugging CI failures.
After this step: Your tests run automatically on every push and PR. Reports are saved as artifacts.
Go deeper: Playwright CI/CD integrations covers GitHub Actions, GitLab CI, Azure DevOps, and more.
When CI tests grow past 50-100 tests, downloading artifact ZIPs and opening local HTML reports gets old fast. TestDino streams Playwright results to a centralized dashboard with traces, screenshots, and failure triage, so your entire team sees results the moment tests finish. Get started with npm install testdino-playwright and a 2-line config change (setup guide).
Step 8: Debug with Trace Viewer and reporting
Time: 2-3 days
What you'll learn: trace: 'on-first-retry' config, npx playwright show-trace, HTML reporter, reading failure reports.
When tests fail, you need more than a stack trace. Playwright's Trace Viewer gives you DOM snapshots, network logs, and screenshots for every action.
Add this to your config:
import { defineConfig } from '@playwright/test';
export default defineConfig({
  use: {
    baseURL: 'https://storedemo.cms.testdino.com',
    trace: 'on-first-retry',       // Captures trace on first retry
    screenshot: 'only-on-failure',  // Screenshot when test fails
    video: 'retain-on-failure',     // Video only for failures
  },
  retries: process.env.CI ? 2 : 0,  // Retry in CI, not locally
});
When a test fails and retries, Playwright records a trace file. Open it with:
npx playwright show-trace test-results/my-test/trace.zip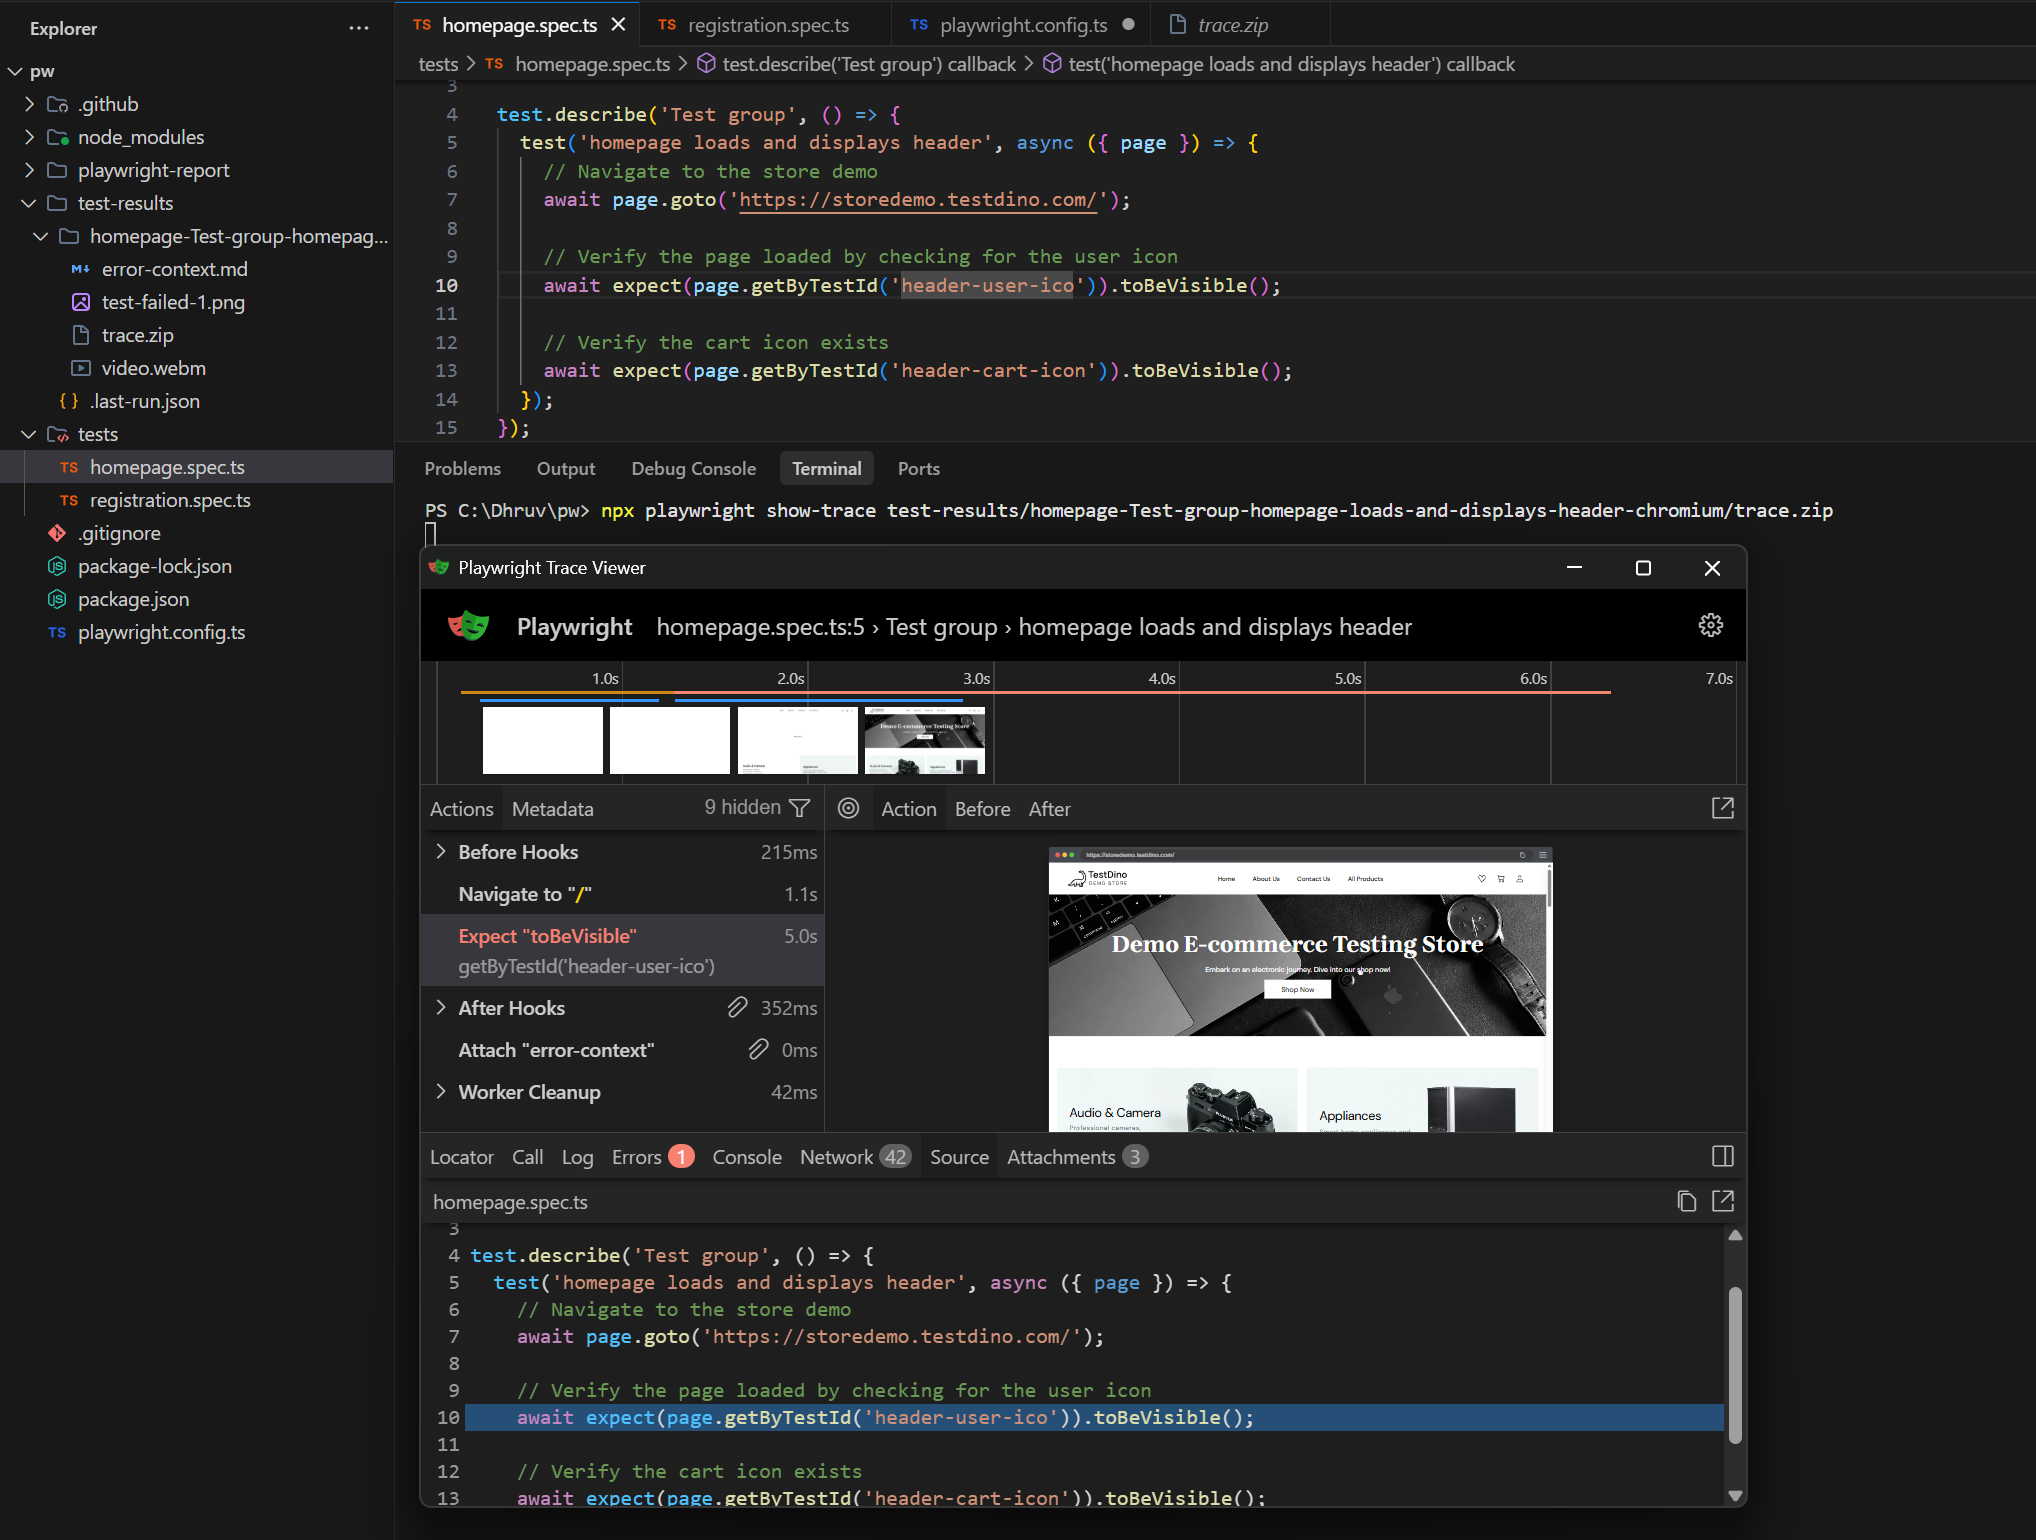
The Trace Viewer shows:
-
Timeline of every action (click, fill, navigate)
-
DOM snapshots before and after each step
-
Network requests with full request/response bodies
-
Console logs from the browser
-
Screenshots at each action point
Important: Set trace: 'on-first-retry' instead of trace: 'on'. Recording every test run generates large files and slows CI. The retry-based approach captures traces only when something goes wrong.
After this step: When a test fails, you have DOM snapshots, network logs, and screenshots to find the root cause.
Go deeper: Playwright debugging guide, Trace Viewer deep dive, HTML reporter configuration, and the Playwright reporting overview.
When your suite grows past 100 tests, triaging failures manually becomes the bottleneck. TestDino's AI failure analysis classifies every failure into infrastructure, code, and flaky test buckets automatically. Instead of reading 50 stack traces, you see a prioritized list of what needs attention.

Step 9: Advanced patterns (sharding, visual testing, flaky test management)
Time: Ongoing
What you'll learn: --shard=X/Y, visual comparison with toHaveScreenshot(), identifying and fixing flaky tests.
Once your suite has 200+ tests, you'll hit two problems: slow CI pipelines and flaky tests.
Sharding splits tests across parallel CI jobs:
# Split tests across 4 CI jobs (run each in a separate GitHub Actions matrix)
npx playwright test --shard=1/4
npx playwright test --shard=2/4
npx playwright test --shard=3/4
npx playwright test --shard=4/4
A well-configured sharding setup should cut total pipeline time by 60-70% at 4 shards. If you're seeing less than 40% reduction, your test distribution is uneven.
Visual testing catches CSS regressions that functional tests miss:
import { test, expect } from '@playwright/test';
test.describe('Test group', () => {
  test('product page matches baseline screenshot', async ({ page }) => {
    await page.goto('https://storedemo.cms.testdino.com/products');
    await expect(page).toHaveScreenshot('products-page.png', {
      maxDiffPixelRatio: 0.01, // Allow 1% pixel difference
    });
  });
});
Flaky tests are tests that pass and fail randomly without code changes. They destroy trust in your suite. The fix is usually one of:
-
Missing await on an assertion
-
Race conditions with network requests
-
Hard-coded test data that conflicts between parallel runs
After this step: Your test suite scales to hundreds of tests without slow pipelines, and you have tools to identify flaky tests before they rot your confidence.
Go deeper:
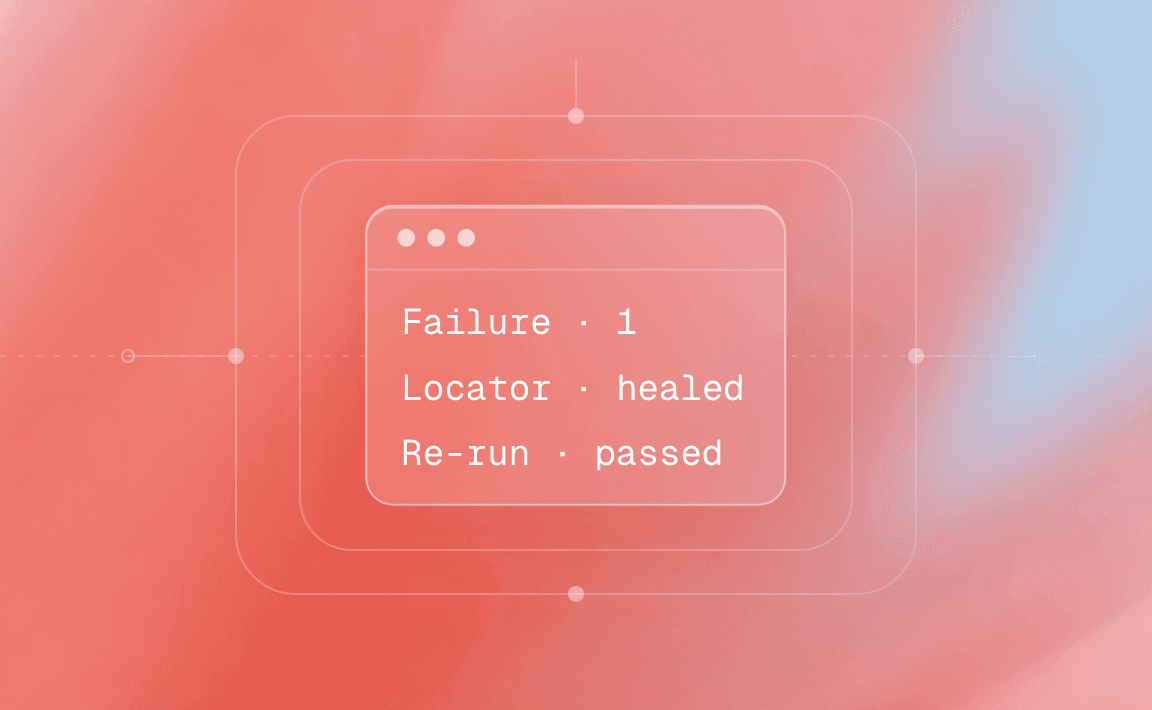
Step 10: The Playwright AI ecosystem (MCP, codegen, test agents)
Time: Ongoing
What you'll learn: Playwright MCP for AI-driven browser control, Codegen for recording tests, v1.56 test agents that plan/generate/heal tests, and skill packs for AI coding agents.
This is what makes 2026 different from 2024.
Playwright v1.56 introduced 3 test agents that work with LLMs like Claude Code, GitHub Copilot, and VS Code:
|
Agent |
What it does |
|---|---|
|
🎭 Planner |
Opens the app, explores pages, produces a Markdown test plan |
|
🎭 Generator |
Turns the Markdown plan into working Playwright test files |
|
🎭 Healer |
Runs the test suite and auto-repairs failing tests |
Set them up with:
# Generate agent definitions for your IDE
npx playwright init-agents --loop=claude    # For Claude Code
npx playwright init-agents --loop=vscode    # For VS Code
Playwright MCP (Model Context Protocol) lets AI agents control a browser through structured accessibility snapshots, not screenshots. It's useful for exploratory testing, self-healing tests, and autonomous workflows.
Playwright CLI (@playwright/cli) is the newer, token-efficient alternative. v1.58 added a CLI mode where AI agents run concise shell commands instead of loading full tool schemas:
# Install the CLI globally
npm install -g @playwright/cli@latest
# AI agents use these commands directly
playwright-cli open https://storedemo.cms.testdino.com --headed
playwright-cli click e5       # Click element by reference
playwright-cli screenshot     # Take snapshot
For AI agents that write tests (Claude Code, Cursor, Copilot), install the Playwright Skill pack for structured knowledge:
# Install the Playwright Skill (70+ AI-ready testing guides)
npx skills add testdino-hq/playwright-skill
No additional configuration is required. The skill activates automatically when your AI agent detects a Playwright-related task
# Install individual sub-skills when you need specific coverage
npx skills add testdino-hq/playwright-skill/core
npx skills add testdino-hq/playwright-skill/ci
npx skills add testdino-hq/playwright-skill/pom
npx skills add testdino-hq/playwright-skill/migration
npx skills add testdino-hq/playwright-skill/playwright-cli
Tip: MCP and CLI serve different purposes. MCP is better for persistent browser sessions and long-running autonomous workflows. CLI is more token-efficient for coding agents that need to run quick browser commands alongside code editing. The CLI vs MCP comparison breaks down when to use each.
After this step: AI agents write better Playwright tests because they have structured knowledge, and you know how to set up each AI integration.
Go deeper:
When your AI-assisted tests start producing real volume, you need visibility into what's passing, what's flaky, and what's actually broken. TestDino's test analytics gives your entire team a shared view of test health, with flaky test detection that catches instability before it spreads.
How long does it take to learn Playwright?
Here's an honest breakdown:
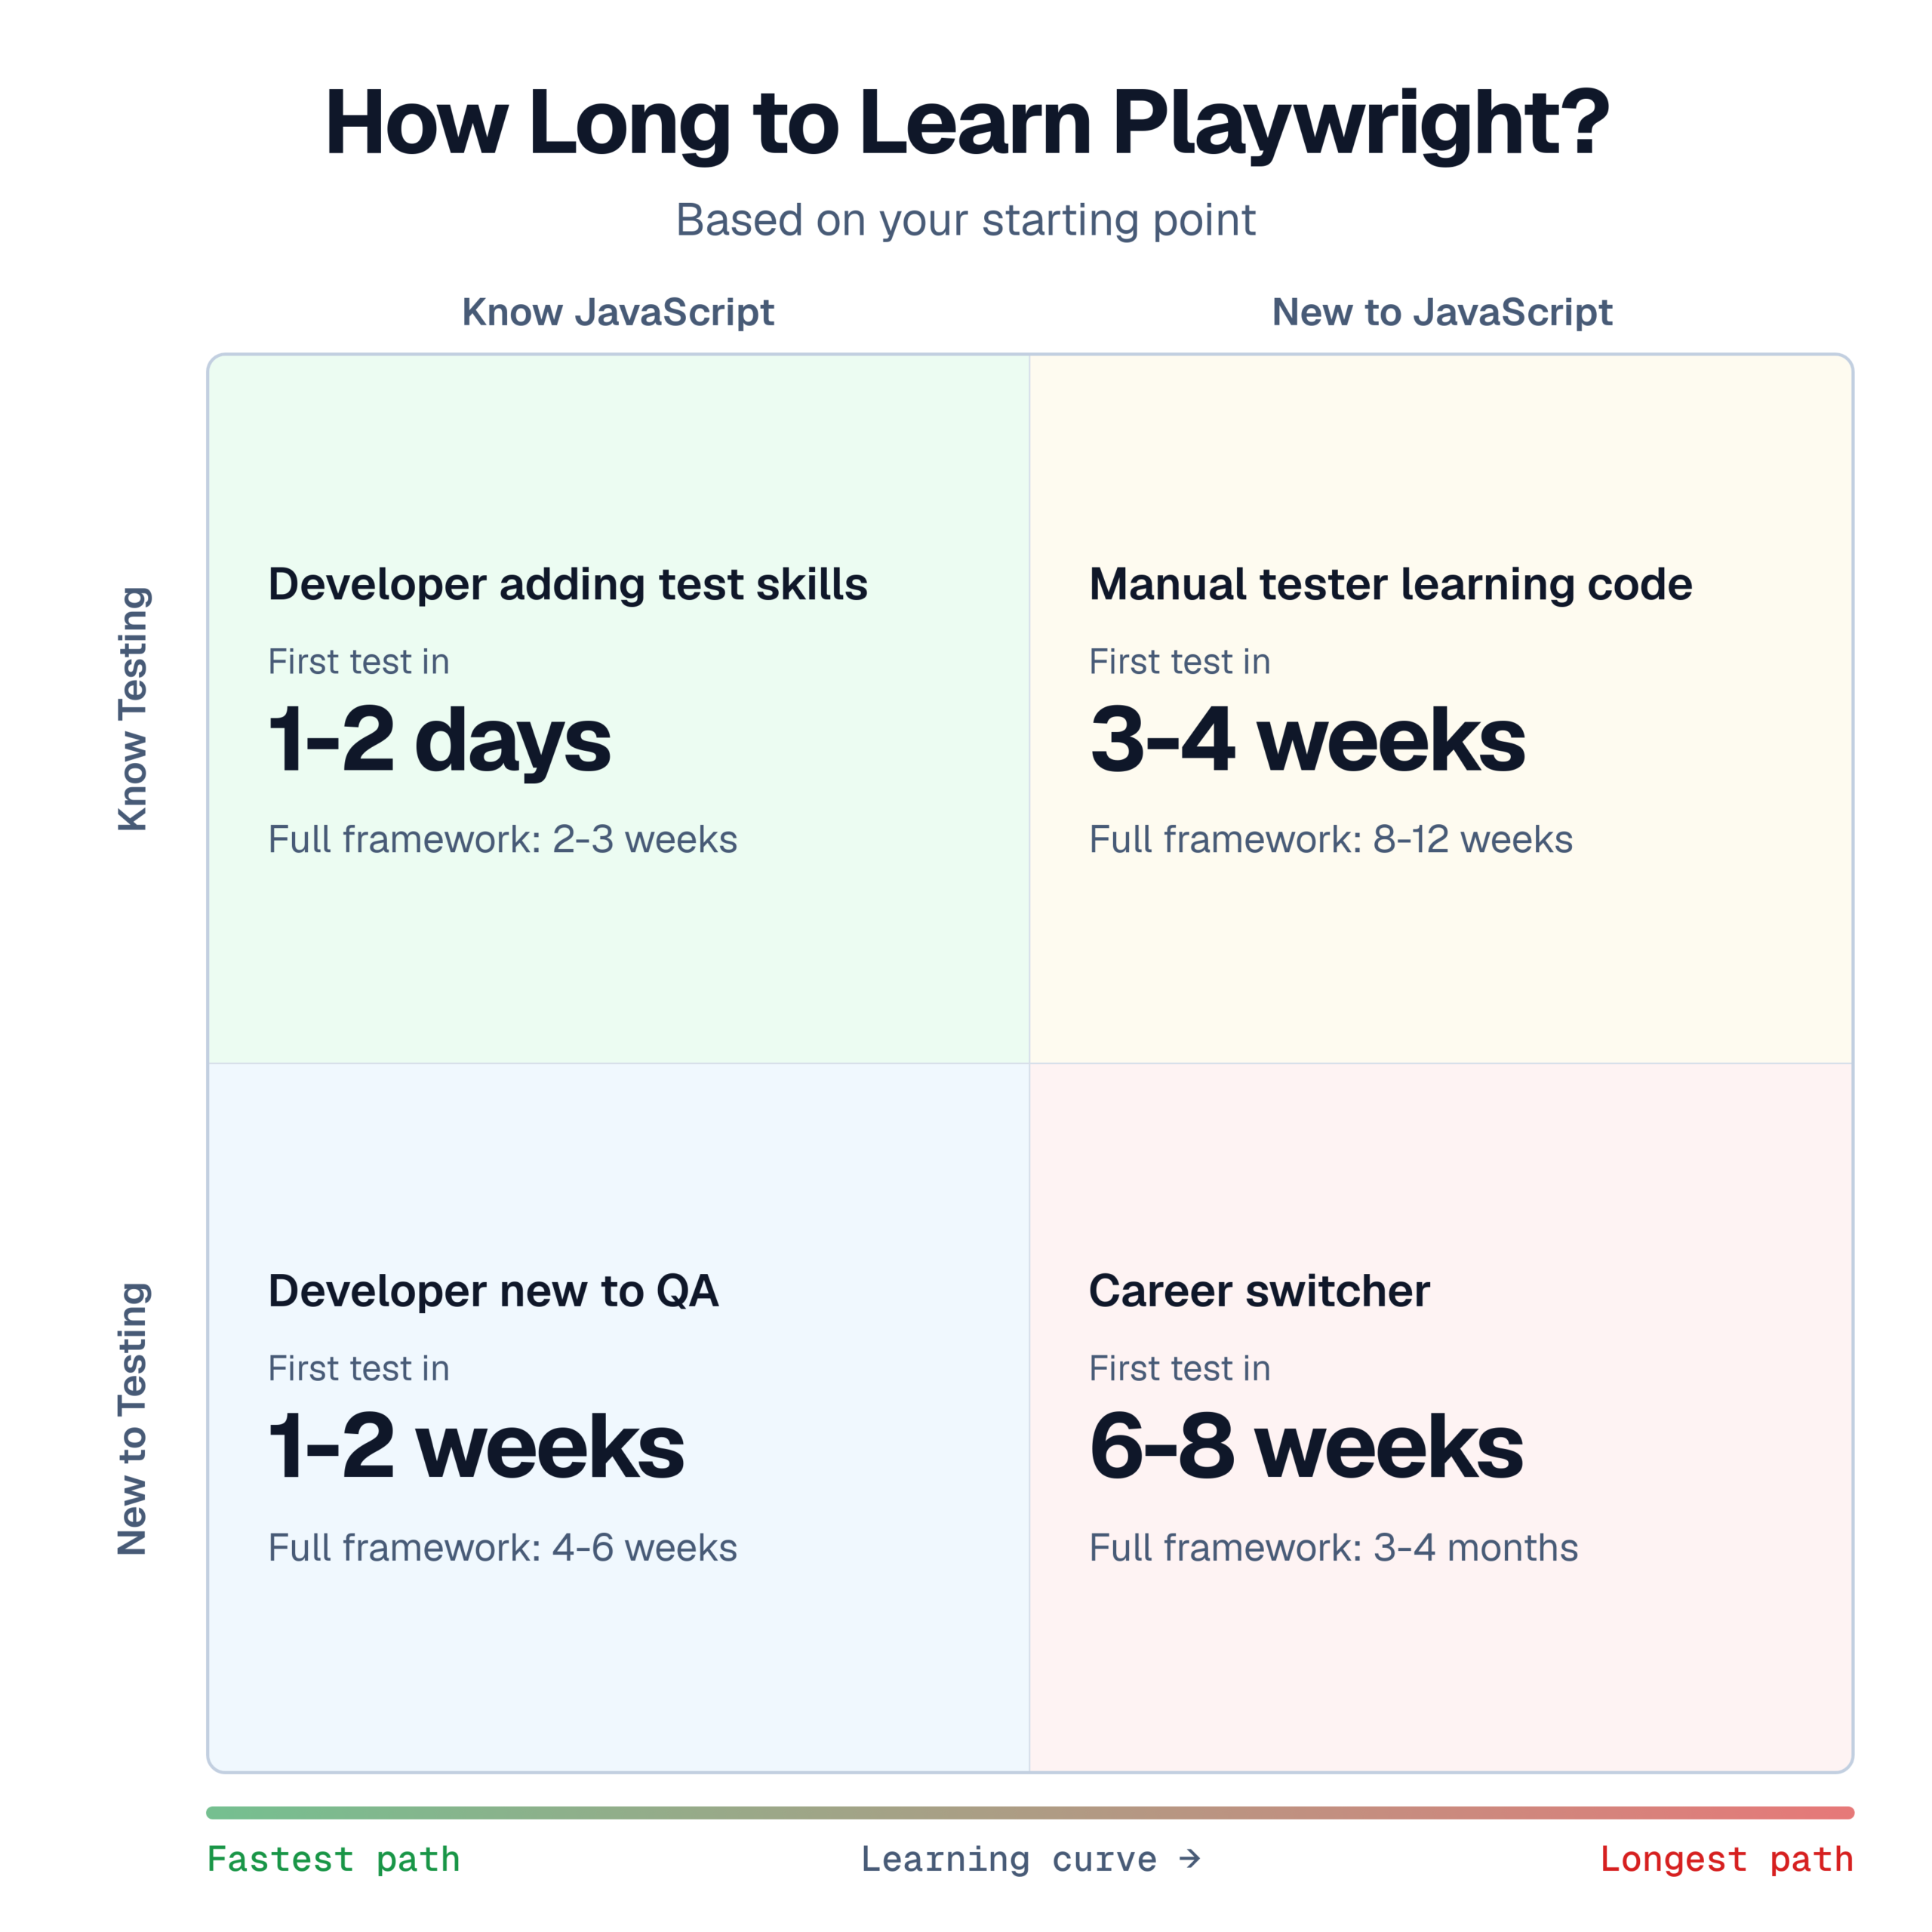
A developer with JavaScript experience can write and run basic Playwright tests within 1-2 days. Building a production-ready framework typically takes 2-4 weeks.
For structured learning, the Playwright automation course roundup compares options. And keep the Playwright cheatsheet open while you're learning.
Best resources to learn Playwright
Here are the top picks. For the full directory with comparison tables, see the Playwright Testing Hub.
GitHub repos worth studying
|
Repo |
Why study it |
|---|---|
|
microsoft/playwright/tests folder |
See how the Playwright team writes tests |
|
Community ecosystem directory |
|
|
Playwright Skill (70+ guides) |
AI-ready patterns for Claude Code, Cursor, Copilot |
FAQ: Learning Playwright

Jashn Jain
Developer Advocate