How to Write Playwright Tests with Windsurf (Complete 2026 Guide)
Write stable Playwright tests using Windsurf Cascade, MCP, and TestDino. Set up rules, load Skills, fix flaky tests, and get CI reports that actually help.
Looking for Smart Playwright Reporter?
Windsurf with Playwright gives you an AI agent that can open a real browser, inspect the page, write tests, run them, and fix failures all without you switching between tools. That's the pitch. The reality depends entirely on how you set it up.
Most teams get started fast. Cascade writes a test in under a minute. But the output breaks the moment it hits a real app. Fragile CSS selectors, missing waits, no auth handling. You spend more time fixing the AI output than you would have spent writing it yourself.
This guide walks through how to set up Windsurf so Cascade generates Playwright tests that actually pass in CI. From connecting the browser to loading Skills to fixing the ones that go flaky over time.
What is Windsurf with Playwright?
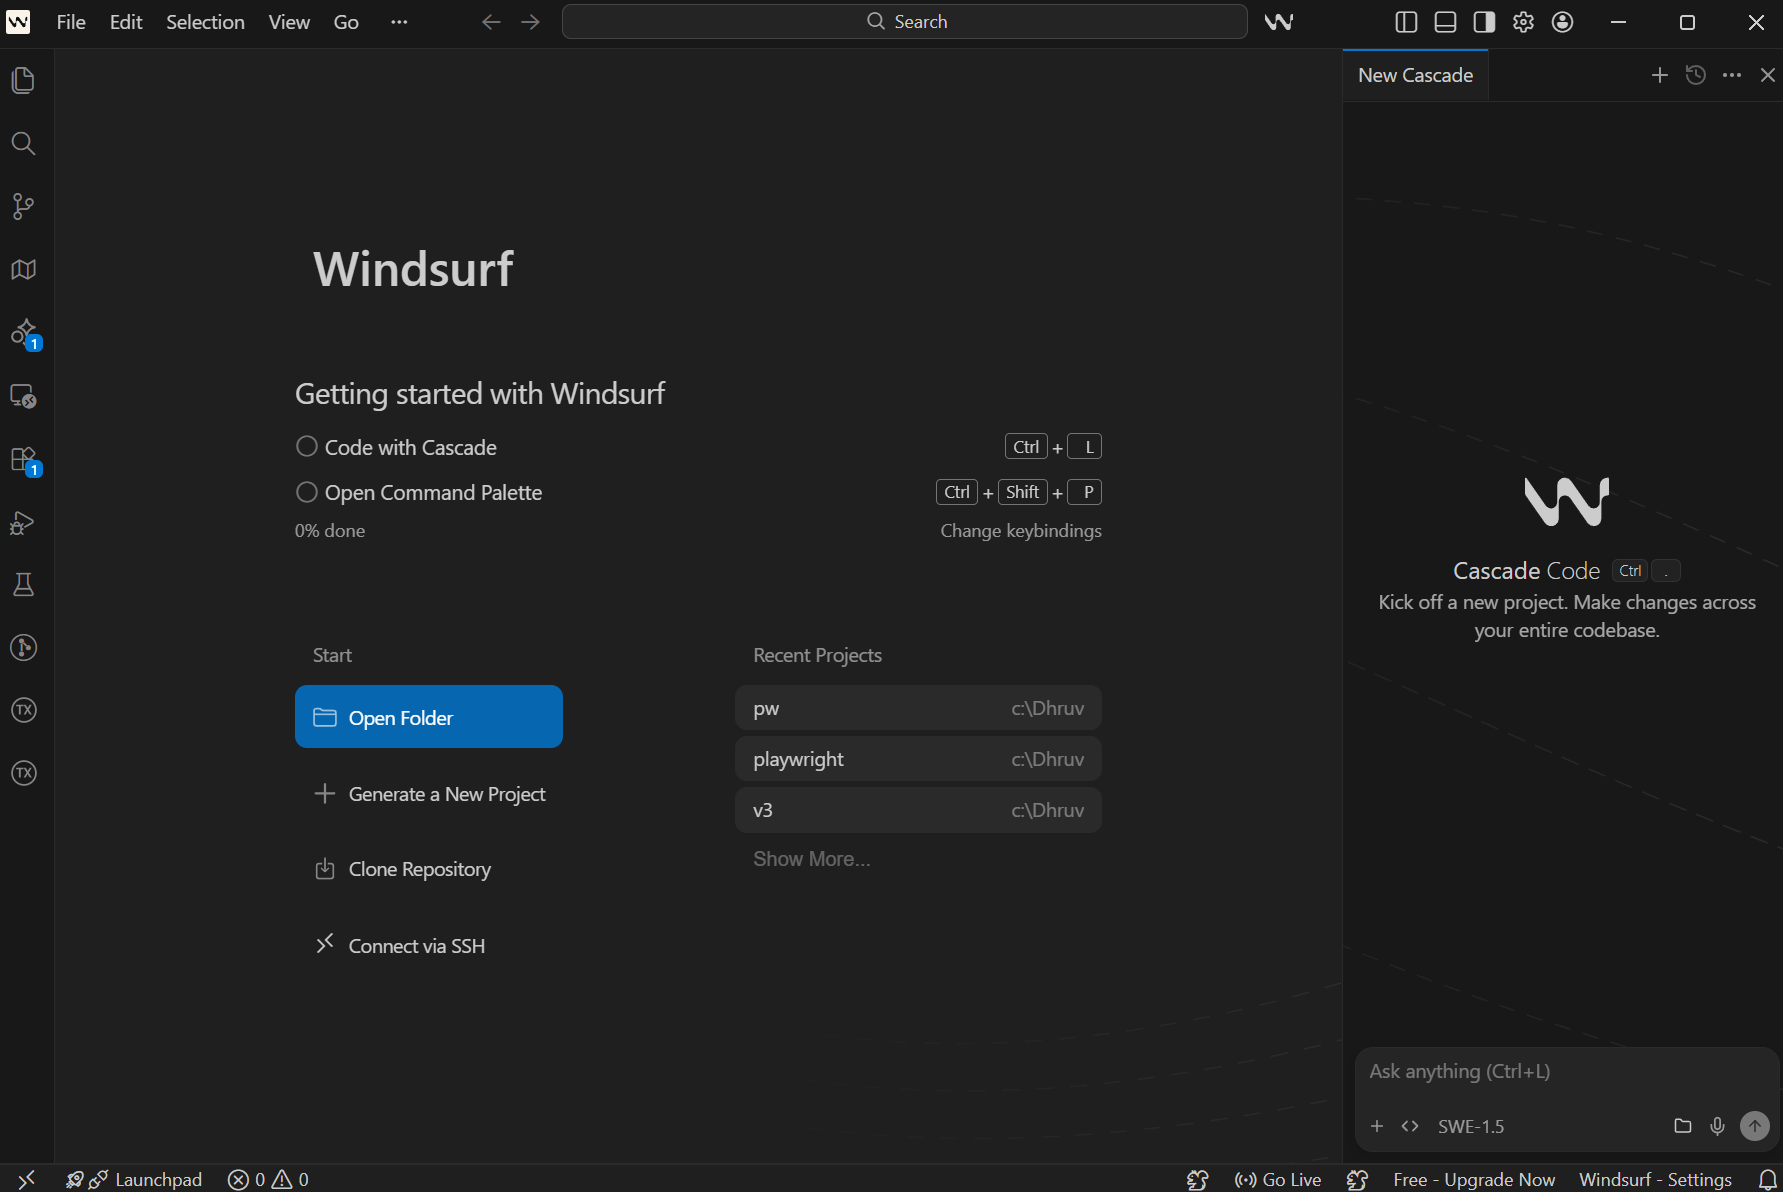
Windsurf is an AI-native code editor built by Codeium. Its main AI feature is called Cascade, an agent that can read your whole codebase, run terminal commands, and connect to external tools without you switching windows.
- Cascade runs steps automatically
- Opens the browser → inspects page → writes test → runs it → fixes errors
- Repeats until the test passes or stops
MCP (Model Context Protocol) is an open standard that enables AI agents to interact with external tools such as browsers, databases, and APIs. In this setup, Playwright MCP allows Cascade to control a real browser session and read the live page state while generating and fixing tests.
Why use Windsurf for Playwright tests?
Windsurf connects to Playwright through MCP, so the Cascade agent can control a real browser, read the live page, and generate tests based on actual DOM state.
For Playwright testing, three things make it worth using:
-
Cascade Agent mode: Runs the full loop automatically, opens the browser, inspects the page, writes the test, runs it, fixes errors, repeats
-
MCP support: Uses a real browser session, so selectors come from the live page, not guesses
-
playwright-cli: More efficient for longer sessions, uses snapshots and element references instead of sending full browser state, which reduces token usage
-
Cascade Rules: Define your team conventions once and reuse them across all test generation
Without these, you get basic demo-level tests. With them, the first draft is much closer to production-ready.
How to set up Windsurf with Playwright (step by step)
Connect Playwright MCP to Windsurf
Playwright MCP is a server that gives Cascade access to a real browser. When it's connected, Cascade can open pages, read the page structure, take screenshots, and pick locators from the actual DOM instead of guessing.
Install Playwright MCP as a dev dependency:
npm install --save-dev @playwright/mcpWindsurf stores all MCP settings in a single global config file, not per project. The path is:
- macOS / Linux: ~/.codeium/windsurf/mcp_config.json
- Windows: %USERPROFILE%\.codeium\windsurf\mcp_config.json
Open this file and add the Playwright MCP entry:
// ~/.codeium/windsurf/mcp_config.json
{
  "mcpServers": {
    "playwright": {
      "command": "npx",
      "args": ["@playwright/mcp@latest"]
    }
  }
}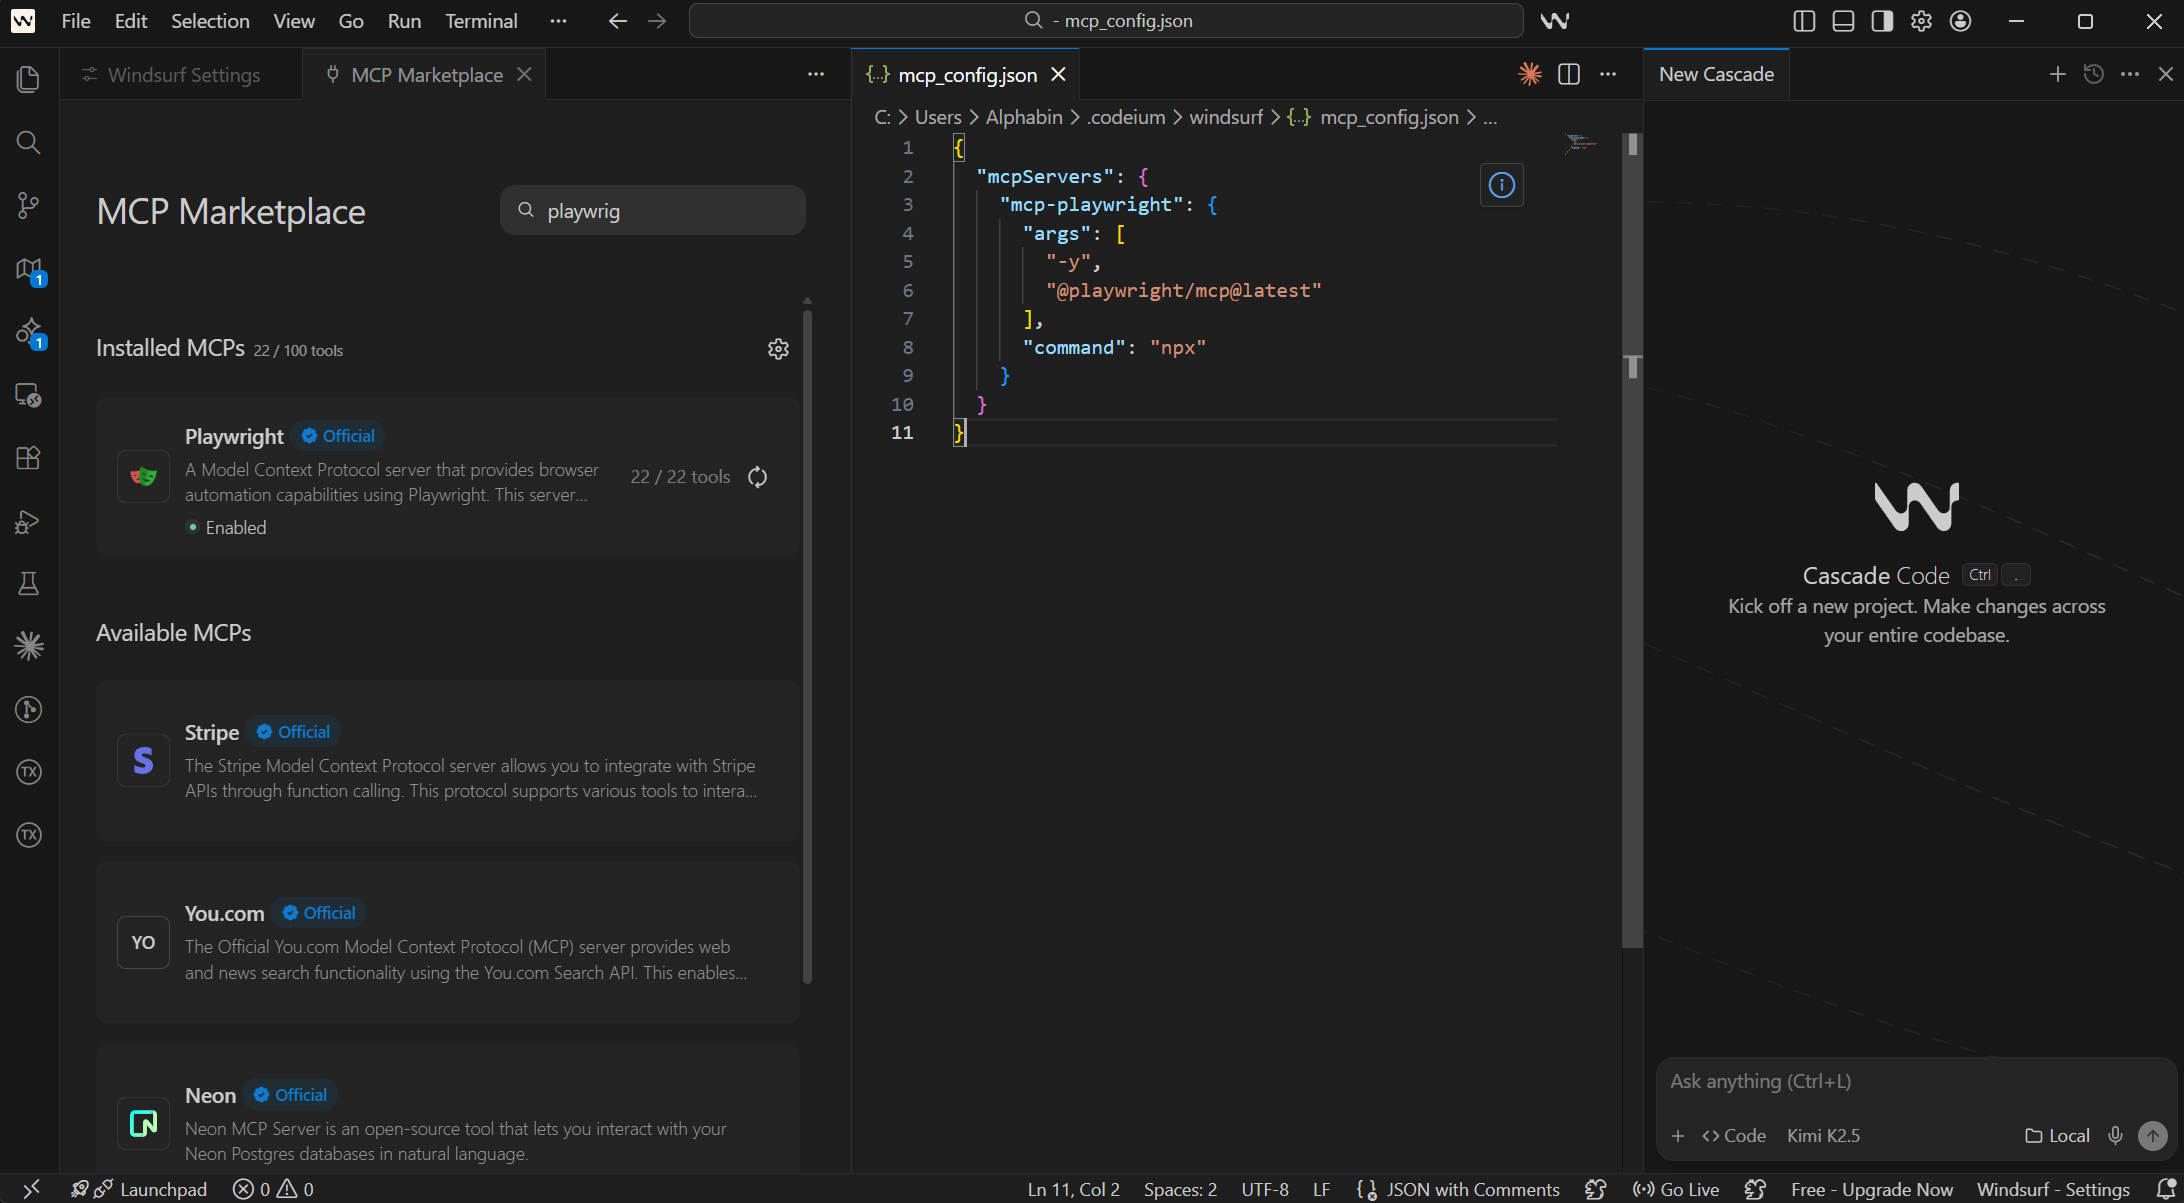
You can also do this through the Windsurf UI. Open the Cascade panel and click the MCPs icon in the top right corner. From there, click Add Server. Or go to Windsurf Settings > Advanced Settings, scroll to the Cascade section, and use the Add Server button there.
Verify the connection: Ask Cascade to open a browser, go to any URL, and take a screenshot. If the browser launches and Cascade describes the page content accurately, the connection is working.
Note: Playwright MCP is built for generating and debugging individual tests. For running full regression suites or generating many test specs in 1 session, use the Playwright CLI instead. MCP sends the full page accessibility tree with every message, which burns through tokens fast.
Install Playwright CLI for batch test generation
When you're generating several test files in 1 session, Playwright MCP gets expensive. Every response includes the full accessibility tree, which burns through your model's context window quickly.
The Playwright CLI handles this better. It gives Cascade structured browser access without the full accessibility tree on every exchange.
npm install -g @playwright/cli@latest
playwright-cli install
npx skills add testdino-hq/playwright-skill/playwright-cli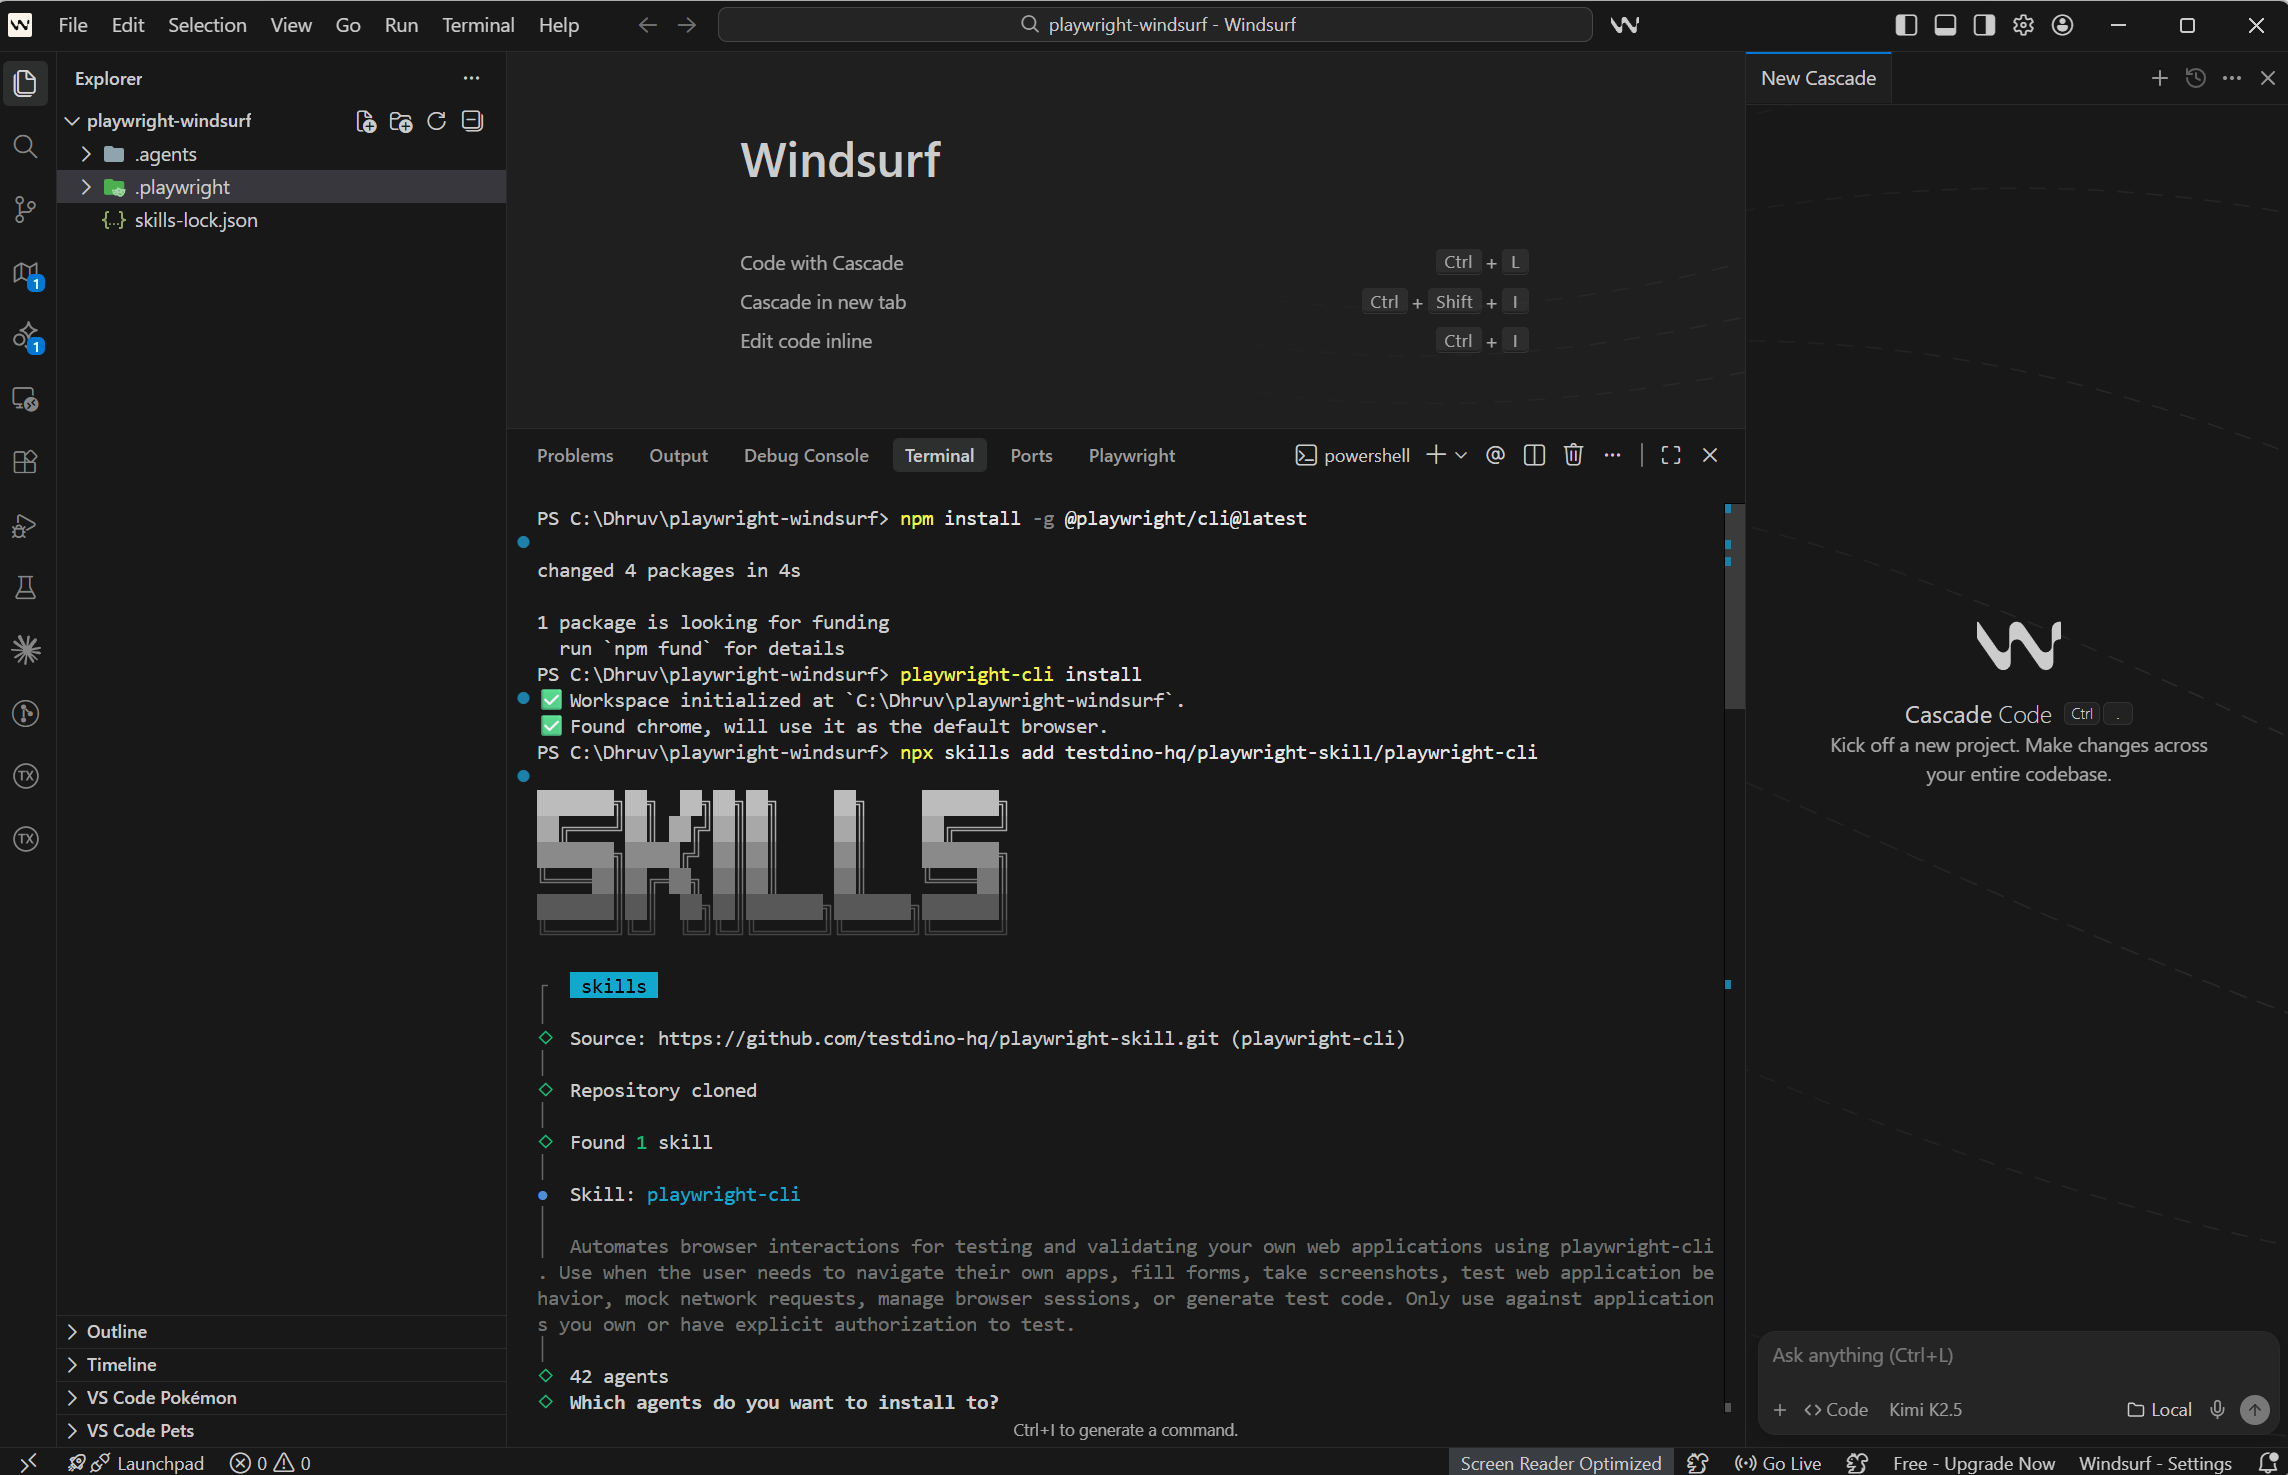
The token difference is significant. A typical Playwright MCP session uses around 114,000 tokens. The same work done through CLI uses around 27,000 tokens. For any session where you're generating more than 1 or 2 test specs, CLI is the right choice.
Note: You can keep both MCP and CLI configured at the same time. Use MCP when Cascade needs to visually inspect a specific page interaction. Switch to CLI when you're generating several tests in 1 session and want to stay within a reasonable token budget.
Load Playwright Skills
Cascade doesn't automatically know how your team writes Playwright tests. Without structured guidance, it falls back to patterns from its training data. That usually means fragile CSS class selectors and fixed waits that fail in CI.
Playwright Skills are collections of markdown guides that teach Cascade proper Playwright patterns. The TestDino Playwright Skills repository has 70+ guides organized into packs:
-
core/ -- 46 guides covering locators, assertions, waits, auth, and fixtures
-
playwright-cli/ -- 11 guides for CLI browser automation
-
pom/ -- 2 guides for Page Object Model patterns
-
ci/ -- 9 guides for GitHub Actions, GitLab CI, and parallel execution
-
migration/ -- 2 guides for moving from Cypress or Selenium
Install all of them with 1 command:
# Install all 70+ guides
npx skills add testdino-hq/playwright-skill
# Or install only the packs you need
npx skills add testdino-hq/playwright-skill/core
npx skills add testdino-hq/playwright-skill/ci
npx skills add testdino-hq/playwright-skill/playwright-cli
The difference is noticeable. Without the Skill loaded, Cascade generates tutorial-quality code with brittle CSS selectors. With the Skill, it uses getByRole() locators, proper wait strategies, and structured test patterns that actually pass against real sites.
The repo is MIT licensed. Fork it, remove guides for frameworks you don't use, and add your own internal patterns. Cascade picks up the changes right away.
Write Cascade rules for your project
Skills give Cascade general Playwright knowledge. Rules give your team's specific conventions. Without rules, every generated test looks slightly different depending on who asked for it and how the prompt was worded.
Windsurf stores rules as markdown files inside a .windsurf/rules/ folder in your project. The files in this folder are version-controlled and shared with your team.
Create the folder and add a rules file:
mkdir -p .windsurf/rules
touch .windsurf/rules/playwright.md
Here's a solid starting point for Playwright projects:
<!-- .windsurf/rules/playwright.md -->
# Playwright test conventions
## Locators
- Always use getByRole, getByTestId, and getByLabel
- Never use CSS class selectors or XPath unless there is no other option
- Never write page.locator('.some-class') style selectors
## Structure
- One test file per feature or user flow
- Group related tests inside describe blocks
- Keep each test under 30 lines
- Name test files as feature-name.spec.ts
## Waits
- Never use page.waitForTimeout or any fixed delay
- Use Playwright auto-wait or explicit waitFor conditions
- Use waitForLoadState('networkidle') after page transitions
## Test data
- Keep test data isolated per test using fixtures
- Never rely on state from a previous test
- Use beforeEach for setup and afterEach for cleanup
## Assertions
- One main assertion per test
- Use toBeVisible, toHaveText, and toHaveURL over generic expect checks
- Assert the outcome, not the steps taken to get there
## Auth
- Use storageState for any test that needs the user to be logged in
- Never log in through the UI inside individual tests
## Output
- Return a diff, not the full file
- Add a short comment at the top of each test file describing what flow it covers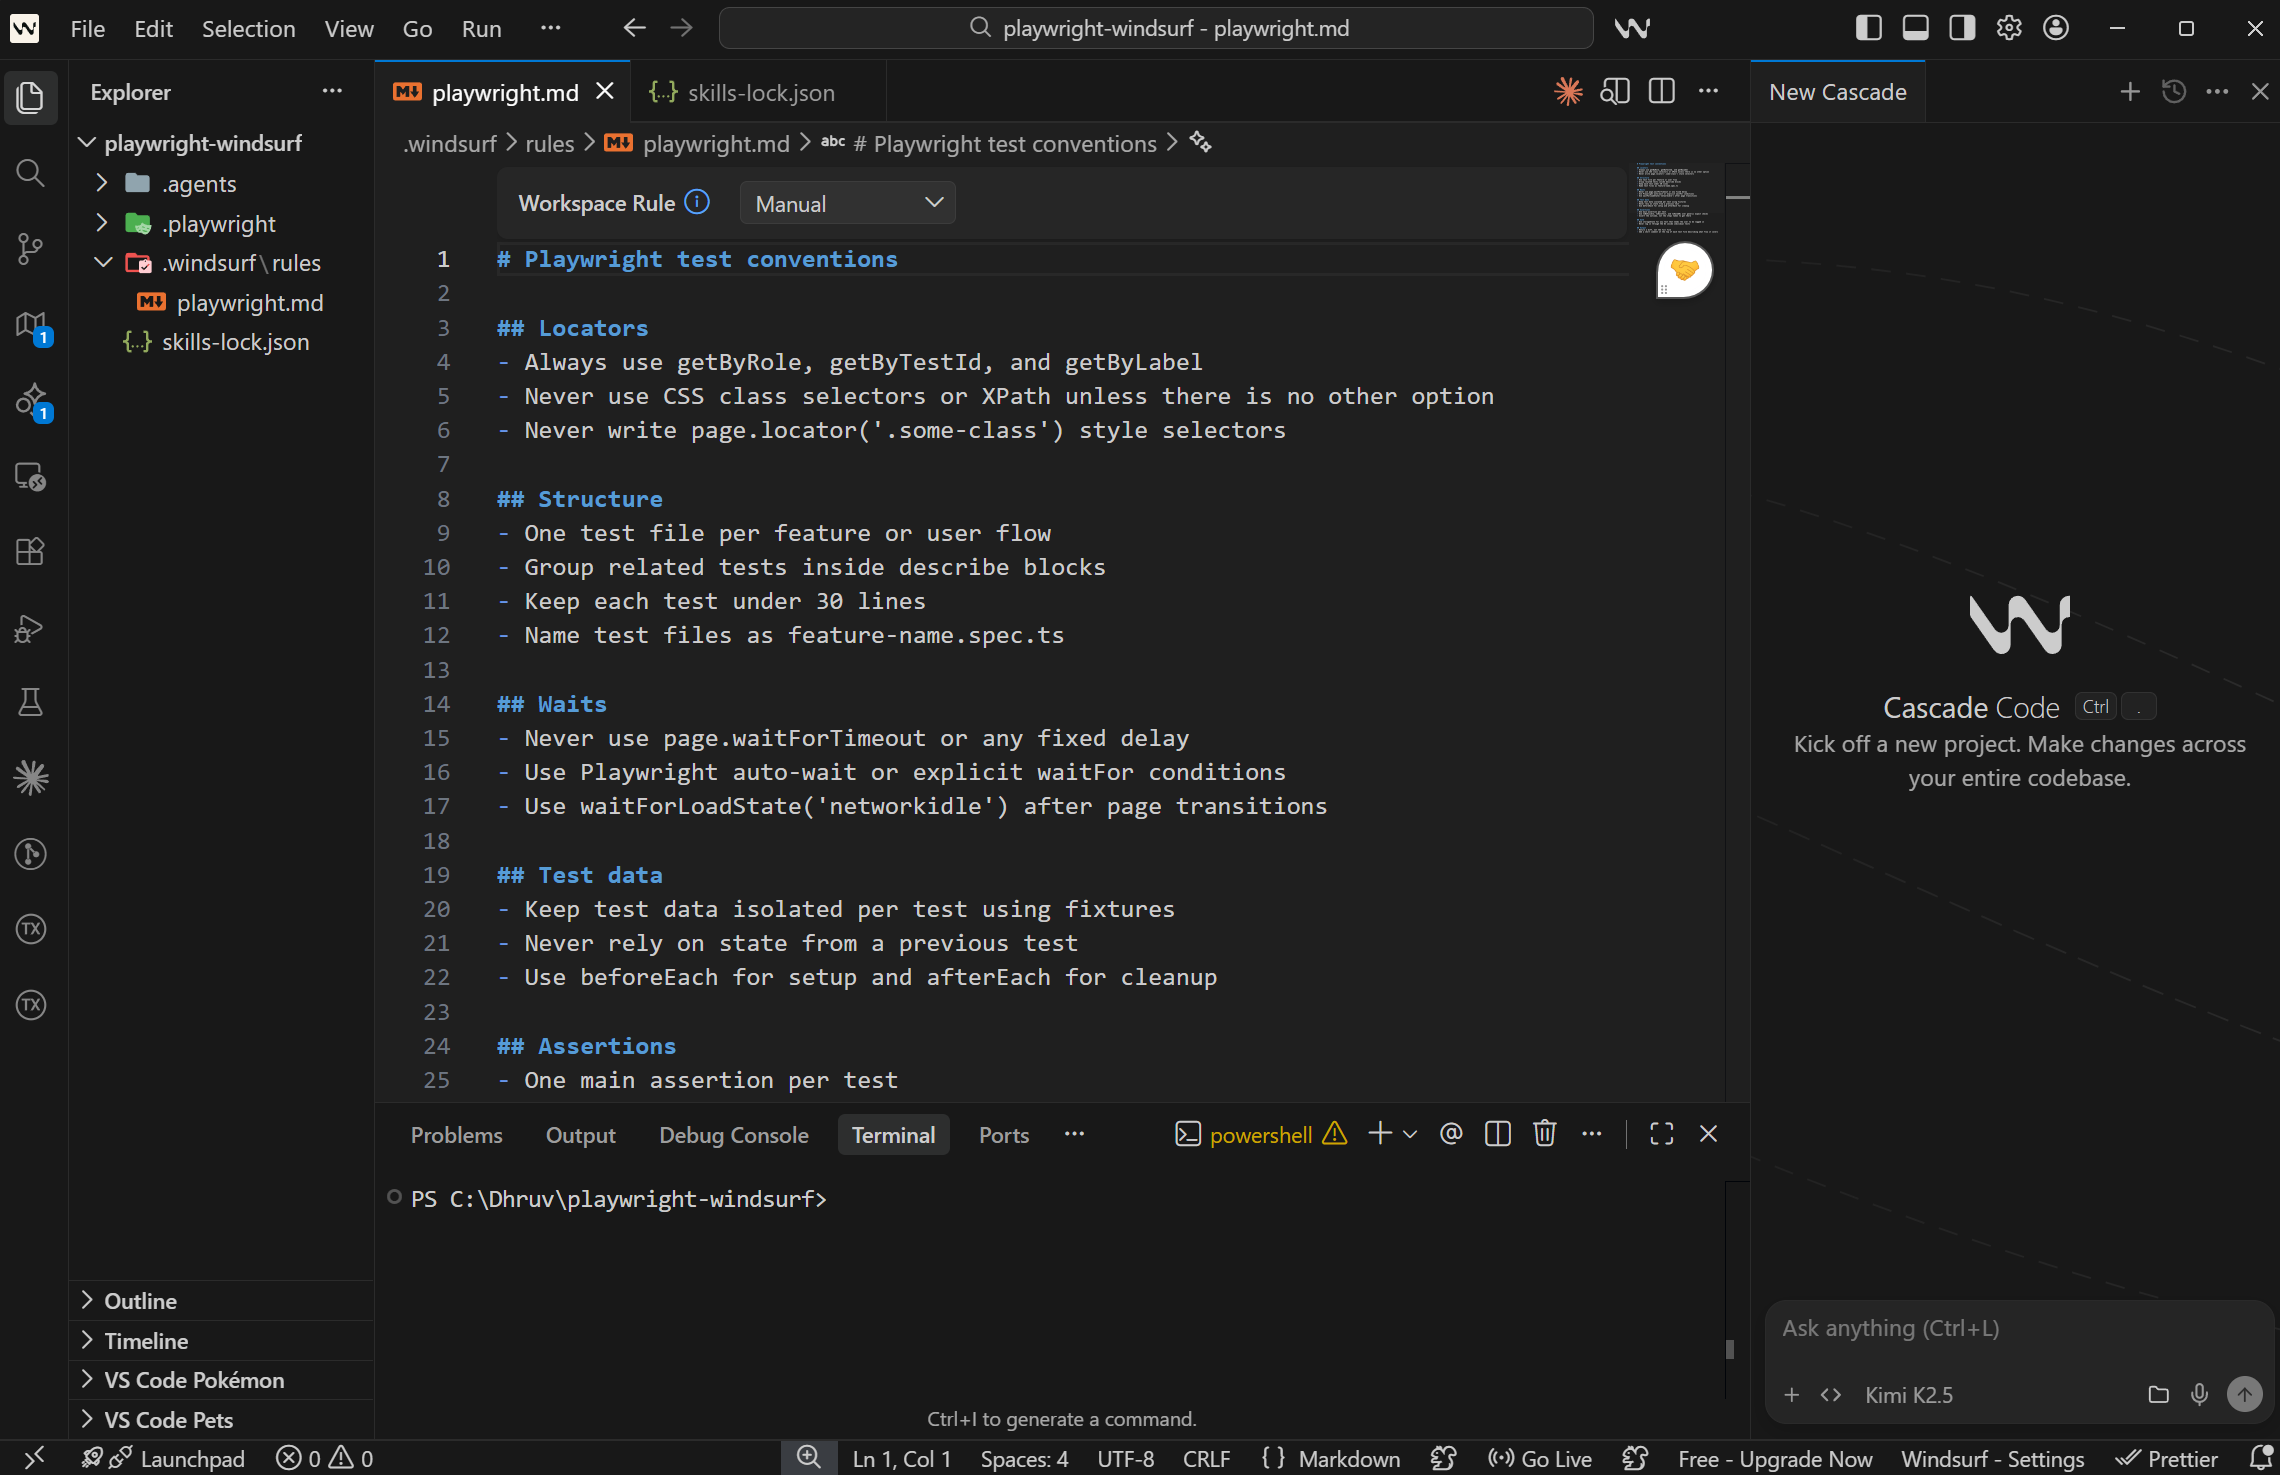
You can also set global rules that apply across all your projects. Open Windsurf Settings, navigate to the Cascade section, and look for Edit Global Rules. Anything you put there applies in every workspace, not just the current one.
Commit the .windsurf/rules/ folder to version control. Every developer on the team gets the same Cascade behavior without anyone having to repeat conventions in their prompts.
How to pick the right model for Playwright test generation
Windsurf lets you change the model per Cascade session. This matters because some models are faster, some follow rules better, and some handle large amounts of context more effectively.
| Model | Speed | Follows Rules | Best For |
|---|---|---|---|
| SWE-1 (Codeium) | Fast | Good | Quick scaffolding, tab completions, inline edits |
| Claude Sonnet 4.6 | Moderate | High | Multi-file generation, complex auth flows |
| Gemini 2.5 Pro | Moderate | Good | Large codebase context, cross-file reasoning |
| GPT-4o | Fast | Good | Short diffs, quick scaffolding |
| Claude Opus 4.6 | Slower | Highest | Large suite refactors, infrastructure changes |
SWE-1 is Codeium's own model, trained specifically on software engineering tasks. It powers Windsurf's Supercomplete tab completion. For single spec generation where the flow is straightforward, SWE-1 is the fastest starting point.
Claude Sonnet 4.6 handles multi-file context well and follows the rules file consistently. It's the best pick when generating tests that need to match existing fixtures, auth setup, or page object patterns across several files.
Gemini 2.5 Pro has a very large context window. This is useful when Cascade needs to reason across many existing test files at once, like when restructuring a suite to use shared fixtures.
How to switch models: Click the model selector in the Cascade panel header. You can switch at any point in a session if the current model starts producing output that doesn't match your rules.
A practical pattern: start with SWE-1 for individual spec files, switch to Claude Sonnet for refactors that touch multiple files, and use Opus only for major infrastructure changes like migrating the whole suite to page objects.

Tip: For official, current SWE-bench scores for all these models, check swe-bench.com/results directly. Scores change with every model update, so any number written here may already be outdated by the time you read it.
Generate your first Playwright test with Windsurf
With MCP connected, Skills loaded, rules in place, and a model chosen, you're ready to generate a test.
There are 2 main approaches depending on how many tests you need.
Using Playwright MCP (inspect the live page first)
Use MCP when Cascade needs to see what the page actually looks like before writing locators. This is the right choice for flows with dynamic content, modals, or multi-step interactions.
// Cascade prompt
Generate a Playwright test for the login flow on https://storedemo.cms.testdino.com.
- Navigate to the site
- Open the login page
- Sign in with valid credentials
- Verify the user is logged in successfully
Use Playwright MCP to inspect the page first.
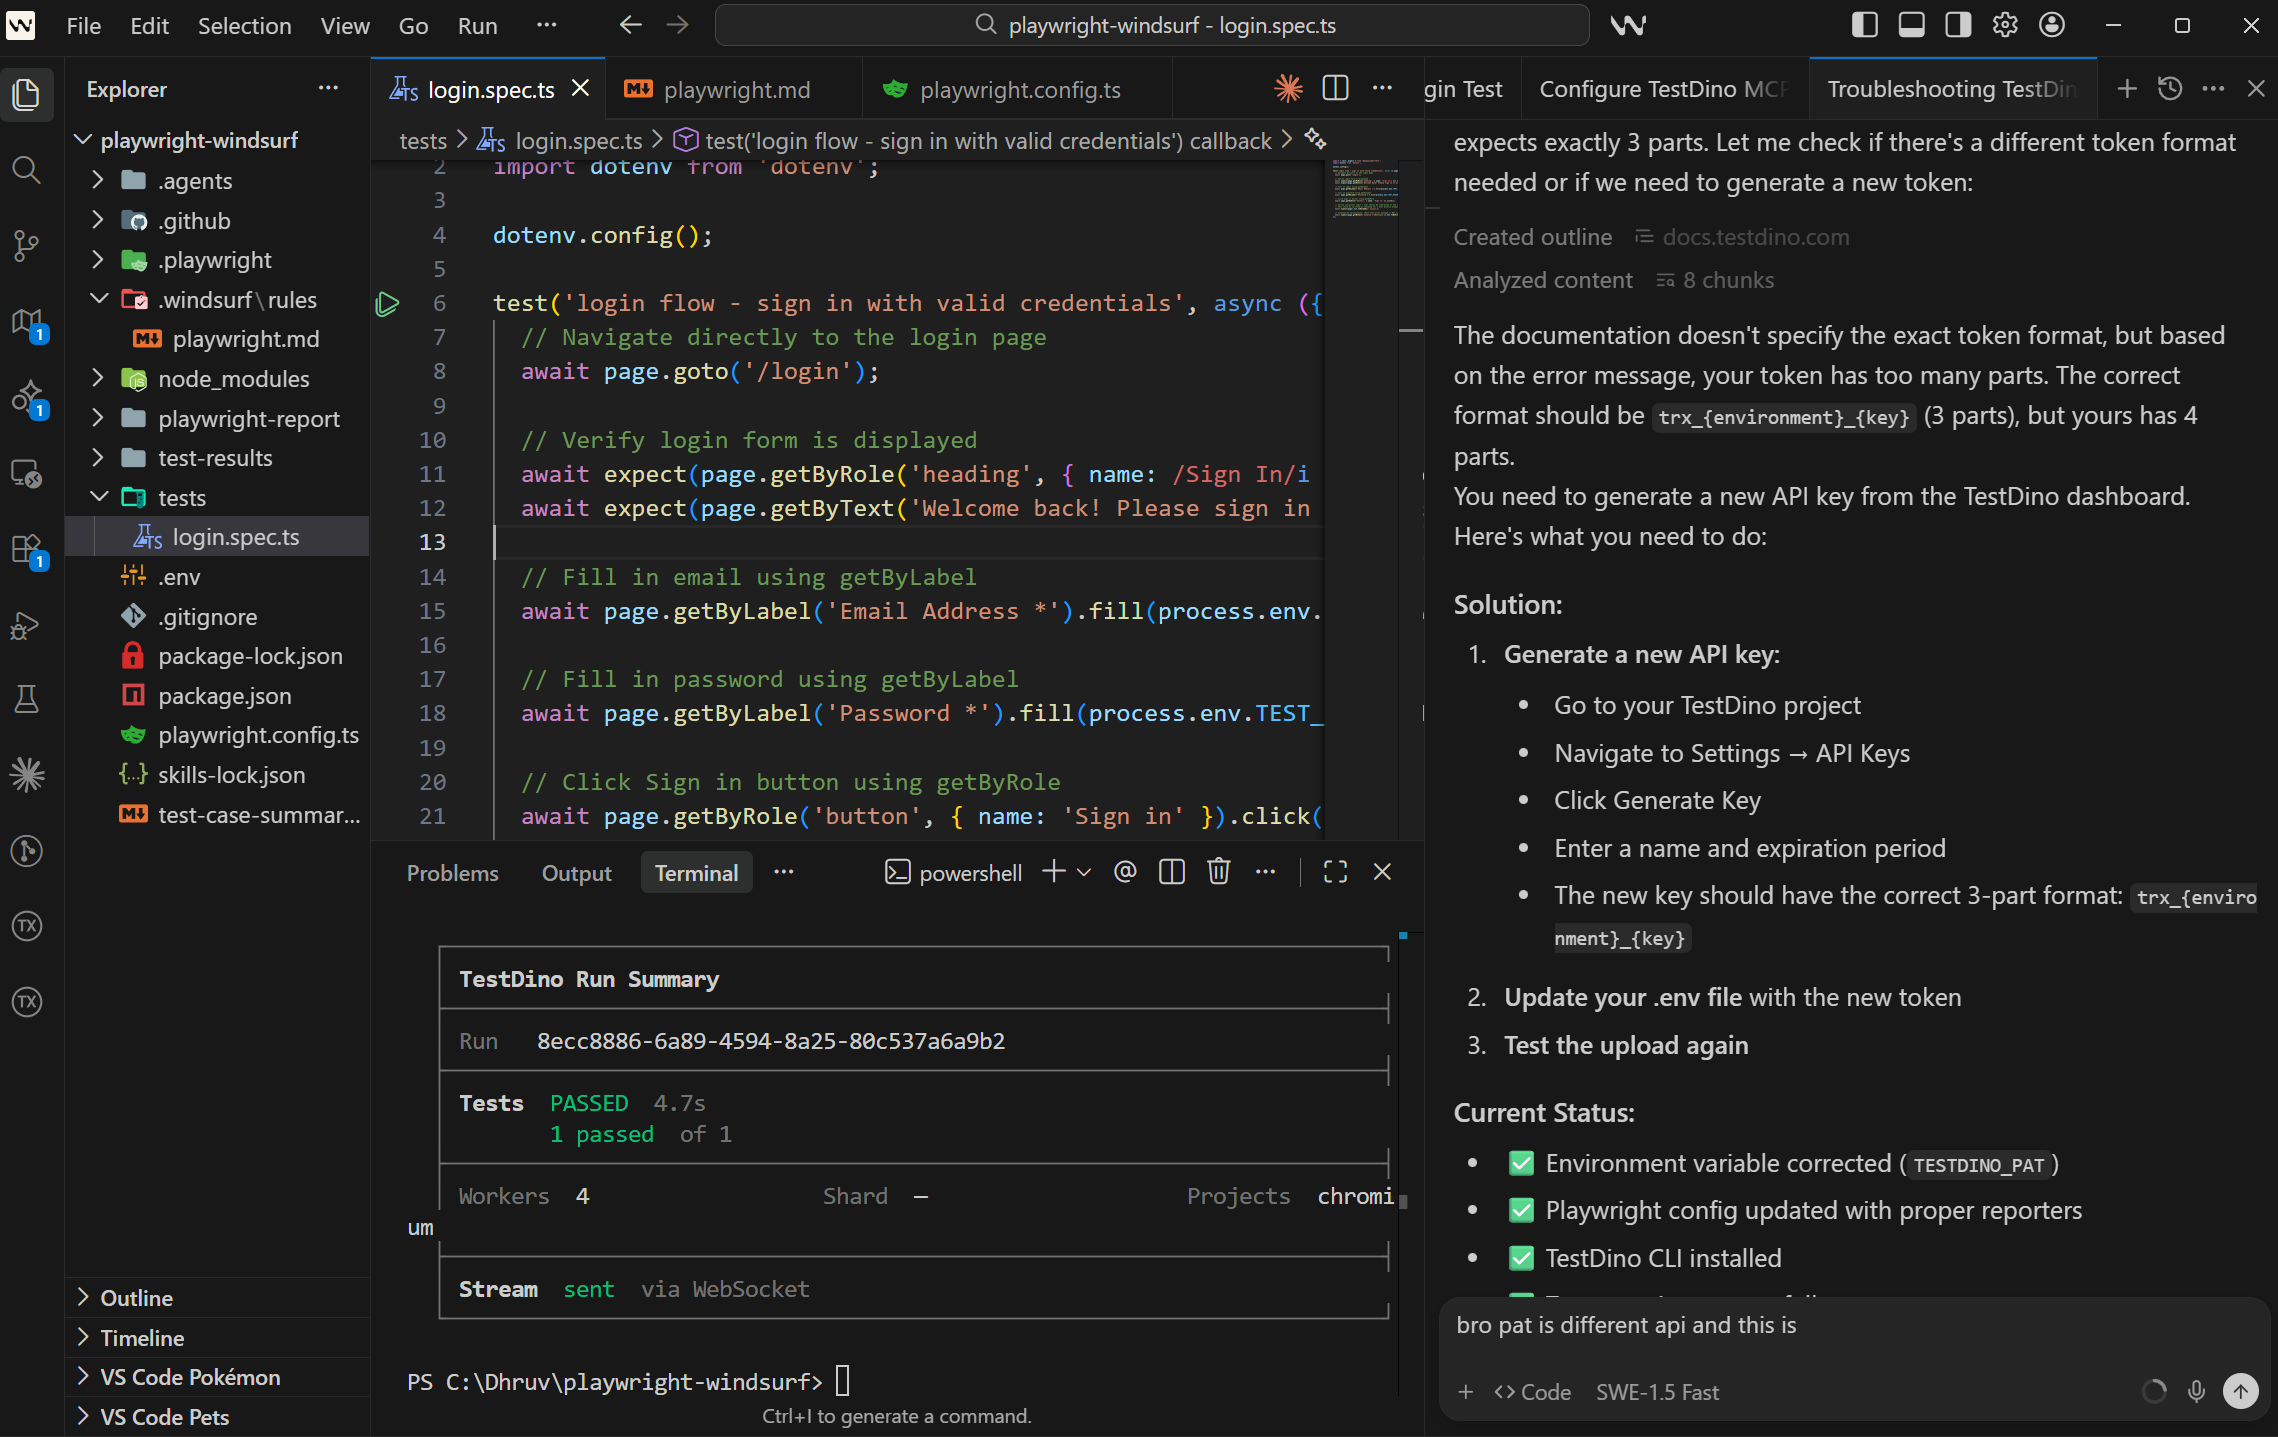
Use getByRole or getByLabel locators only.What Cascade generates with this setup in place:
import { test, expect } from '@playwright/test';
import dotenv from 'dotenv';
dotenv.config();
test('login flow - sign in with valid credentials', async ({ page }) => {
  // Navigate directly to the login page
  await page.goto('/login');
  // Verify login form is displayed
  await expect(page.getByRole('heading', { name: /Sign In/i })).toBeVisible();
  await expect(page.getByText('Welcome back! Please sign in to access your account')).toBeVisible();
  // Fill in email using getByLabel
  await page.getByLabel('Email Address *').fill(process.env.TEST_EMAIL!);
  // Fill in password using getByLabel
  await page.getByLabel('Password *').fill(process.env.TEST_PASSWORD!);
  // Click Sign in button using getByRole
  await page.getByRole('button', { name: 'Sign in' }).click();
  // Verify successful login - user should be redirected or see logged-in state
  // This could be verified by checking for a user profile element, logout button, or specific URL
  await expect(page).not.toHaveURL(/.*login/);
  // Alternative verification: check that error message is NOT visible
  await expect(page.getByText('Invalid credentials')).not.toBeVisible();
});
The locators come from the real page. The wait is implicit. Credentials come from environment variables. This is what the output looks like when Cascade has actual browser context to work from.
Using Playwright CLI (generate multiple tests, save tokens)
Use CLI when you're generating several specs in 1 session. The prompt looks nearly the same, without the MCP instruction:
// Cascade prompt
Using Playwright CLI, generate a Playwright test for the checkout flow
on https://storedemo.cms.testdino.com.
- Add a product to the cart
- Proceed to checkout
- Fill in shipping details
- Verify the order confirmation screen appears
Use getByRole or getByTestId locators only.
The AI test generation best practices around prompt structure and locator guidance apply here too. Be specific about what the test should assert and Cascade will produce a tighter first draft.
Playwright config
// playwright.config.ts
import { defineConfig, devices } from '@playwright/test';
export default defineConfig({
  testDir: './tests',
  fullyParallel: true,
  forbidOnly: !!process.env.CI,
  retries: process.env.CI ? 2 : 0,
  workers: process.env.CI ? 1 : undefined,
  reporter: ['html', 'json'],
  use: {
    baseURL: 'https://storedemo.cms.testdino.com',
    trace: 'on-first-retry',
  },
  projects: [
    {
      name: 'chromium',
      use: { ...devices['Desktop Chrome'] },
    },
  ],
});
Set credentials:
# .env
STOREDEMO_EMAIL=[email protected]
STOREDEMO_PASSWORD=your-password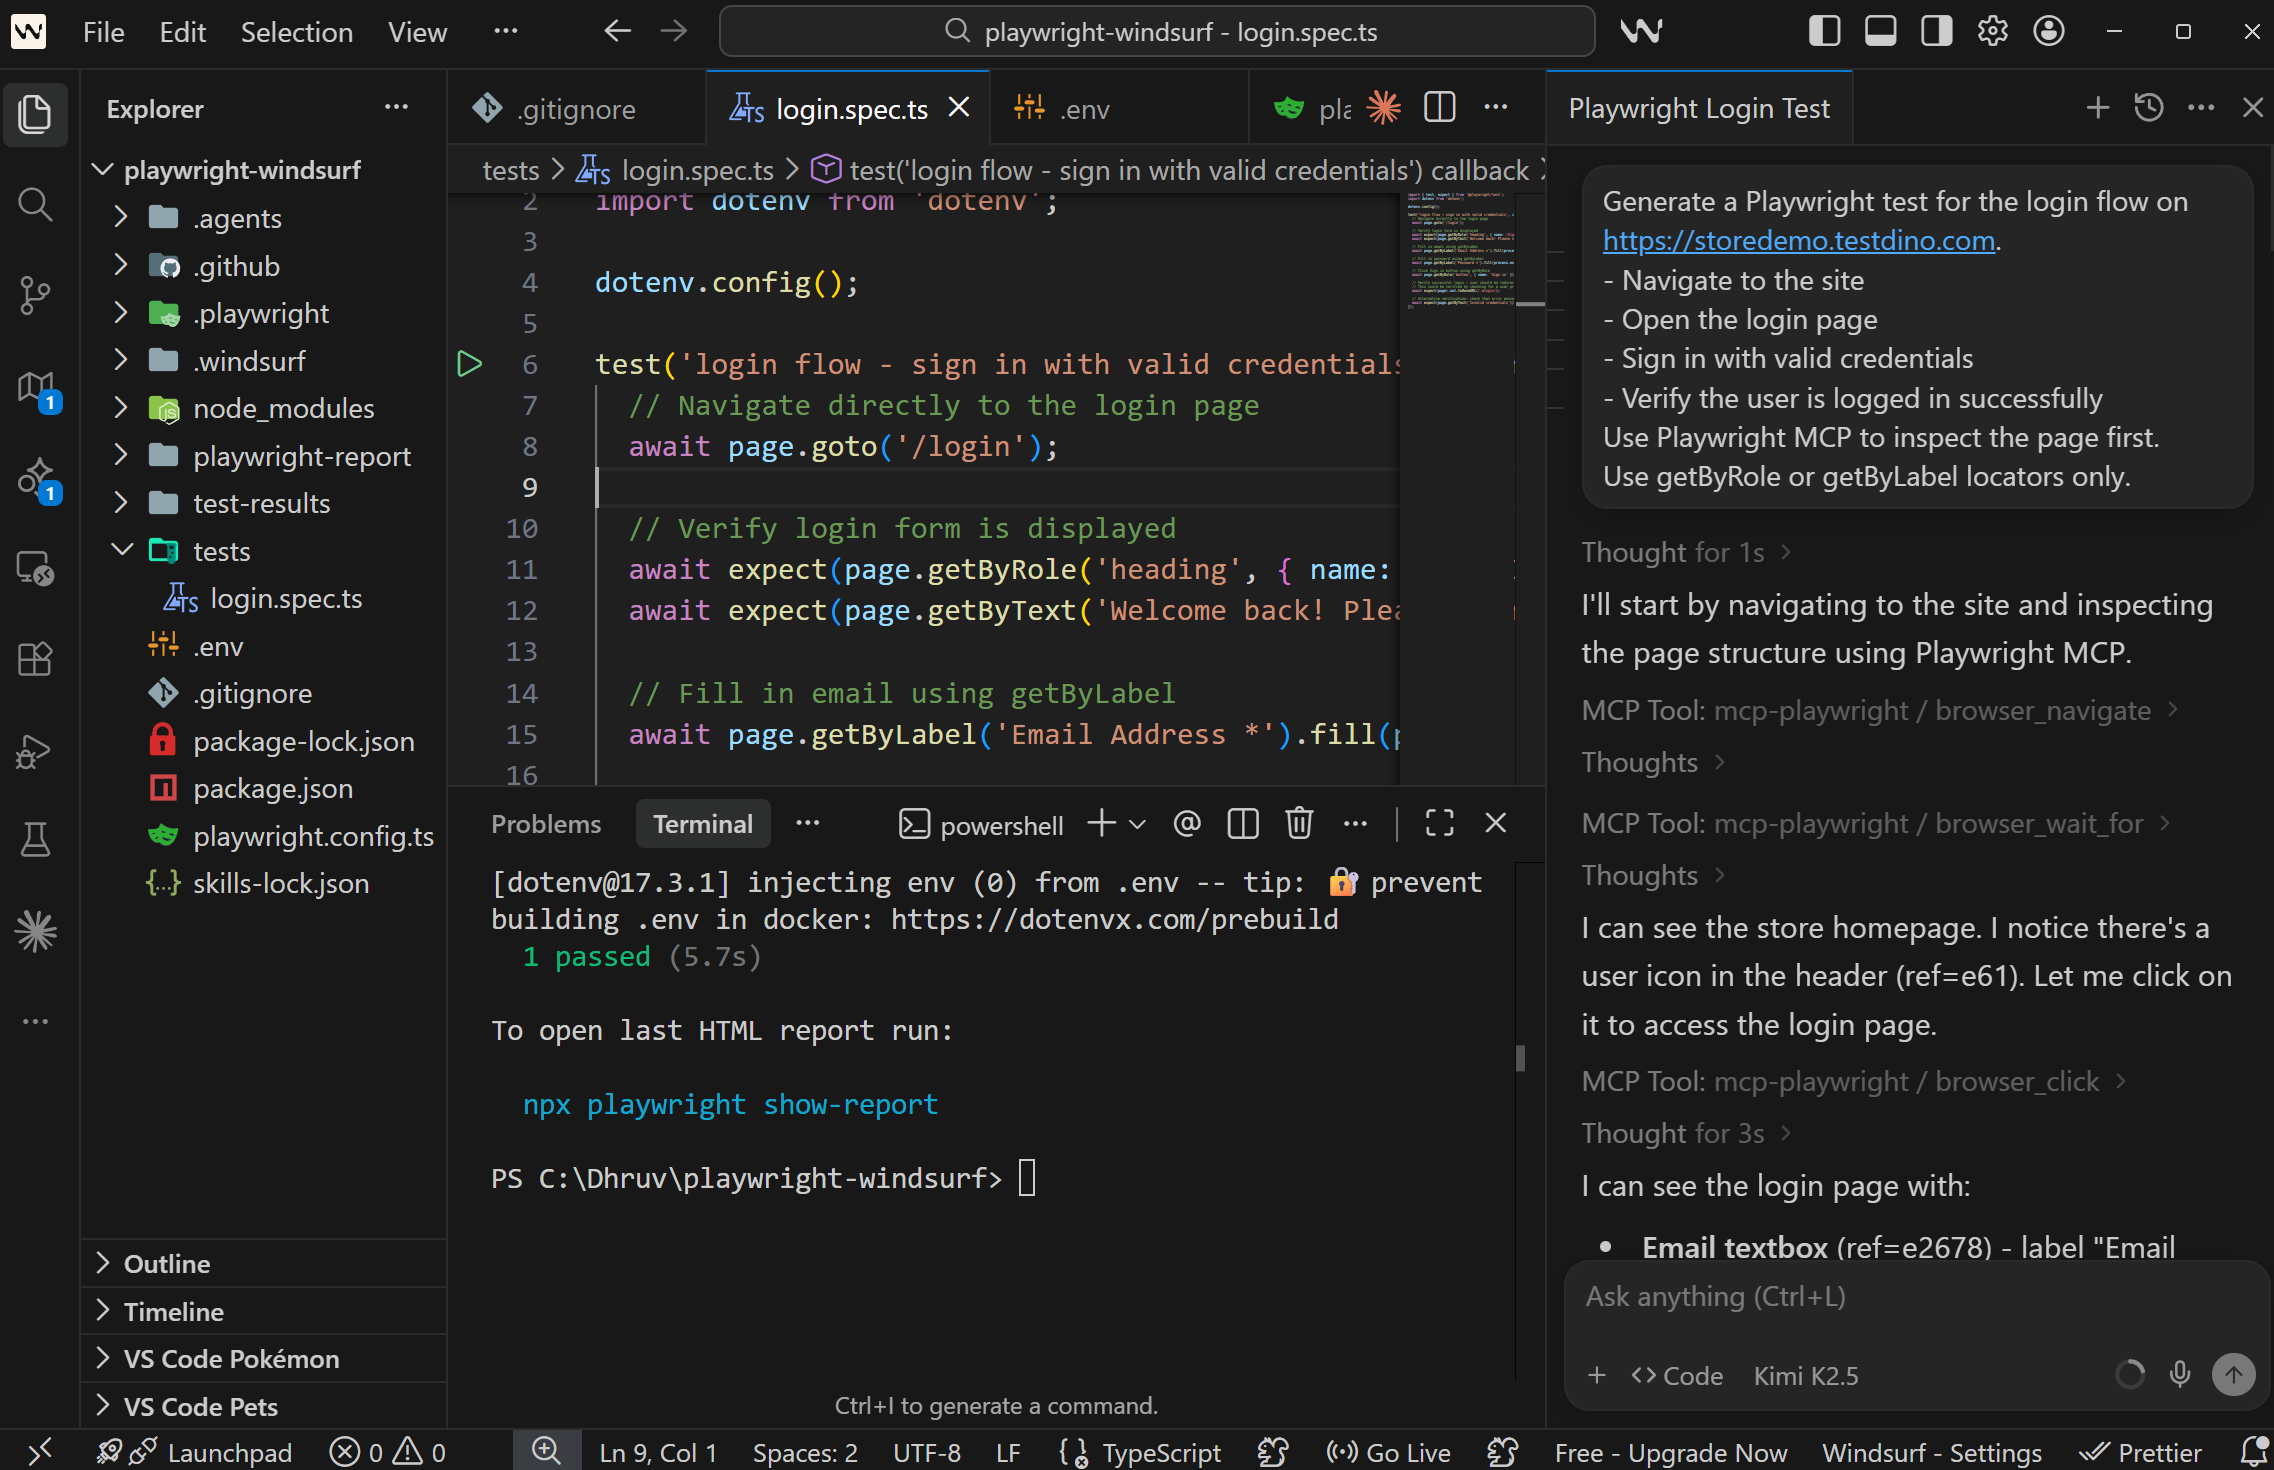
What to check before committing
Run through these before merging any AI-generated test:
-
Run it locally with npx playwright test tests/auth/login-flow.spec.ts --headed and confirm it passes
-
Check the locators -- Are they role-based or CSS class names?
-
Check the assertion -- Does it verify the actual outcome or just that a page loaded?
-
Check isolation -- Can this test run alone without needing state from another test?
-
Run with trace enabled -- npx playwright test --trace on
Treat Cascade output the way you'd treat code from a developer who writes fast but sometimes skips edge cases. Strong first draft, worth a quick review before merging.
Cascade AI flow for Playwright test generation
This is what makes Windsurf different from other AI coding tools for Playwright testing. Cascade doesn't just respond to a single prompt. It runs a multi-step flow where each step builds on the last.

This loop continues until the test passes or Cascade marks it as a real bug using test.fixme().
Arena Mode lets you run two Cascade agents with different models side by side and compare their outputs. You can choose the better result, and over time, Windsurf builds a leaderboard based on your selections.
For Playwright testing, this helps you identify which model works best for your test patterns, whether it is handling locators, waits, or test structure.
The key difference comes down to control vs automation. Cursor gives you more control over each step, while Windsurf focuses on running the full flow automatically. Choose based on how much you want to guide the process versus let the agent handle it.
Best practices for Windsurf with Playwright
After working with Windsurf and Playwright across multiple projects, these are the patterns that consistently produce better output from Cascade.
1. Start with one clean reference test: Cascade learns from your codebase. If your project has no tests, it has no context.
-
Write one clean test manually
-
Use it as the reference for all generated tests
2. Define rules in .windsurf/rules/playwright.md: Without rules, output becomes inconsistent. Set clear rules like
-
use getByRole, getByTestId
-
avoid CSS selectors
3. Load Playwright Skills: Skills help the AI follow real patterns, like:
-
auth handling
-
fixtures
-
retries and CI setup
4. Use CLI for batch generation: MCP is useful for debugging and inspection, not for long sessions.
-
Use MCP for interactive work
-
Switch to CLI when generating multiple tests
-
Reduces token usage and improves efficiency
5. Review every generated test: Treat it like a PR from a junior developer. Check:
-
locators
-
waits
-
edge cases
6. Reference existing specs in prompts: Avoid vague prompts. Always point to an example.
-
Use existing test files as a reference
-
Helps maintain consistency in structure and style
7. Use Arena Mode to pick the best model: Different models produce different results.
-
Run the same prompt across models
-
Compare output side by side
-
Pick the one that works best for your codebase
8. Run tests in CI with trace enabled: A test passing locally may fail in CI.
-
Run with --trace on
-
Capture logs, screenshots, and execution flow
Common errors when using Windsurf with Playwright (and how to fix them)
Every developer using Windsurf with Playwright runs into these. Here's what causes them and how to fix each one.
MCP connection fails or browser does not launch
This is the most common setup issue. Cascade connects to MCP but nothing happens when you ask it to open a browser.
Causes:
-
Node.js version is below 18
-
Playwright browsers aren't installed
-
mcp_config.json has a syntax error
-
Windsurf wasn't restarted after config changes
Fix:
# Check Node version (must be 18+)
node --version
# Install Playwright browsers
npx playwright install --with-deps
# Verify your MCP config is valid JSON
cat ~/.codeium/windsurf/mcp_config.json | python -m json.tool
After fixing, restart Windsurf completely. Reloading the window isn't always enough.
Generated tests use brittle CSS selectors
Cascade generates page.locator('.btn-primary') instead of semantic locators. These break whenever the UI changes.
Root cause: No rules file, or the rules don't include locator constraints.
Fix: Add locator rules to .windsurf/rules/playwright.md:
## Locators
- Always use getByRole, getByTestId, and getByLabel
- Never use CSS class selectors or XPath
- Never write page.locator('.some-class')
Also load Playwright Skills (npx skills add testdino-hq/playwright-skill/core). The core pack includes a locator hierarchy guide that teaches Cascade which locators to prefer.
Token limit exceeded during long sessions
You're halfway through generating a test suite, and Cascade stops responding or cuts off mid-generation.
Root cause: MCP sends the full accessibility tree and console output on every response. A single session can burn through 114,000+ tokens.
Fix: Switch to Playwright CLI for batch generation. CLI uses around 27,000 tokens per session. Break long sessions into smaller conversations. Start a new Cascade session after every 3-4 tests.
Tests pass locally but fail in CI
The test runs fine on your machine with --headed, but CI reports it as failed.
Common causes:
-
Playwright browsers not installed in CI
-
Environment variables not set in the CI pipeline
-
Base URL mismatch between local config and CI environment
-
Timing differences in headless mode
Fix:
# .github/workflows/playwright.yml
- name: Install Playwright Browsers
  run: npx playwright install --with-deps
- name: Run Playwright Tests
  run: npx playwright test
  env:
    STOREDEMO_EMAIL: ${{ secrets.STOREDEMO_EMAIL }}
    STOREDEMO_PASSWORD: ${{ secrets.STOREDEMO_PASSWORD }}
Always use trace: 'on-first-retry' in your Playwright config. When a test fails in CI, the trace gives you a complete timeline of what happened, including DOM snapshots, network requests, and console logs.
The Playwright HTML reporter guide explains how the local report is structured, and the custom reporter guide covers how to extend it.
Cascade ignores .windsurf/rules/
You've added rules, but Cascade keeps generating code that violates them.
Common causes:
-
The rules folder is not in the project root
-
The file doesn't have a .md extension
-
You opened a parent folder in Windsurf, so it doesn't see the rules in a subfolder
-
The rules file is too long and gets truncated
Fix: Check the file location. The .windsurf/rules/ folder should be at the root of the directory you opened in Windsurf. Verify the file is named with a .md extension.
If project-level rules aren't being picked up, try using global rules instead. Open Windsurf Settings > Cascade > Edit Global Rules. Global rules apply in every workspace.
How to run and report Playwright tests with TestDino
Once your test suite grows past a handful of files, you need a place to see results across runs, not just the most recent one. TestDino is a Playwright reporting platform that plugs into standard Playwright output and gives you dashboards, flaky test tracking, and CI integration without changing your test framework.
For context on why reporting matters as suites grow, the scalable Playwright framework guide covers how centralized reporting and fast CI execution work together.
Install TestDino MCP in Windsurf
Generate a Personal Access Token from your TestDino account at User Settings > Personal Access Tokens.
Add TestDino MCP to your Windsurf MCP config at ~/.codeium/windsurf/mcp_config.json:
{
  "mcpServers": {
    "TestDino": {
      "command": "npx",
      "args": ["-y", "testdino-mcp"],
      "env": {
        "TESTDINO_PAT": "your-token-here"
      }
    }
  }
Full setup steps are in the TestDino getting started docs.
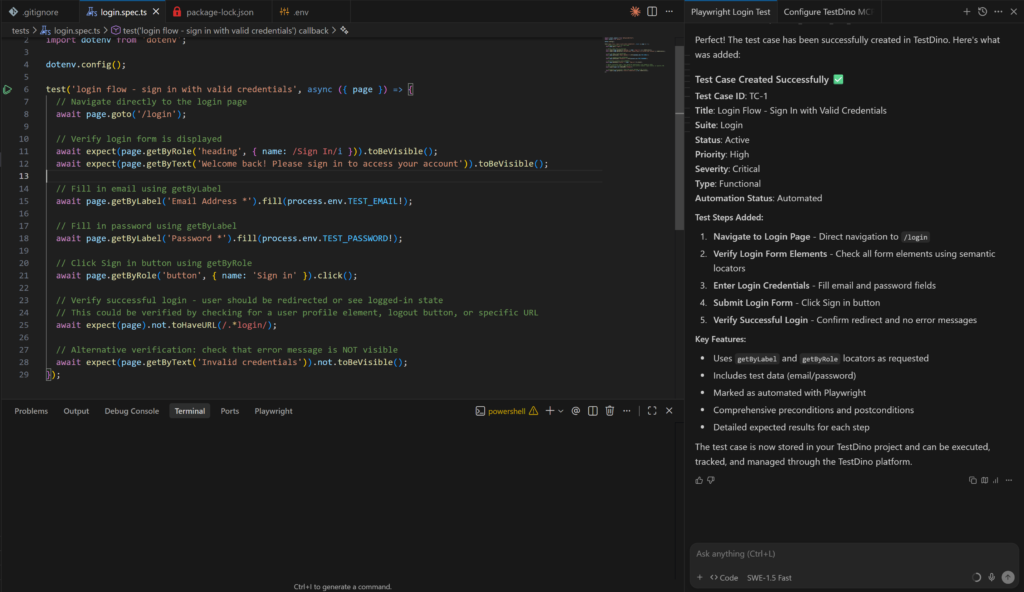
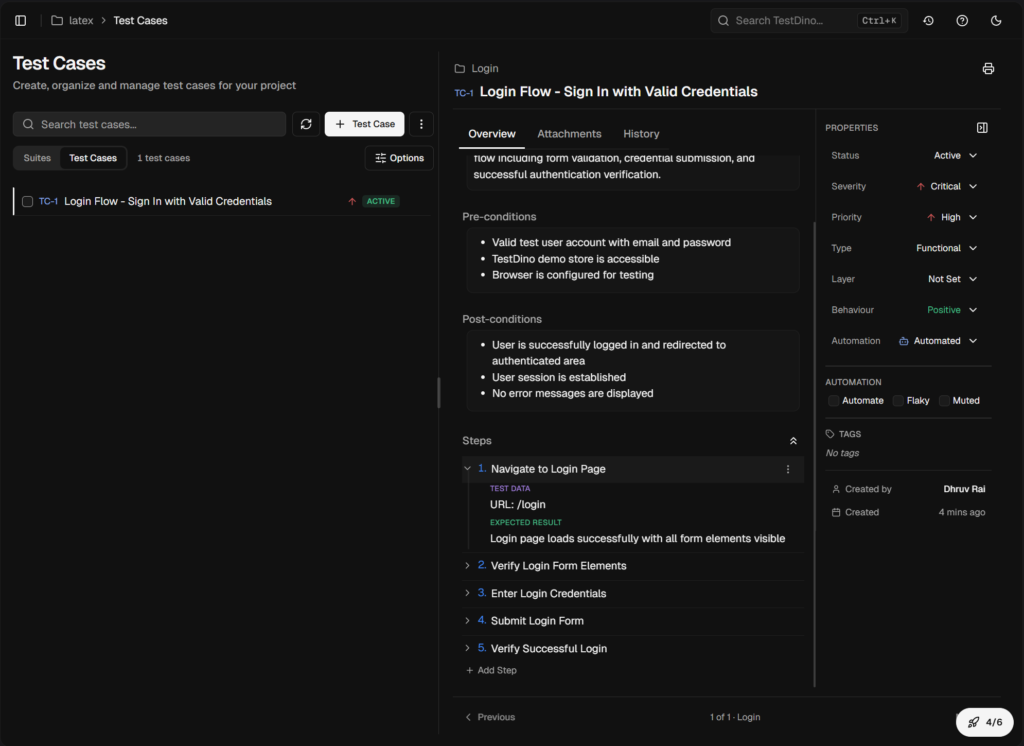
Store test cases in TestDino
After generating a test, ask Cascade to record it in TestDino:
// Cascade prompt
Store this test case with its steps in plain English in TestDino test management.
This keeps your generated coverage tracked alongside the actual spec files.
Run with npx tdpw test
The fastest way to get results into TestDino is the tdpw CLI. Install it once:
npm i @testdino/playwrightThen run using this command;
npx tdpw test --token "your_token_here"If you don't want to pass the token again and again store it in your environment.
Add token to your .env file:
TESTDINO_TOKEN="your_token_here"Now when you run npx tdpw test, you get reports in 2 parts:
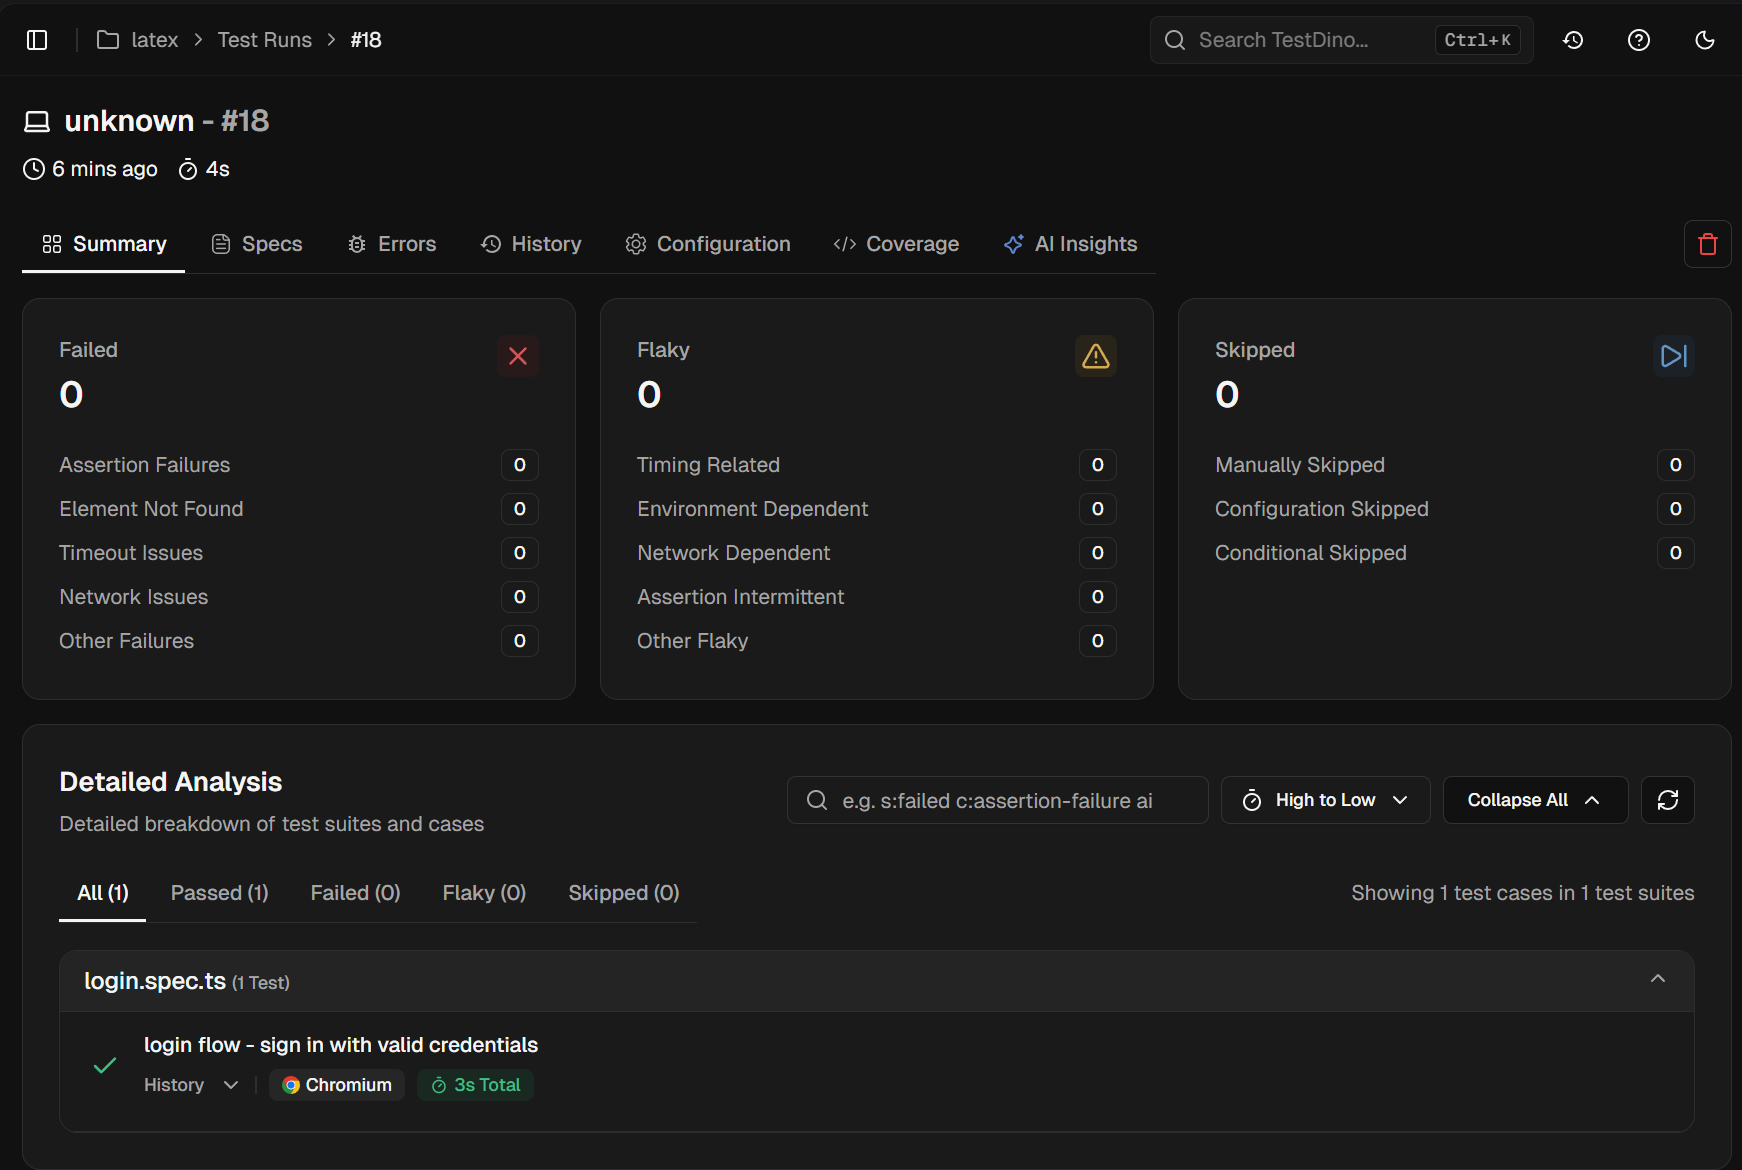
1. Terminal report (instant feedback): You see pass or fail status, execution time, and run summary directly in your terminal.
2. TestDino dashboard gets the full results. Every failure is classified as Bug, Flaky, or UI Change with a confidence score. Screenshots, traces, and videos are attached to each result. Your team sees what broke and whether it's a recurring pattern or a 1-off failure.
For CI, add the upload step after your test run:
- name: Run Playwright Tests
  run: npx playwright test
- name: Upload to TestDino
  if: always()
  run: npx tdpw upload ./playwright-report --token="${{ secrets.TESTDINO_TOKEN }}" --upload-html
Note: The if: always() condition makes sure results get uploaded even when tests fail. Without it, a failing suite blocks the upload step and you lose the failure data you actually need to debug things.
Fix flaky Playwright tests with TestDino MCP and Windsurf
This is where the setup pays off most directly. Flaky tests are the biggest time drain in test automation. They fail sometimes and pass other times, which makes them hard to reproduce and hard to fix with confidence.
Playwright 1.56 introduced the Healer agent, part of the broader Playwright test agents system. The Healer can repair failing tests by re-inspecting the live page. But it has a gap. It only sees what the page looks like right now. It doesn't know if a test has been failing intermittently for 2 weeks. It can't tell you that the failure only happens on WebKit. It has no access to your CI history.
TestDino MCP fills that gap by giving the Healer your actual historical failure data.
Ask Cascade to find the failing test
TestDino MCP gives Cascade tools to query your test history using plain language directly inside the Cascade panel:
-
"What are the failure patterns for the checkout flow test in the last 30 runs?"
-
"Is the login-flow test flaky? How often does it fail on WebKit versus Chromium?"
-
"Which tests failed in CI this week but passed locally?"
-
"Debug 'Verify User Can Complete Checkout' using TestDino reports."
Cascade queries TestDino through MCP and returns the historical data inline in your session.
Ask Cascade to fix it using that context
Once you have the failure patterns, pass them directly to the Healer:
// Cascade prompt
Fix checkout-flow.spec.ts using the error context from TestDino.
The test is flaky on webkit only. It fails on the payment form animation.
Use TestDino MCP to fetch the failure data and apply the correct fix.
The Healer runs the test in debug mode, identifies the animation timing issue, adds a proper waitFor condition, and reruns until the test passes on all browsers.
What happens if the Healer can't fix it: If Cascade decides the failure is caused by a real application bug rather than a test issue, it marks the test with test.fixme() and adds a comment explaining the difference between what happens and what should happen. It won't force a bad fix. You get a clear pointer to the bug instead of a patch that hides it.
Windsurf vs other AI agents for Playwright (2026)
Windsurf is 1 of several strong options for AI-assisted Playwright testing in 2026. Here's how it compares across the things that matter most.
| Feature | Windsurf | Cursor | Claude Code | GitHub Copilot |
|---|---|---|---|---|
| MCP support | Yes (MCPs icon in Cascade) | Yes (plugin system) | Yes (deep, per-agent) | Yes (via VS Code) |
| Multi-model | Yes (SWE-1, Claude, Gemini, GPT) | Yes (OpenAI, Anthropic, Gemini, Cursor) | Anthropic only | OpenAI primarily |
| Rules file | .windsurf/rules/ directory | .cursorrules | CLAUDE.md | .github/copilot-instructions.md |
| Tab completion | Yes (Supercomplete via SWE-1) | Yes (Supermaven) | ||
| Playwright Skills | Supported | Supported | Supported | Supported |
| Autonomous multi-step | Yes (Cascade flow) | Manual per-step | Yes (subagents) | Yes (agent mode) |
| Best for | Guided agentic workflows | Interactive IDE with model switching | Terminal-heavy refactors | Teams on VS Code already |
Windsurf's main strengths for Playwright test generation are SWE-1 for fast scaffolding, Cascade running multiple steps autonomously, and an MCP marketplace built into the editor. Arena Mode is a bonus for finding the best model for your codebase.
Cursor has more flexibility around model switching and a larger community. Claude Code is better for large-scale refactors where you want to stay close to every step. GitHub Copilot is the right pick for teams staying on VS Code.
For teams building out Playwright CI pipelines, Windsurf with TestDino gives you the same tight loop any IDE offers: generate, run, report, fix, repeat.
FAQs

Dhruv Rai
Product & Growth Engineer