Playwright in GitLab CI: A Complete Setup and Configuration Guide
Running Playwright in GitLab CI requires the right Docker image, artifact config, and job structure. This guide covers everything from your first .gitlab-ci.yml to parallel execution and debugging failed runs.
Most teams writing end-to-end tests today are also trying to run those tests automatically on every push. GitLab CI/CD powers roughly 19% of organizational pipelines according to the JetBrains 2025 Developer Ecosystem Survey, and that number climbs higher in mid-to-large companies that rely on GitLab as their single DevOps platform.
The real challenge is not writing the tests. It is getting Playwright in GitLab CI to run reliably where browsers need system libraries and a 200-test suite blocks merge requests.
This guide walks through every step of setting up Playwright in GitLab CI, from your first .gitlab-ci.yml file to Docker images and artifact storage. By the end, you will have a pipeline that runs Playwright test automation reliably on every commit.
What is Playwright and why run it in GitLab CI?
GitLab CI/CD is the continuous integration platform built into GitLab. Here is why running Playwright in GitLab CI makes sense:
- Docker-first architecture. GitLab CI runs every job inside a Docker container by default. Playwright publishes official Docker images with all browser binaries and system dependencies pre-installed. No manual library setup.
- Built-in artifact storage. GitLab lets you attach files to any job using the artifacts keyword. Screenshots, videos, HTML reports, and Playwright trace viewer files get stored and stay downloadable from the pipeline UI.
- Native parallel sharding. GitLab's parallel keyword splits a single job into N identical jobs, each receiving a CI_NODE_INDEX and CI_NODE_TOTAL variable. Playwright's --shard flag maps directly onto these variables.
- Integrated merge request feedback. When a pipeline runs on a merge request, GitLab shows the pass/fail status directly on the MR page. Failed Playwright tests block the merge until the issues are fixed.
Prerequisites before you start
Before writing any YAML, make sure the following are in place.
Local environment:
- Node.js 18 or later installed (LTS recommended)
- A working Playwright project with at least one test file
- @playwright/test added to your package.json dev dependencies
GitLab repository:
- Your project code pushed to a GitLab repository
- Access to create or edit .gitlab-ci.yml in the repository root
- GitLab shared runners enabled (they are enabled by default on GitLab.com)
If you are starting from scratch, run this command to scaffold a new Playwright project:
npm init playwright@latestThe CLI will ask whether you want TypeScript or JavaScript, which browsers to install, and whether to add a sample test file. Once the setup completes, push your project to GitLab and you are ready to write the pipeline.
If you already have a project and just need the pipeline file, the next section walks through building one from scratch.
Writing your first .gitlab-ci.yml for Playwright
The pipeline file lives at the root of your repository as .gitlab-ci.yml. Here is a complete, working configuration for running Playwright in GitLab CI followed by a line-by-line explanation.
stages:
  - test
playwright_tests:
  stage: test
  image: mcr.microsoft.com/playwright:v1.52.0-noble
  script:
    - npm ci
    - npx playwright test
  artifacts:
    when: always
    paths:
      - playwright-report/
      - test-results/
    expire_in: 7 days
Breaking down each section
Stages
The stages block defines the pipeline structure. A single test stage is enough for most setups. You can add build or deploy stages later as your pipeline grows.
Job name (playwright_tests)
This is the name that appears in the GitLab pipeline UI. Use something descriptive so your team can identify what the job does at a glance.
Docker image (image)
The image keyword tells GitLab which Docker container to run the job inside. The official Playwright Docker image (mcr.microsoft.com/playwright) comes with all three browser engines and every system dependency pre-installed. No need for a separate browser install step.
Script
npm ci performs a clean install from package-lock.json. It is faster than npm install and guarantees reproducible builds. npx playwright test runs your entire test suite using the configuration in playwright.config.ts.
Artifacts
The when: always setting is critical. Without it, GitLab skips artifact upload when tests fail, and you lose the very report you need to debug the failure. The paths array tells GitLab which directories to save. expire_in: 7 days controls how long the artifacts remain downloadable.
Choosing the right Docker image and installing browsers
The Docker image you pick when running Playwright in GitLab CI determines whether your tests work out of the box. Choosing the wrong image often leads to missing library errors. There are two main approaches.
Option 1: use the official Playwright Docker image (recommended)
Playwright publishes Docker images on Microsoft Container Registry for every release. The image tag format is mcr.microsoft.com/playwright:v{VERSION}-{DISTRO}.
playwright_tests:
  image: mcr.microsoft.com/playwright:v1.52.0-noble
  script:
    - npm ci
    - npx playwright test
This image ships with:
- Chromium, Firefox, and WebKit binaries matching that Playwright version
- All required OS-level system dependencies (fonts, media codecs, shared libraries)
- Node.js pre-installed
You do not need to run npx playwright install or npx playwright install --with-deps because everything is already in the image. This saves 30 to 60 seconds per pipeline run.
Option 2: use a generic Node.js image with manual browser install
If your organization restricts Docker images to an approved registry, you can use a standard Node.js image and install browsers manually:
playwright_tests:
  image: node:20
  script:
    - npm ci
    - npx playwright install --with-deps
    - npx playwright test
The --with-deps flag is essential here. It installs both the browser binaries and the OS-level system dependencies (like libgbm, libnss3, and font packages) that headless browsers need to launch on Linux. Without it, you will see errors like browserType.launch: Executable doesn't exist or error while loading shared libraries.
Version pinning
Always pin your Docker image version to match the Playwright version in your package.json. A mismatch between the installed @playwright/test npm package and the browsers in the Docker image causes unpredictable failures.
| Approach | Pros | Cons |
|---|---|---|
| Official Playwright image | Zero browser install time, all deps included, version-matched | Larger image pull on first run (~1.2 GB) |
| Generic Node.js image + install | Smaller base image, more control | 30-60s extra per run, manual dep management |
For most teams, the official image is the better choice. It removes an entire class of "missing dependency" bugs from your pipeline.

Tip: Check the Microsoft Container Registry for the latest Playwright Docker image tags. Always match the image tag version to your @playwright/test npm package version to avoid browser-binary mismatches.
Running tests, storing artifacts, and debugging failures
Once your pipeline runs, the next priorities are collecting test output, making reports accessible, and knowing how to debug when things break.
Running Playwright tests in headless mode
Playwright runs in headless mode by default. No special flag is needed. The npx playwright test command inside a GitLab CI job automatically launches browsers without a visible window.
If you need headed mode for debugging on a self-hosted runner that has a display, you can pass the --headed flag. On Linux-based GitLab runners without a display server, headed mode requires Xvfb:
playwright_tests:
  image: mcr.microsoft.com/playwright:v1.52.0-noble
  script:
    - npm ci
    - xvfb-run npx playwright test --headed
In practice, headless mode is what you want in CI. It is faster and requires no display server configuration.
Storing test artifacts: screenshots, traces, and reports
GitLab CI artifacts are the primary way to preserve test output between pipeline runs. Here is how to configure them for maximum debugging value:
playwright_tests:
  image: mcr.microsoft.com/playwright:v1.52.0-noble
  script:
    - npm ci
    - npx playwright test
  artifacts:
    when: always
    paths:
      - playwright-report/
      - test-results/
    reports:
      junit: test-results/results.xml
    expire_in: 7 days
Key points about the artifacts configuration:
- when: always saves artifacts regardless of job outcome. This is non-negotiable. Failed test reports are the ones you need most.
- playwright-report/ contains the HTML report generated by Playwright's default reporter.
- test-results/ contains screenshots, videos, and trace files for failed tests.
- reports: junit enables GitLab's built-in test report integration. When you add JUnit output, GitLab parses the XML and displays pass/fail results directly in the merge request UI.
Warning: Never omit when:always from your artifact configuration. Without it, GitLab skips artifact uploads on failed jobs, and you lose the screenshots, traces, and reports you need most for debugging. This is the single most common GitLab CI artifact mistake.
To generate JUnit output alongside the HTML report, update your playwright.config.ts:
import { defineConfig } from "@playwright/test";
export default defineConfig({
  reporter: [
    ["html", { open: "never" }],
    ["junit", { outputFile: "test-results/results.xml" }],
  ],
  use: {
    trace: "on-first-retry",
    screenshot: "only-on-failure",
    video: "retain-on-failure",
  },
});
The trace: 'on-first-retry' setting records a full trace only when a test fails and is about to be retried. This gives you detailed debugging data without wasting storage on passing tests.
Debugging failed Playwright runs in GitLab
When tests fail in your Playwright GitLab CI pipeline, follow this standard debugging sequence:
- Check the job log. Click on the failed job in the GitLab pipeline UI. The console output shows which tests failed and the error messages.
- Download artifacts. Scroll to the job page and click the artifact download button. Extract the zip and open playwright-report/index.html locally.
- Use the trace viewer. If you enabled trace: 'on-first-retry', failed tests will have .zip trace files in test-results/. Open them at trace.playwright.dev or run npx playwright show-trace <trace-file> locally.
Check environment differences, most "passes locally, fails in CI" issues stem from:
- Missing environment variables
- Different screen resolution or font rendering
- Network timeouts due to slower CI runners
- Race conditions exposed by different CPU/memory constraints
For a systematic approach to diagnosing CI-only failures, the Playwright debugging guide covers trace analysis and common pitfalls in detail.
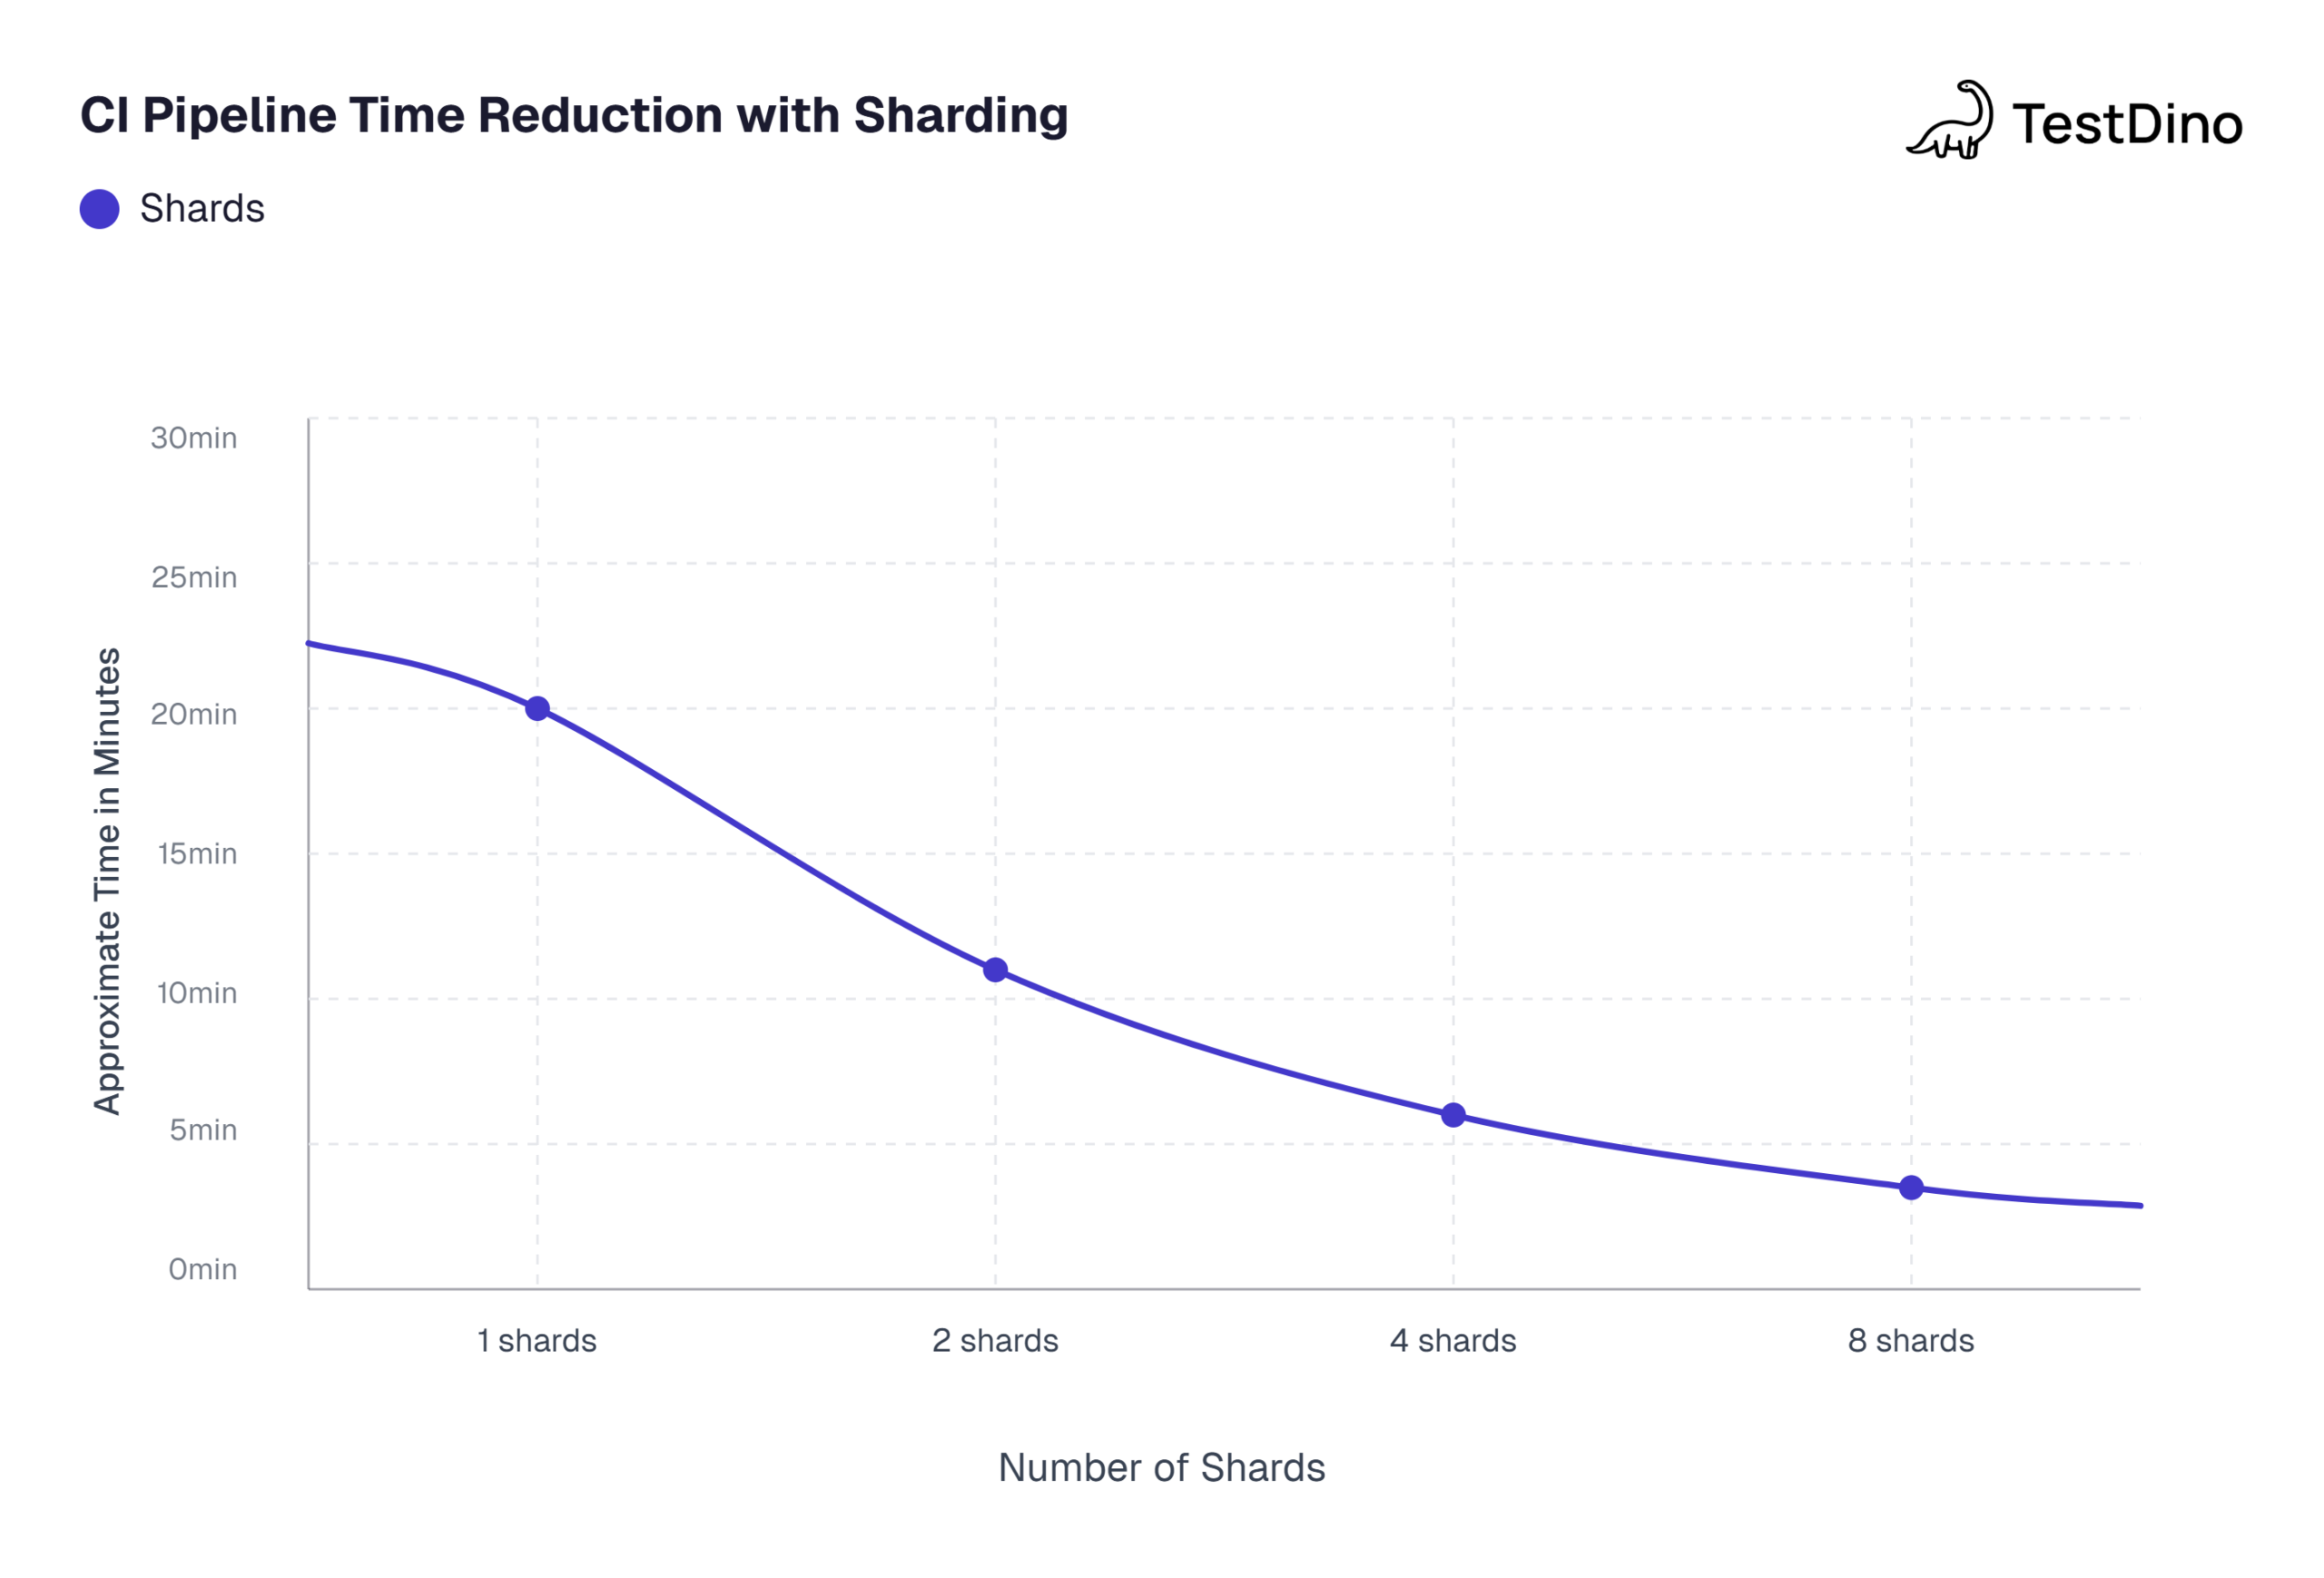
Configuring parallel test execution with sharding
When your Playwright in GitLab CI suite grows past 50 tests, running everything on a single runner starts blocking merge requests. A 200-test suite can easily take 15 to 20 minutes on a shared runner with 2 vCPUs. Sharding solves this by splitting the suite across multiple parallel jobs.
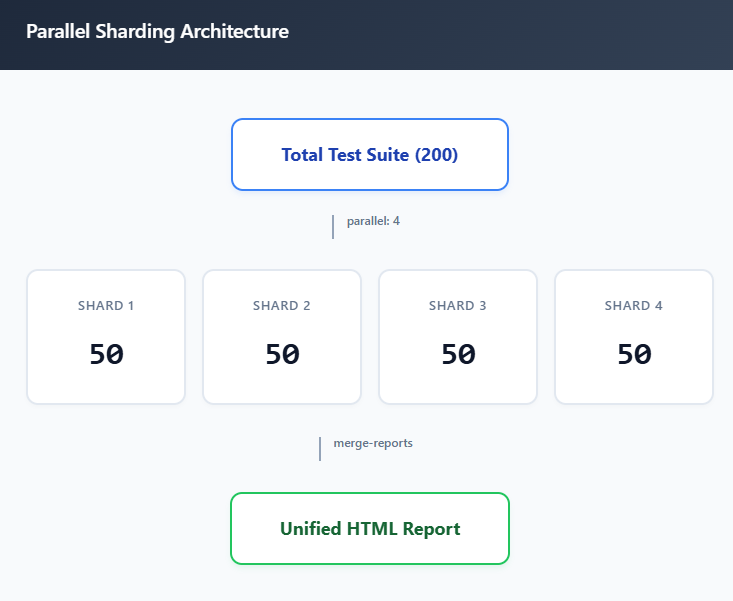
How GitLab CI parallel sharding works
GitLab's parallel keyword creates N copies of a job. Each copy receives two predefined variables:
- CI_NODE_INDEX: the current job's index (1-based, so 1, 2, 3, ... N)
- CI_NODE_TOTAL: the total number of parallel jobs
Playwright's --shard flag accepts the exact same format: --shard=INDEX/TOTAL. This makes the integration straightforward.
The sharding configuration
Here is a complete .gitlab-ci.yml that shards tests across 4 parallel jobs:
stages:
  - test
  - report
playwright_tests:
  stage: test
  image: mcr.microsoft.com/playwright:v1.52.0-noble
  parallel: 4
  script:
    - npm ci
    - npx playwright test --shard=$CI_NODE_INDEX/$CI_NODE_TOTAL
  artifacts:
    when: always
    paths:
      - blob-report/
    expire_in: 1 day
merge_reports:
  stage: report
  when: always
  image: mcr.microsoft.com/playwright:v1.52.0-noble
  script:
    - npm ci
    - npx playwright merge-reports --reporter html ./blob-report
  artifacts:
    when: always
    paths:
      - playwright-report/
    expire_in: 7 days
Configuring the blob reporter for sharding
When you shard tests, each job produces its own partial report. To merge them into a single HTML report, configure Playwright to use the blob reporter in CI:
import { defineConfig } from "@playwright/test";
export default defineConfig({
  reporter: process.env.CI ? "blob" : "html",
  // ... rest of your config
});
The blob reporter produces a binary format optimized for merging. The merge_reports job downloads all blob files from the test stage, combines them, and generates a single HTML report.
When to shard and how many shards to use
Sharding introduces complexity (extra YAML, blob reporters, a merge job), so do not add it prematurely. Here is a practical guideline:
- Under 50 tests: Probably not worth sharding. Optimize Playwright workers first.
- 50 to 200 tests: 2 to 4 shards usually gives the best return.
- 200+ tests: 4 to 8 shards are common. Beyond 8, the overhead of spinning up runners often outweighs the time savings.
Each shard has fixed overhead: pulling the Docker image, running npm ci, and initializing the runner. On GitLab shared runners, this overhead is roughly 30 to 60 seconds per job. So 10 shards adds up to 5 to 10 minutes of pure overhead, which is counterproductive for small suites.
Source: Playwright official documentation on sharding .Note: Values based on a 200-test suite running on standard GitHub-hosted ubuntu-latest runners with 2 vCPUs each. Actual results vary by test complexity.
For a deeper look at parallel execution strategies and how workers interact with CI runner CPU cores, the Playwright parallelism documentation explains the relationship between workers, fullyParallel, and sharding.
Multi-browser sharding with parallel:matrix
GitLab also supports parallel:matrix for more advanced setups. This lets you shard across both browsers and test partitions simultaneously:
playwright_tests:
  stage: test
  image: mcr.microsoft.com/playwright:v1.52.0-noble
  parallel:
    matrix:
      - PROJECT: ["chromium", "webkit"]
        SHARD: ["1/4", "2/4", "3/4", "4/4"]
  script:
    - npm ci
    - npx playwright test --project=$PROJECT --shard=$SHARD
  artifacts:
    when: always
    paths:
      - blob-report/
    expire_in: 1 day
This creates 8 parallel jobs (2 browsers x 4 shards). Each job runs one-quarter of the tests for one browser. The parallel:matrix approach is powerful for teams running cross-browser Playwright testing at scale.
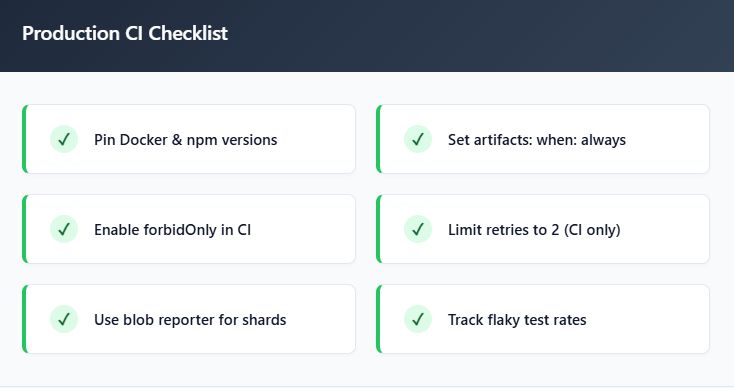
Best practices for a production-ready Playwright CI pipeline
After setting up the basics, these best practices separate a Playwright in GitLab CI setup that "works sometimes" from one that runs reliably at scale.
Pin your Docker image and Playwright versions
Always match the Playwright version in package.json with the Docker image tag. A mismatch causes browser launch failures because the installed npm package expects binaries that do not exist in the container.
{
  "devDependencies": {
    "@playwright/test": "1.52.0"
  }
}
The Docker image tag should be mcr.microsoft.com/playwright:v1.52.0-noble. When you upgrade Playwright, update both the npm package and the image tag in the same commit.
Configure your playwright.config.ts for CI
A production-ready configuration should behave differently in CI than on a developer's laptop:
import { defineConfig, devices } from "@playwright/test";
export default defineConfig({
  testDir: "./tests",
  fullyParallel: true,
  forbidOnly: !!process.env.CI,
  retries: process.env.CI ? 2 : 0,
  workers: process.env.CI ? 1 : undefined,
  reporter: process.env.CI ? "blob" : "html",
  use: {
    baseURL: process.env.BASE_URL || "http://localhost:3000",
    trace: "on-first-retry",
    screenshot: "only-on-failure",
    video: "retain-on-failure",
  },
  projects: [
    {
      name: "chromium",
      use: { ...devices["Desktop Chrome"] },
    },
    {
      name: "firefox",
      use: { ...devices["Desktop Firefox"] },
    },
    {
      name: "webkit",
      use: { ...devices["Desktop Safari"] },
    },
  ],
});| Config option | Purpose |
|---|---|
| fullyParallel: true | Distributes individual tests across workers, not just files |
| forbidOnly: !!process.env.CI | Fails the build if someone accidentally commits test.only() |
| retries: 2 (in CI) | Auto-retries failed tests to catch transient flakiness |
| workers: 1 (in CI) | Prioritizes stability on shared runners with limited CPU |
| reporter: 'blob' (in CI) | Produces mergeable reports for the sharding workflow |
| trace: 'on-first-retry' | Records a trace only when a test fails, reducing storage |
| screenshot: 'only-on-failure' | Captures a screenshot at the moment of failure |
| video: 'retain-on-failure' | Records video but only keeps it for failed tests |
Playwright's official documentation recommends setting workers to 1 in CI environments to prioritize stability and reproducibility. If you have a powerful self-hosted runner, you can increase workers.
Handle environment variables and secrets
Real-world test suites need credentials, API keys, and environment-specific URLs. Hardcoding them is a security risk. GitLab CI/CD variables solve this:
- Go to your GitLab project
- Navigate to Settings > CI/CD > Variables
- Add your variables (e.g., BASE_URL, AUTH_TOKEN)
- Mark sensitive values as Masked and Protected
Reference these variables in your .gitlab-ci.yml:
playwright_tests:
  script:
    - npm ci
    - npx playwright test
  variables:
    BASE_URL: $STAGING_URL
    CI: "true"
Access them in your tests through process.env.BASE_URL or configure them in playwright.config.ts via the use.baseURL property.
Handle flaky tests and retries
Flaky tests undermine confidence in the entire pipeline. Playwright has built-in retry support that helps separate genuine failures from intermittent flakiness:
export default defineConfig({
  retries: process.env.CI ? 2 : 0,
});
Tests that fail then pass on retry are marked as "flaky" in the report. This is a diagnostic tool, not a fix. Track your flaky test rate over time. Industry data from the flaky test benchmark report shows that teams with flaky rates above 15% spend significantly more engineering hours on test maintenance.
Note: Retries are a diagnostic signal, not a permanent fix. If a test consistently needs 2 retries to pass, the root cause is unresolved. Prioritize stabilizing these flaky tests rather than masking the problem with more retries.
Common causes of flaky tests in CI:
- Hardcoded waits. Replace page.waitForTimeout(5000) with Playwright's auto-waiting locators like toBeVisible() or toBeEnabled(). This is one of the key Playwright mistakes to avoid.
- Shared state between tests. Each test should create its own data. Use Playwright's browser context isolation or the Page object model pattern.
- Network-dependent assertions. Mock external API calls using Playwright's route interception instead of hitting real endpoints.
- Timing issues. CI runners have fewer CPU cores than developer machines. Tests that barely pass locally often fail under CI resource constraints.
For teams managing flaky test detection at scale, automated tools that track failure patterns across pipelines and branches save significant debugging time compared to manual triage.
Speed up slow pipelines
If your Playwright in GitLab CI pipeline exceeds 15 minutes, try these optimizations in order:
- Use the official Docker image to skip browser installation (saves 30-60s)
- Cache node_modules to avoid re-downloading npm packages:
playwright_tests:
  cache:
    key:
      files:
        - package-lock.json
    paths:
      - node_modules/
    policy: pull-push
3. Enable fullyParallel: true to distribute individual tests across workers
4. Reduce browser scope. If you only need Chromium for CI, run npx playwright test --project=chromium instead of all three browsers
5. Shard the suite across multiple parallel jobs (covered in the sharding section)
For a deeper analysis of execution speed optimization, the guide on slow playwright tests covers profiling techniques and config changes.
Complete production-ready .gitlab-ci.yml
Here is the full pipeline configuration combining sharding, caching, artifacts, JUnit reporting, and a merge job:
stages:
  - test
  - report
variables:
  CI: "true"
playwright_tests:
  stage: test
  image: mcr.microsoft.com/playwright:v1.52.0-noble
  parallel: 4
  cache:
    key:
      files:
        - package-lock.json
    paths:
      - node_modules/
    policy: pull-push
  script:
    - npm ci
    - npx playwright test --shard=$CI_NODE_INDEX/$CI_NODE_TOTAL
  variables:
    BASE_URL: $STAGING_URL
  artifacts:
    when: always
    paths:
      - blob-report/
      - test-results/
    reports:
      junit: test-results/results.xml
    expire_in: 1 day
merge_reports:
  stage: report
  when: always
  image: mcr.microsoft.com/playwright:v1.52.0-noble
  cache:
    key:
      files:
        - package-lock.json
    paths:
      - node_modules/
    policy: pull
  script:
    - npm ci
    - npx playwright merge-reports --reporter html ./blob-report
  artifacts:
    when: always
    paths:
      - playwright-report/
    expire_in: 30 days
This production-ready Playwright in GitLab CI configuration follows the patterns recommended in the Playwright automation checklist and works well for teams running Playwright CI/CD integrations across staging and production environments.
Scaling reports beyond artifact downloads
For teams running hundreds of tests across multiple shards and branches, downloading artifact zips from GitLab becomes unsustainable. This is where test automation reporting platforms add real value.
Tools like TestDino integrate directly with your CI pipeline and provide:
- Pass/fail trends across branches and commits
- Flaky test detection with automatic pattern recognition
- Screenshots, videos, and traces viewable in the browser
- Historical run comparisons to catch regressions early
The Playwright reporting ecosystem also includes reporters like list, json, junit, and the blob reporter used in sharding. You can stack multiple reporters in your config to serve different needs simultaneously.
Tracking reporting metrics like pass rate, flake rate, and average execution time gives your team data-driven signals about pipeline health rather than relying on gut feelings.
Conclusion
Setting up Playwright in GitLab CI is not just about dropping a YAML file in your repository root. A production-grade pipeline involves making real decisions about Docker images, artifact storage, parallel sharding, environment variable management, and retry configuration.
Start simple. The basic single-job configuration from the first section is enough for small projects with under 50 tests. As your suite grows, add caching to speed up npm installs. When runs start exceeding 10 to 15 minutes, introduce sharding with GitLab's parallel keyword.
When your team grows to the point where multiple engineers triage failures every morning, invest in a proper test reporting tool that surfaces trends without manual artifact downloads. The key takeaway: treat your Playwright GitLab CI pipeline as a first-class part of your testing infrastructure and optimize it just like you would optimize the tests themselves.
FAQ

Savan Vaghani
Product Developer