Playwright E2E Testing: Step-by-Step Setup Guide 2026
Playwright E2E testing delivers reliable cross-browser automation with auto-waiting locators and built-in debugging. Learn how to set up stable, low-flake UI tests for CI in 2026.
Playwright E2E testing is what many teams are moving to in 2026 because it gives cross browser testing plus a built in runner, and locators that auto wait and retry.
The core problem it solves is brittle UI tests. Modern UIs re render a lot, so old style selectors break, clicks happen too early, and you hit timeouts or flaky element state issues.
This guide helps by showing a clean setup, stable locator patterns, web first assertions, and trace based debugging so failures are easy to understand and fix.
What is Playwright E2E testing and why use it in 2026?
End to end testing checks whether your product works the way a user experiences it. That includes routing, forms, authentication, rendering, API driven data, and browser behavior working together.
Playwright E2E testing means validating real user journeys in a real browser by automating user actions and assertions across pages, network calls, and UI states.
Playwright E2E Testing uses Playwright Test to run those flows across Chromium, Firefox, and WebKit with one API and one configuration model. This matters because teams now care about reliability and debugging speed as much as raw automation coverage.
Playwright is also a good fit for modern frontend apps with async rendering and hydration. Its locator model and web first assertions help reduce race conditions compared with brittle selector patterns.
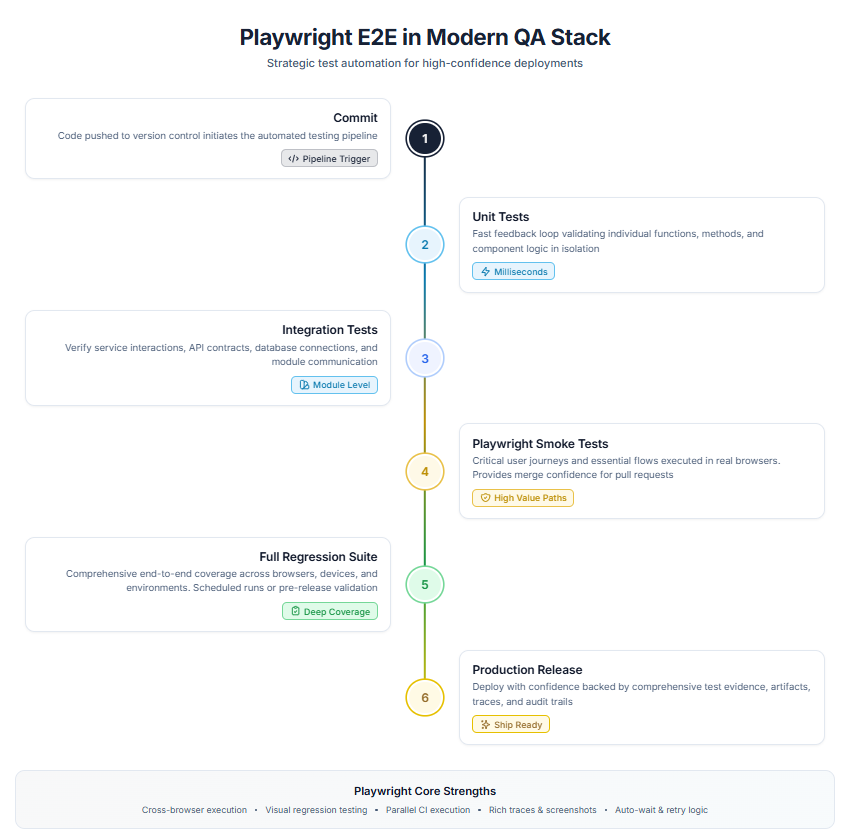
When to use E2E vs other test types
| Test type | Best for | Execution speed | User flow confidence | Use with Playwright? |
|---|---|---|---|---|
| Unit tests | Functions and pure logic | Fastest | Low | Usually no |
| Integration tests | Module and service interaction | Fast | Medium | Sometimes |
| E2E tests | Critical user journeys in browser | Slowest | Highest | Yes, primary use case |
Step-by-step Playwright E2E testing setup for beginners
The fastest beginner path is the Playwright initializer. It scaffolds the config, a sample test, and optionally a GitHub Actions workflow so you can get to a passing test quickly.
Prerequisites
-
Node.js LTS installed
-
A web app to test locally or a staging URL
-
Basic JavaScript or TypeScript familiarity
-
Terminal access on your machine or CI runner

Tip: Start with TypeScript unless your project is strictly JavaScript. The editor support and refactoring safety help a lot as the suite grows.
1) Initialize a new Playwright project
npm init playwright@latestDuring the prompts, choose your language, test folder, and whether to add a GitHub Actions workflow. If you accept browser installation, Playwright also downloads supported browser binaries.
2) Install browsers (if you skipped it earlier)
npx playwright installFor Linux CI runners:
npx playwright install --with-deps3) Run the sample tests
npx playwright testThis verifies that Node, dependencies, browsers, and local execution are working correctly.
4) Understand the generated project structure
Starter project file map
| File / Folder | Purpose | Why it matters early |
|---|---|---|
| playwright.config.ts | Main runner configuration | Controls retries, workers, reporters, baseURL, projects |
| tests/ | Spec files | Keep early tests focused on smoke paths |
| package.json | Scripts and dependencies | Standardizes local and CI commands |
| playwright-report/ | HTML report output | Fast debugging after failures |
| test-results/ | Artifacts like traces and screenshots | Critical for flaky test analysis |
5) Start with a clean baseline config
import { defineConfig, devices } from "@playwright/test";
export default defineConfig({
  testDir: "./tests",
  timeout: 30_000,
  expect: { timeout: 5_000 },
  fullyParallel: true,
  forbidOnly: !!process.env.CI,
  retries: process.env.CI ? 2 : 0,
  workers: process.env.CI ? 2 : undefined,
  reporter: process.env.CI ? [["dot"], ["html"]] : [["list"], ["html"]],
  use: {
    baseURL: process.env.BASE_URL || "http://localhost:3000",
    trace: "on-first-retry",
    screenshot: "only-on-failure",
    video: "retain-on-failure",
  },
  projects: [
    { name: "chromium", use: { ...devices["Desktop Chrome"] } },
    { name: "firefox", use: { ...devices["Desktop Firefox"] } },
    { name: "webkit", use: { ...devices["Desktop Safari"] } },
  ],
});
Note: Add baseURL on day one. It keeps tests readable and makes environment switching easy when you add staging or preview environments.
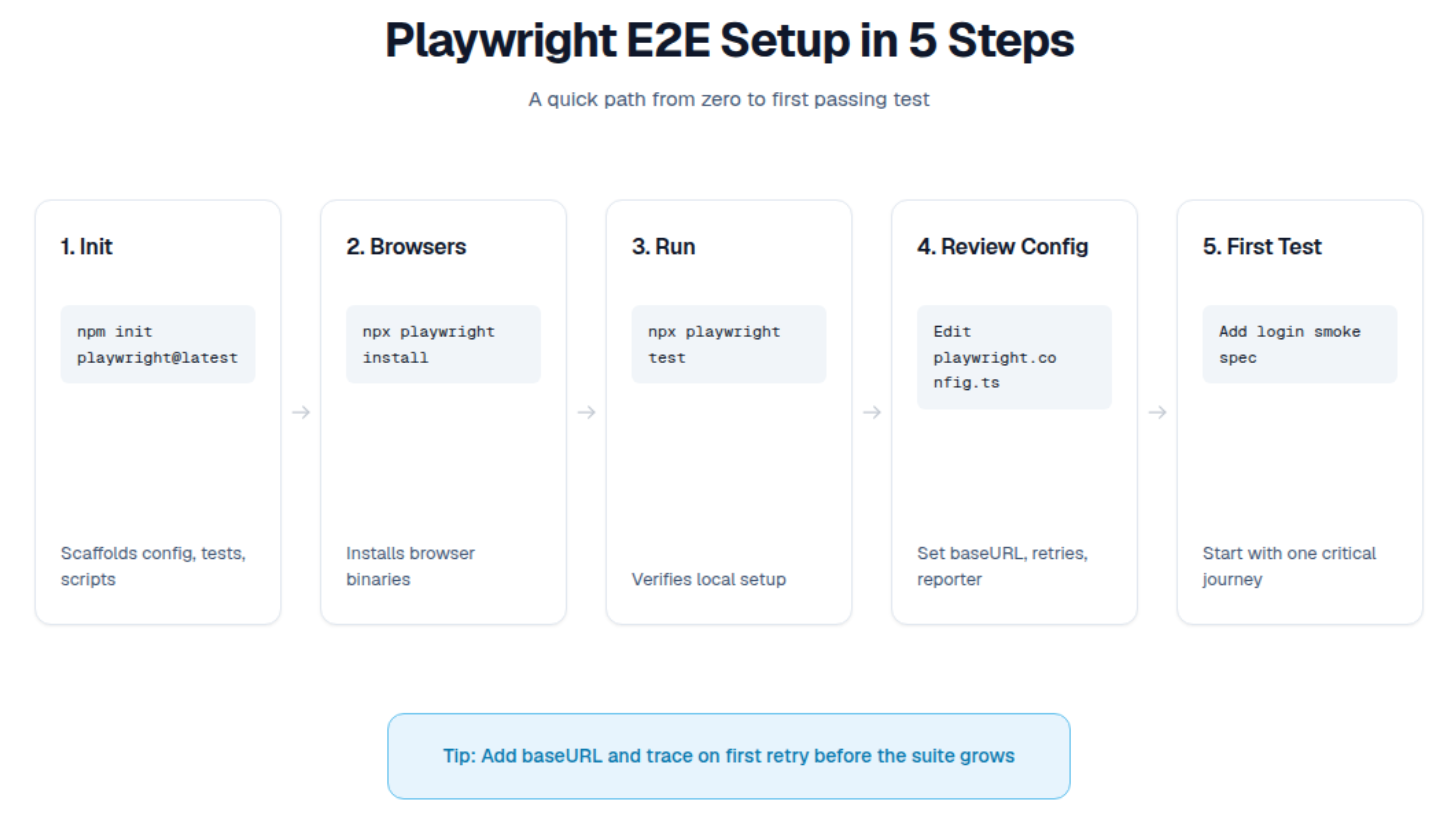
Write your first Playwright E2E test
The most common beginner mistake is recording or writing a huge flow first. Start with one high value journey like login, checkout, or a dashboard smoke test. Then harden that pattern and reuse it.
import { test, expect } from "@playwright/test";
test("user can sign in and reach dashboard", async ({ page }) => {
  await page.goto("/login");
  await page
    .getByLabel("Email")
    .fill(process.env.E2E_EMAIL ?? "[email protected]");
  await page
    .getByLabel("Password")
    .fill(process.env.E2E_PASSWORD ?? "StrongPassword123!");
  await page.getByRole("button", { name: /sign in/i }).click();
  await expect(page).toHaveURL(/dashboard/);
  await expect(page.getByRole("heading", { name: /dashboard/i })).toBeVisible();
});
Why this test is a good template
-
Uses user facing locators (getByLabel, getByRole)
-
Relies on web first assertions
-
Verifies both navigation and UI state
-
Avoids brittle CSS chain selectors
When your first real E2E flow starts failing, it is usually because selectors are too brittle or assertions are racing the UI. For selector strategy that survives UI refactors, use the Playwright Locators.
Add test data rules early
Keep credentials and environment specific values out of test code. Use .env files locally and CI secrets in pipelines. This keeps your specs portable across local, staging, and preview environments.
Tip: Run a new test at least 5 to 10 times before cloning its pattern into the rest of the suite. A test that passes once is not yet stable.
Run, debug, and inspect test results
Writing tests is only half the job. Debugging speed decides whether your suite becomes a trusted signal or a noisy blocker.
Core commands you will use often
npx playwright test
npx playwright test --ui
npx playwright test --headed
npx playwright test tests/auth/login.spec.ts
npx playwright test --project=webkit
npx playwright test --grep "@smoke"
npx playwright show-report
How to choose the right mode
Use headed mode for a quick visual reproduction. Use UI Mode while authoring tests and refining locators. Use the HTML report after full runs. Use traces when a failure is timing sensitive or only appears in CI.
Debug workflow cheat sheet
| Tool | Best for | Typical moment |
|---|---|---|
| Headed mode | Quick visual reproduction | Local sanity checks |
| UI Mode | Fast authoring and selective reruns | Building new tests |
| HTML report | Run summary and attachments | After local or CI runs |
| Trace Viewer | Root cause analysis | Retries and flaky failures |
When you are drafting a brand new flow, Playwright AI Codegen can give you a quick first pass that you then clean up into stable locators. Once you run tests daily, the small CLI switches start saving real time, and Playwright CLI focuses on the commands you actually use.
Make tests stable and reduce flakiness
Playwright is fast, so it exposes app instability quickly. That is useful only when your test design is stable.
Common flakiness causes
-
Hard waits like waitForTimeout
-
Fragile selectors tied to layout
-
Shared state between tests
-
Slow or noisy backend dependencies
-
Hydration timing and async rendering
-
Assertions that check the wrong state transition
Common Playwright E2E errors and fixes
| Error pattern | Likely cause | Practical fix |
|---|---|---|
| Timeout waiting for element | Selector is weak or element state is not ready | Use role or label locators and assert expected state explicitly |
| Element not visible or not clickable | Overlay, animation, or wrong target | Assert visibility first, then click the correct role based locator |
| Passes locally, fails in CI | Timing, CPU, network, or env differences | Enable trace on retry, inspect artifacts, reduce shared state |
| Intermittent auth failures | Repeated login steps and state drift | Use storageState for authenticated flows |
Reuse auth with storageState
use: {
  storageState: 'playwright/.auth/user.json',
}
Mock network responses when needed
await page.route("**/api/orders", async (route) => {
  await route.fulfill({
    status: 200,
    contentType: "application/json",
    body: JSON.stringify([{ id: 1, status: "paid" }]),
  });
});
Timeout tuning without hiding real issues
Increase timeouts only after you understand the wait condition. If the test passes only because the timeout is huge, the problem still exists. Fix readiness, locator quality, or backend determinism first.
Note: Retries are not a long term solution. Treat retry passes as defect signals and track them like bugs.
Organize, scale, and run Playwright E2E tests in CI/CD
As your suite grows, the main challenge becomes signal quality. Good structure, tagging, fixtures, and CI execution strategy matter more than adding another test file.
Organize by feature and execution intent
A practical structure:
-
tests/smoke/ for merge gate coverage
-
tests/regression/ for broader flows
-
tests/features/<feature>/ for feature level grouping
-
fixtures/ for reusable setup
-
pages/ for page objects where reuse is meaningful
Use fixtures for reusable setup
Fixtures reduce setup duplication and keep tests readable. They are especially useful for authenticated sessions, seeded data, or reusable API preparation.
Fixtures and suite structure are where execution control starts to pay off. If you are setting up tags, retries, and targeted runs, the Playwright Annotations ties those pieces together in a way that stays maintainable as the suite grows.
Add tags for execution control
You can use tags in titles or the details object. Tags help local runs, smoke pipelines, and targeted debugging.
import { test } from "@playwright/test";
test("checkout with coupon @smoke @payments", async ({ page }) => {
  // ...
});
// Alternative with details object
test(
  "account profile update",
  { tag: ["@regression", "@account"] },
  async ({ page }) => {
    // ...
  },
);
CI/CD baseline flow
-
Install dependencies with npm ci
-
Install browsers with npx playwright install --with-deps
-
Start the app or a test environment
-
Run Playwright tests
-
Upload playwright-report and test-results artifacts
-
Publish JUnit or HTML reports for CI visibility
Minimal GitHub actions example
name: Playwright E2E
on:
  pull_request:
  push:
    branches: [main]
jobs:
e2e:
runs-on: ubuntu-latest
timeout-minutes: 30
steps:
- uses: actions/checkout@v4
- uses: actions/setup-node@v4
with:
node-version: 22
cache: npm
- run: npm ci
- run: npx playwright install --with-deps
- run: npm run start:test &
- run: npx wait-on http://127.0.0.1:3000
- run: npx playwright test
env:
CI: true
- uses: actions/upload-artifact@v4
if: always()
with:
name: playwright-artifacts
path: |
playwright-report
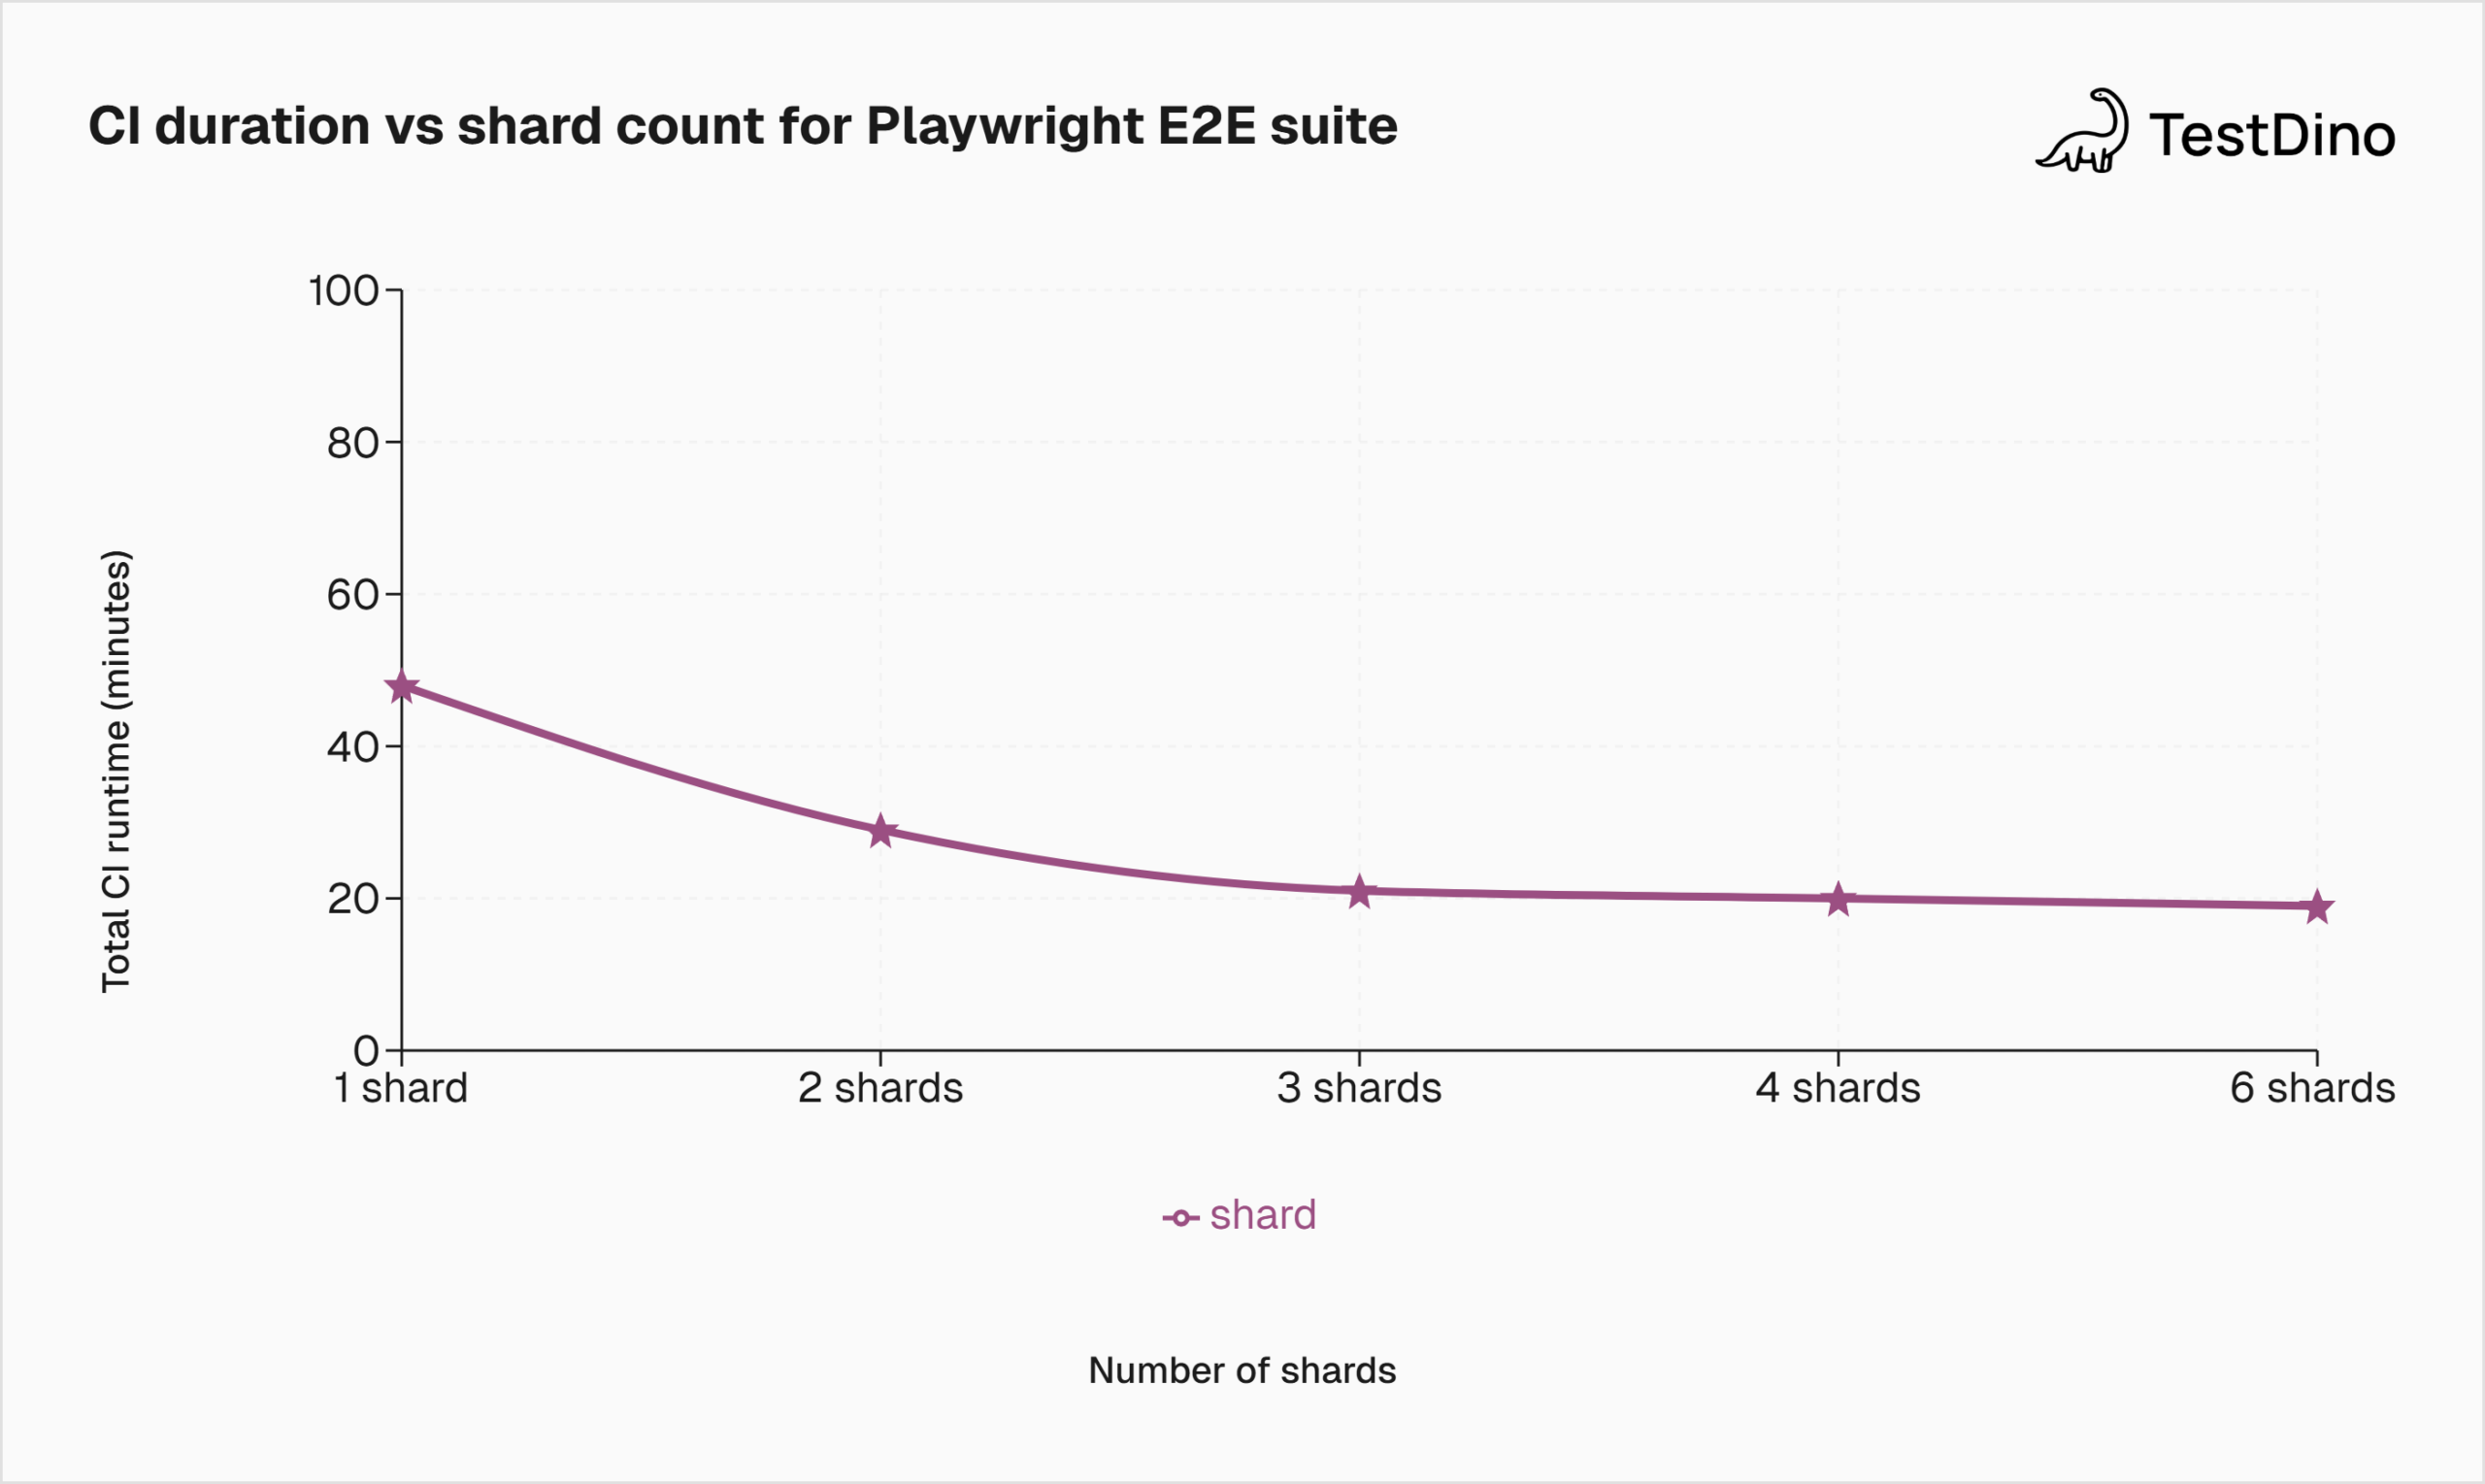
test-resultsCI scaling knobs
| Knob | What it controls | Starter recommendation |
|---|---|---|
| workers | Parallel execution per machine | 2 in CI, default locally |
| retries | Retry behavior and trace capture policy | 2 in CI, 0 locally |
| trace | Debug artifact capture | on-first-retry |
| Sharding | Split tests across CI jobs | Start with 2 to 4 shards |
| Artifacts | Failure analysis retention | Always upload reports and results |
Reporting options and when to use them
Start with the built in HTML report and traces. Add JUnit when your CI platform needs machine readable test results. If your team needs centralized run history, screenshots, and traces across many CI runs, a reporting workflow can help later.
After the baseline is working in CI and if you are deciding where component tests fit alongside E2E, Playwright vs Cypress Component Testing can help you pick the right scope.
Conclusion
Playwright E2E Testing is more than a tool choice in 2026. It is a workflow choice. Teams that succeed with it start with critical journeys, use stable locator and assertion patterns, and treat traces and reports as part of normal engineering work.
If you follow the setup and scaling path in this guide, you can move from a first passing local test to a CI ready suite that stays readable as your product grows. Start with a smoke suite, keep it clean, and reduce flakiness every week.
As your suite grows, stability usually comes down to two things first: selectors and assertions. The Playwright Locators and Playwright Assertions help you make tests resilient without hiding problems behind bigger timeouts.
When the bottleneck shifts to writing and organizing more tests, Playwright AI Codegen can speed up the first draft, and Playwright Annotations helps you keep smoke and regression execution clean.
FAQs

Dhruv Rai
Product & Growth Engineer