GitHub Copilot with Playwright: Setup, MCP & Test Guide (2026)
Learn how to write reliable Playwright tests using GitHub Copilot, Playwright MCP, and Skills inside VS Code in 2026.
Have you asked AI to write Playwright tests and received code that works in a demo but breaks on a real app?
If you write Playwright tests regularly, you know the pain:
-
finding stable locators
-
covering real user flows
-
fixing tests after UI changes
-
chasing flaky CI failures
This guide shows how to write Playwright tests with Github copilot and Playwright MCP that work in real projects. You will set up VS Code, load Playwright skills, generate your first test, view reports with TestDino, and fix unstable tests using the Healer agent.
Why use GitHub Copilot with Playwright for test generation?
GitHub Copilot runs natively inside VS Code. It reads your codebase, supports MCP servers as of VS Code 1.99, and lets you switch between models from OpenAI, Anthropic, and Google mid-session inside Copilot Chat.
For Playwright testing, this matters because test generation is not just about writing code. It is about writing code that matches your project structure, uses the right locator strategies, and runs reliably in CI.
Most AI coding tools generate tutorial-quality Playwright tests. They use brittle CSS selectors, skip auth handling, and ignore your project's fixture patterns. GitHub Copilot solves this with three features that generic autocomplete tools lack.
- First, MCP support in VS Code lets Copilot connect to the Playwright MCP server. Instead of guessing the DOM, the AI drives a real browser, reads the accessibility tree, and generates locators from actual page state.
- Second, Copilot Chat supports loading Skills, which are structured markdown guides that teach the AI your testing patterns.
- Third, .github/copilot-instructions.md lets you define project-level instructions that every Copilot interaction follows automatically.
The combination of live browser context, skill-based knowledge, and enforced instructions is what separates GitHub Copilot from tools that just autocomplete code. You get tests that match your codebase from the first generation, not after three rounds of manual fixes.
Prerequisites
Before starting, make sure you have these in place:
-
Node.js 18 or newer installed and available on your command line
-
Playwright installed in your project (npm init playwright@latest if starting fresh)
-
VS Code 1.99 or newer with the GitHub Copilot extension installed and active
-
Playwright browsers installed (npx playwright install --with-deps)
-
A working Playwright project with at least one passing test, so the AI has a reference spec to learn from
If you are starting from zero, run npm init playwright@latest first and get one basic test passing before adding AI to the workflow.
Connect Playwright MCP to GitHub Copilot
Playwright MCP is a Model Context Protocol server that connects AI agents to the Playwright test runner. It lets GitHub Copilot execute, inspect, and debug real browser sessions through Playwright instead of only generating test code.
VS Code has built-in MCP support starting from version 1.99. There are two ways to configure it.
- Quick setup (recommended): Visit the Playwright MCP VS Code setup page and follow the GitHub Copilot tab for the one-click configuration.
- Manual setup: If you want more control, follow these steps.
Install Playwright MCP as a dev dependency:
npm install --save-dev @playwright/mcp
The --save-dev flag adds it as a development dependency since it is only needed during local development and testing, not in production builds.
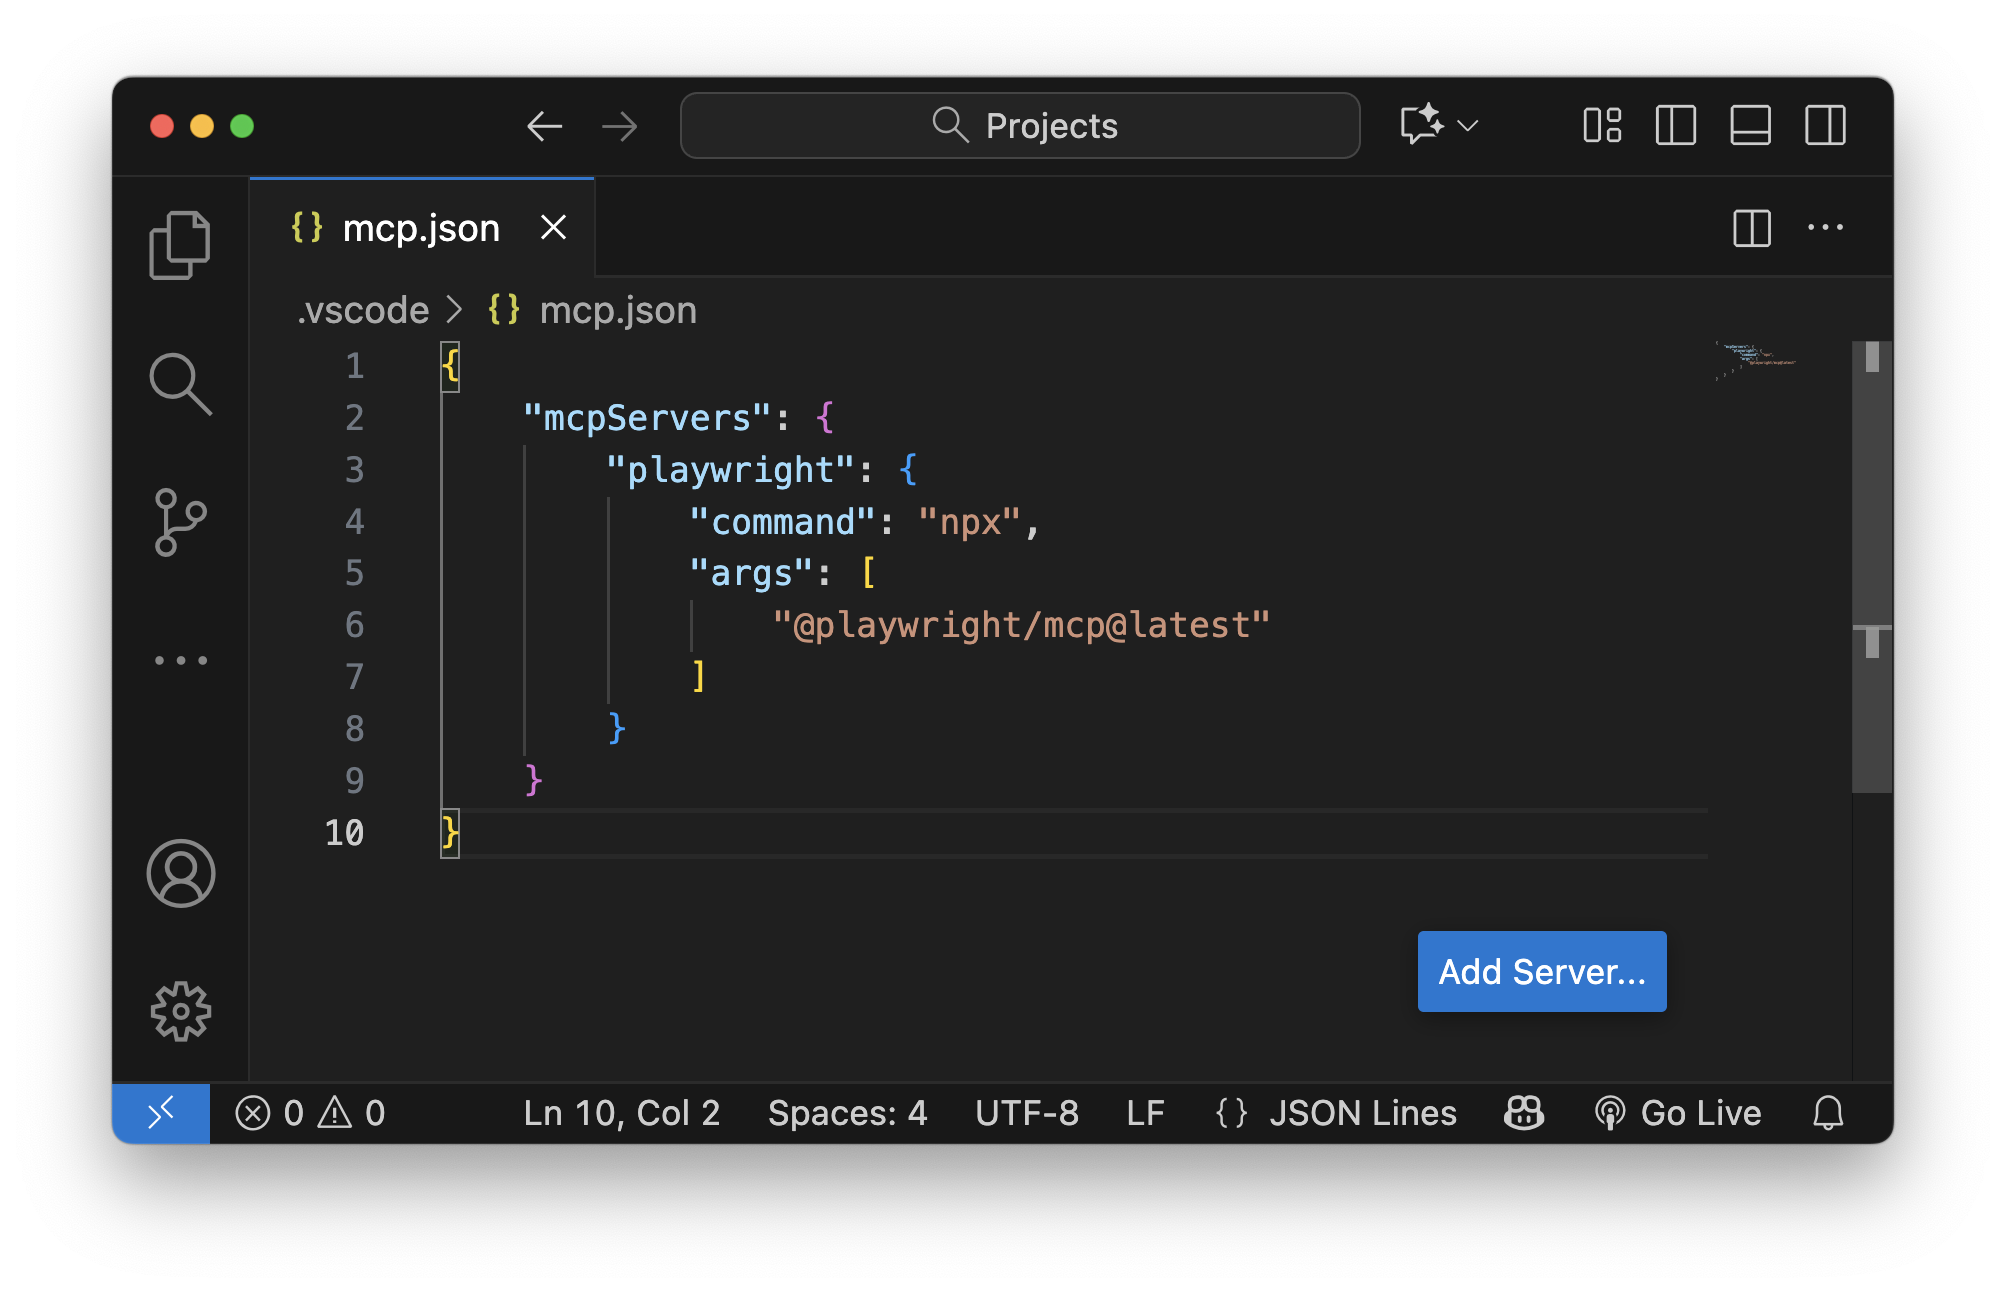
Next, create a .vscode/mcp.json file in your project root. VS Code and GitHub Copilot pick this up automatically:
{
  "servers": {
    "playwright": {
      "command": "npx",
      "args": ["@playwright/mcp@latest"]
    }
  }
}
Reload VS Code to apply the configuration.
If you are still facing the issue with the installation, you can check out this YouTube video
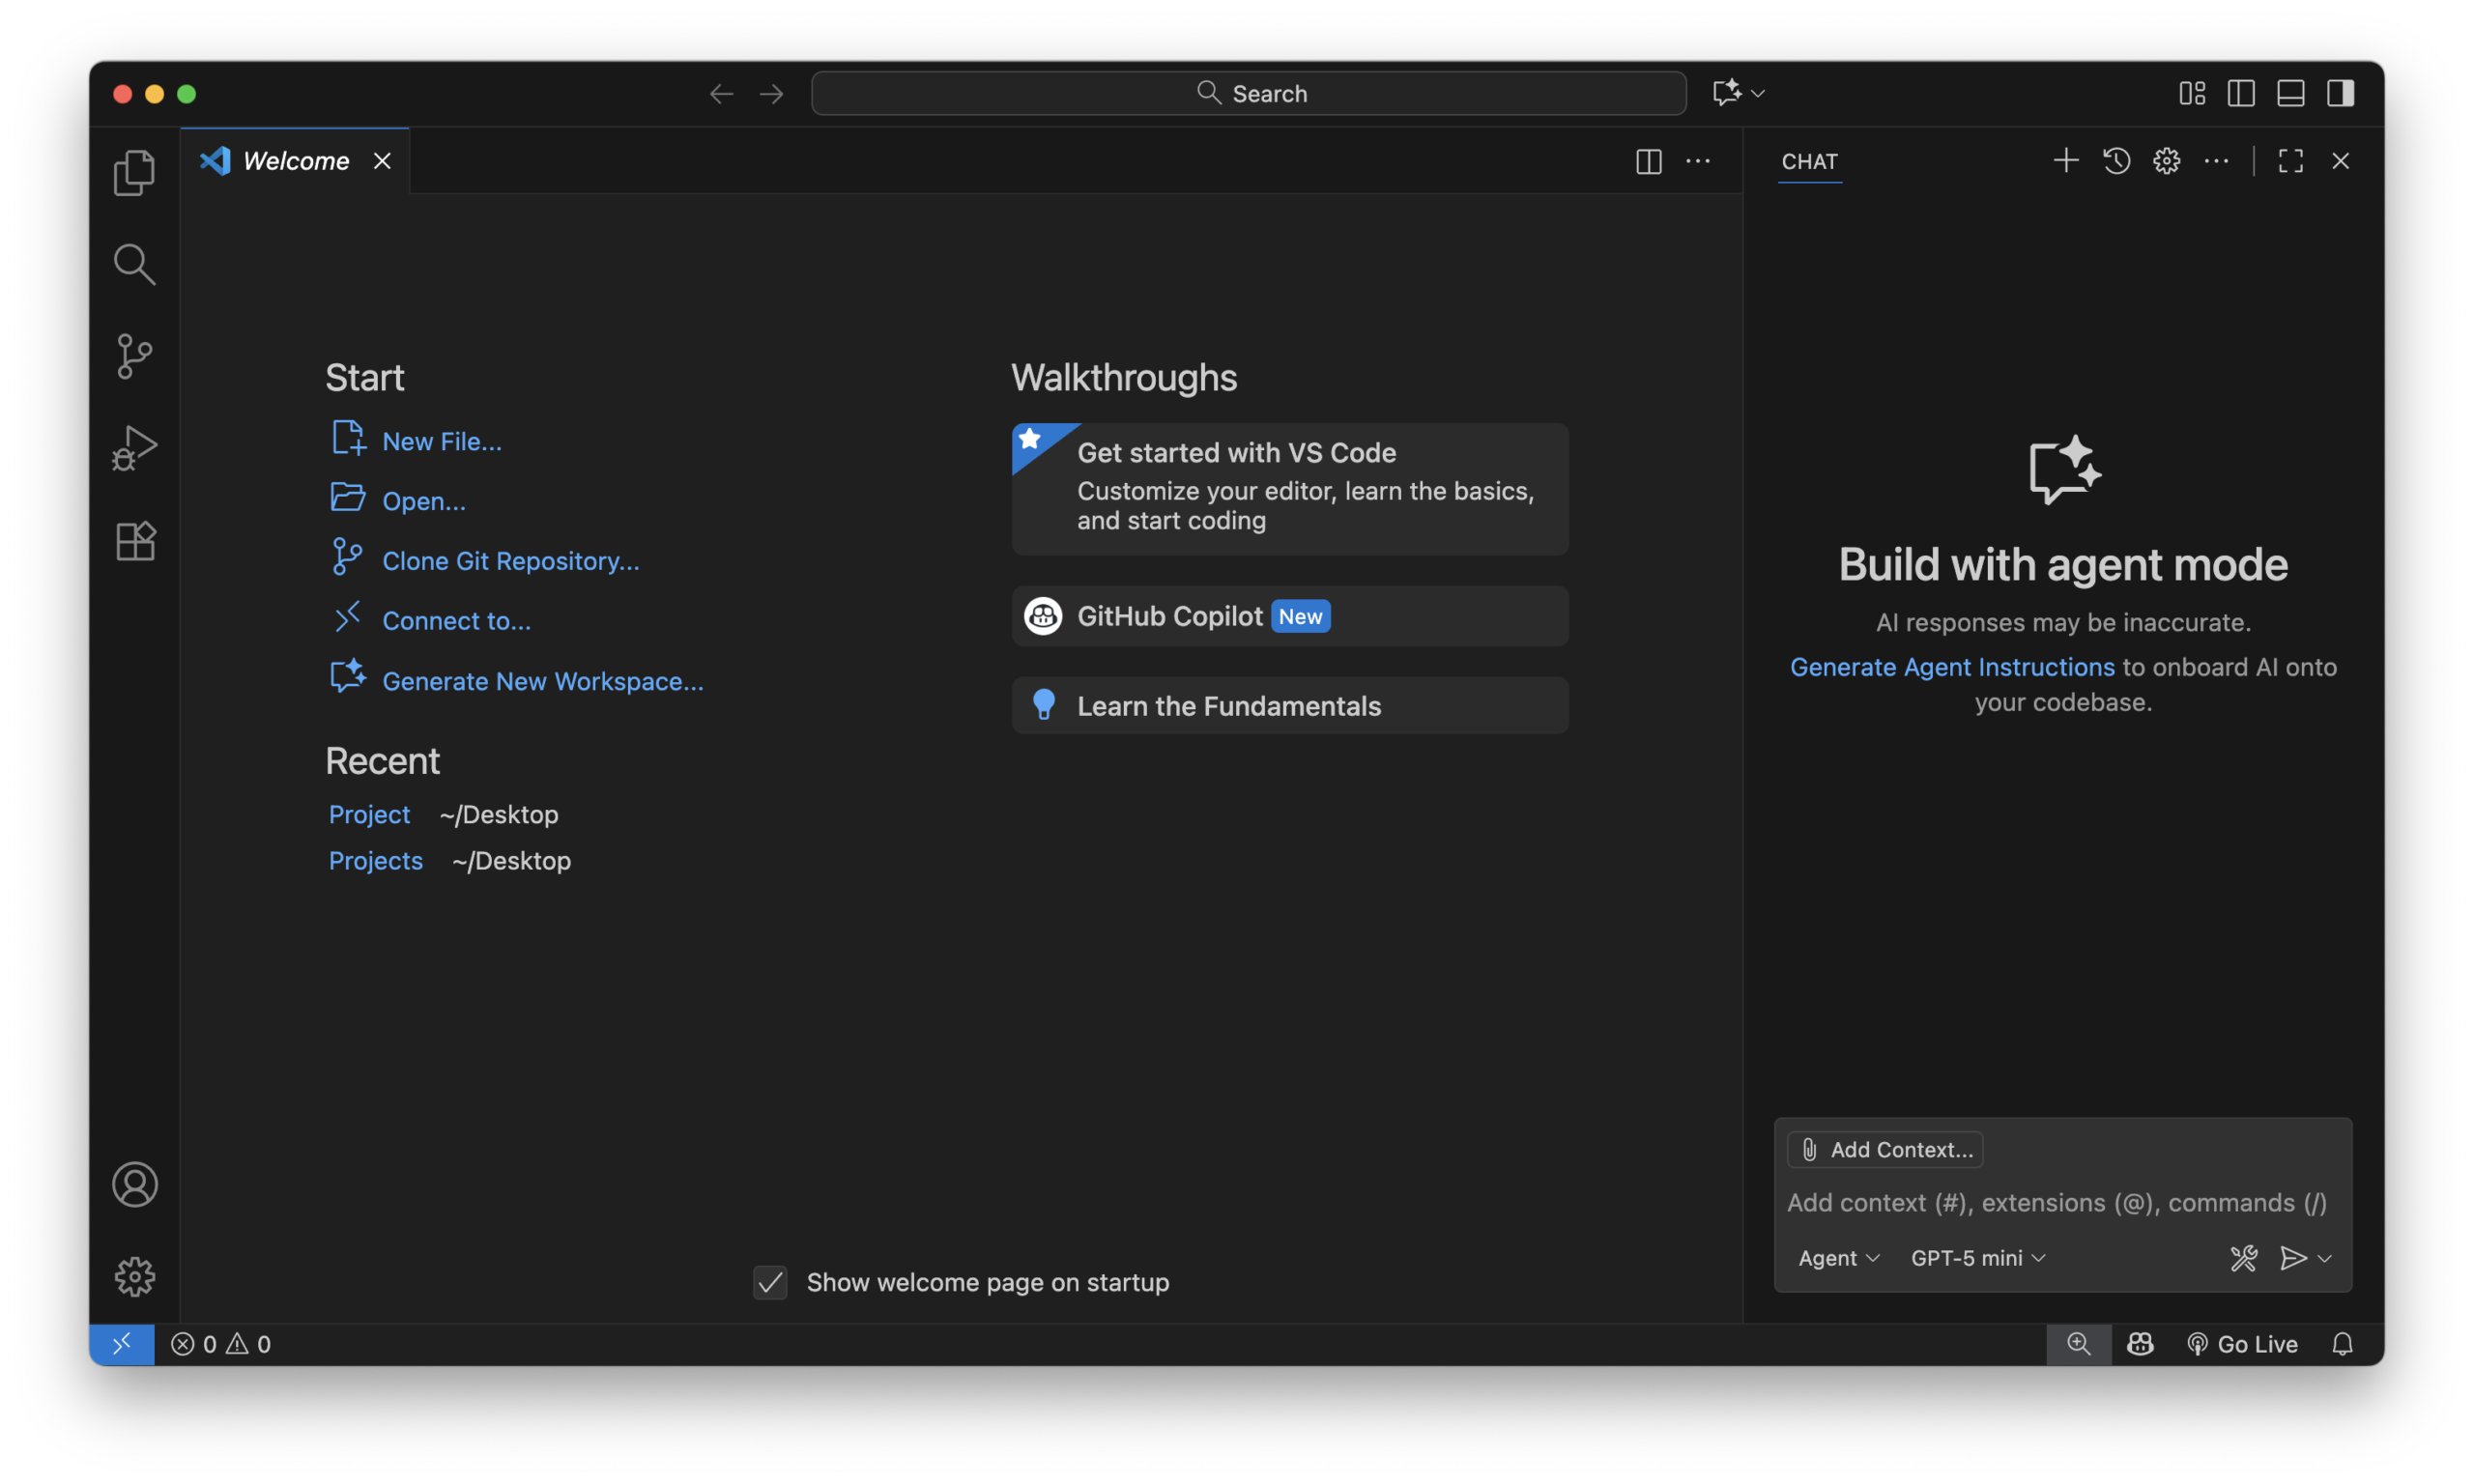
Verify it works: Open Copilot Chat in VS Code (the chat panel), switch to Agent mode, and ask it to open a real browser session, navigate to any URL, and take a screenshot. If the browser launches and Copilot returns a screenshot, the connection is live.
One thing to keep in mind: Playwright MCP is designed for interactive development and debugging. If you are running large regression suites or performance-sensitive test runs, MCP adds unnecessary overhead. Its strength is in test creation and debugging, not bulk execution.
Use Playwright CLI for batch test generation
Playwright MCP works well for interactive sessions, but it sends the full accessibility tree and console output on every response. That burns through tokens fast. For longer sessions where you are generating multiple tests, the Playwright CLI is more token-efficient.
Microsoft built playwright-cli specifically for AI coding agents. Instead of streaming the entire browser state to the model, the CLI saves a snapshot to disk with short element references like e1, e15, and e255. The agent uses those references in subsequent commands.
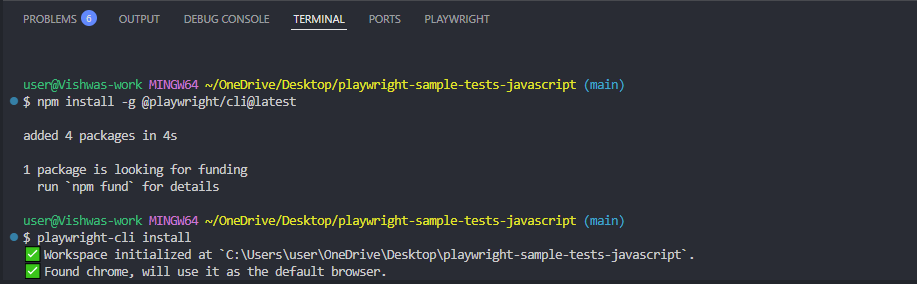
-
Install CLI using npm install -g @playwright/cli@latest
-
Install it for your project using playwright-cli install
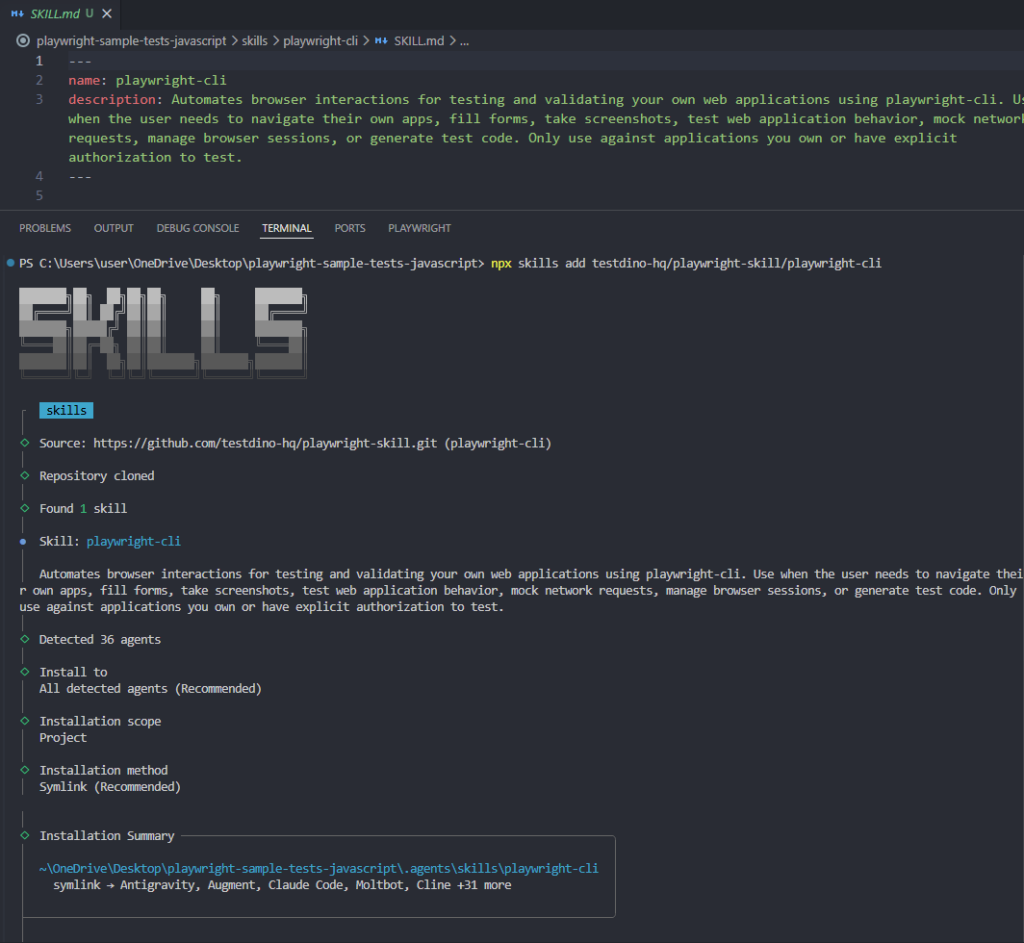
-
Install CLI skills: npx skills add testdino-hq/playwright-skill/playwright-cli
Each command is a single line. The AI agent spends tokens on reasoning, not on processing massive browser state dumps. Teams running heavy AI-driven test automation workflows report cutting monthly token spend by 60-75% after switching from MCP to CLI for batch generation.
Load Playwright Skills for structure
AI agents write decent Playwright tests out of the box, but they fall apart on real-world sites. Wrong selectors, broken auth, flaky CI runs. The root cause is that agents do not have context about your app or about Playwright best practices beyond their training data.
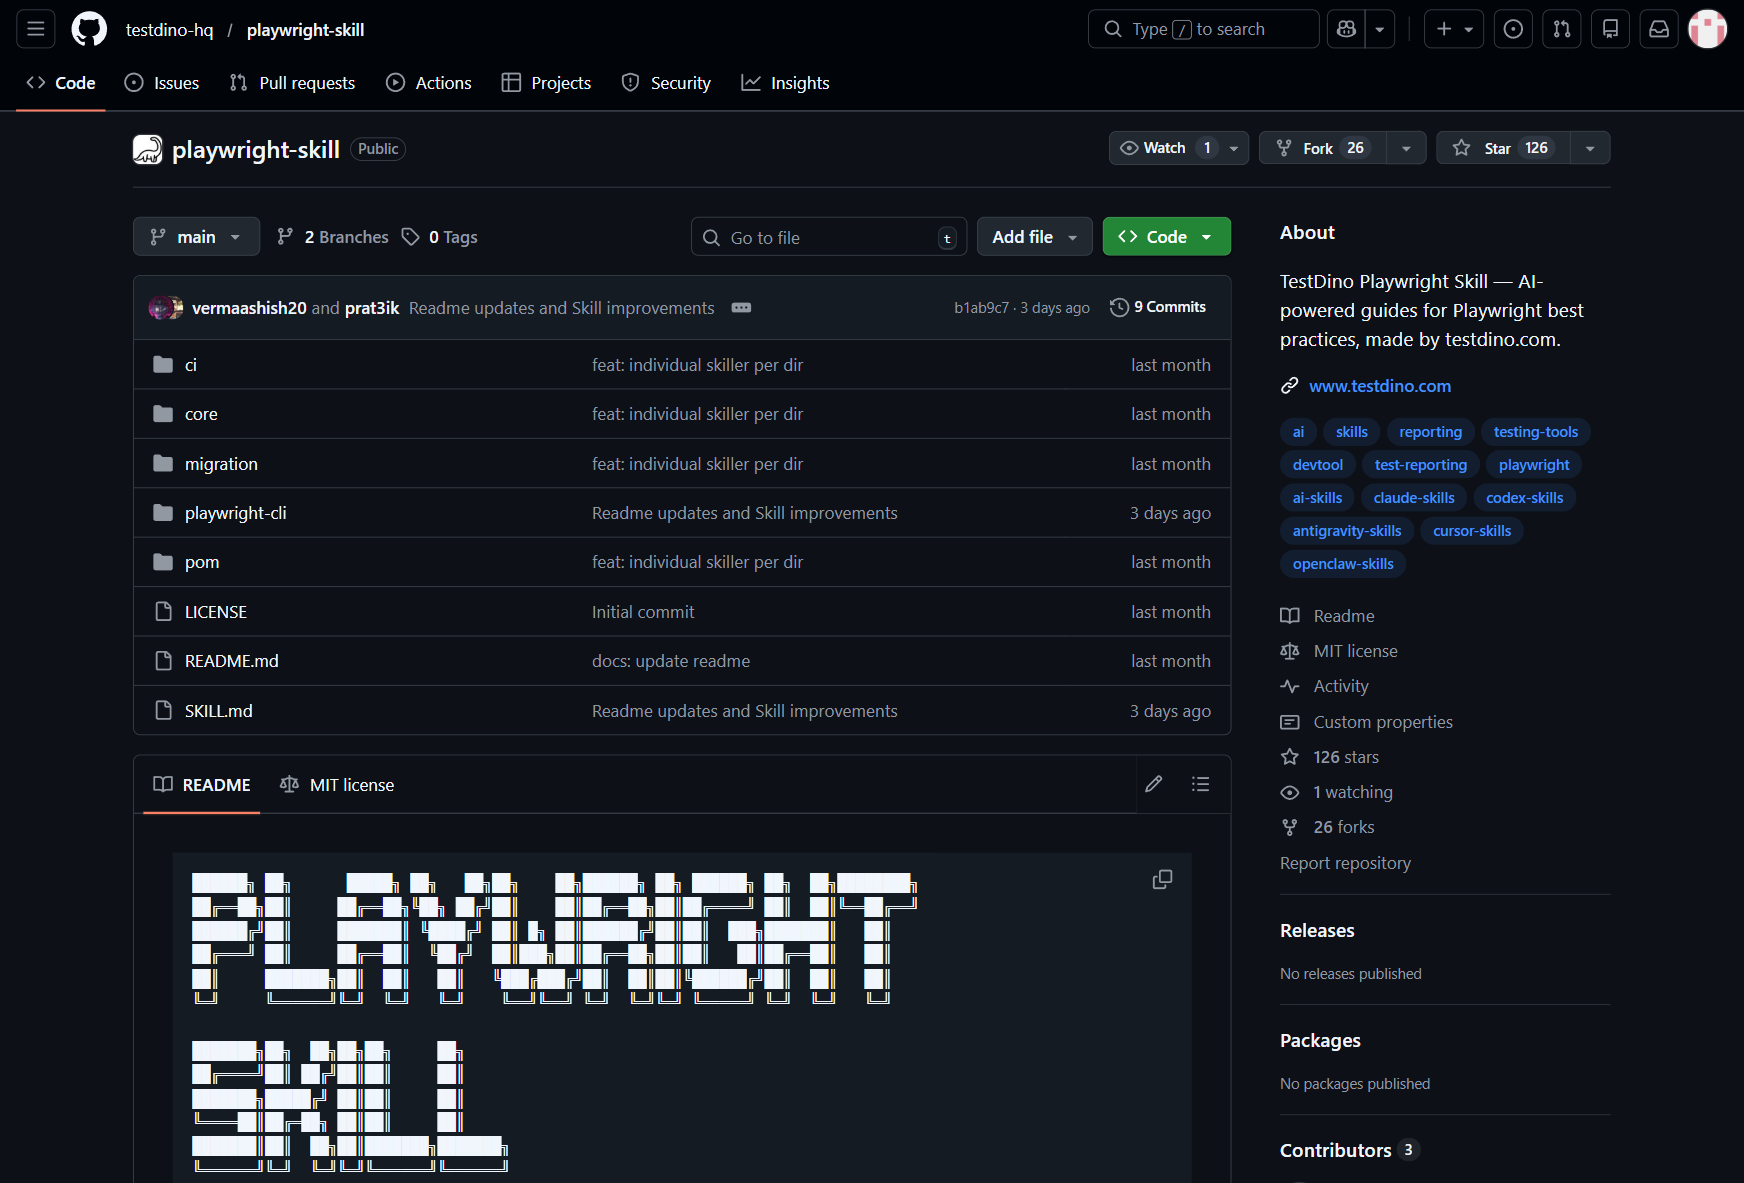
Playwright Skills fix this. A Skill is a curated collection of markdown guides that teach AI coding agents how to write production-grade Playwright tests. The Playwright Skill repository maintained by TestDino contains 70+ guides organized into five packs:
-
core/ -- 46 guides covering locators, assertions, waits, auth, fixtures, and more
-
playwright-cli/ -- 11 guides for CLI browser automation
-
pom/ -- 2 guides for Page Object Model patterns
-
ci/ -- 9 guides covering GitHub Actions, GitLab CI, and parallel execution
-
migration/ -- 2 guides for moving from Cypress or Selenium
Install them with a single command:
# Install all 70+ guides
npx skills add testdino-hq/playwright-skill

# Or install individual packs
npx skills add testdino-hq/playwright-skill/core
npx skills add testdino-hq/playwright-skill/ci
The difference is noticeable. Without the Skill loaded, an AI agent generates tutorial-quality code with brittle CSS selectors. With the Skill, it uses getByRole() locators, proper wait strategies, and structured test patterns that actually pass against real sites.
The repo is MIT licensed. Fork it and add your team's naming conventions, remove guides for frameworks you do not use, or add new guides for your internal tools. The structure stays the same, and your AI agent keeps working.
Write github-copilot-instructions.md for your team
Skills give the agent general Playwright knowledge. .github/copilot-instructions.md gives it your team's specific conventions. Without instructions, Copilot will invent its own structure, and every generated test will look different.
Create a .github/copilot-instructions.md file in your project root. GitHub Copilot loads this file automatically for every interaction in the repository. Here is a practical starting point for Playwright projects:
# Playwright Test Generation Rules

## Locators
- Always prefer getByRole, getByTestId, and getByLabel
- Never use CSS selectors or XPath unless no semantic alternative exists
- Never use page.locator('div.some-class') style selectors

## Structure
- One test file per feature or user flow
- Use describe blocks to group related tests
- Keep individual tests under 30 lines
- Name test files as feature-name.spec.ts

## Waits and Timing
- Never use page.waitForTimeout or fixed delays
- Use auto-wait or explicit waitFor conditions
- Prefer waitForLoadState('networkidle') for page transitions

## Data
- Isolate test data per test using fixtures
- Never depend on data from a previous test
- Use beforeEach for setup, afterEach for cleanup

## Assertions
- One primary assertion per test
- Use toBeVisible, toHaveText, toHaveURL over generic expect
- Always assert the outcome, not the intermediate state

## Auth
- Use storageState for authenticated tests
- Never log in through the UI in every test

## Output
- Return a diff, not the full file
- Add a brief comment at top explaining what the test covers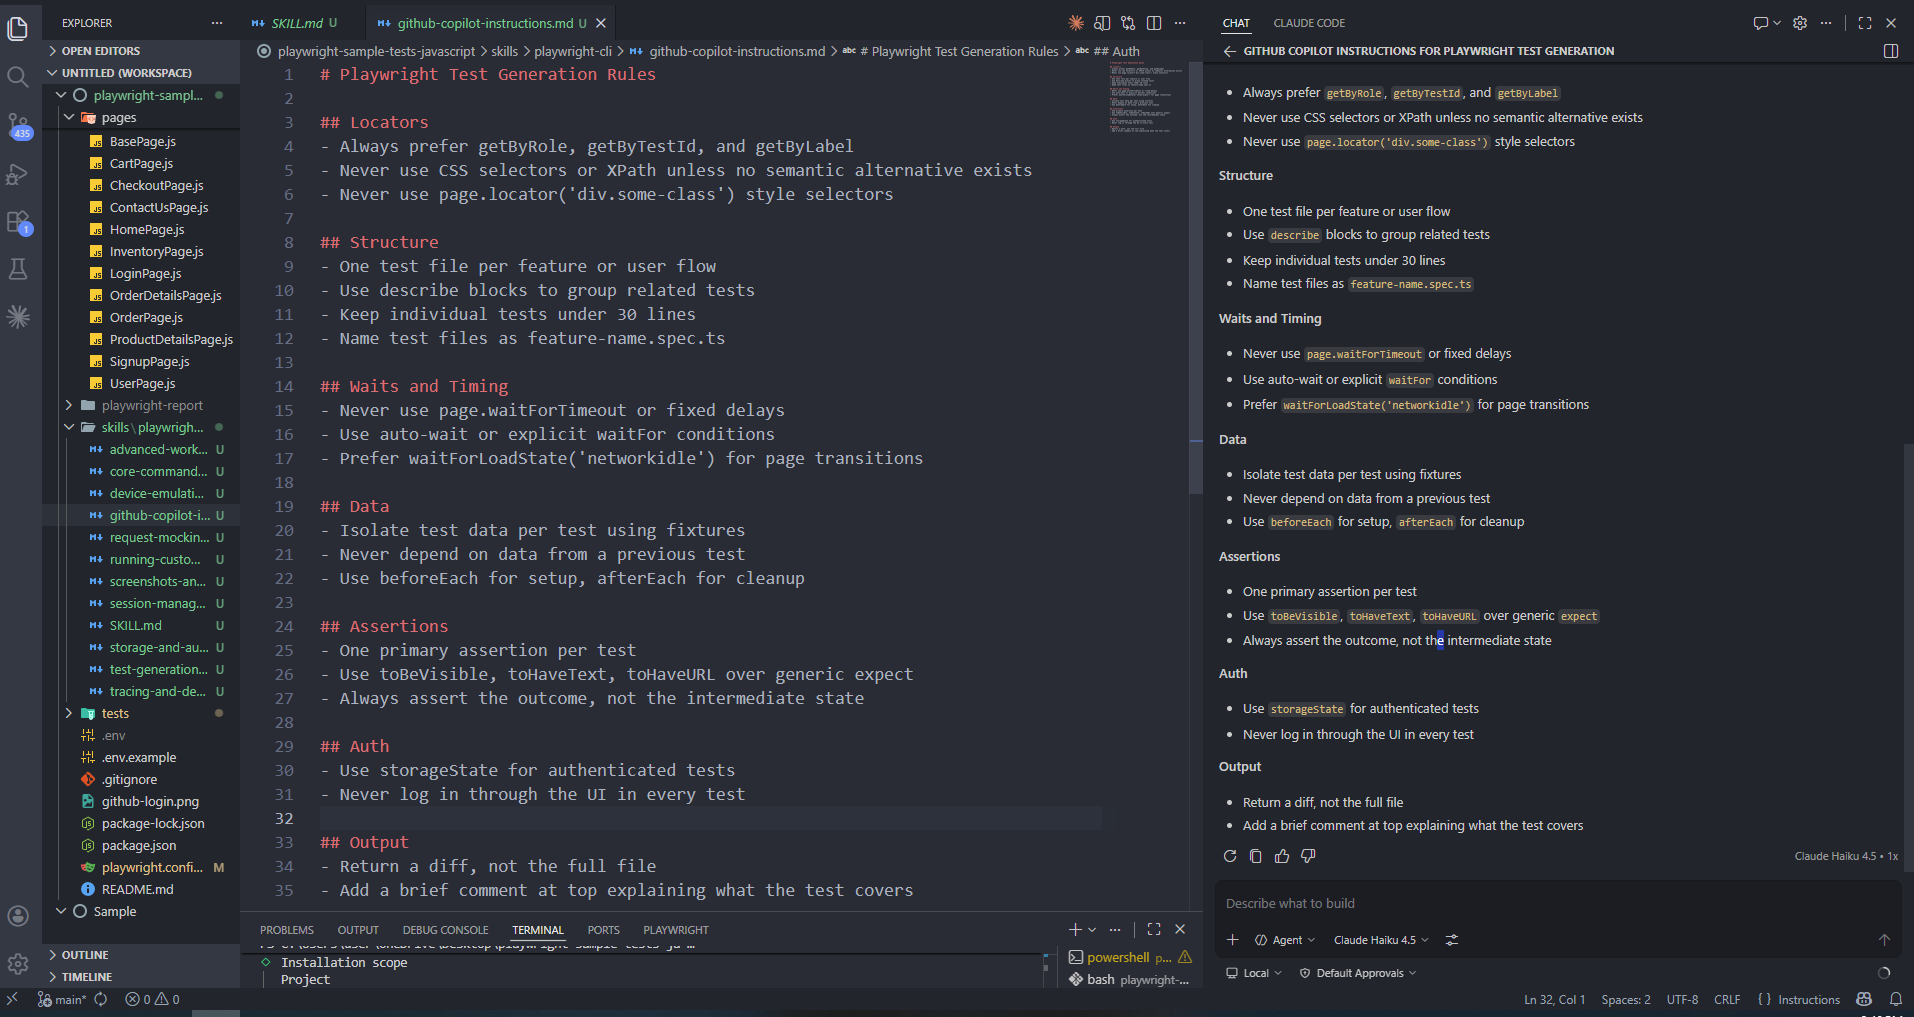
This file is loaded automatically by GitHub Copilot for every Chat and agent interaction in the repository. When you ask Copilot to generate a test, it follows these rules without you repeating them in every prompt.
Share this file across your team through version control. Everyone gets the same AI behavior, which means consistent test output across developers.
Pick the right model for test generation
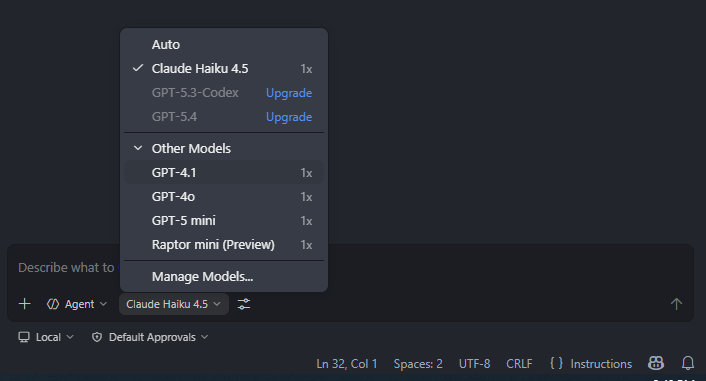
GitHub Copilot lets you switch between models inside Copilot Chat. This is useful because different models excel at different parts of the test generation workflow.
Available models in 2026
- Claude Haiku 4.5 is Copilot's current default model. It is fast, follows .github/copilot-instructions.md reliably, handles multi-file context well, and generates tests that are more likely to match your fixture patterns on the first try. For most Playwright test generation work, Claude Haiku 4.5 is the everyday pick where accuracy matters more than raw speed.
- GPT-4.1 is a strong all-rounder at the standard 1x quota tier. It handles straightforward spec generation and inline edits well. Use it as a reliable alternative to Claude Haiku 4.5 for simpler test generation tasks or when you want to compare output quality between models.
- GPT-4o remains available at the 1x quota tier. It is fast and predictable for quick fixes, individual spec generation, and cases where you have clear context and written instructions already in place.
- GPT-5 mini is the lightweight option for high-volume generation. Use it when you are generating a large batch of simple tests and want to preserve quota for more complex tasks later in the session.
- Raptor mini (Preview) is an experimental model available for early access. It is worth testing for reasoning-heavy debugging tasks, but as a preview model its behavior may change between sessions.
- GPT-5.3-Codex requires a plan upgrade. It is built specifically for code generation and handles complex Playwright patterns, fixture refactors, and multi-file test restructuring particularly well.
- GPT-5.4 requires a plan upgrade and is the most capable option in the switcher. Use it for advanced test architecture decisions, restructuring large suites, or diagnosing persistent flaky tests that require step-by-step reasoning to untangle.
Quick comparison table
| Model | Quota | Speed | Best For |
|---|---|---|---|
| Claude Haiku 4.5 | 1x (default) | Fast | Routine test generation, instruction-following |
| GPT-4.1 | 1x | Fast | Straightforward specs, inline edits |
| GPT-4o | 1x | Fast | Simple tests, quick fixes |
| GPT-5 mini | 1x | Fastest | High-volume simple generation, quota preservation |
| Raptor mini (Preview) | 1x | Fast | Experimental reasoning tasks |
| GPT-5.3-Codex | Upgrade | Moderate | Complex test patterns, multi-file refactors |
| GPT-5.4 | Upgrade | Slower | Advanced reasoning, suite architecture, flaky debugging |
Accuracy here means how often the generated test runs without manual edits on first try, given proper context (MCP, skills, and instructions).
How to switch models in Copilot Chat
Click the model selector dropdown at the top of the Copilot Chat panel in VS Code. Select the model you want for the current conversation. Each conversation can use a different model. You can also switch mid-conversation if the current model is not producing good results.
Generate your first test
With MCP connected, skills loaded, instructions in place, and a model selected, you are ready to generate a test.
Prompt example
Here is a prompt that works well with the setup from the previous steps. Open Copilot Chat, switch to Agent mode, and use this:
Generate a Playwright test for the login flow on https://storedemo.cms.testdino.com.

- Navigate to the site
- Open the login page
- Sign in with valid credentials
- Verify the user is logged in

Use getByRole or getByTestId locators.
Use Playwright MCP
The key parts of this prompt: it references an existing spec so Copilot knows your conventions, it specifies locator strategy, and it asks for a diff instead of a full file dump.
Full generated test code
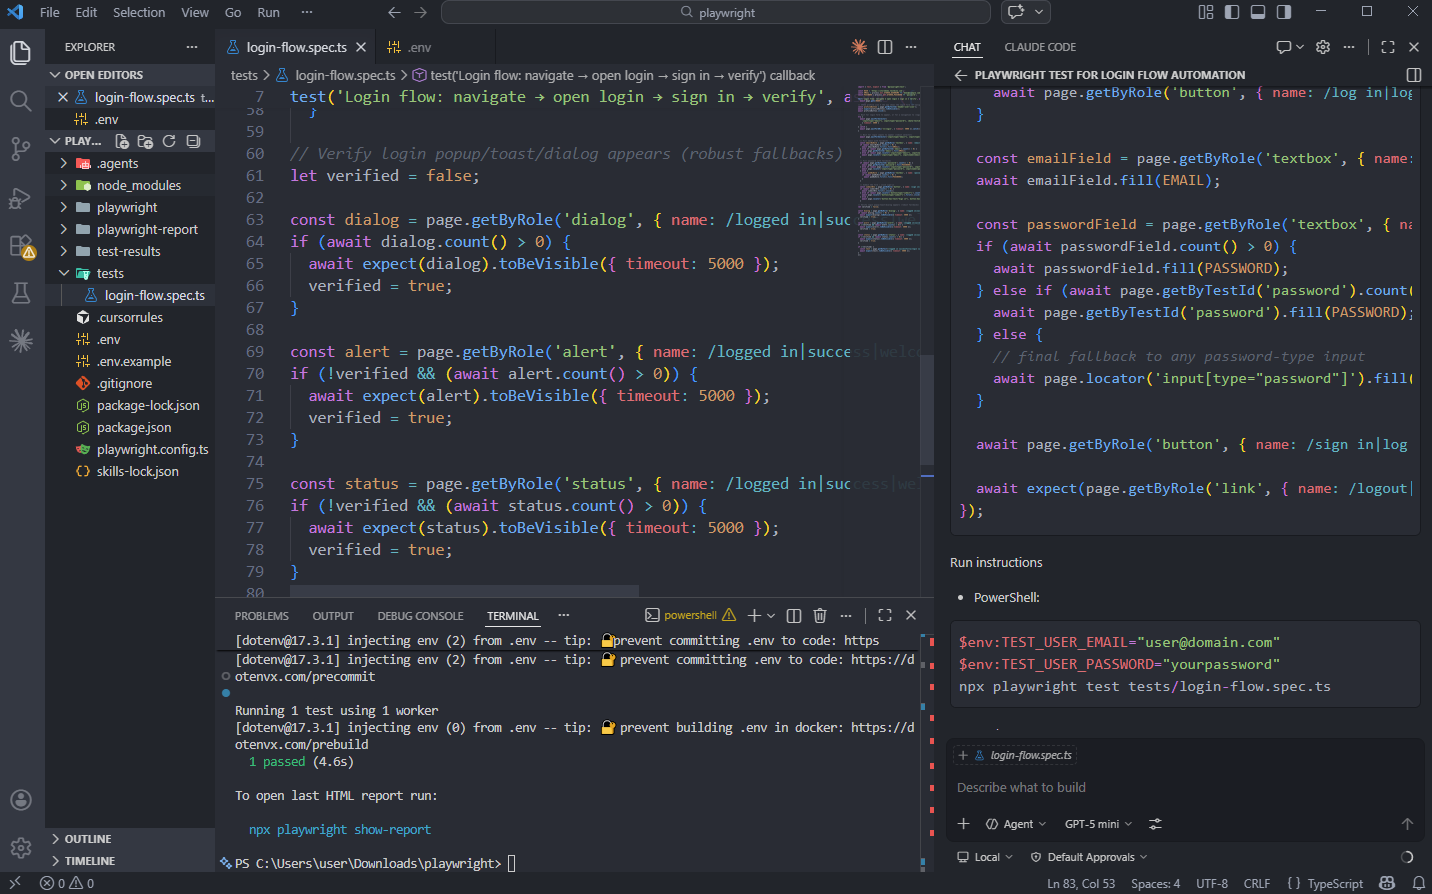
Here is what a well-configured GitHub Copilot setup produces:
import { test, expect } from '@playwright/test';

test('login flow on storedemo.cms.testdino.com', async ({ page }) => {
  const base = 'https://storedemo.cms.testdino.com';
  await page.goto(base);

  // Open login page (try a link/button first, else go directly)
  const openLogin = page.getByRole('link', { name: /sign in|login/i });
  if (await openLogin.count() > 0) {
    await openLogin.click();
  } else {
    await page.goto(`${base}/login`);
  }

  // Credentials from env vars
  const USERNAME = process.env.STORED_USERNAME ?? '';
  const PASSWORD = process.env.STORED_PASSWORD ?? '';
  if (!USERNAME || !PASSWORD) throw new Error('Set STORED_USERNAME and STORED_PASSWORD env vars');

  // Find username field (prefer getByTestId, fallback to getByRole)
  let userLocator = page.getByTestId('username');
  if (await userLocator.count() === 0) userLocator = page.getByTestId('email');
  if (await userLocator.count() === 0) userLocator = page.getByRole('textbox', { name: /email|username|login/i });
  await userLocator.fill(USERNAME);

  // Find password field
  let passLocator = page.getByTestId('password');
  if (await passLocator.count() === 0) passLocator = page.getByRole('textbox', { name: /password/i });
  await passLocator.fill(PASSWORD);

  // Submit (button via role)
  const submit = page.getByRole('button', { name: /sign in|log in|submit/i });
  if (await submit.count() > 0) {
    await submit.click();
  } else {
    await page.keyboard.press('Enter');
  }

  // Verify logged in by popup text
  const successPopup = page.getByText(/logged in successfully/i);
  await expect(successPopup).toBeVisible({ timeout: 10000 });
});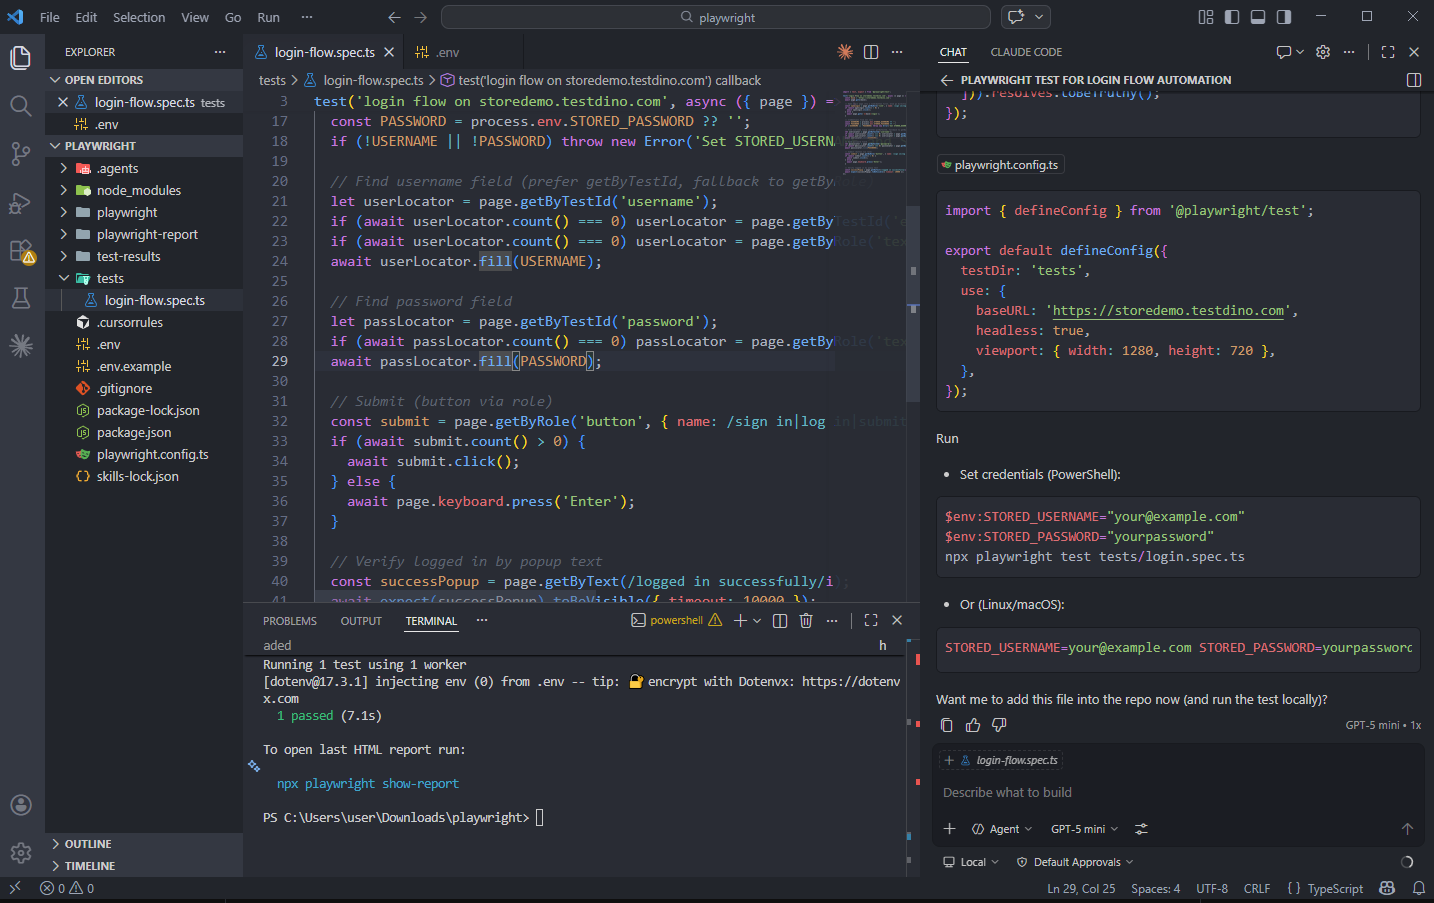
Notice how it uses the existing loginPage fixture from your project, follows getByRole and getByTestId conventions, and avoids any fixed waits.
Playwright config:
import { defineConfig, devices } from '@playwright/test';
import dotenv from 'dotenv';
import path from 'path';

dotenv.config({ path: path.resolve(__dirname, '.env') });

export default defineConfig({
  testDir: './tests',
  fullyParallel: true,
  forbidOnly: !!process.env.CI,
  retries: process.env.CI ? 2 : 0,
  workers: process.env.CI ? 1 : undefined,
  reporter: 'html',
  use: {
    baseURL: 'https://storedemo.cms.testdino.com',
    trace: 'on-first-retry',
  },

  projects: [
    {
      name: 'chromium',
      use: { ...devices['Desktop Chrome'] },
    },

    // {
    //   name: 'firefox',
    //   use: { ...devices['Desktop Firefox'] },
    // },

    // {
    //   name: 'webkit',
    //   use: { ...devices['Desktop Safari'] },
    // },

    /* Test against mobile viewports. */
    // {
    //   name: 'Mobile Chrome',
    //   use: { ...devices['Pixel 5'] },
    // },
    // {
    //   name: 'Mobile Safari',
    //   use: { ...devices['iPhone 12'] },
    // },

    /* Test against branded browsers. */
    // {
    //   name: 'Microsoft Edge',
    //   use: { ...devices['Desktop Edge'], channel: 'msedge' },
    // },
    // {
    //   name: 'Google Chrome',
    //   use: { ...devices['Desktop Chrome'], channel: 'chrome' },
    // },
  ],

});
This sets the base URL, enables traces on retry, and loads environment variables.
Set test credentials
Your test uses environment variables for login. You can set them in two ways.
Option 1: Terminal (for quick run)
$env:STOREDEMO_EMAIL="your-email"
$env:STOREDEMO_PASSWORD="your-password"
npx playwright test --headed
Use this for quick local runs.
Option 2: .env file (recommended)
STOREDEMO_EMAIL=your-email
STOREDEMO_PASSWORD=your-password
This keeps credentials consistent across runs and works well in CI.
Example-2: Generate tests using Playwright CLI (token efficient way to generate tests)
Pre-requisite: Ensure you have installed CLI in your current directory using the steps from Playwright CLI for batch test generation section
Here is a prompt that works well with the setup from the previous steps:
Ensure you are following

Using Playwright CLI Generate a Playwright test for the login flow on https://storedemo.cms.testdino.com.

- Navigate to the site
- Open the login page
- Sign in with valid credentials
- Verify the user is logged in

Use getByRole or getByTestId locators.
This works because the flow is clear and VS Code applies your github-copilot-instructions.md, Skills, and existing project structure automatically.
What to check before committing
Before merging AI-generated tests, run through this quick checklist:
-
Run the test locally with npx playwright test tests/auth/login-flow.spec.ts --headed to verify it passes
-
Check locators -- are they semantic (getByRole, getByTestId) or fragile (CSS class names)?
-
Check for hardcoded data -- test data should come from fixtures, not inline strings
-
Check assertions -- does the test assert the actual outcome, or just that "something loaded"?
-
Check independence -- can this test run in isolation without depending on other tests?
-
Run in CI with trace enabled so failures come with evidence: npx playwright test --trace on
Treat AI-generated tests as a strong first draft. Review them the same way you would review code from a junior developer who writes fast but sometimes misses edge cases.
Store tests and run CI reports with TestDino
Generating tests is only half the workflow. Once your suite grows past a handful of specs, you need centralized reporting, failure tracking, and visibility into what broke and why. This is where TestDino fits in.
TestDino is a Playwright-focused reporting and analytics platform that consumes standard Playwright test output. It provides centralized dashboards, AI failure classification, flaky test tracking, and GitHub PR integration. No custom framework or code refactoring required.
Install TestDino MCP in VS Code (JSON config)
Generate a Personal Access Token (PAT) from your TestDino account. Go to User Settings > Personal Access Tokens and create one. This PAT gives access to all organizations and projects you have permissions for.
Add TestDino MCP to your VS Code configuration. Open .vscode/mcp.json and add:
{
  "servers": {
    "playwright": {
      "command": "npx",
      "args": ["@playwright/mcp@latest"]
    },
    "TestDino": {
      "command": "npx",
      "args": ["-y", "testdino-mcp"],
      "env": {
        "TESTDINO_PAT": "your_token_here"
      }
    }
  }
}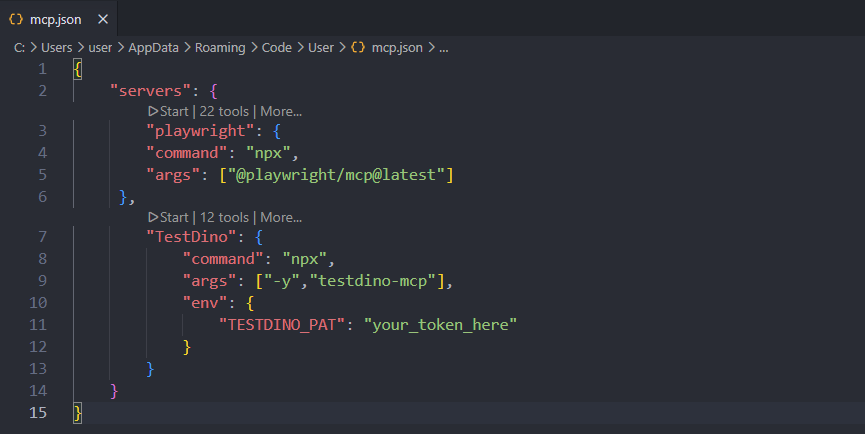
Replace your_token_here with your actual API key from your TestDino project settings. Reload VS Code.
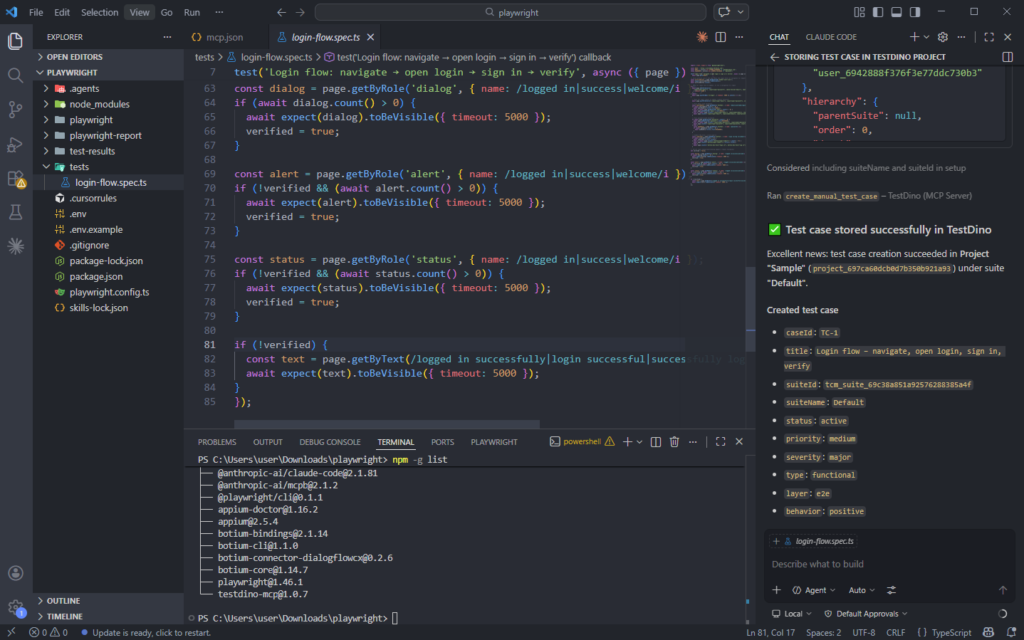
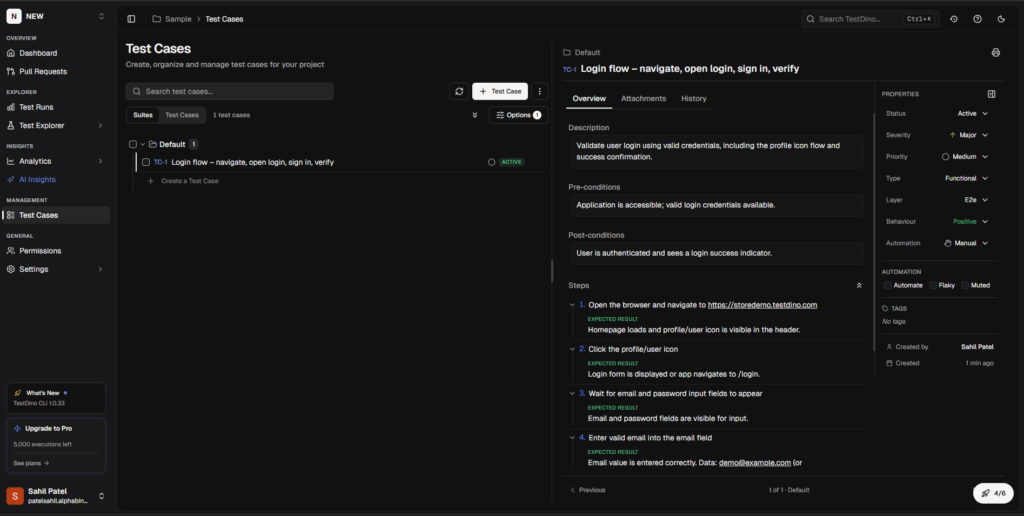
Step -1: Add test cases to TestDino test management
TestDino's Test Case Management tab is a standalone workspace where teams create, organize, and maintain all their manual and automated test cases within a project. As you generate tests with GitHub Copilot, you can track them inside TestDino to keep your coverage organized.
You can now simply use this prompt to store your test on TestDino
Can you to store this test case with steps(english language) in Project - "project name" TestDino test management.Replace the "project name" with your desired one.
Step -2 Run with npx tdpw test
The fastest way to get results into TestDino is the tdpw CLI. Install it once:
npm install tdpwThen replace your standard Playwright run command:
# Instead of: npx playwright test
npx tdpw test --project=desktop-chrome
Every Playwright CLI flag works the same: --project, --grep, --workers, --shard, --headed. Nothing changes except results now stream to the TestDino dashboard in real time via WebSocket.
For CI environments, add the upload step after your test run:
- name: Run Playwright Tests
  run: npx playwright test

- name: Upload to TestDino
  if: always()
  run: npx tdpw upload ./playwright-report --token="${{ secrets.TESTDINO_TOKEN }}" --upload-html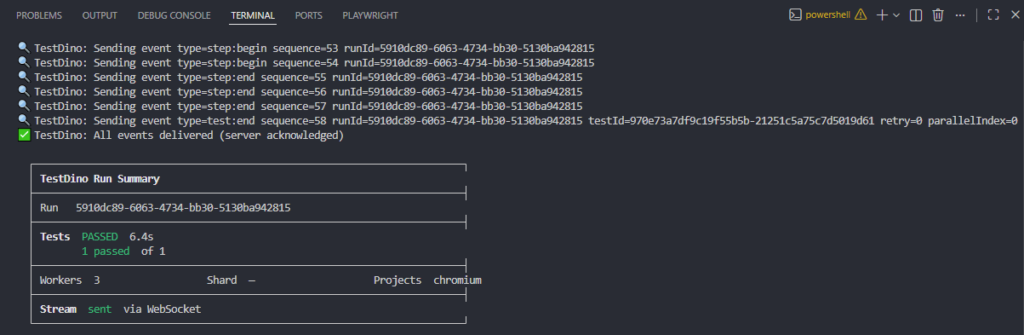
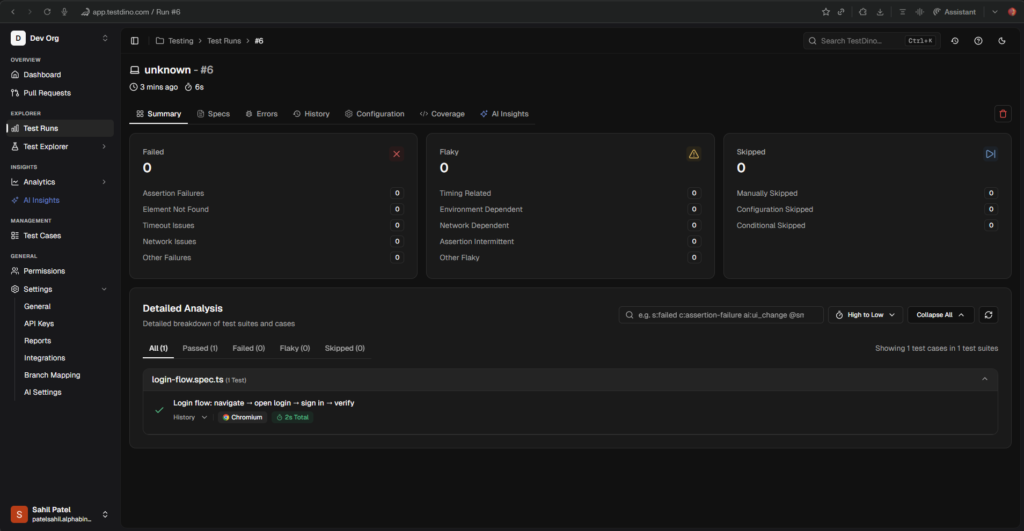
Real-time streaming, evidence panel, suite history
Results appear as tests finish, not after the entire suite completes. AI categorizes every failure as Bug, Flaky, or UI Change with confidence scores. Screenshots, traces, and videos are all accessible from the same dashboard.
Your team sees exactly what broke, when it started breaking, and whether it is a one-time failure or a recurring pattern. That context is what turns raw test output into actionable information
Fix flaky tests with TestDino MCP + Playwright Agents
This is where the full workflow comes together. Flaky tests are the number one productivity killer in test automation. A test that passes sometimes and fails other times wastes hours of debugging time because the failure is not consistent enough to reproduce easily.
Playwright 1.56 introduced test agents, including the Healer agent that automatically repairs failing tests. But the Healer has a blind spot: it only sees the current UI state. It cannot tell if a test has been flaky for two weeks or if this is a brand-new regression. That is where TestDino MCP fills the gap.
TestDino MCP gives the context: error messages, failure patterns, flaky status, browser-specific issues
TestDino MCP exposes 12 tools that let you query your test data using natural language directly inside Copilot Chat. You can ask things like:
-
"What are the failure patterns for the checkout flow test?"
-
"Is this test flaky? Show me the last 10 runs."
-
"Debug 'Verify User Can Complete Checkout' from testdino reports"
-
"Which tests failed on webkit but passed on chromium this week?"
The MCP server returns error messages, stack traces, flaky status, browser-specific failure rates, and historical run data. This is context that no code editor has access to on its own.
Playwright Agents act on that context
Playwright's Healer agent is a specialist subagent defined in markdown. It runs failing tests in debug mode, inspects page snapshots and console logs, identifies broken locators, updates the test code with stable alternatives, and re-runs to confirm the fix. If the application itself is broken rather than the test, it skips the test with a test.fixme() annotation instead of masking the bug.
The Healer works by examining the current UI. TestDino MCP adds the historical dimension: is this a timing issue that happens 30% of the time? Is it webkit-specific? Did it start failing after a specific commit?
Real workflow: flaky test detected, ask TestDino MCP, feed patterns to Healer, Healer fixes and reruns, test passes
Here is how the full loop works in practice:
- CI reports a failing test. TestDino classifies it as "Flaky" with 85% confidence.
- In Copilot Chat, ask TestDino MCP: "Why is the checkout-flow test failing? Show me the failure patterns from the last 20 runs."
- TestDino MCP returns: "Fails on webkit 6 out of 20 runs. Error: element not visible. Timing issue on the payment form animation."
- Feed this context to the Healer agent: "Fix the checkout-flow test. It is flaky on webkit due to a timing issue with the payment form animation. Use Playwright MCP tools to inspect the page and fix the wait strategy."
- The Healer runs the test in debug mode, identifies the animation causing the issue, adds a proper wait condition, and re-runs until the test passes.
- Review the diff. Commit.
Why this matters
Without TestDino's historical failure data, the Healer only sees the current UI. It can patch a selector or add a wait, but it cannot tell if the test has been intermittently failing for weeks. It does not know if the failure is browser-specific. It does not have access to the stack traces from previous runs.
TestDino MCP gives the Healer the "memory" it needs to make informed decisions instead of applying blind patches. The result is fixes that actually stick, not band-aids that pass once and break again tomorrow.
GitHub Copilot vs other AI agents (2026)
GitHub Copilot is not the only option for AI-assisted Playwright test writing. Here is how it stacks up against the main alternatives in 2026.
| Feature | GitHub Copilot | Cursor | Claude Code | Windsurf |
|---|---|---|---|---|
| MCP support | Yes (built-in VS Code) | Yes (plugin system) | Yes (deep, per-agent) | Yes (marketplace) |
| Multi-model | Yes (GPT-4o, Claude, o3) | Yes (OpenAI, Anthropic, Gemini, Cursor) | Anthropic only | Limited |
| .rules files | .github/copilot-instructions.md | .cursorrules | CLAUDE.md | Cascade rules |
| Tab completion | Yes (Supermaven) | |||
| Playwright Skills | Supported | Supported | Supported | Supported |
| Visual diffs | Inline in VS Code | Inline in editor | Terminal-based | Inline in editor |
| Best for | Teams already on VS Code | Interactive IDE workflow | Terminal-heavy, deep refactors | Teams wanting guided flows |
The main advantage of GitHub Copilot for Playwright testing is that it lives inside VS Code with no editor switch required. Your existing VS Code extensions, keyboard shortcuts, terminal, debugger, and git panel all stay in place. MCP is configured once and works across all your projects. The .github/copilot-instructions.md file is version-controlled alongside your tests, so the whole team gets the same AI behavior automatically.
Cursor has stronger multi-model switching and a more powerful agent mode for large-scale refactors. Claude Code is the pick for terminal-heavy workflows and deep codebase reasoning. Windsurf offers a guided experience but has a smaller community.
For teams already working in VS Code who want AI-assisted Playwright test generation without changing their editor, GitHub Copilot plus TestDino gives you the tightest loop: generate, run, report, fix, repeat.
FAQs

Savan Vaghani
Product Developer