Playwright Locators Guide: Every Locator Type Explained with Examples
Playwright locators are the foundation of stable automation. Learn every locator type, when to use them, and how to debug failures without adding manual waits.
You've probably been there. You write a test, it passes locally, and then it breaks in CI because the button you were clicking hadn't finished rendering yet. Or worse, you're targeting a CSS selector like div.main > ul > li:nth-child(3) > a and someone on the front-end team shuffles the layout.
This is exactly why Playwright locators exist. They're not just selectors with a fancy name. Locators are objects that find elements at interaction time, wait for them to be ready, and retry if something goes wrong. No more await page.waitForSelector() followed by a prayer.
In this guide, we'll cover every Playwright locator type, show you when to use each one, and walk through the changes that came with Playwright v1.59 and v1.60. If you've got existing tests using _react or _vue selectors, you'll want to read the migration section too.
How Locators Differ from Selectors
This three-part behavior is what makes locators different from raw selectors.
You don't need to write like await page.waitForSelector('.submit-btn') before clicking. Just use a locator and Playwright handles the timing. To understand how the test runner queries the browser's accessibility tree, read our breakdown of Playwright architecture.
// Old way (selector + manual wait)
await page.waitForSelector('.submit-btn');
await page.click('.submit-btn');
// Locator way (auto-waits built in)
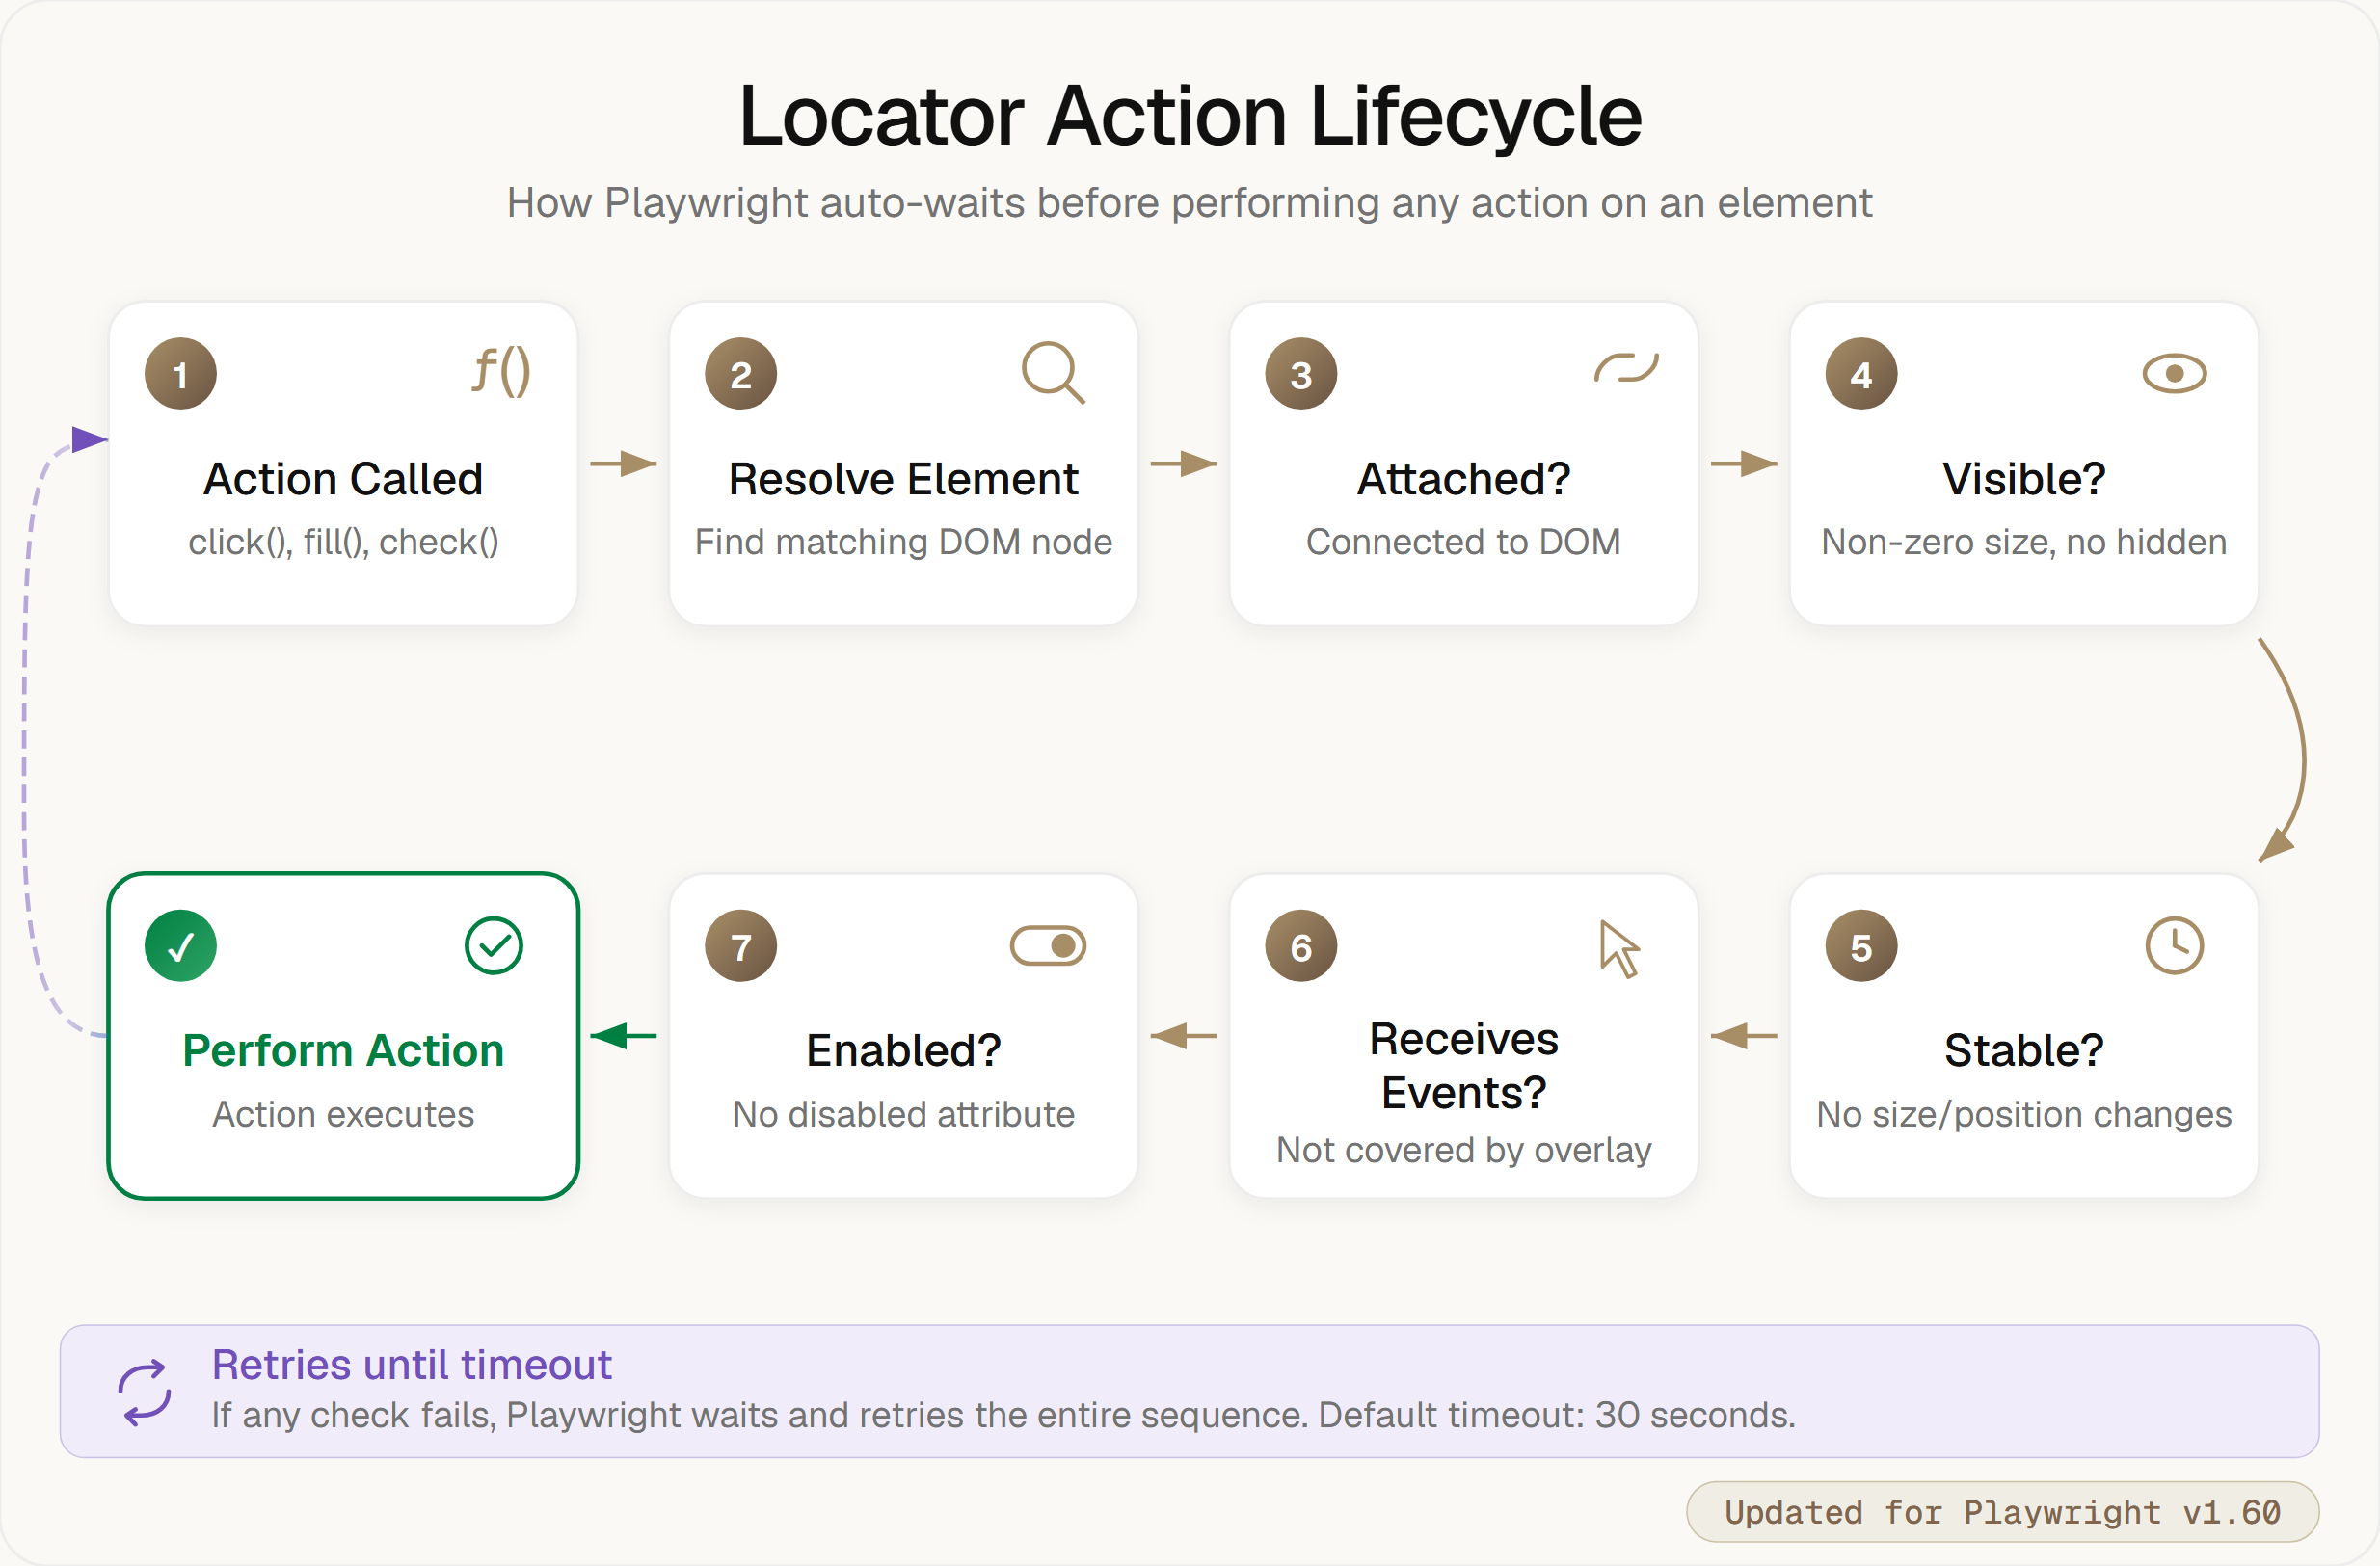
await page.getByRole('button', { name: 'Submit' }).click();How Auto Waiting and Retry Work Under the Hood
Every time you call an action on a locator (like .click() or .fill()), Playwright runs through this sequence:
What Changed in Playwright Locators (v1.58 to v1.60)
Recent Playwright releases in 2026 introduced key modifications to locator engines. Here is a summary of major removals and additions:
Removals in v1.58
- Removed Selectors: The framework-specific _react and _vue selector engines, along with the Shadow DOM-piercing :light suffix, have been completely removed.
- Migration: Switch to user-facing locators (getByRole(), getByTestId()) or standard CSS selectors.
// Before (Fails in v1.58+)
await page.locator('_react=BookItem[author="Kafka"]').click();

// After (v1.58+)
await page.getByRole('listitem').filter({ hasText: 'Kafka' }).click();
Additions in v1.59
- page.pickLocator(): Launches a visual element picker in headed mode (--headed) to automatically generate the best locator string by clicking elements on the page.
- locator.normalize(): A refactoring tool that converts brittle CSS/XPath selectors into clean, ARIA-based or test-ID canonical locators.
- getByRole() description option: Matches elements by their accessible description (e.g., aria-describedby or title attributes) for more precise targeting:
await page.getByRole('button', { name: 'Submit', description: 'Sends form data' }).click();Additions in v1.60
- locator.drop(): Simulates external file drops or clipboard data transfers onto dropzones.
await page.locator('#dropzone').drop({
  files: { name: 'report.pdf', mimeType: 'application/pdf', buffer: Buffer.from('data') }
});- ARIA Snapshots: Adds boxes: true and mode: 'ai' to ariaSnapshot(), and allows expect(page).toMatchAriaSnapshot() directly on page objects.
Built in Locator Types in Playwright
1. getByRole: Locate by Accessibility Role
getByRole() matches elements by their ARIA role. Most HTML elements have implicit roles: <button> has role "button", <a> has role "link", <input type="checkbox"> has role "checkbox", and so on.
// Click a button by its visible text
await page.getByRole('button', { name: 'Sign Up' }).click();

// Click a link
await page.getByRole('link', { name: 'Documentation' }).click();

// Check a checkbox
await page.getByRole('checkbox', { name: 'Accept terms' }).check();

// Select a tab
await page.getByRole('tab', { name: 'Settings' }).click();
getByRole Options
The name option matches the element's accessible name (the text users see or screen readers announce). You can use exact matching or regex:
// Exact match (default)
await page.getByRole('button', { name: 'Submit' }).click();
// Substring match
await page.getByRole('button', { name: /submit/i }).click();
// With description (NEW in v1.59)
await page.getByRole('button', {
name: 'Delete',
description: 'Permanently removes this item'
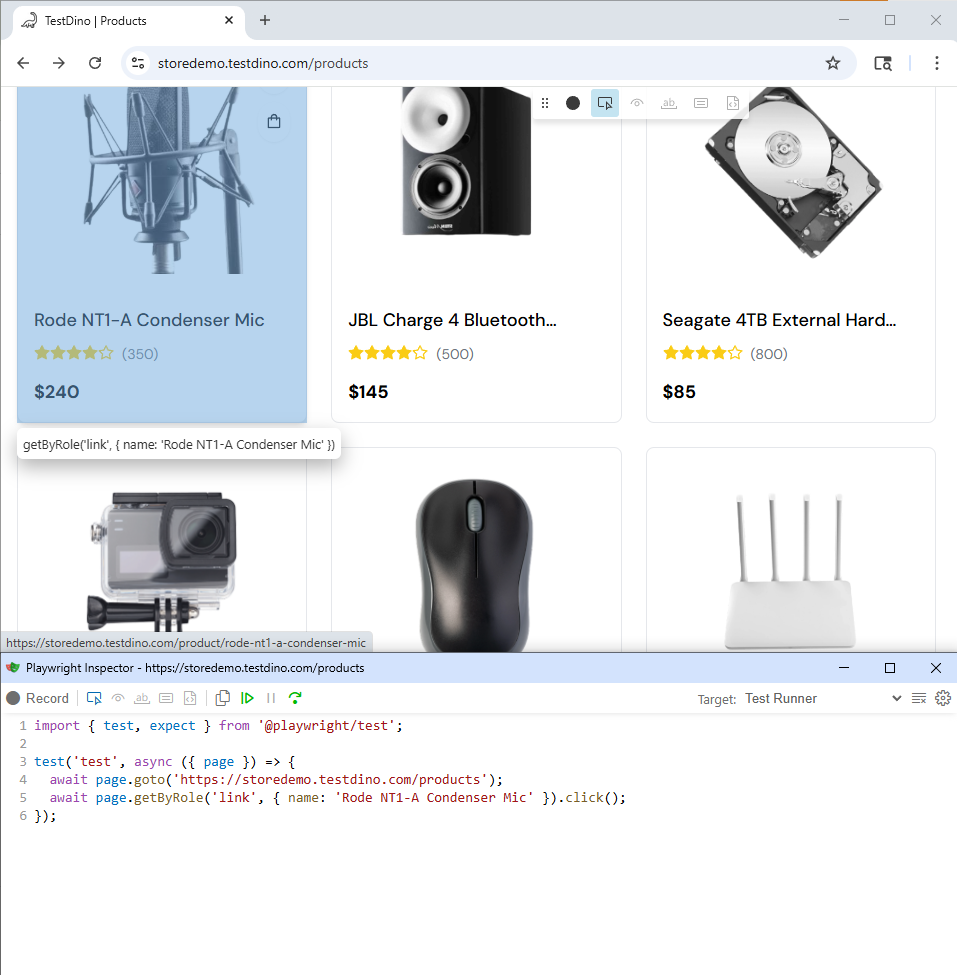
}).click();Exact matching is critical when the UI contains elements with similar labels. For example, to open a specific product page:
await page.goto('https://storedemo.testdino.com/products');
await page.getByRole('link', { name: 'Rode NT1-A Condenser Mic' }).click();
Below is the Playwright Inspector showing the exact match link resolution:
Other useful options:
- exact: true for case-sensitive, whole-string matching
- pressed: true for toggle buttons
- expanded: true for accordions/dropdowns
- checked: true for checkboxes (already checked)
- level: 2 for headings (matches <h2>)
2. getByText: Locate by Visible Text Content
getByText() matches elements by their text content. It's best for assertions and clicking non-interactive elements like headings, paragraphs, or list items.
// Check that a heading exists
await expect(page.getByText('Getting Started')).toBeVisible();

// Click a menu item
await page.getByText('Account Settings').click();

// Use regex for flexible matching
await page.getByText(/welcome/i).click();
By default, getByText() does a substring match. Use { exact: true } for an exact match:
// This matches "Submit Form" and "Submit"
page.getByText('Submit');

// This matches only "Submit" exactly
page.getByText('Submit', { exact: true });
3. getByLabel: Locate Form Controls by Label
getByLabel() finds form controls by their associated label text. It works with both <label for="..."> and wrapping <label> patterns.
For example, filling out a contact form on TestDino:
await page.goto('https://storedemo.testdino.com/contact-us');

await page.getByLabel(/first name/i).fill('qa');
await page.getByLabel(/last name/i).fill('example');
await page.getByLabel(/subject/i).fill('Playwright locators');
await page.getByLabel(/your message/i).fill('Testing getByLabel on storedemo.');

await page.getByRole('button', { name: /send message/i }).click();
Here is how Playwright locates and fills these form elements in real-time during test execution:

4. getByPlaceholder: Locate Form Fields by Placeholder
Some forms skip labels and rely on placeholder text instead (not great for accessibility, but common). getByPlaceholder() handles these cases.
await page.getByPlaceholder('Search...').fill('playwright locators');
await page.getByPlaceholder('Enter your email').fill('[email protected]');
5. getByAltText: Locate Images and Areas
Use getByAltText() to locate images, area elements, or custom graphics that have an alternate text description. This ensures that screen readers and other assistive technologies can identify the element.
// Images with alt text
await page.getByAltText('Company logo').click();
6. getByTitle: Locate by Title Attribute
Use getByTitle() to locate elements that have a title attribute, which typically displays as a tooltip when a user hovers over the element.
// Elements with title attribute
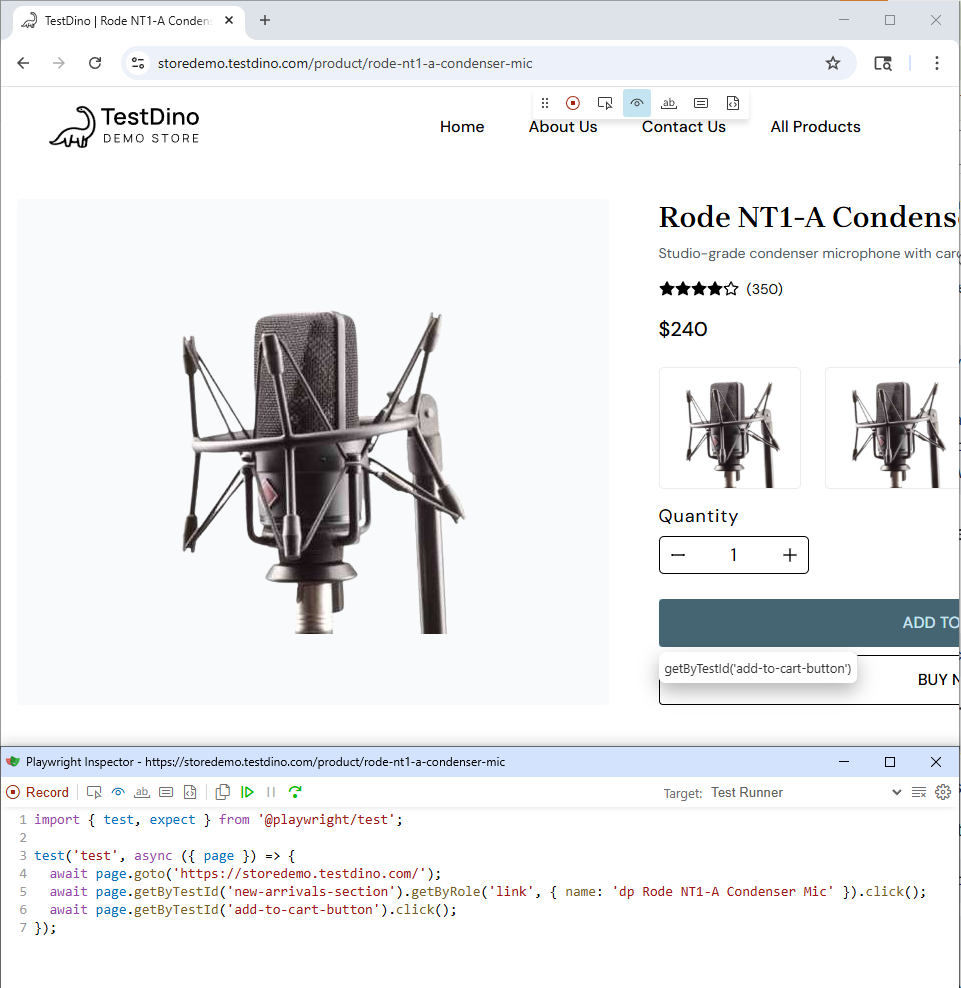
await page.getByTitle('Close dialog').click();7. getByTestId: The Explicit Testing Contract
When semantic locators don't work (maybe the element has no meaningful role, label, or text), getByTestId() is your safety net. It matches the data-testid attribute.
// In your HTML: <button data-testid="add-to-cart-button">Cart</button>
await page.getByTestId('add-to-cart-button').click();
Here is the targeted element in the Playwright Inspector:
While test IDs are highly stable, using semantic locators first helps to reduce test maintenance and ensures your tests reflect real user accessibility.
You can customize which attribute Playwright uses for test IDs in your config:
export default defineConfig({
  use: {
    testIdAttribute: 'data-qa', // or whatever your team uses
  },
});
CSS and XPath Locators in Playwright
You can still use CSS and XPath selectors with page.locator(). They work, but they're more brittle because they depend on DOM structure.
1. CSS Selectors: Syntax and Practical Examples
Use CSS selectors to target elements based on their class names, IDs, attributes, or structural relationships in the DOM tree. CSS selectors are standard in web development but should be treated as a last resort in testing compared to user-facing locators.
// CSS selector
await page.locator('.nav-menu > .dropdown-item:first-child').click();
Removed in v1.58: _react, _vue, and :light Selectors
Playwright v1.58 dropped three selector engines that some teams relied on:
- _react selector - Used to find React components by component name and props. Gone.
- _vue selector - Same idea, but for Vue components. Also gone.
- :light suffix - Used to opt out of Shadow DOM piercing. No longer supported.
If your tests used any of these, they will break after upgrading. The fix is straightforward: switch to user-facing locators like getByRole(), getByTestId(), or standard CSS selectors.
Before (v1.57 and earlier):
// These no longer work in v1.58+
await page.locator('_react=BookItem[author="Kafka"]').click();
await page.locator('_vue=book-list').click();
await page.locator('button:light').click();
After (v1.58+):
// Use user-facing locators instead
await page.getByRole('listitem').filter({ hasText: 'Kafka' }).click();
await page.getByTestId('book-list').click();
await page.locator('button').click(); // standard CSS, no :light needed
The Playwright team made this change because _react and _vue selectors were framework-specific and broke easily between framework versions. User-facing locators are more stable because they match what your users actually see and interact with.
If you are migrating legacy tests from older frameworks or selectors, check out our Selenium to Playwright migration guide.
2. XPath Selectors: When and Why to Use Them
XPath (XML Path Language) allows you to traverse the XML structure of a document. It is useful for complex DOM traversal, such as finding elements based on their text content or parent-child relationships that are hard to target with CSS.
// XPath
await page.locator('//div[@class="modal"]//button[text()="Confirm"]').click();
Filtering and Chaining Locators
You can combine locators to narrow down results.
Filtering by Text and Child Locators
filter() narrows results based on text content or child elements:
// Find a list item containing "Kafka"
await page.getByRole('listitem')
  .filter({ hasText: 'Kafka' })
  .click();

// Find a row that contains a specific button
await page.getByRole('row')
  .filter({ has: page.getByRole('button', { name: 'Edit' }) })
  .click();
Chaining Locators for Nested Elements
Chaining scopes a locator within another locator's subtree:
// Find the "Delete" button inside the "User Settings" section
await page.getByRole('region', { name: 'User Settings' })
  .getByRole('button', { name: 'Delete' })
  .click();
Logical Operators (.or() and .and())
Sometimes you need to match one of several possible locators:
// Match either a button OR a link with "Submit"
const submitElement = page.getByRole('button', { name: 'Submit' })
  .or(page.getByRole('link', { name: 'Submit' }));
await submitElement.click();

// Match an element that's both a button AND has specific text
const specificButton = page.getByRole('button')
  .and(page.getByText('Save Changes'));
await specificButton.click();
Which Locator Should You Use?
Common UI Elements and Their Best Locators
Playwright gives you several locator types. Here's the priority order the Playwright team recommends:
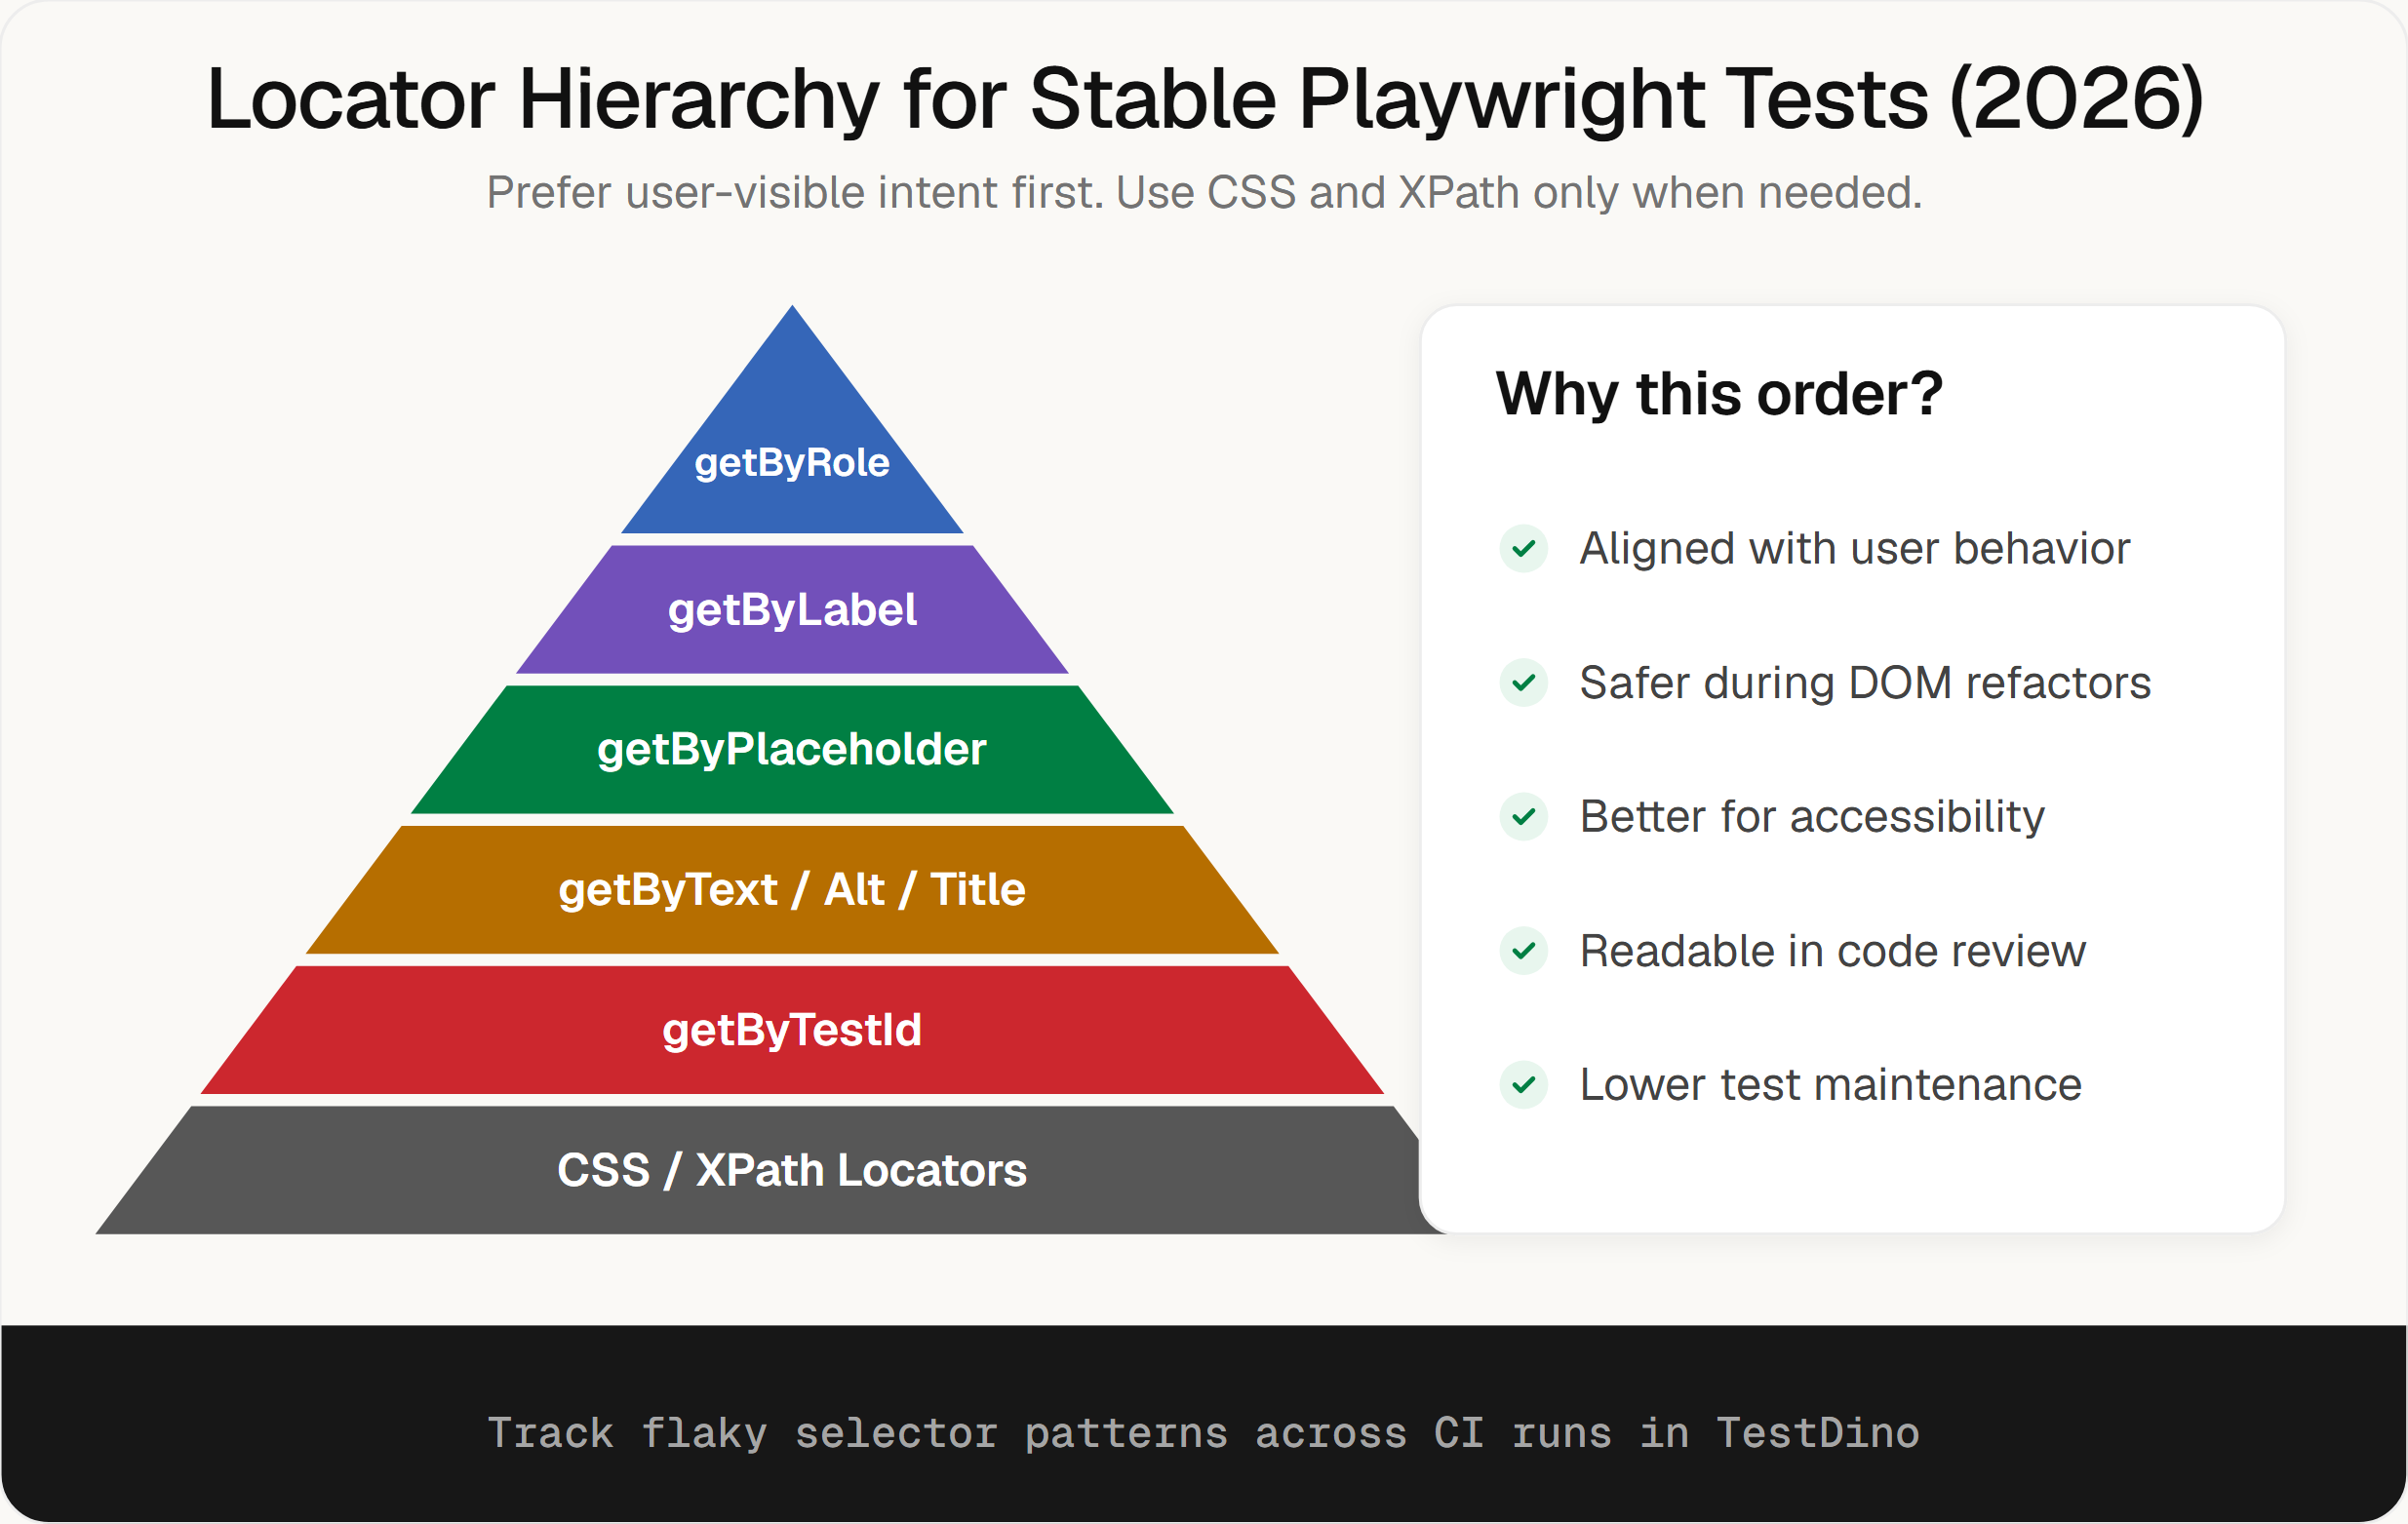
| Locator | When to Use |
|---|---|
| getByRole() | Interactive elements (buttons, links, checkboxes, inputs) |
| getByLabel() | Form fields with labels |
| getByPlaceholder() | Inputs with placeholder text |
| getByText() | Static text content, headings |
| getByAltText() | Images with alt text |
| getByTitle() | Elements with title attribute |
| getByTestId() | When no semantic locator works |
| CSS / XPath | Legacy DOM structures only |
Start at the top and work your way down. getByRole() is almost always your best bet because it matches what assistive technologies (screen readers) see, which means it's stable across visual redesigns.
Debugging Locators That Do Not Work
When tests fail because a locator can't find an element, here are the tools that help:
Using Playwright Inspector to Test Locators
Run tests with --debug to open the Playwright Inspector:
npx playwright test --debugThe inspector lets you step through actions, see which elements locators resolve to, and test locators interactively.
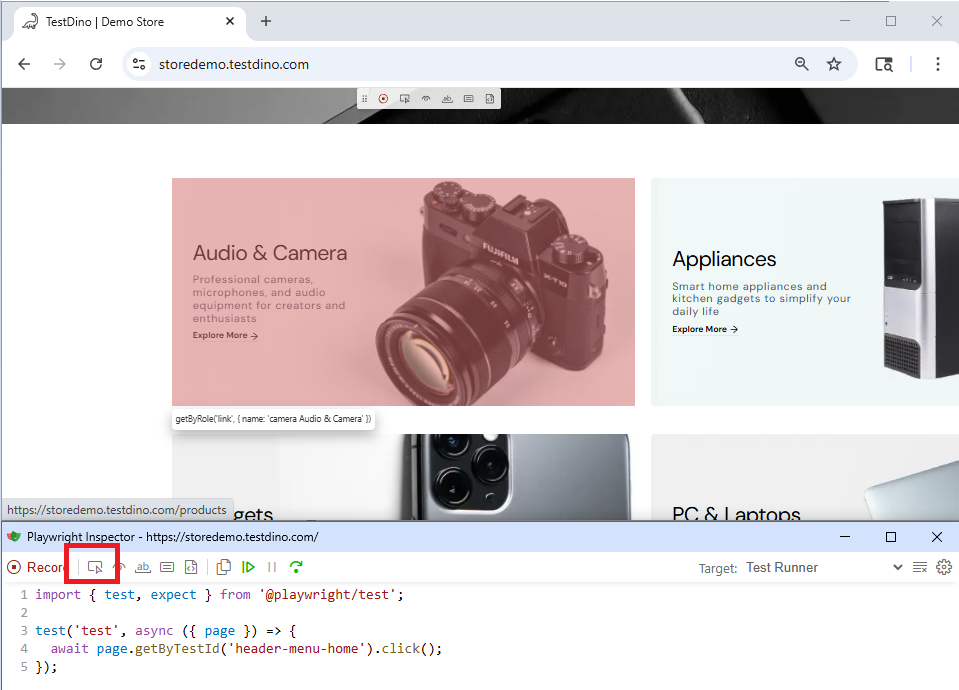
Visual Element Picker (page.pickLocator()) (v1.59+)
This is a helpful tool for test development. Run your tests in headed mode, and pickLocator() lets you click on any element in the browser to generate the best locator for it automatically.
// Run with --headed flag
const locator = await page.pickLocator();
console.log(locator); // Outputs something like: getByRole('button', { name: 'Submit' })
await locator.click();
You need headed mode for this (npx playwright test --headed). It won't work in headless CI runs, but it's perfect for local test creation. To activate it, click the Pick Locator button in the Playwright Inspector toolbar, as shown below:
Brittle Selector Cleanup (locator.normalize()) (v1.59+)
Got a codebase full of CSS selectors that break every time the UI changes? normalize() converts them to best-practice locators automatically.
// Start with a brittle selector
const brittle = page.locator('[data-testid="header-cart-icon"]');

// Convert to canonical form
const clean = brittle.normalize();
// Result: getByTestId('header-cart-icon')
It prioritizes ARIA roles, test IDs, and stable attributes. Run this across your test suite to get cleaner, more resilient selectors.
Trace Viewer for Intermittent Locator Failures
Playwright's trace viewer records screenshots, DOM snapshots, network activity, and console logs for every test action. When a locator fails, the trace shows you exactly what the page looked like at that moment. Before setting up advanced configurations, read our detailed Playwright debugging guide.
export default defineConfig({
  use: {
    trace: 'on-first-retry',
  },
});
After a failure, open the trace with:
npx playwright show-trace trace.zipYou can find complete setup steps in our Playwright Trace Viewer guide.
If you're running tests at scale in CI, tools like TestDino parse Playwright traces automatically. Instead of downloading and opening trace files one by one, you see screenshots, network logs, and console errors in one dashboard. TestDino's AI failure analysis also tells you whether a failure was a real bug, an infrastructure problem, or a flaky test, so you know where to focus.
Playwright Locator Best Practices
Practices That Prevent Flaky Tests
- Start with getByRole() - It's the most stable option and matches what users actually see. Use the description option (v1.59+) when names alone aren't enough.
- Avoid structure-dependent selectors - div > ul > li:nth-child(3) breaks when the UI evolves. Prefer user-facing attributes.
- Use getByTestId() as a fallback, not a default - Test IDs are stable, but they don't test accessibility. Try semantic locators first.
- Remove _react, _vue, and :light selectors - These were removed in v1.58 and will cause test failures if you upgrade Playwright without migrating.
Practices That Improve Test Maintainability
- Run normalize() on your existing selectors - If you inherited a test suite full of CSS selectors, normalize() can suggest better alternatives across your whole codebase.
- Use pickLocator() during test development - Instead of guessing which locator works best, let Playwright suggest one by clicking the element directly.
- Chain and filter for precision - Instead of complex CSS selectors, combine simple locators: section.getByRole('button', { name: 'Delete' }).
- Use Page Object Model - Combine your selectors with the Playwright Page Object Model pattern to keep locator definitions dry.
External Drag-and-Drop (locator.drop()) (v1.60)
Simulating file drops onto upload zones can be difficult. The drop() method simulates external data (files, clipboard content) being dropped onto an element.
// Drop files onto an upload zone
await page.locator('#dropzone').drop({
  files: {
    name: 'report.pdf',
    mimeType: 'application/pdf',
    buffer: Buffer.from('file content here')
  }
});

// Drop text/URL data
await page.locator('#dropzone').drop({
  data: {
    'text/plain': 'hello world',
    'text/uri-list': 'https://example.com'
  }
});
This dispatches dragenter, dragover, and drop events with a proper DataTransfer object.
ARIA Snapshot Improvements (v1.60)
Version 1.60 also added ariaSnapshot({ boxes: true }) for bounding box data and ariaSnapshot({ mode: 'ai' }) for AI-optimized snapshots. Plus, you can now use expect(page).toMatchAriaSnapshot() directly on page objects, not just locators.
These changes matter most for teams building AI-powered testing workflows. If your team is exploring AI-powered QA, take a look at our analysis of the Playwright AI ecosystem.
Generating Locators with Playwright Codegen
Playwright Codegen is a powerful code-generation tool that lets you record manual browser interactions and automatically outputs test code with stable locators.
You can launch the generator from your command line:
npx playwright codegenAs you click around the page, Codegen analyzes the DOM and prioritizes stable, user-facing locators (like getByRole, getByText, and getByTestId) over fragile CSS classes.
While Codegen is an excellent tool for discovering how Playwright wants you to locate elements, treat its output as a starting point. Always review and refactor the generated locators to ensure they follow your project's clean testing policies and best practices.
Conclusion
Playwright locators keep getting better. The v1.58-1.60 releases cleaned out legacy selectors and added practical tools like pickLocator() and normalize() that save real time during test development.
If you're starting fresh, stick with getByRole() as your default. If you're maintaining an older test suite, run normalize() across your selectors and replace any _react, _vue, or :light usage before they break.
If you are evaluating how to track test health across your team, compare the top options in our roundup of Playwright reporting tools. And if you're running Playwright tests at scale in CI, you can follow the TestDino integration guide to hook up your pipeline. TestDino categorizes failures automatically so you're not digging through traces to figure out whether a failed locator was a real bug or just a flaky selector.
Frequently Asked Questions

Dhruv Rai
Product & Growth Engineer