OpenCode Playwright Setup: Write and Heal AI Tests in 6 Steps
Connect OpenCode to Playwright MCP, avoid the config traps in OpenCode 1 and 2, and ship AI-written tests that pass.
A free AI helper can now open a real browser, click through your website, and write the checks for it, and that is what an OpenCode Playwright setup gives you.
The catch is that the 2 official guides no longer match. OpenCode changed its settings file in September 2026, and 1 auto-generated line can hide every browhis guide walks through 6 steps on a real project, shows the settings for both OpenCode versions, wires in Playwright MCP, and ends with tests that passed against a live demo store.
What an OpenCode Playwright setup looks like in 2026
An OpenCode Playwright setup is the open-source OpenCode coding agent with a Playwright browser attached, usually through the Playwright MCP server. The agent opens real pages, reads their structure, and writes or repairs Playwright tests from what it sees.
OpenCode is an open-source coding agent. Its docs describe it as available "as a terminal-based interface, desktop app, or web app." The code is MIT licensed, and the GitHub repository showed 227,120 stars on November 16, 2026.
It is not tied to one model vendor. You connect a provider with /connect, and the same agent runs on Claude, GPT, Gemini, or an open model. For test work, that means you can pick a model by cost and quality instead of by tool.
Why OpenCode 2 changed the setup
OpenCode 2.0.0 reached npm on September 11, 2026 as a new package, @opencode/cli. OpenCode 1 still ships as opencode-ai, and its latest release, 1.19.5, landed on October 28, 2026.
Both versions install a command named opencode. The migration guide says they "are no longer installed side by side by default," so a machine runs one or the other.
The config file kept its name and location, but several keys changed shape. The matrix below covers the ones that touch Playwright work.
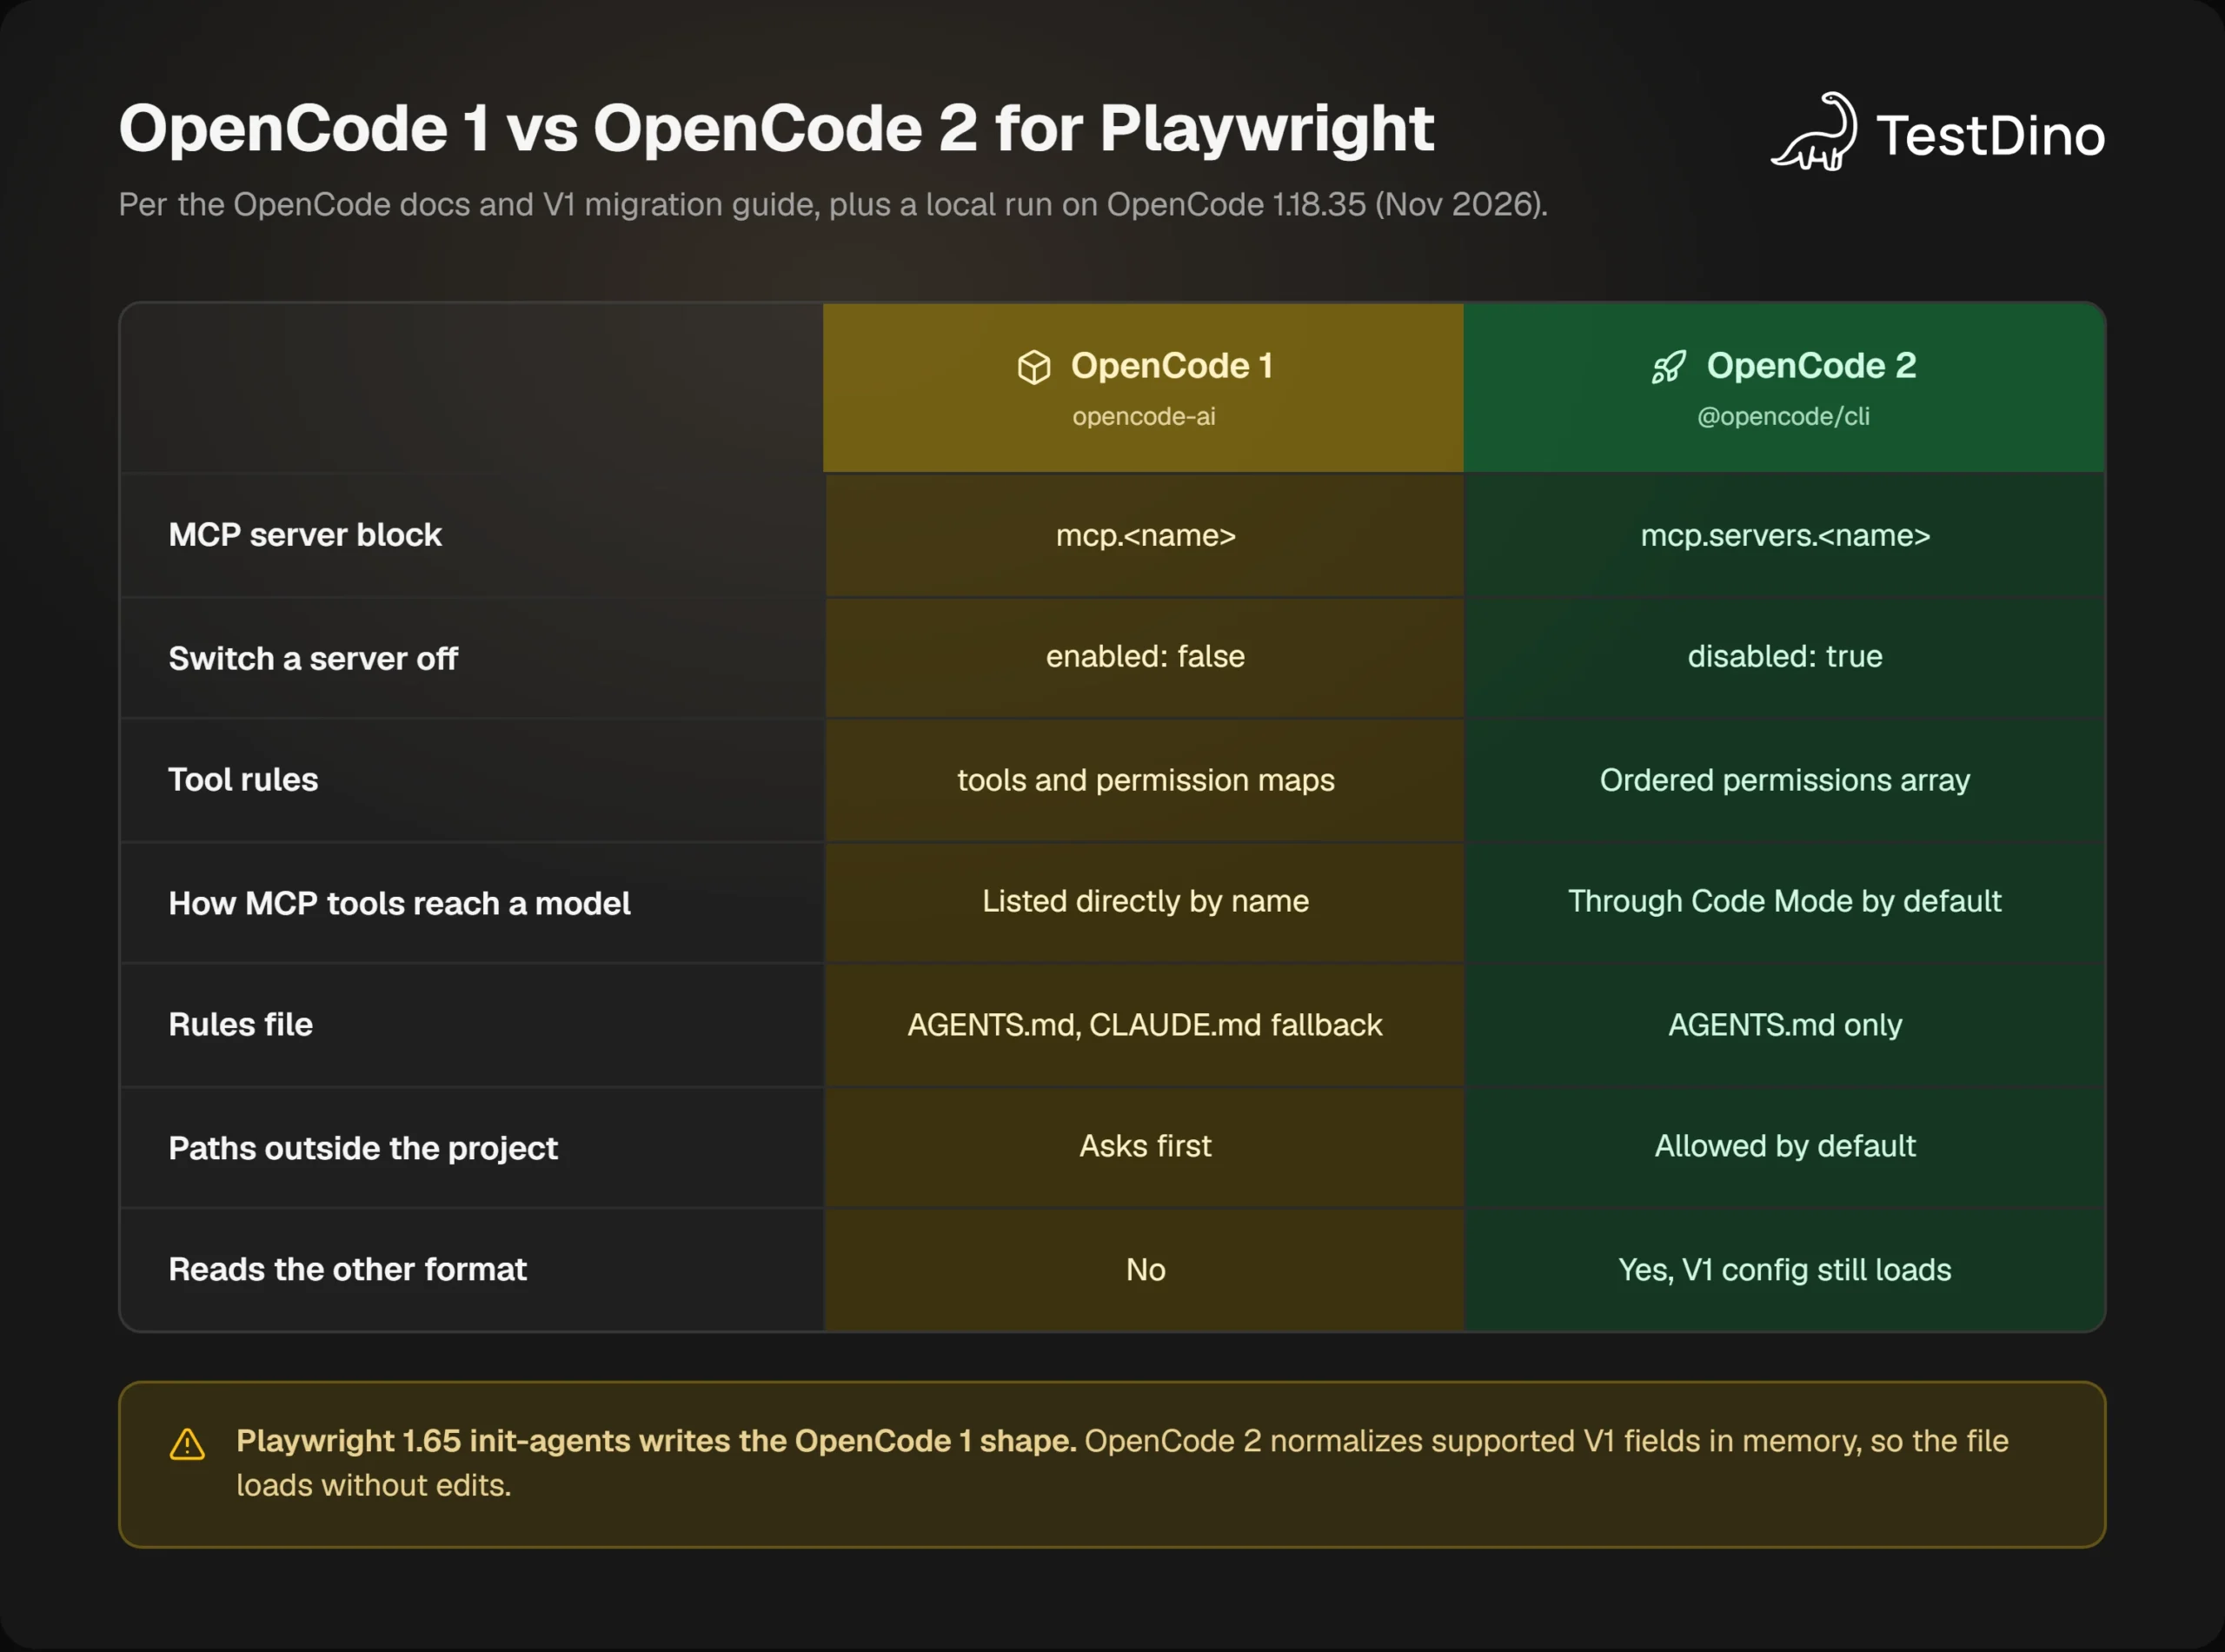
Here is why that matters for testing. Playwright's own MCP docs and its agent generator both write the OpenCode 1 shape. OpenCode 2 reads that shape and converts it in memory, according to the migration guide, so nothing breaks.
The reverse is not true. The same guide warns you not to point OpenCode 1 at files converted to the newer shape. So the older layout is the safe choice for a shared repo where teammates run different versions.
One note on evidence. Every command and output in this guide comes from a run on OpenCode 1.18.35 with Playwright 1.65.1. The OpenCode 2 details come from its official docs and migration guide.
Why teams pair OpenCode with Playwright
Three things put OpenCode on the shortlist for test automation work:
- Playwright supports it directly. The init-agents command accepts --loop=opencode, next to the claude, codex, copilot, and vscode loops.
- You choose the model. Our runs used a free model from the opencode provider, and opencode stats reported a total cost of $0.00.
- It scripts well. opencode run takes a prompt and exits, so generation and repair fit into a pipeline.
Usage has grown fast. Monthly npm downloads of opencode-ai rose from 0.29 million in November 2025 to 14.79 million in October 2026, about 50 times higher within a year.
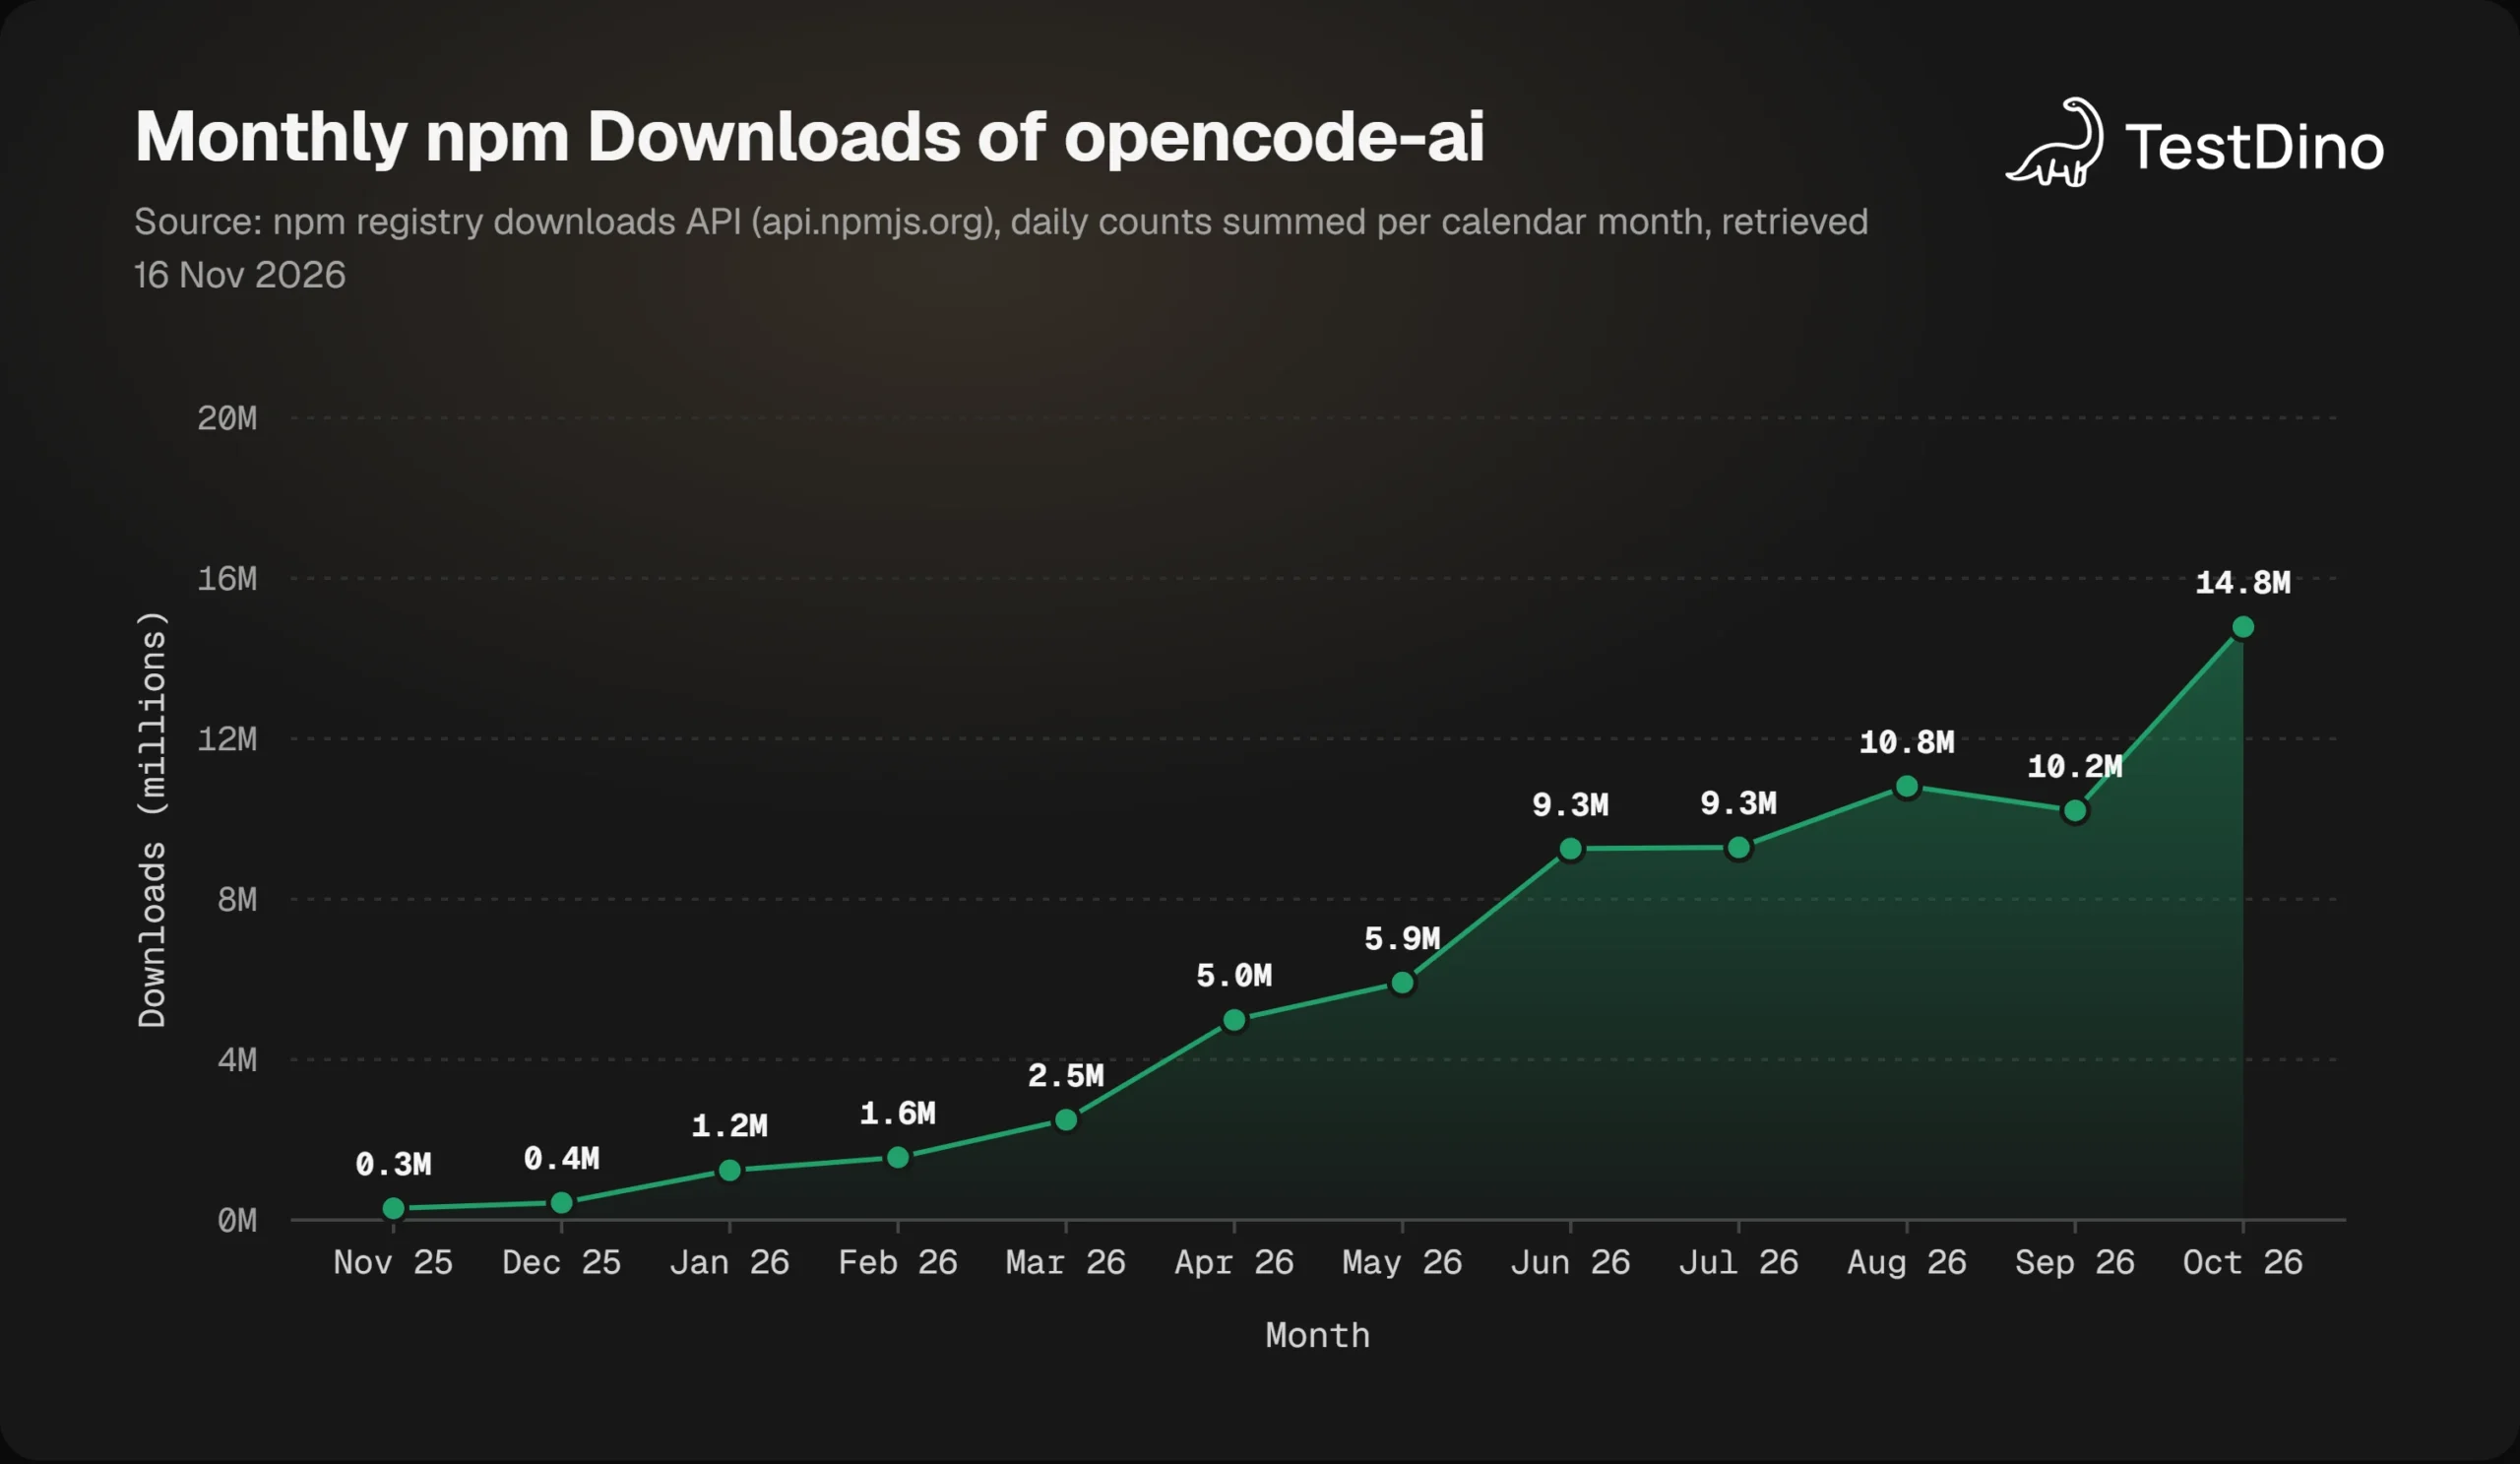
The newer package is smaller for now. In October 2026, @opencode/cli recorded 1.77 million downloads against 14.79 million for opencode-ai. Most installs still run OpenCode 1, which is why each config below appears in both shapes.
If you want the wider map first, the Playwright AI ecosystem shows where agents, MCP, and skills sit. Otherwise, the next section lays out the whole process before the details.
How to set up OpenCode Playwright testing in 6 steps
Here is the full path from an empty terminal to tracked, AI-written tests. Each step has a trap, and later sections show the trap and the fix with real output.
- Install OpenCode with npm and connect a model provider with /connect.
- Add the Playwright MCP server to opencode.json and confirm it with opencode mcp list.
- Write an AGENTS.md file with your locator and wait rules, then install a Playwright skill pack.
- Prompt for a spec, let the agent inspect the live page, and run npx playwright test.
- Run npx playwright init-agents --loop=opencode to add the planner, generator, and healer subagents.
- Stream every run to TestDino so you can see how AI-written tests behave over time.
Check the environment first. The @playwright/test package requires Node 20 or newer, and Playwright MCP requires Node 18 or newer, so Node 20 covers both.
You also need a Playwright project. npm init playwright@latest creates one, and Playwright 1.65 is the current release line.
Every browser example runs against the public TestDino demo store at storedemo.testdino.com. It is a small electronics shop with search, cart, and login pages. Swap in your own staging URL once the loop works.
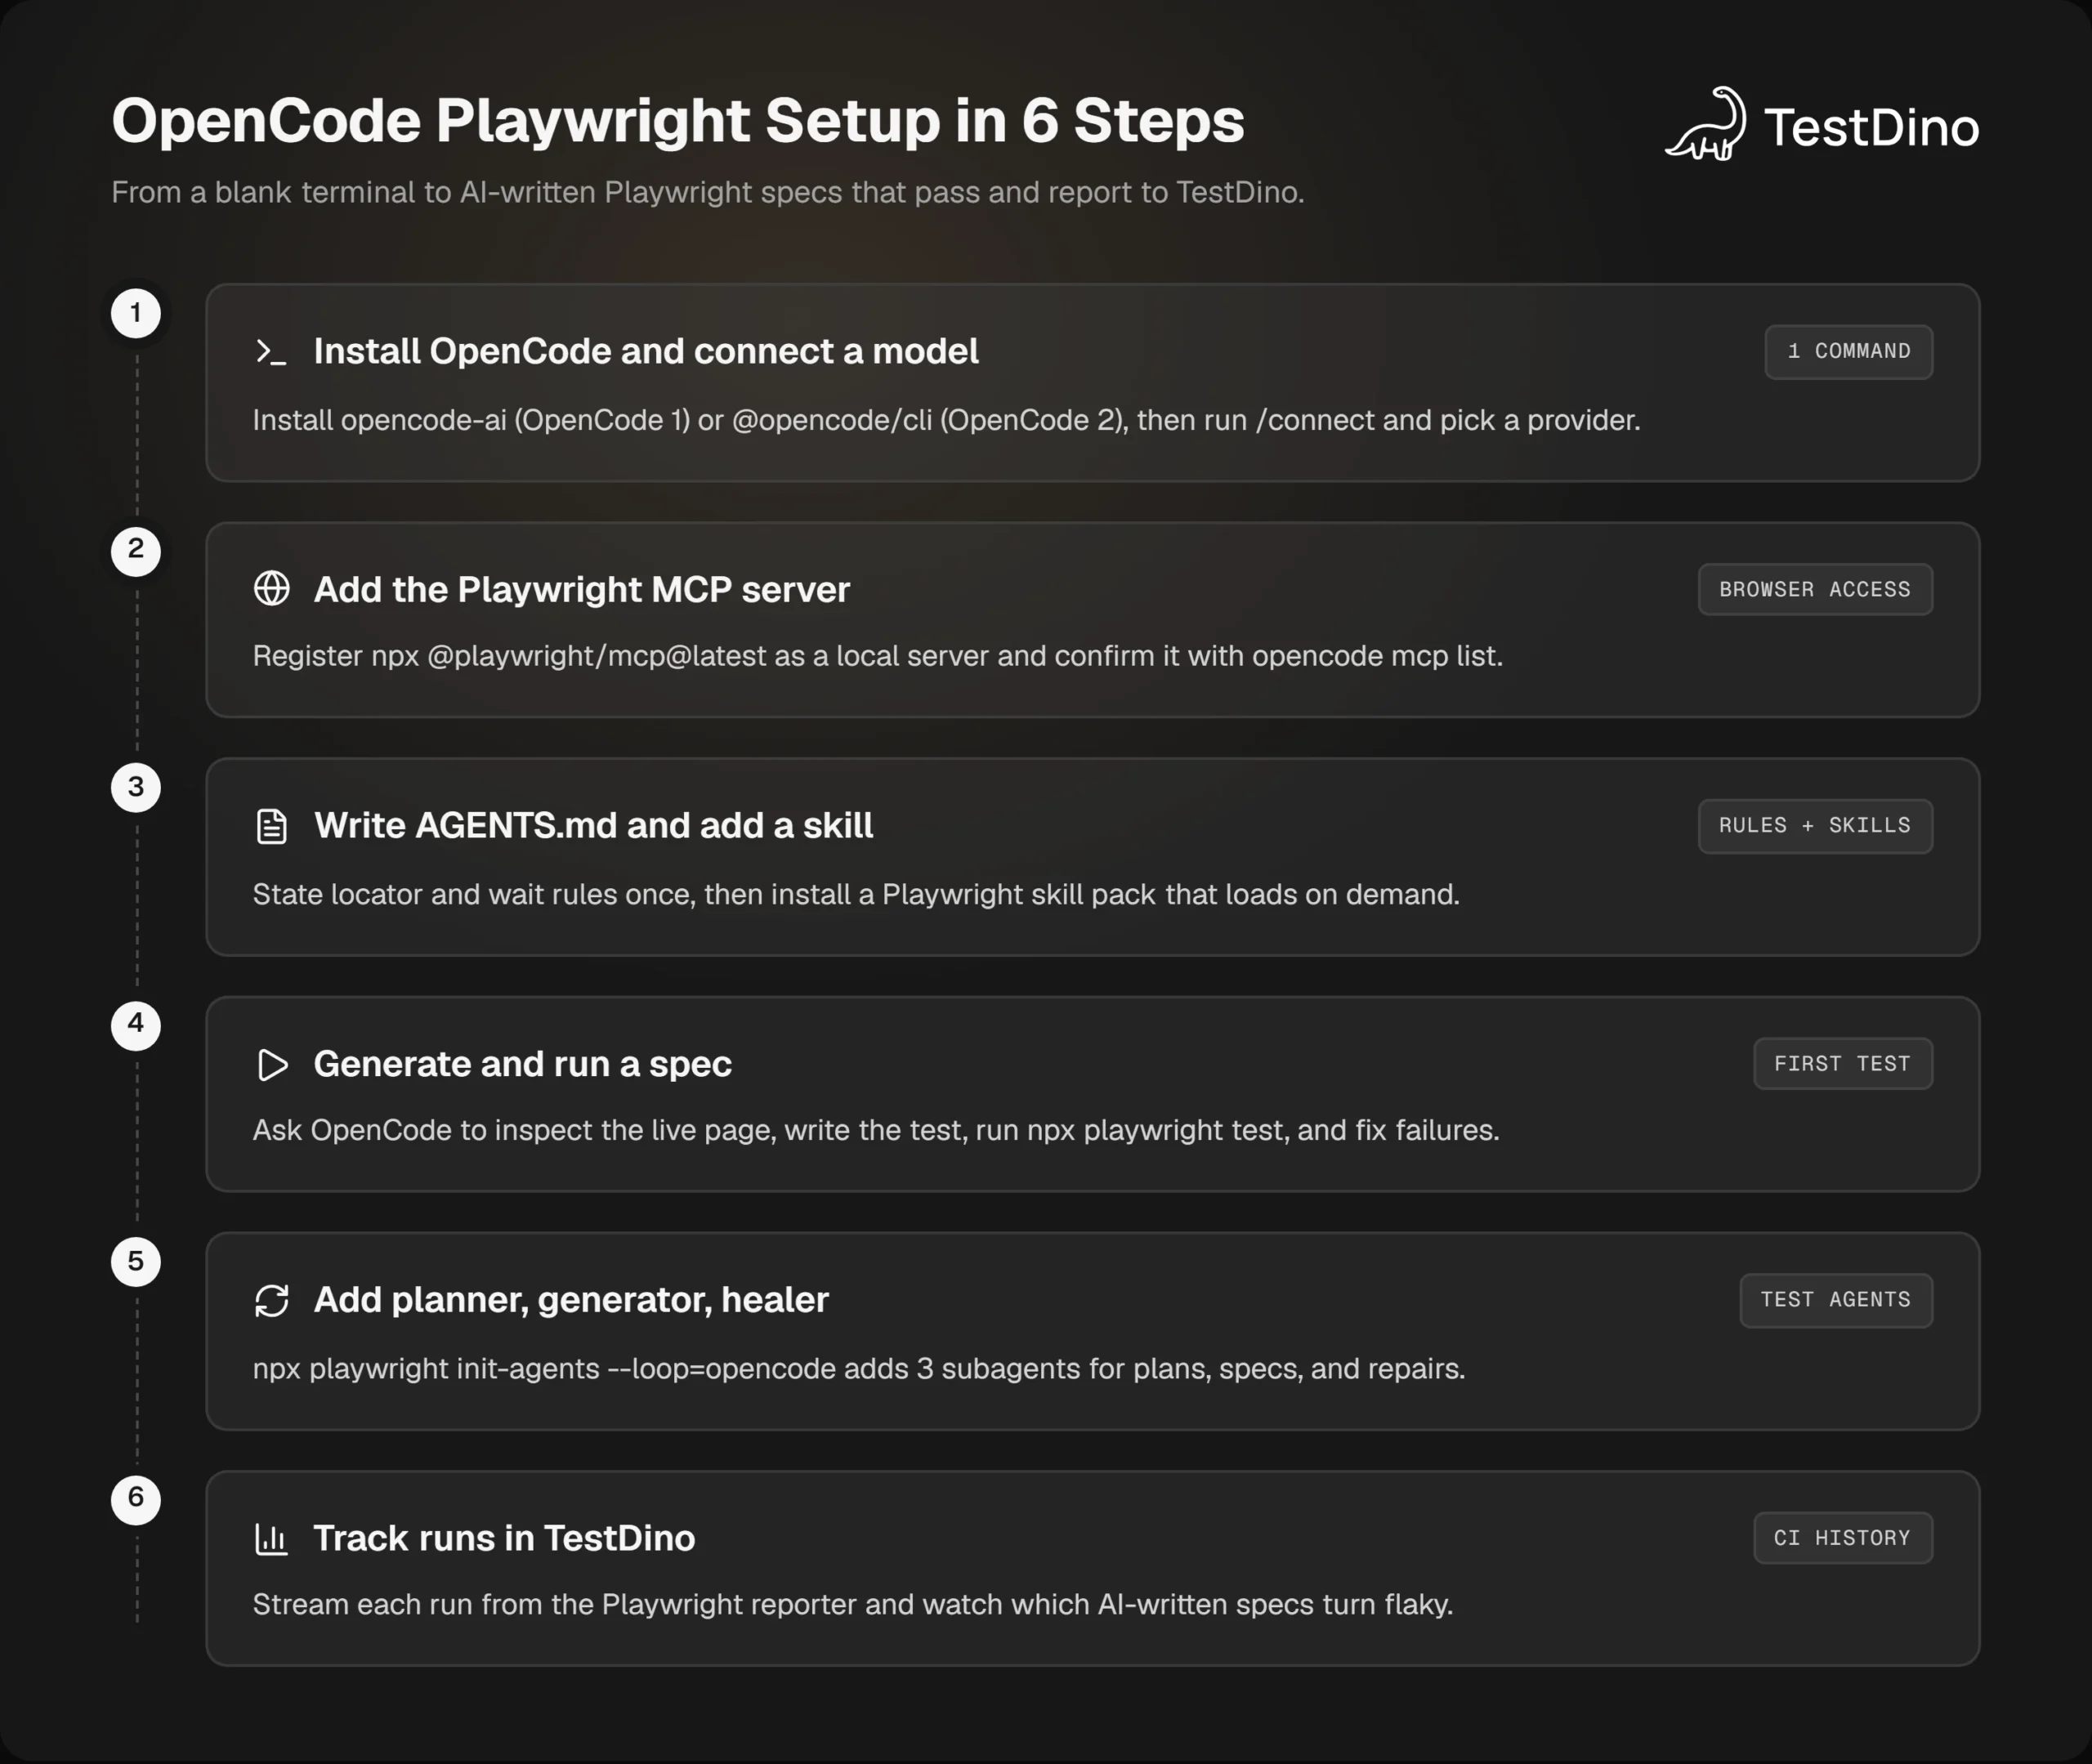
The first 2 steps belong together, because the version you install decides how the browser gets attached.
Steps 1 and 2: install OpenCode and connect the Playwright MCP server
Install OpenCode and pick a model
Pick one package. Both install the same opencode command, so remove the other before you switch.
npm install -g opencode-ai@latest      # OpenCode 1 (1.19.5 on November 16, 2026)
npm install -g @opencode/cli@latest    # OpenCode 2 (2.3.0 on November 16, 2026)
opencode --version
Run opencode inside your project, then type /connect to add a provider. OpenCode also picks up provider keys from environment variables. On our machine, opencode providers list showed a Gemini key under "Environment" without any login step.
Run opencode models to see what you can use. Our install listed 11 models under the opencode provider, 10 of them with "free" in the name, plus opencode/big-pickle. Every run in this guide used that last one.
Pin the model in the project config so the whole team generates tests with the same one. The -m flag overrides it for a single run.
{
  "$schema": "https://opencode.ai/config.json",
  "model": "opencode/big-pickle"
}
A free model is fine for learning the loop. For a real suite, test 2 or 3 models on the same prompt and compare the specs, because output quality varies by model more than by tool.
Add the Playwright MCP server with one command
Playwright MCP is the bridge. It exposes browser actions as tools, and OpenCode is one of the clients that can call them. If you searched for opencode playwright mcp, this is the step you wanted.
opencode mcp add playwright -- npx @playwright/mcp@latestThe OpenCode docs say this command "writes the server to the project configuration," and that --global makes it available in every project. Everything after the double dash is the command OpenCode will start.
Note: On OpenCode 1.18.35, the same command wrote the server into the global file at ~/.config/opencode/opencode.jsonc, not the project. Read the path in the confirmation line. If it is the global file, move the block into your project config.
Write the opencode mcp config by hand
Writing the block yourself is the reliable route, and it keeps the server in version control. This is the OpenCode 1 shape. It is also what the Playwright MCP docs show for OpenCode.
{
  "$schema": "https://opencode.ai/config.json",
  "mcp": {
    "playwright": {
      "type": "local",
      "command": ["npx", "@playwright/mcp@latest", "--headless", "--isolated"],
      "enabled": true
    }
  }
}
OpenCode 2 groups servers under mcp.servers. Its docs are direct about the switch: "Use disabled, not an enabled field, to keep one configured without connecting it."
{
  "$schema": "https://opencode.ai/config.json",
  "mcp": {
    "servers": {
      "playwright": {
        "type": "local",
        "command": ["npx", "@playwright/mcp@latest", "--headless", "--isolated"]
      }
    }
  }
}
Use one shape per file. If anyone on the team still runs OpenCode 1, commit the first block, because OpenCode 2 can read it and OpenCode 1 cannot read the second.
Verify the connection
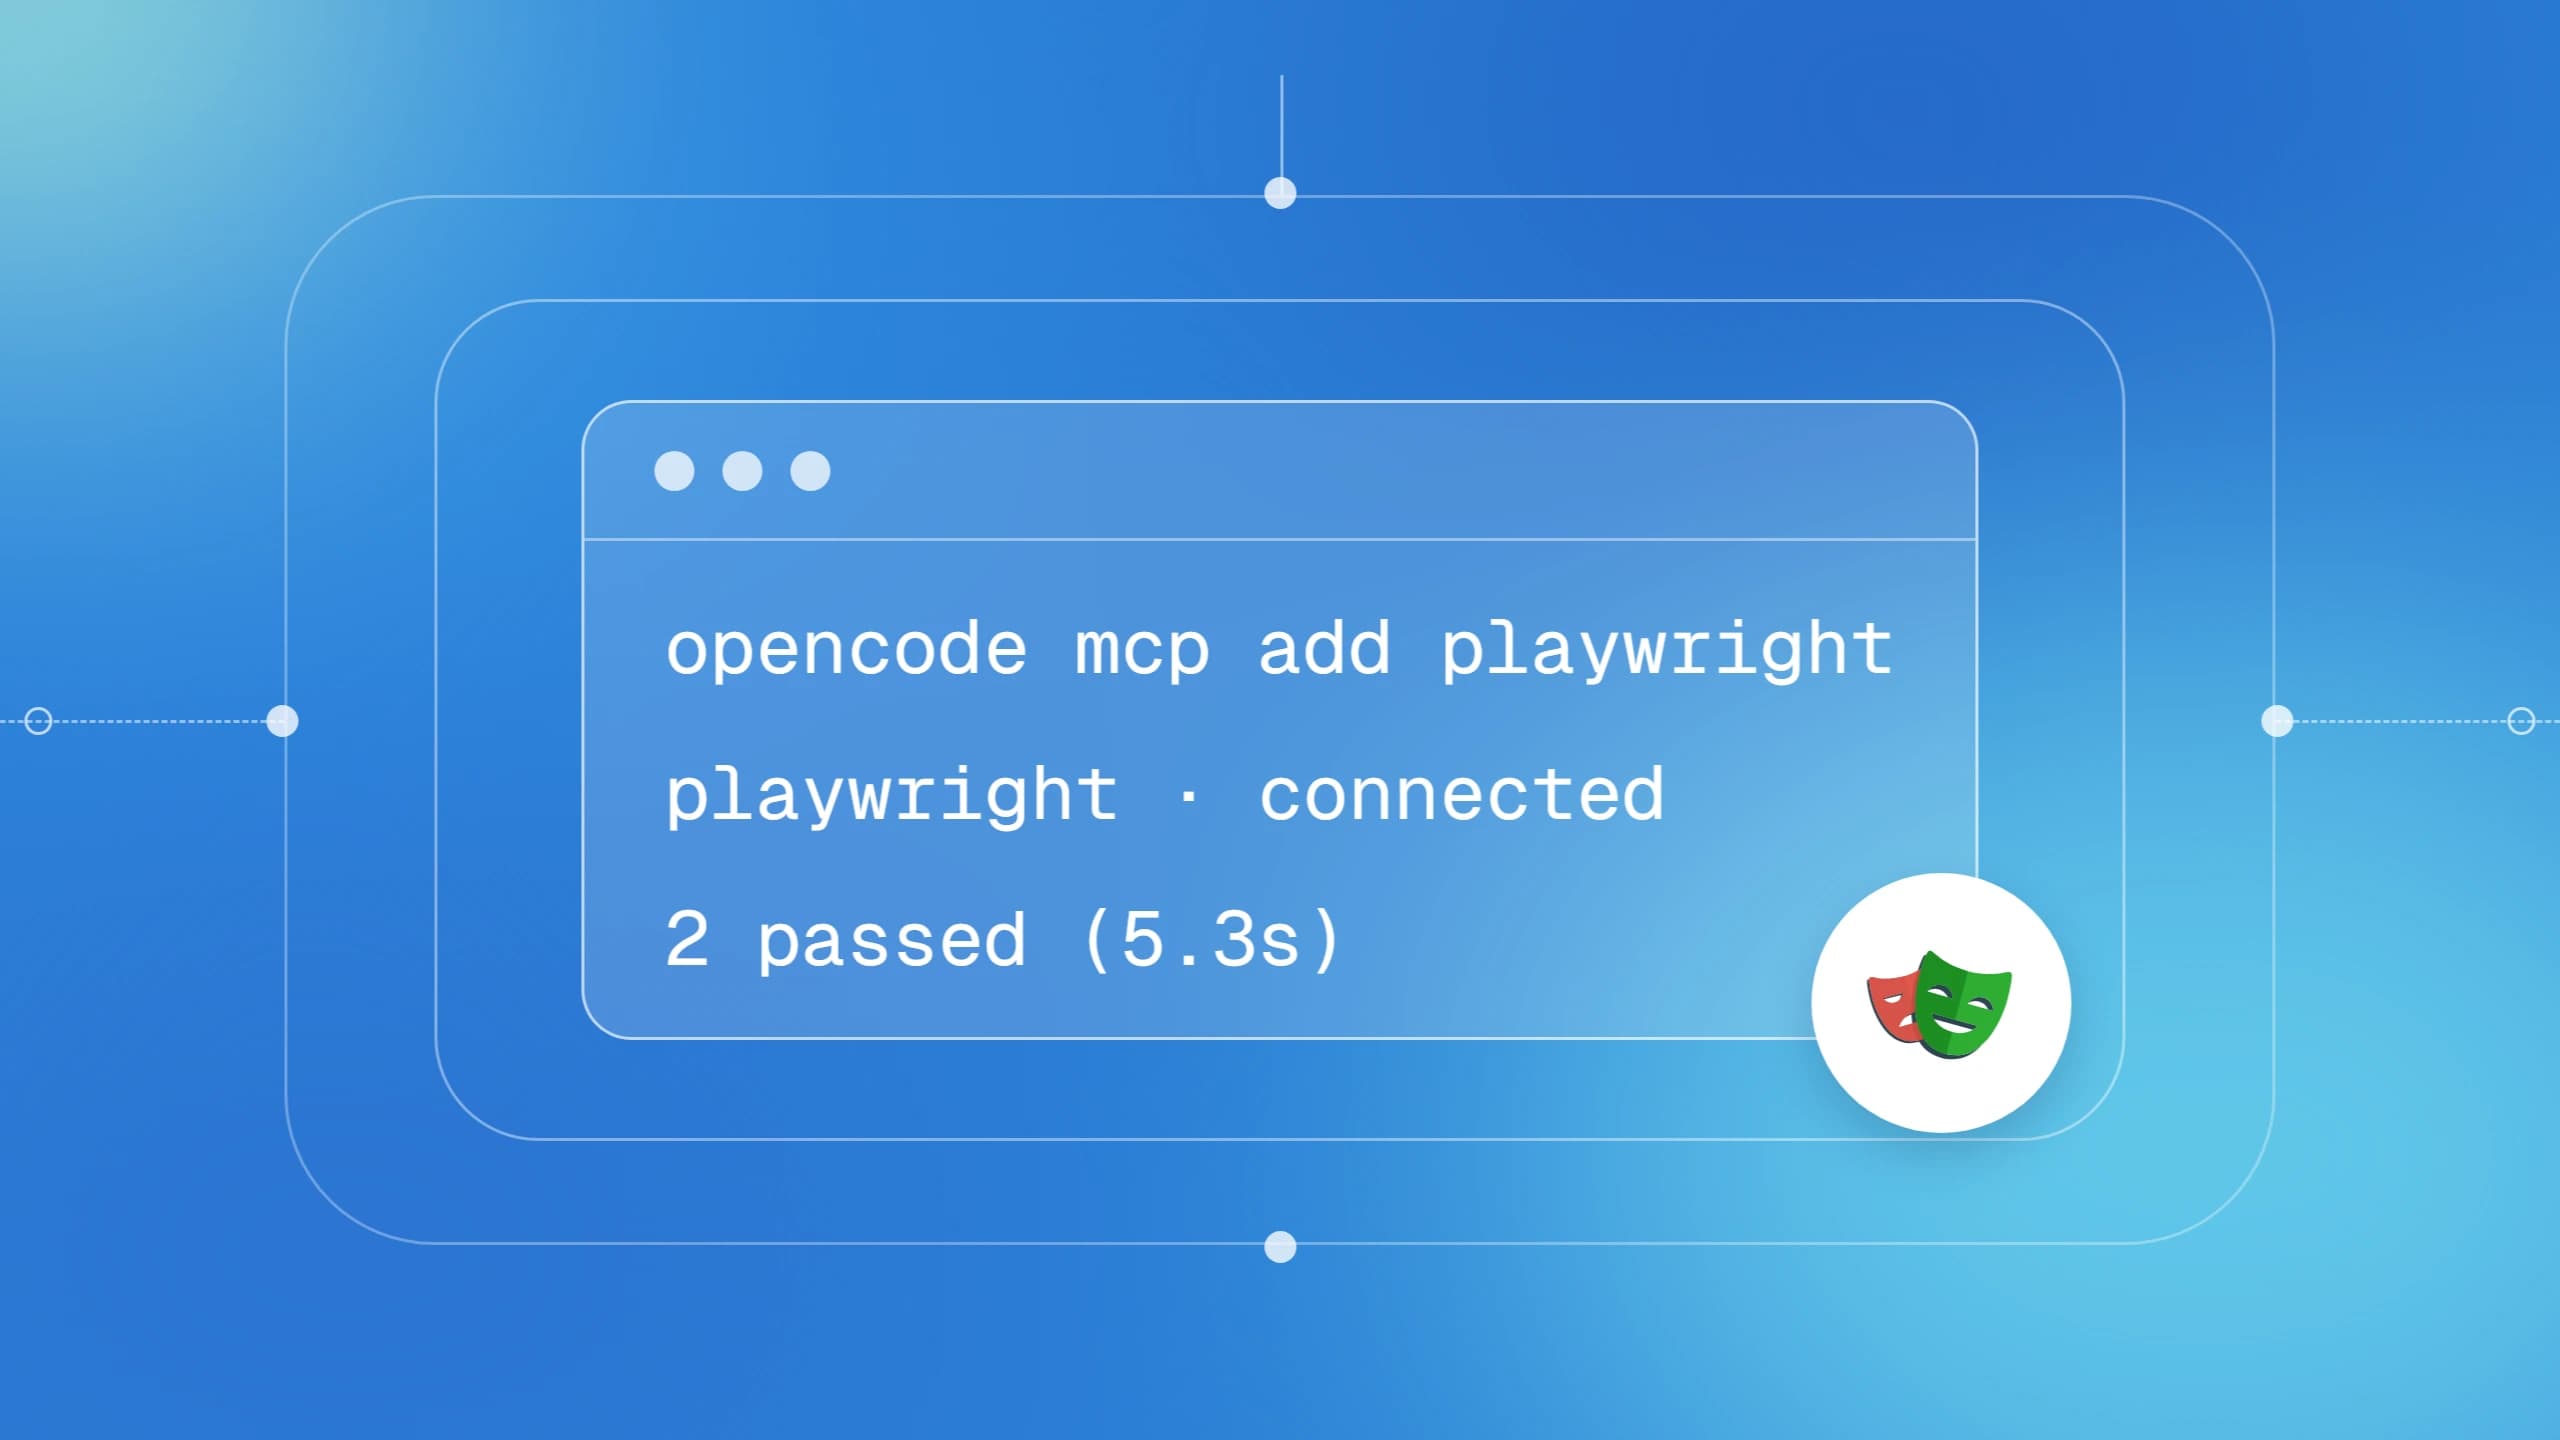
List the servers from the project folder. A healthy setup prints the server name, a check mark, and the command it launched.
opencode mcp list
# ┌  MCP Servers
# │
# ●  ✓ playwright connected
# │      npx @playwright/mcp@latest --headless --isolated
# │
# └  1 server(s)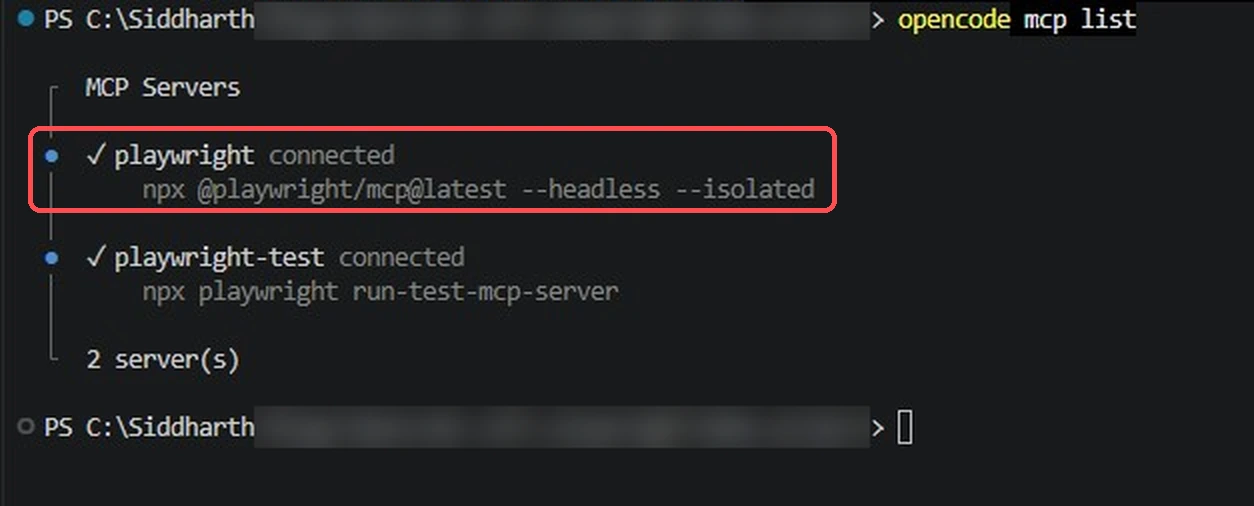
OpenCode names each tool as server name plus tool name. With a server called playwright, the model sees playwright_browser_navigate, playwright_browser_snapshot, playwright_browser_click, and so on. Our install exposed 25 of them.
These tools read the page's accessibility tree, so the model works from element roles and names, not pixels. That is also where good locators come from.
OpenCode 2 adds a twist called Code Mode. It is on by default, and tools are grouped as tools.playwright.browser_navigate(...) instead of sitting on the model's native tool list. Set "codemode": false on the server if you want the direct list back.
If the server does not connect, Playwright MCP troubleshooting covers the npx and browser-install failures that come up most.
Flags worth adding to the command array
The default server opens a visible browser and keeps a profile on disk. Both are fine for a first run and wrong for CI. These options come from the Playwright MCP README.
| Flag | What it does | Use it when |
|---|---|---|
| --headless | Runs the browser without a window; headed is the default | CI, SSH sessions, containers |
| --isolated | Keeps the profile in memory and does not save it to disk | Every session should start logged out |
| --storage-state auth.json | Loads saved cookies and local storage into an isolated session | Reusing a login captured with Playwright |
| --browser firefox | Switches to chrome, firefox, webkit, or msedge | Cross-browser exploration |
| --caps testing | Adds browser_generate_locator and browser_verify_* tools | You want locators and assertions checked live |
| --viewport-size 1280x720 | Fixes the viewport | Matching your Playwright config |
| --output-dir ./mcp-out | Sets the folder for automatically named output files | Keeping artifacts out of the repo root |
The storage state flag is the one to reach for on apps behind a login. Capture the state once with the approach in Playwright authentication, and the agent starts every exploration signed in.
Tools are not free. We measured the first request of a session with and without the server. It grew from 12,677 to 17,477 tokens. So in a default OpenCode Playwright MCP setup, the 25 tool definitions add about 4,800 tokens to every request.
Set guardrails before the agent starts clicking
Both versions let the default agent act without asking. On OpenCode 2, the base policy allows every action and only asks before reading .env files. In our OpenCode 1 runs, browser calls and shell commands also ran with no prompt.
That is convenient and risky. A short rule set makes shell commands ask first while the test command stays approved. This is the OpenCode 2 form, where the last matching rule wins.
{
  "permissions": [
    { "action": "shell", "resource": "*", "effect": "ask" },
    { "action": "shell", "resource": "npx playwright test *", "effect": "allow" },
    { "action": "external_directory", "resource": "*", "effect": "ask" }
  ]
}
OpenCode 1 groups the same idea by tool, under a singular permission key.
{
  "permission": {
    "bash": {
      "*": "ask",
      "npx playwright test*": "allow"
    }
  }
}
Tip: OpenCode 1 asks before touching paths outside the project. OpenCode 2 allows them by default, so keep the external_directory rule above. A cloned repo can also ship its own MCP servers, a risk covered in MCP server security.
The browser is attached and the guardrails are set. The agent still has no idea how your team writes tests, and that is the next job.
Step 3: teach OpenCode your test rules with AGENTS.md and skills
Connecting MCP gives the model eyes. It does not give it taste. Left alone, most models write CSS selectors, add fixed waits, and share state between tests. Two things fix that: a rules file and a skill pack.
Write an AGENTS.md that states your rules
AGENTS.md is OpenCode's instruction file. The agent loads the global file, then every AGENTS.md from your workspace up toward the home directory, and sends them with the session. The /init command drafts one from your repo.
Keep it short and specific. Every line should be a rule the model would otherwise break. This is the exact file used for the runs in this guide.
# Playwright test rules
- Use the playwright MCP tools to inspect the live page before writing any locator.
- Prefer getByRole, getByLabel, getByPlaceholder, and getByText. Never use CSS or XPath selectors.
- Never call page.waitForTimeout(). Use web-first assertions like expect(locator).toBeVisible().
- One user flow per test. No shared state between tests.
- Read baseURL from playwright.config.ts. Never hardcode the host in a spec.
- Put new specs in tests/ and name them <feature>.spec.ts.
- After writing a spec, run `npx playwright test <file>` and fix failures before reporting done.
- If a test fails because the app is broken, report it. Do not weaken the assertion.
There is one version difference to know. OpenCode 1 falls back to CLAUDE.md when no AGENTS.md exists. The OpenCode 2 docs state that it "recognizes AGENTS.md only," so move any rules out of CLAUDE.md before you upgrade.
The structure in AGENTS.md for Playwright goes deeper on what belongs in this file. As the suite grows, Playwright best practices is a good source for rules worth adding.
Install a Playwright skill pack
A skill is a folder with a SKILL.md file. OpenCode lists only each skill's ID, name, and description to the model. The full guide loads when the model calls the skill tool, so a large pack costs little until it is needed.
The open-source TestDino Playwright skill packages 79 guides across 7 packs: core, qa, frontend, ci, playwright-cli, pom, and migration. It is MIT licensed, and the install is one command.
npx skills add testdino-hq/playwright-skillOpenCode reads skills from .opencode/skills, and it also reads .claude/skills and .agents/skills for compatibility. On our machine, opencode debug skill listed skills from both compatibility folders, so a pack installed for another agent shows up here too.
Note: Rules and skills do different jobs. AGENTS.md is sent with every session, so it works as a hard constraint. Skills are reference material loaded on demand. Keep the rules file to the handful of lines you would refuse to merge without.
The OpenCode 2 docs add one shortcut: mention a skill as @skill-id in your prompt to load it yourself. The background on how these packs work is in Playwright skill.
Browser, rules, skill pack. Now ask for a test.
Step 4: generate and run your first Playwright test with OpenCode
Point Playwright at the app first. Set the base URL once, and every generated spec can use relative paths.
import { defineConfig, devices } from '@playwright/test';

export default defineConfig({
  testDir: './tests',
  fullyParallel: true,
  retries: process.env.CI ? 2 : 0,
  reporter: [['list']],
  use: {
    baseURL: 'https://storedemo.testdino.com',
    trace: 'on-first-retry',
  },
  projects: [{ name: 'chromium', use: { ...devices['Desktop Chrome'] } }],
});
Prompt for a spec, not for a script
The difference between a useful prompt and a wasteful one is whether you ask for proof. Tell the agent to inspect the page first, and tell it what done looks like. More patterns like this are collected in Playwright prompts.
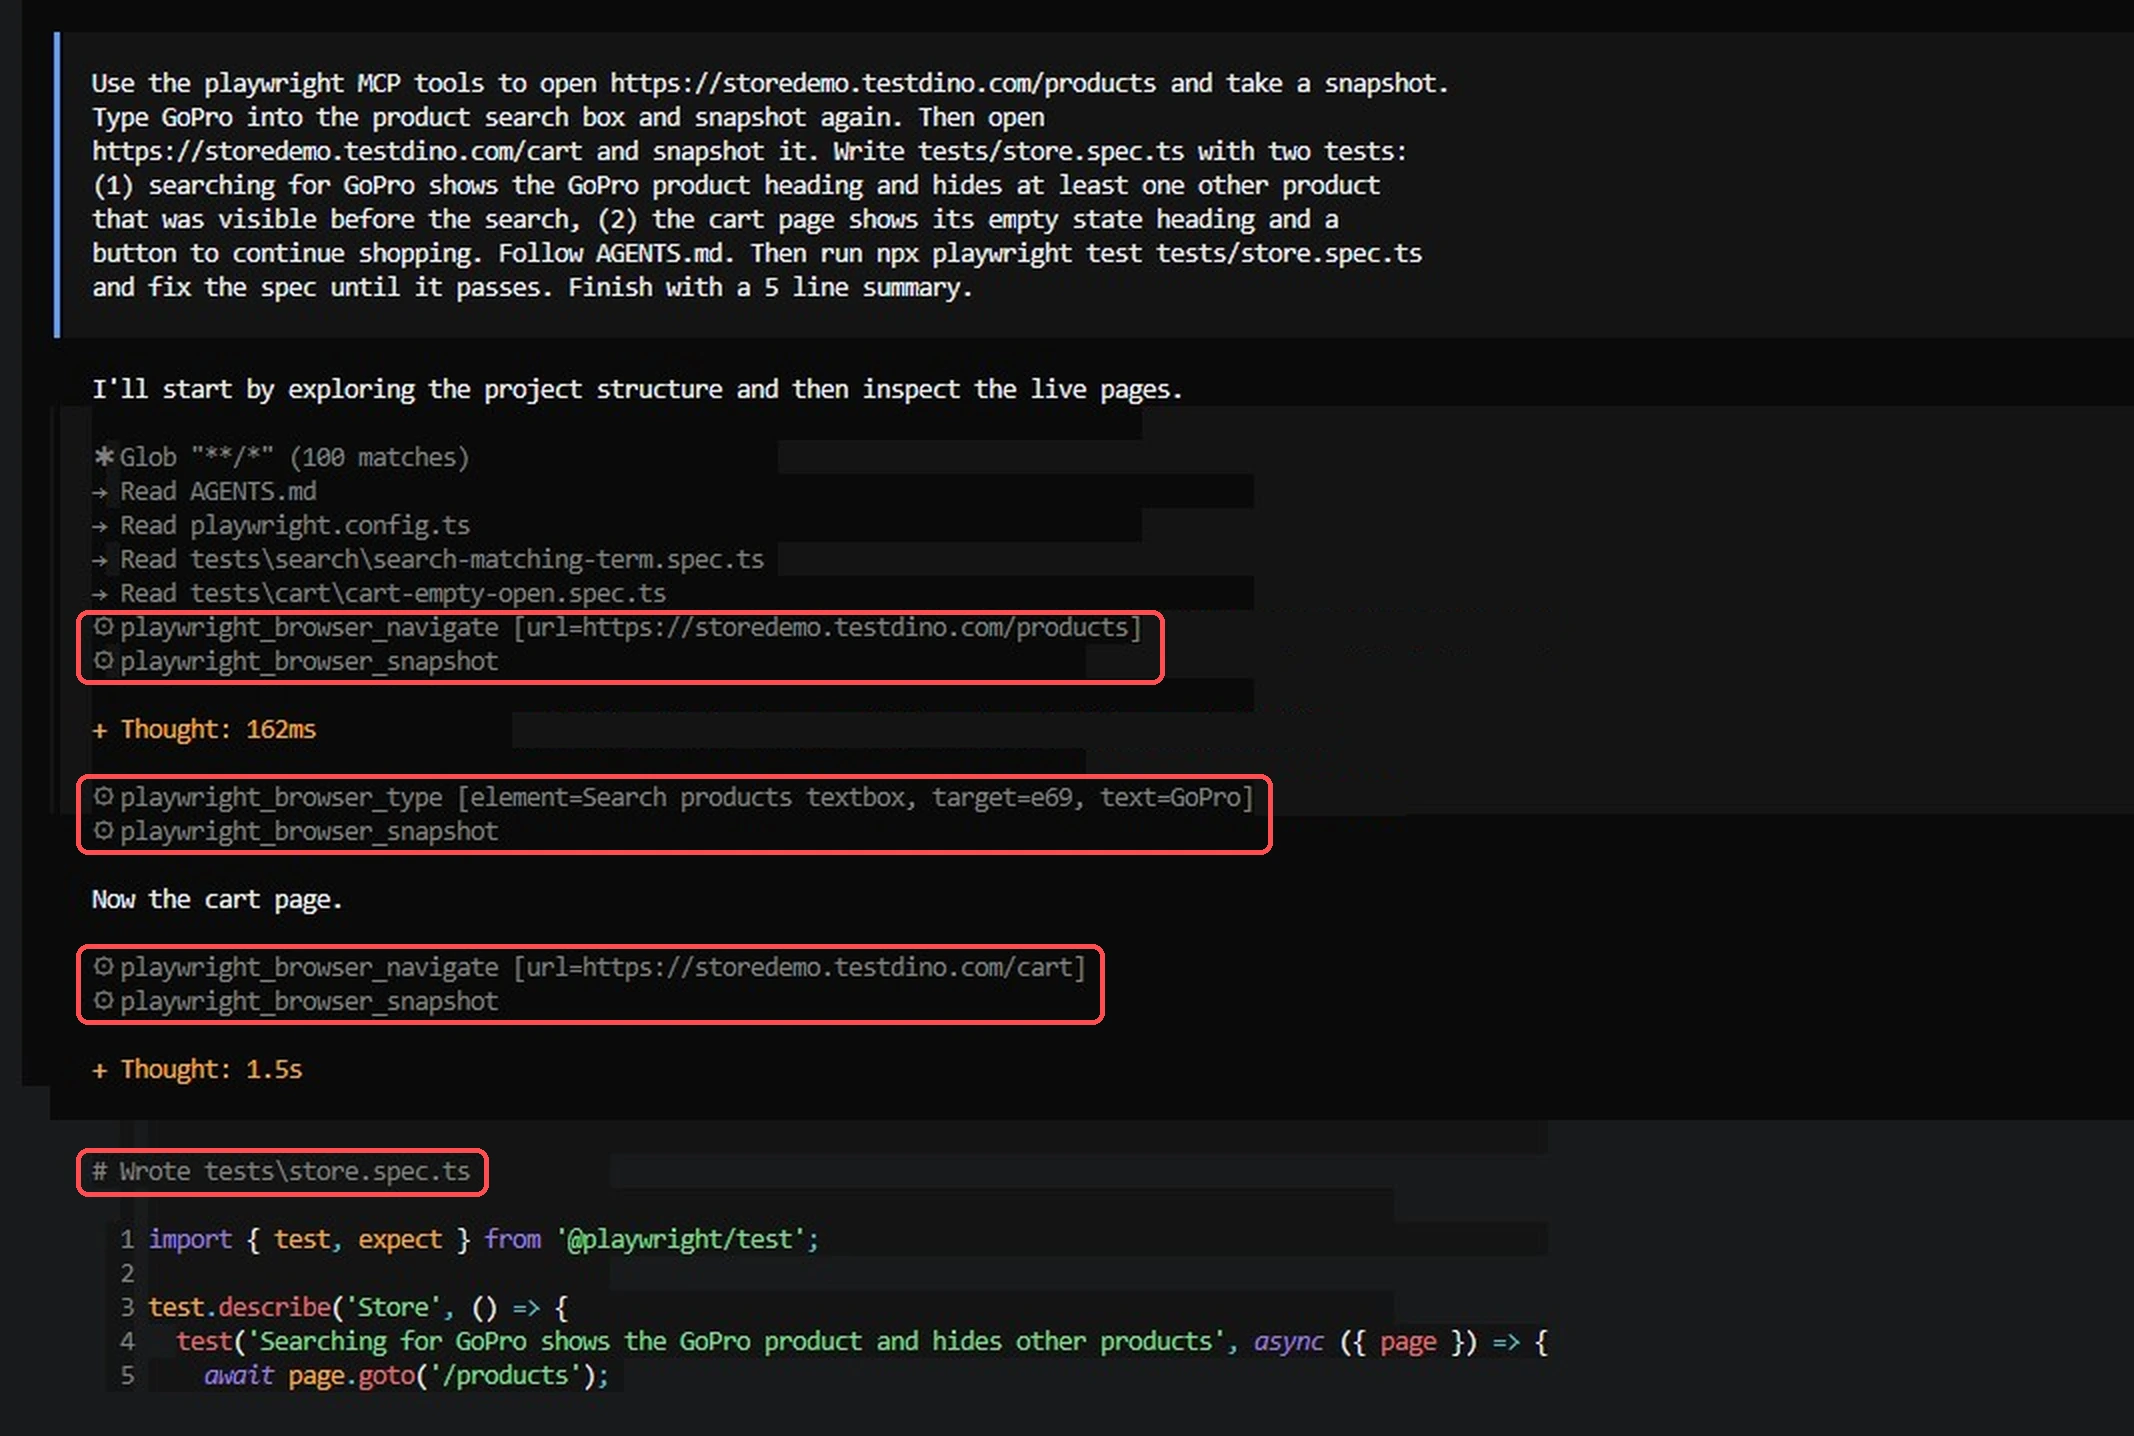
Use the playwright MCP tools to open https://storedemo.testdino.com/products and take a snapshot.
Type GoPro into the product search box and snapshot again. Then open
https://storedemo.testdino.com/cart and snapshot it. Write tests/store.spec.ts with two tests:
(1) searching for GoPro shows the GoPro product heading and hides at least one other product
that was visible before the search, (2) the cart page shows its empty state heading and a
button to continue shopping. Follow AGENTS.md. Then run npx playwright test tests/store.spec.ts
and fix the spec until it passes. Finish with a 5 line summary.
OpenCode read AGENTS.md and the config, then called playwright_browser_navigate, typed into the search box, and took a snapshot. Playwright MCP saved each snapshot as a YAML file, and the agent read those files instead of pulling whole pages into the chat.
The session took 70 seconds and 14 model steps. It made 15 tool calls, and only 4 of them were browser calls. The rest were file reads, 1 write, and shell commands.
What the generated spec looked like
This is the file exactly as the agent saved it on the first attempt. Every locator is role or placeholder based, and every check is a web-first assertion that waits on its own.
import { test, expect } from '@playwright/test';
test('searching for GoPro shows the GoPro product and hides other products', async ({ page }) => {
  await page.goto('/products');
  const goproHeading = page.getByRole('heading', { name: 'GoPro HERO10 Black', level: 2 });
  const otherHeading = page.getByRole('heading', { name: 'Rode NT1-A Condenser Mic', level: 2 });
  await expect(otherHeading).toBeVisible();
  await page.getByPlaceholder('Search products...').fill('GoPro');
  await expect(goproHeading).toBeVisible();
  await expect(otherHeading).toBeHidden();
});
test('empty cart shows the empty state heading and a continue shopping button', async ({ page }) => {
  await page.goto('/cart');
  await expect(page.getByRole('heading', { name: 'Your cart is empty' })).toBeVisible();
  await expect(page.getByRole('button', { name: 'Continue Shopping' })).toBeVisible();
});
Notice the first test. It checks that the other product is visible before the search and hidden after it. That is a real behavior check, not a filler assertion that would pass on a blank page.
Expect small differences on your machine. A repeat of the same prompt wrapped both tests in a test.describe block and reworded the titles, which is why the screenshots show slightly different test names.
If your output uses CSS selectors or a fixed sleep, a better prompt is rarely the fix. Look for a missing rule in AGENTS.md. Playwright locators explains why role-based locators survive UI changes, and Playwright assertions covers the waiting behavior.
Run it and read the result
The agent ran the spec itself, because the rules file told it to. Both tests passed on the first run.
npx playwright test tests/store.spec.ts
# Running 2 tests using 2 workers
#
#   ✓  2 [chromium] › tests\store.spec.ts:17:1 › empty cart shows the empty state heading and a continue shopping button (3.7s)
#   ✓  1 [chromium] › tests\store.spec.ts:3:1 › searching for GoPro shows the GoPro product and hides other products (4.0s)
#
#   2 passed (5.3s)
One small hiccup is worth knowing. The agent asked for a snapshot with its own file name, then looked for it in .playwright-mcp/. Named files are saved to the workspace root instead, which the Playwright MCP README confirms. The agent found the file and moved on.
Add .playwright-mcp/ to .gitignore. Snapshots pile up there during exploration, and none of them belong in a commit.
Run the same prompt without the terminal UI
You do not need the full-screen interface. The OpenCode docs describe opencode run as "designed for scripts, CI jobs, and other workflows that need model output directly in the terminal." Every run in this guide used it.
opencode run -m opencode/big-pickle --title "store-spec" "Use the playwright MCP tools to open https://storedemo.testdino.com/products ..."
opencode stats --days 1
The second command prints sessions, tokens, cost, and a tool usage chart. In any OpenCode Playwright project, it is the quickest way to see whether the agent used the browser or only guessed from your source code.
A single prompt works well for 1 or 2 flows. For wider coverage, Playwright ships a more structured option, and OpenCode is one of the tools it supports.
Step 5: run Playwright test agents in OpenCode
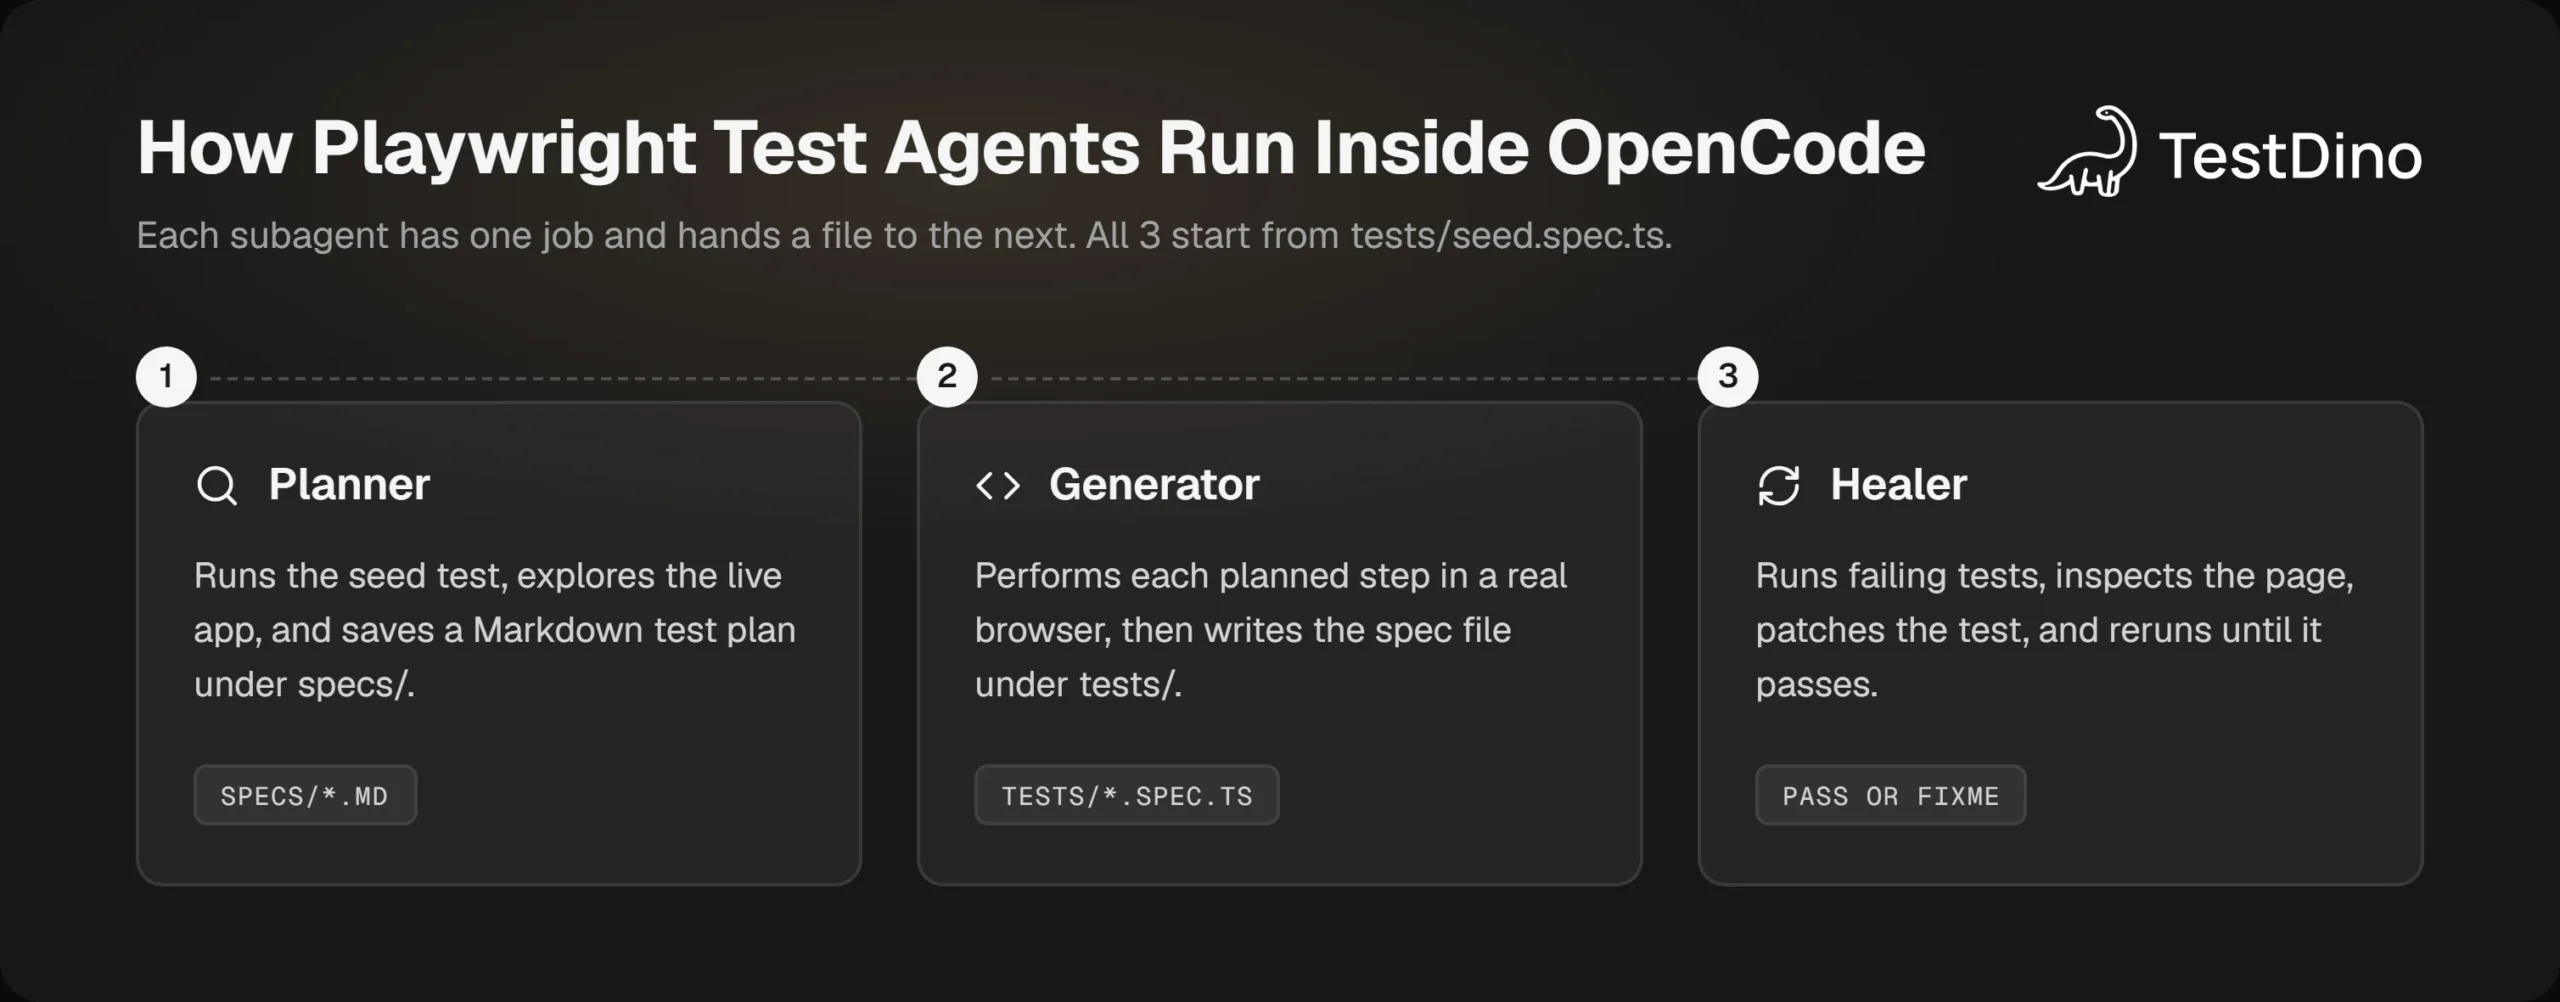
Playwright includes 3 ready-made agents: a planner, a generator, and a healer. The planner explores the app and writes a Markdown plan. The generator turns the plan into spec files. The healer runs failing tests and repairs them.
They are the heart of Playwright test agents, and one command adds them to an OpenCode project. The --prompts flag also writes ready-made prompt templates.
npx playwright init-agents --loop=opencode --prompts
#  🎭 Using project "chromium" as a primary project
#  📝 specs\README.md - directory for test plans
#  🌱 tests\seed.spec.ts - default environment seed file
#  📝 .opencode\prompts\playwright-test-plan.md - prompt template
#  🤖 .opencode\prompts\playwright-test-generator.md - agent definition
#  🤖 .opencode\prompts\playwright-test-healer.md - agent definition
#  🤖 .opencode\prompts\playwright-test-planner.md - agent definition
#  🔧 opencode.json - opencode configuration
#  ✅ Done.
That is the trimmed output from Playwright 1.65.1. The command wrote 3 agent definitions, 4 prompt templates, a seed test, a specs folder, and an opencode.json. If you searched for playwright test agents opencode, these are the files to expect.
What init-agents writes into opencode.json
The generated config registers a second MCP server and 3 subagents. This is an abridged copy, with the long tool lists cut.
{
  "$schema": "https://opencode.ai/config.json",
  "mcp": {
    "playwright-test": {
      "type": "local",
      "command": ["npx", "playwright", "run-test-mcp-server"],
      "enabled": true
    }
  },
  "tools": {
    "playwright*": false
  },
  "agent": {
    "playwright-test-planner": {
      "description": "Use this agent when you need to create comprehensive test plan for a web application or website",
      "mode": "subagent",
      "prompt": "{file:.opencode/prompts/playwright-test-planner.md}",
      "tools": { "playwright-test*browser_snapshot": true, "playwright-test*planner_save_plan": true }
    }
  }
}
Three details stand out. The server is playwright-test, not the general Playwright MCP. The file uses the OpenCode 1 keys agent, prompt, and tools. And a top-level rule turns off every tool whose name starts with playwright for the main agent.
After the command, opencode agent list showed the 3 new subagents next to the built-in ones, and opencode mcp list showed the test server as connected.
4 traps in the generated setup
We hit each of these on a clean project. None of them shows an error, which is what makes them slow to find.
Trap 1: the tool rule hides your Playwright MCP server. We added our own playwright server next to the generated one. Both showed as connected. Then we asked the model to list its browser tools, and it answered "NONE."
The generated "playwright*": false rule matches playwright_browser_navigate too. Narrowing the rule brought all 25 tools back. Renaming our server to browser also worked.
{
  "tools": {
    "playwright-test*": false
  }
}
Trap 2: the prompt templates are not slash commands. The templates land in .opencode/prompts/, and OpenCode loads commands from .opencode/commands/. After the init, opencode debug config showed an empty command list. Copying the files registered them.
mkdir -p .opencode/commands
cp .opencode/prompts/playwright-test-plan.md .opencode/commands/plan-tests.md
cp .opencode/prompts/playwright-test-generate.md .opencode/commands/generate-tests.md
cp .opencode/prompts/playwright-test-heal.md .opencode/commands/heal-tests.md
Trap 3: the seed test opens nothing. The generated seed contains only a comment. The planner runs the seed to reach a ready page, so give it a real starting point.
import { test, expect } from '@playwright/test';
test.describe('Test group', () => {
  test('seed', async ({ page }) => {
    await page.goto('/products');
  });
});
Trap 4: running init-agents again wipes your edits. The Playwright docs say agent definitions "should be regenerated whenever Playwright is updated." We ran the command a second time. It replaced opencode.json, removed our extra server, and reset the tool rule. The seed test was left alone.
Commit the config before you regenerate, then compare the diff and put your changes back. On OpenCode 2, the migration guide maps a legacy tools entry to a deny rule, so expect Trap 1 there as well.
Plan the tests
With the traps fixed, the main agent can hand work to each subagent. The planner goes first.
Use the playwright-test-planner subagent to create a test plan for the product search box
and the empty cart page of the store at https://storedemo.testdino.com.
Seed file: tests/seed.spec.ts. Save the plan to specs/store-search.plan.md.
Keep it to 4 scenarios at most.
The planner took 5 minutes and 31 seconds. It ran the seed, took 4 snapshots, clicked and typed through the page, and saved a 4-scenario plan with steps and expected results.
The plan was honest about its limits. For the cart scenario, the planner wrote that the empty-state assertion should use "accessible content present in the live UI at test-writing time" and added "do not guess hidden selectors." It flagged its own gap rather than inventing a locator.
Generate the specs
The generator works through one scenario at a time. It performs each step in a real browser, then writes the file.
Use the playwright-test-generator subagent to generate tests for every scenario in
specs/store-search.plan.md, one scenario at a time. Seed file: tests/seed.spec.ts.
When all are written, run npx playwright test and report the results.
OpenCode started a separate subagent session per scenario. We capped the run at 560 seconds, and by then 3 of the 4 specs were on disk. The full suite then ran clean.
npx playwright test
# Running 6 tests using 6 workers
#   (the 3 generated specs are shown; the seed and store.spec.ts tests also passed)
#   ✓  [chromium] › tests\search\search-matching-term.spec.ts:7:3 › Product Search Box › Filter products by a matching search term (1.5s)
#   ✓  [chromium] › tests\search\search-no-results.spec.ts:7:3 › Product Search Box › Show no-results state for a non-matching search term and recover with Reset All Filters (2.0s)
#   ✓  [chromium] › tests\cart\cart-empty-open.spec.ts:7:3 › Empty Cart Page / Cart Drawer › Display empty cart drawer when opened from the products page (1.7s)
#   6 passed (2.8s)
Passing is not the same as good. A review of the 3 generated files turned up 2 things we would change before merging:
- A hardcoded count. Two specs assert the text "Showing 14 products." The test breaks the day someone adds a product.
- A parent hop. The cart spec uses locator('..').locator('..') to climb the DOM. That is XPath in disguise, and it breaks the rule in AGENTS.md.
Both passed, and both would cause maintenance work later. Treat generated specs like a pull request from a new teammate, an idea covered in how to test AI-generated code.
Heal a failing test
To see the healer work, we broke a test on purpose. The cart heading in the spec was changed from "Your cart is empty" to "Your basket is empty," and the run failed with a 5-second timeout.
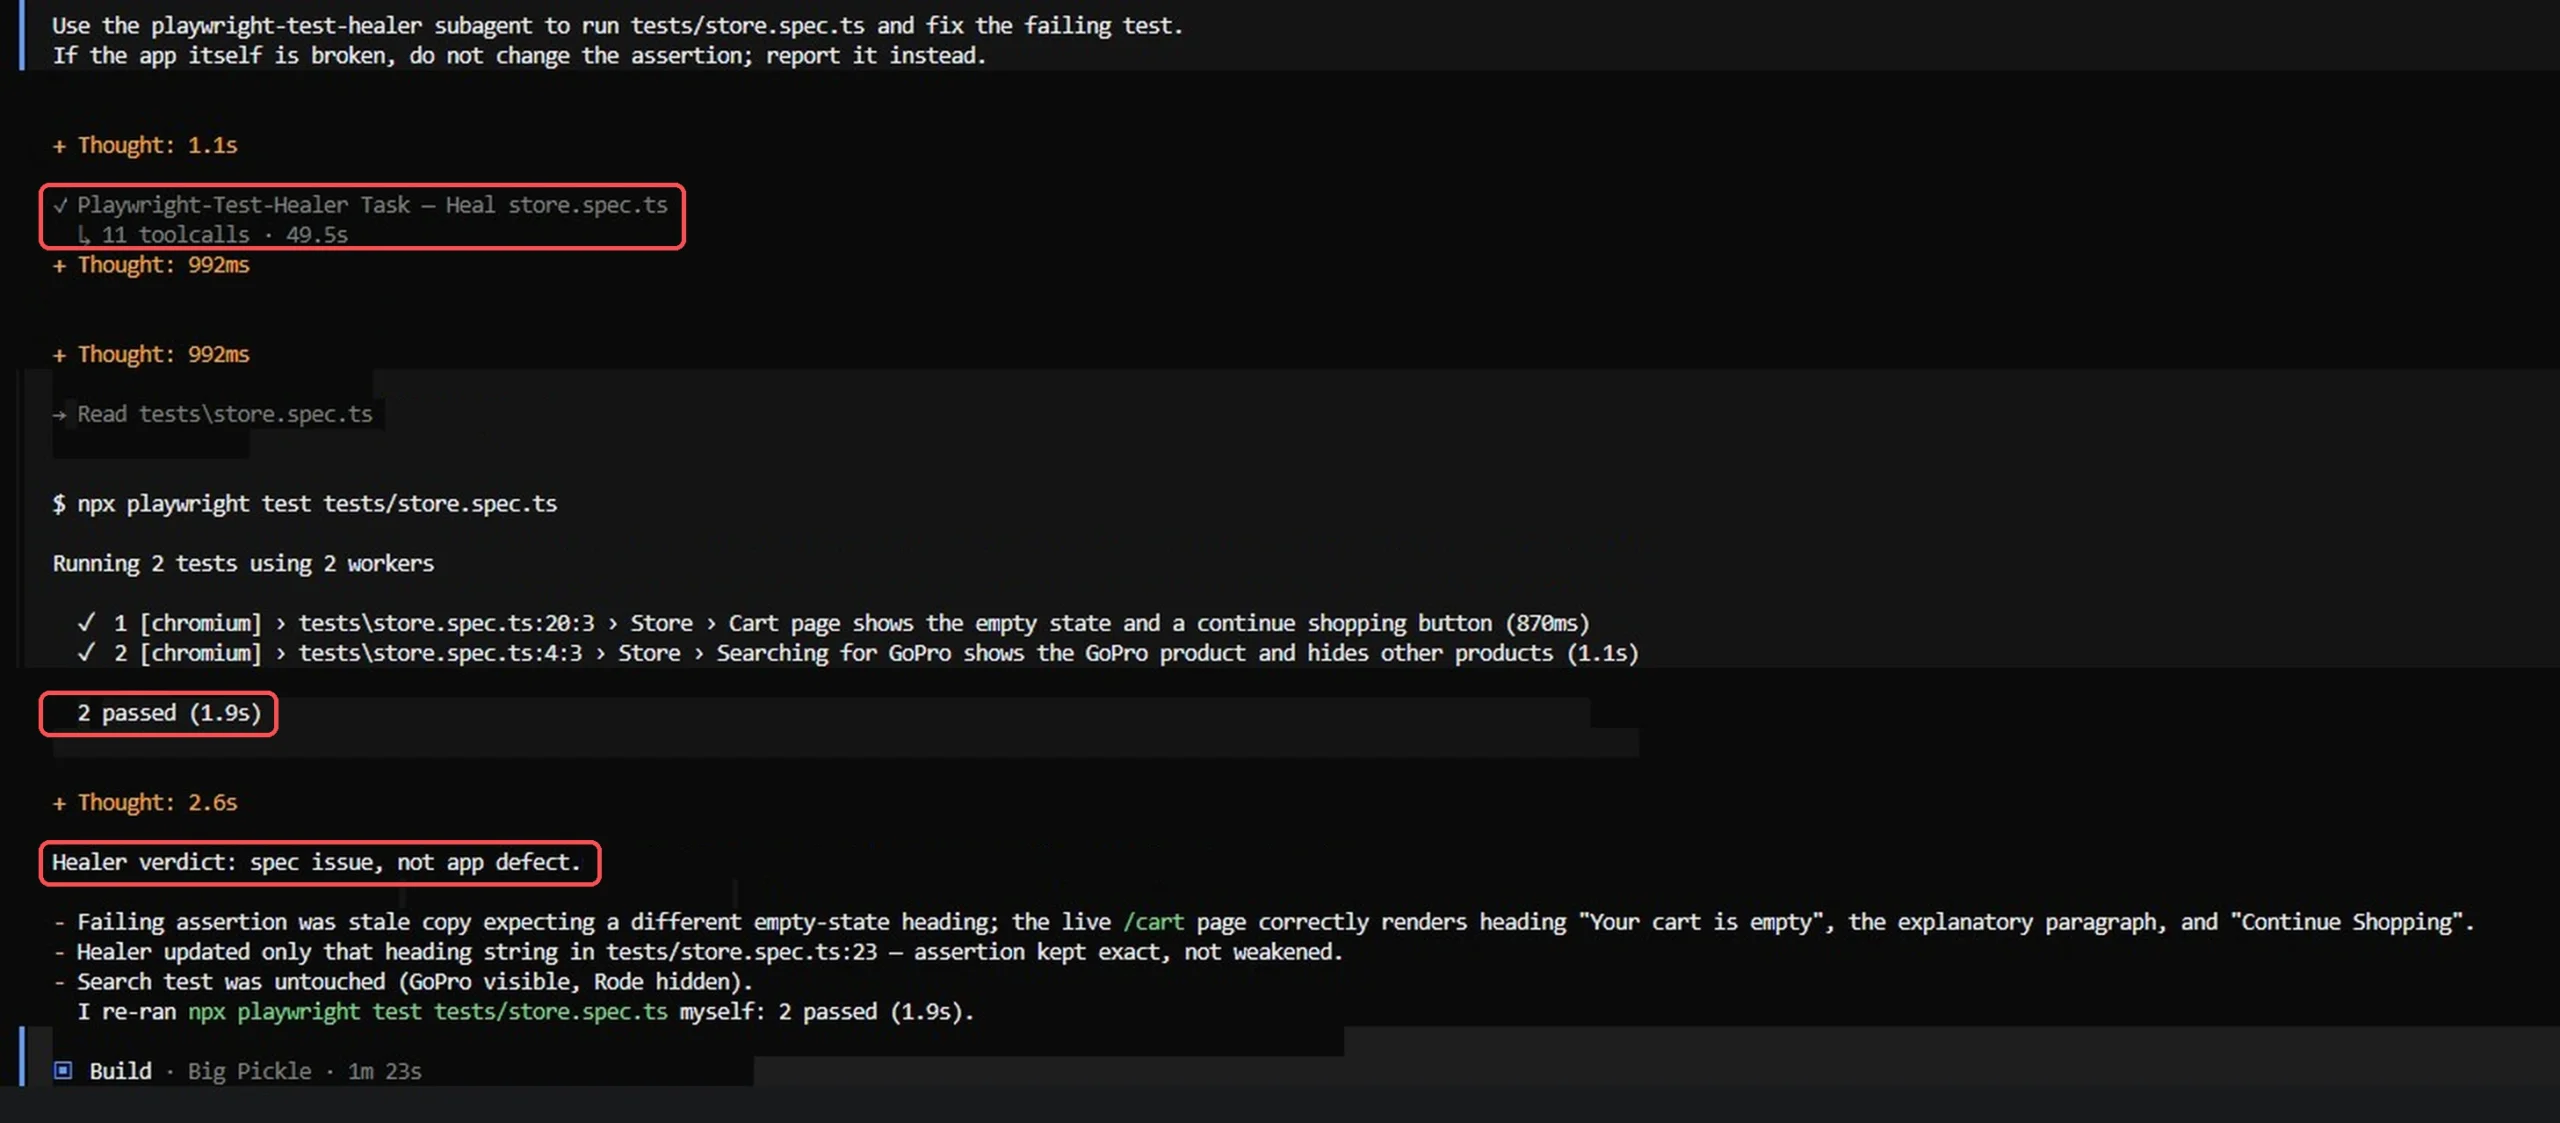
Use the playwright-test-healer subagent to run tests/store.spec.ts and fix the failing test.
If the app itself is broken, do not change the assertion; report it instead.
The healer did not touch the file. It opened the cart page, compared the snapshot to the locator, and reported a "copy mismatch in the app's empty-cart state." It even noted an unrelated typo in the store's footer.
That is the right call. The agent cannot know whether the test or the app holds the correct wording. So we told it.
Use the playwright-test-healer subagent to fix tests/store.spec.ts. The app is the source
of truth: its current text is correct and the test is out of date.
This time the healer updated the one stale line in 85 seconds and reran the file. The suite returned to 6 passed.
Agents do not always make the same call. On a repeat run of the first prompt, the healer ruled it a "spec issue, not app defect" and updated the heading without being told.
The lesson carries over to self-healing tests in Playwright in general. Healing is only safe when someone states which side is the source of truth. More repair patterns are in fixing Playwright tests with AI.
What the full loop cost in tokens
We exported each session and added up input and cache-read tokens, including the subagent sessions. The single prompt from Step 4 processed 344,000 tokens. The generator processed 2.48 million for 3 specs.
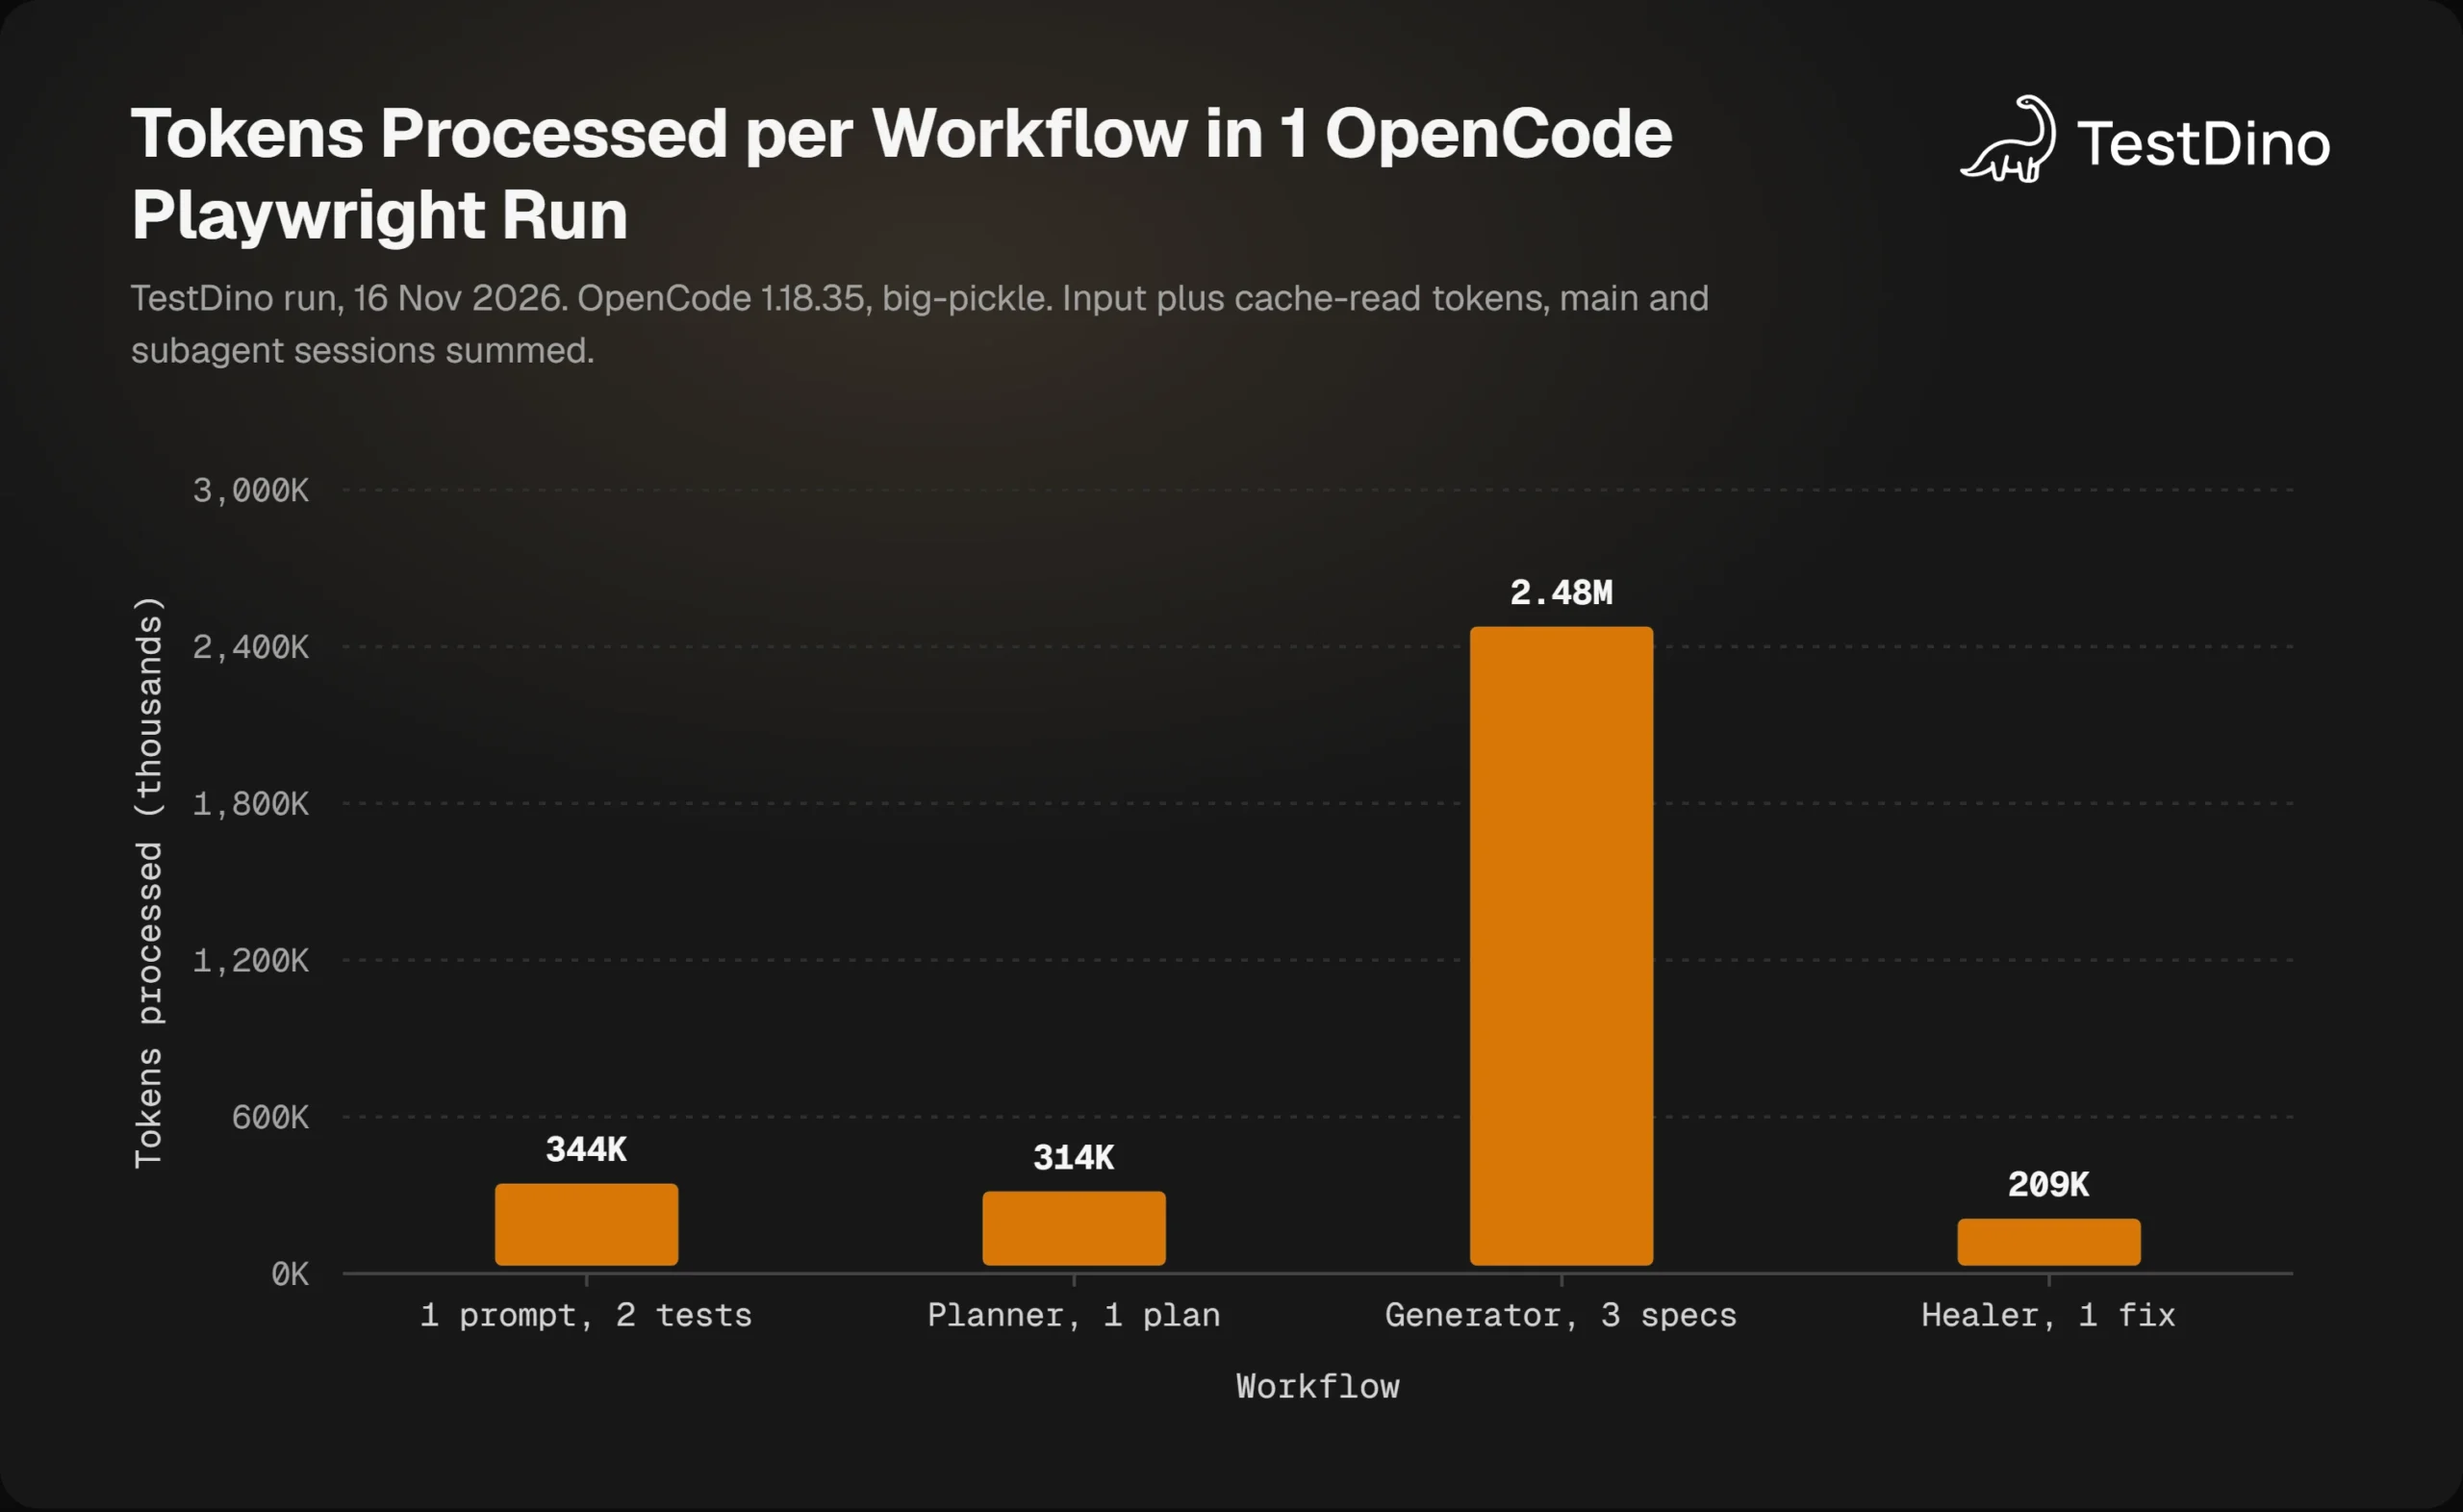
Read these numbers with care. They come from 1 run of each workflow on 1 free model, and most of the total is cached context read again on every step. Your totals will differ by model and by app.
The pattern is still useful. Each subagent session starts fresh and re-reads its instructions and tools, so the agent loop pays for structure. In an OpenCode Playwright project, use a single prompt for a quick spec and the agents when you want a reviewable plan first.
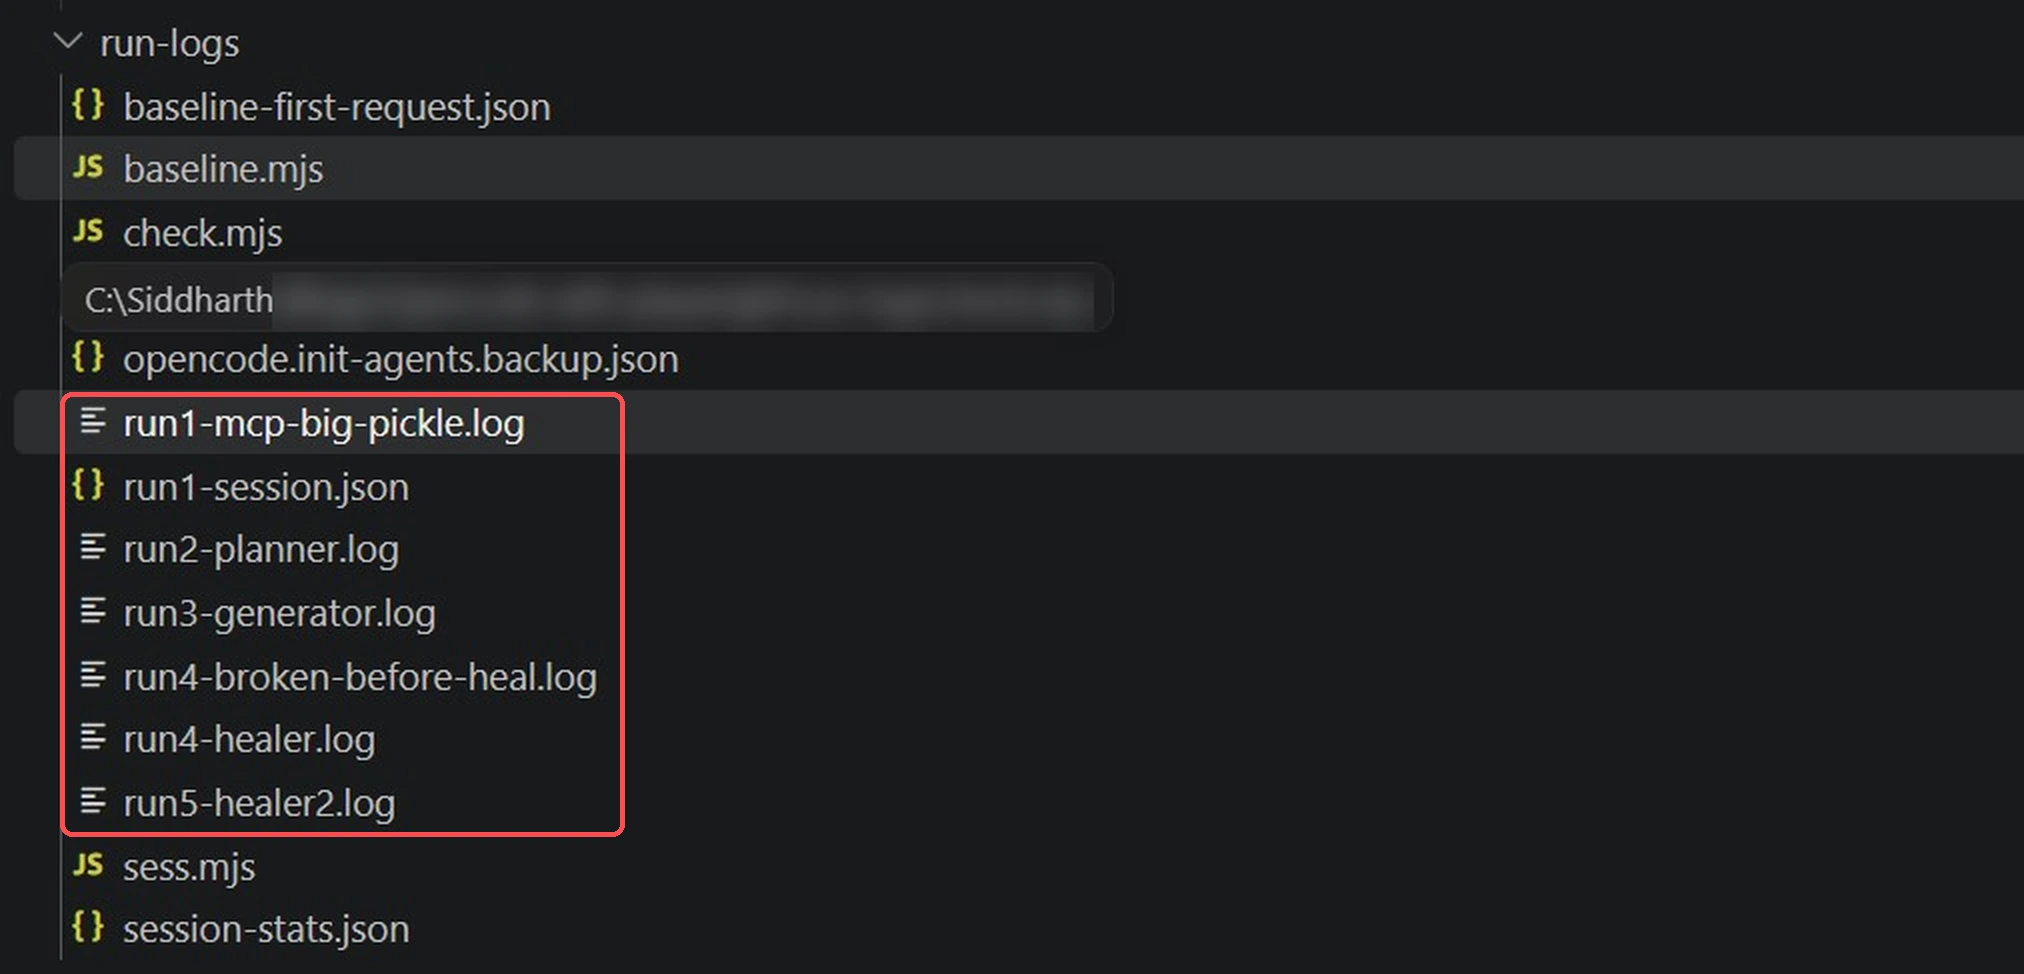
Every figure above traces back to a saved file. Each run wrote a log, and each session was exported as JSON before we counted anything.
Quick fixes for the errors we hit
| Symptom | Cause | Fix |
|---|---|---|
| Server shows connected, but the model has no browser tools | The generated "playwright*": false rule matches your server's tools | Narrow the rule to "playwright-test*" or rename your server |
| Prompt templates do not appear as slash commands | Templates are written to .opencode/prompts | Copy them into .opencode/commands |
| Server added by the CLI is missing from the repo | OpenCode 1.18.35 wrote it to the global config file | Move the block into the project opencode.json |
| Planner starts on a blank page | The generated seed test has no navigation | Add page.goto() to tests/seed.spec.ts |
| Custom servers vanish after a Playwright upgrade | Running init-agents again replaces opencode.json | Commit first, regenerate, then restore your changes from the diff |
Generated tests are only useful if you can see how they behave over weeks, not minutes. That is the last step.
Step 6: track OpenCode-written tests in CI with TestDino
AI-written tests need more scrutiny than hand-written ones, not less. You want to know which generated specs fail after a deploy, which fail 1 run in 5, and which never fail at all. TestDino gives you that view from a Playwright reporter.
Add the reporter
Install the package and register it next to your existing reporters. Results stream to the dashboard as each test finishes, so there is no upload step.
npm install --save-dev @testdino/playwrightimport { defineConfig } from '@playwright/test';
export default defineConfig({
  reporter: [
    [process.env.CI ? 'dot' : 'list'],
    ['@testdino/playwright', { token: process.env.TESTDINO_TOKEN }],
  ],
  use: { trace: 'on-first-retry' },
});
Create an API key in your TestDino project, then export it as TESTDINO_TOKEN locally and store it as a secret in CI. Keep tracing on, because the Playwright trace viewer is where you will debug the agent's failures.
This matters more when an agent runs the tests. The rules file already tells OpenCode to run npx playwright test, so every generation and every heal attempt lands in the same history without extra work.
Wire it into GitHub Actions
The workflow is standard Playwright plus one variable. The same pattern works for the other providers covered in Playwright in GitHub Actions.
name: Playwright Tests
on: [push, pull_request]
jobs:
  test:
    runs-on: ubuntu-latest
    steps:
      - uses: actions/checkout@v4
      - uses: actions/setup-node@v4
        with:
          node-version: '20'
      - run: npm ci
      - run: npx playwright install --with-deps
      - name: Run tests with TestDino
        env:
          TESTDINO_TOKEN: ${{ secrets.TESTDINO_TOKEN }}
        run: npx playwright test
Tag the specs OpenCode wrote so you can compare them with hand-written ones. Playwright accepts a tag in the test details object.
test('empty cart shows the empty state heading', { tag: '@ai-generated' }, async ({ page }) => {
  await page.goto('/cart');
  await expect(page.getByRole('heading', { name: 'Your cart is empty' })).toBeVisible();
});
That comparison is the fastest way to learn whether your AGENTS.md rules are working. If tagged specs flake more often, the rules need another line.
OpenCode can also live inside the pipeline. Running opencode github install sets up a workflow that answers /opencode or /oc comments on issues and pull requests, using the anomalyco/opencode/github action on your own runners.
Give OpenCode your CI history with TestDino MCP
Playwright MCP shows the agent the page as it is right now. It cannot tell the agent that a test has failed on WebKit every Tuesday for a month. The TestDino MCP server fills that gap, and it sits next to the Playwright server in the same file.
{
  "$schema": "https://opencode.ai/config.json",
  "mcp": {
    "playwright": {
      "type": "local",
      "command": ["npx", "@playwright/mcp@latest", "--headless", "--isolated"],
      "enabled": true
    },
    "testdino": {
      "type": "local",
      "command": ["npx", "-y", "@testdino/mcp@latest"],
      "environment": { "TESTDINO_PAT": "{env:TESTDINO_PAT}" },
      "enabled": true
    }
  }
}
The personal access token comes from User Settings and Access Tokens in TestDino. OpenCode expands {env:TESTDINO_PAT} from your environment, so the secret never sits in the file. Shell forms like $TESTDINO_PAT are not expanded.
A hosted option exists too, and local MCP vs remote MCP explains when each one fits. Remember the cost rule from Step 2: every extra server adds tool definitions to every request.
Tip: Before you fix flaky tests one at a time, put a number on the problem. A flaky cost calculator and a locator playground for checking getByRole queries are both part of TestDino's free tools.
With both servers connected, one prompt closes the loop: find the flakiest test, open the page, diagnose, and propose a fix.
Use the testdino tools to list the 3 flakiest tests in the last 20 runs of the main branch.
For the top one, open the failing page on https://storedemo.testdino.com with the playwright
tools, compare the current snapshot to the failing locator, and explain the root cause.
Propose a fix but do not edit the file yet.
The diagnosis usually matches one of the causes in Playwright flaky test debugging, and now it arrives with run history attached.
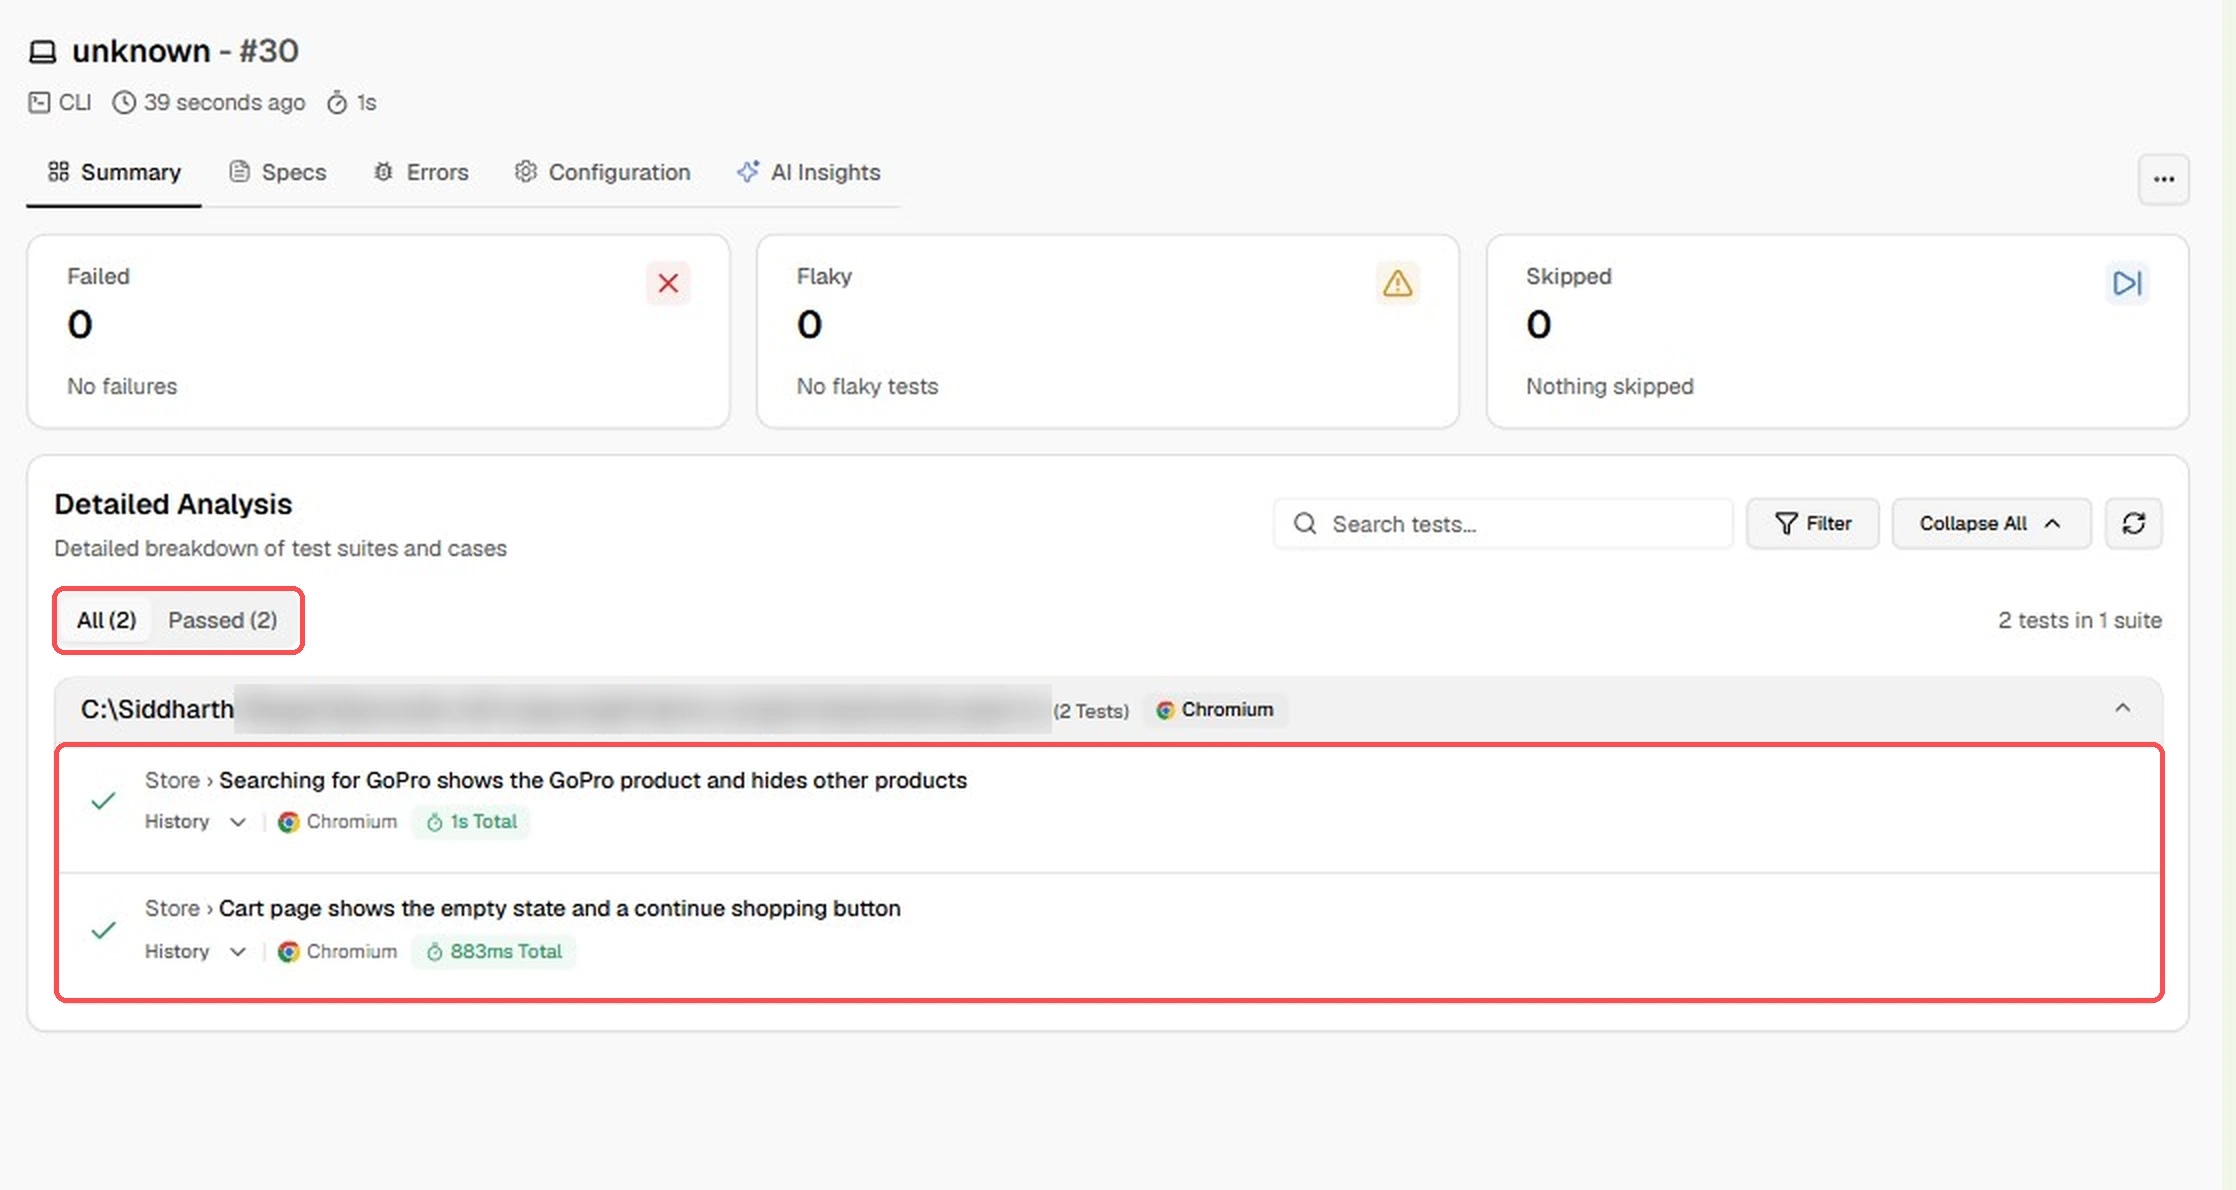
The full loop now works from prompt to dashboard. One question is left: whether OpenCode is the right agent to run it.
OpenCode vs Claude Code vs Gemini CLI for Playwright tests
All 3 tools drive the same Playwright MCP server and can produce the same style of test. What differs is licensing, model choice, where the config lives, and whether Playwright generates agents for the tool.
| Feature | OpenCode | Claude Code | Gemini CLI |
|---|---|---|---|
| Interface | Terminal, desktop app, web | Terminal, IDE extensions, desktop app, web | Terminal |
| Open source | Yes, MIT | Yes, Apache 2.0 | |
| Models | Any connected provider | Claude models | Gemini models |
| Playwright MCP config | opencode.json | claude mcp add | .gemini/settings.json |
| Rules file | AGENTS.md | CLAUDE.md | GEMINI.md |
| Skills location | .opencode/skills, .claude/skills, .agents/skills | .claude/skills | .gemini/skills or .agents/skills |
| init-agents loop | Yes, --loop=opencode | Yes, --loop=claude |
The last row is the practical one. Playwright 1.65.1 lists claude, codex, copilot, opencode, vscode, and vscode-legacy as loop choices. Tools outside that list drive the same steps through plain prompts.
Playwright MCP vs Playwright CLI inside OpenCode
MCP is not the only way to give OpenCode a browser. The Playwright CLI README states that CLI invocations "are more token-efficient: they avoid loading large tool schemas and verbose accessibility trees into the model context."
The same README says MCP "remains relevant for specialized agentic loops that benefit from persistent state, rich introspection, and iterative reasoning over page structure." The trade is visibility against context cost.
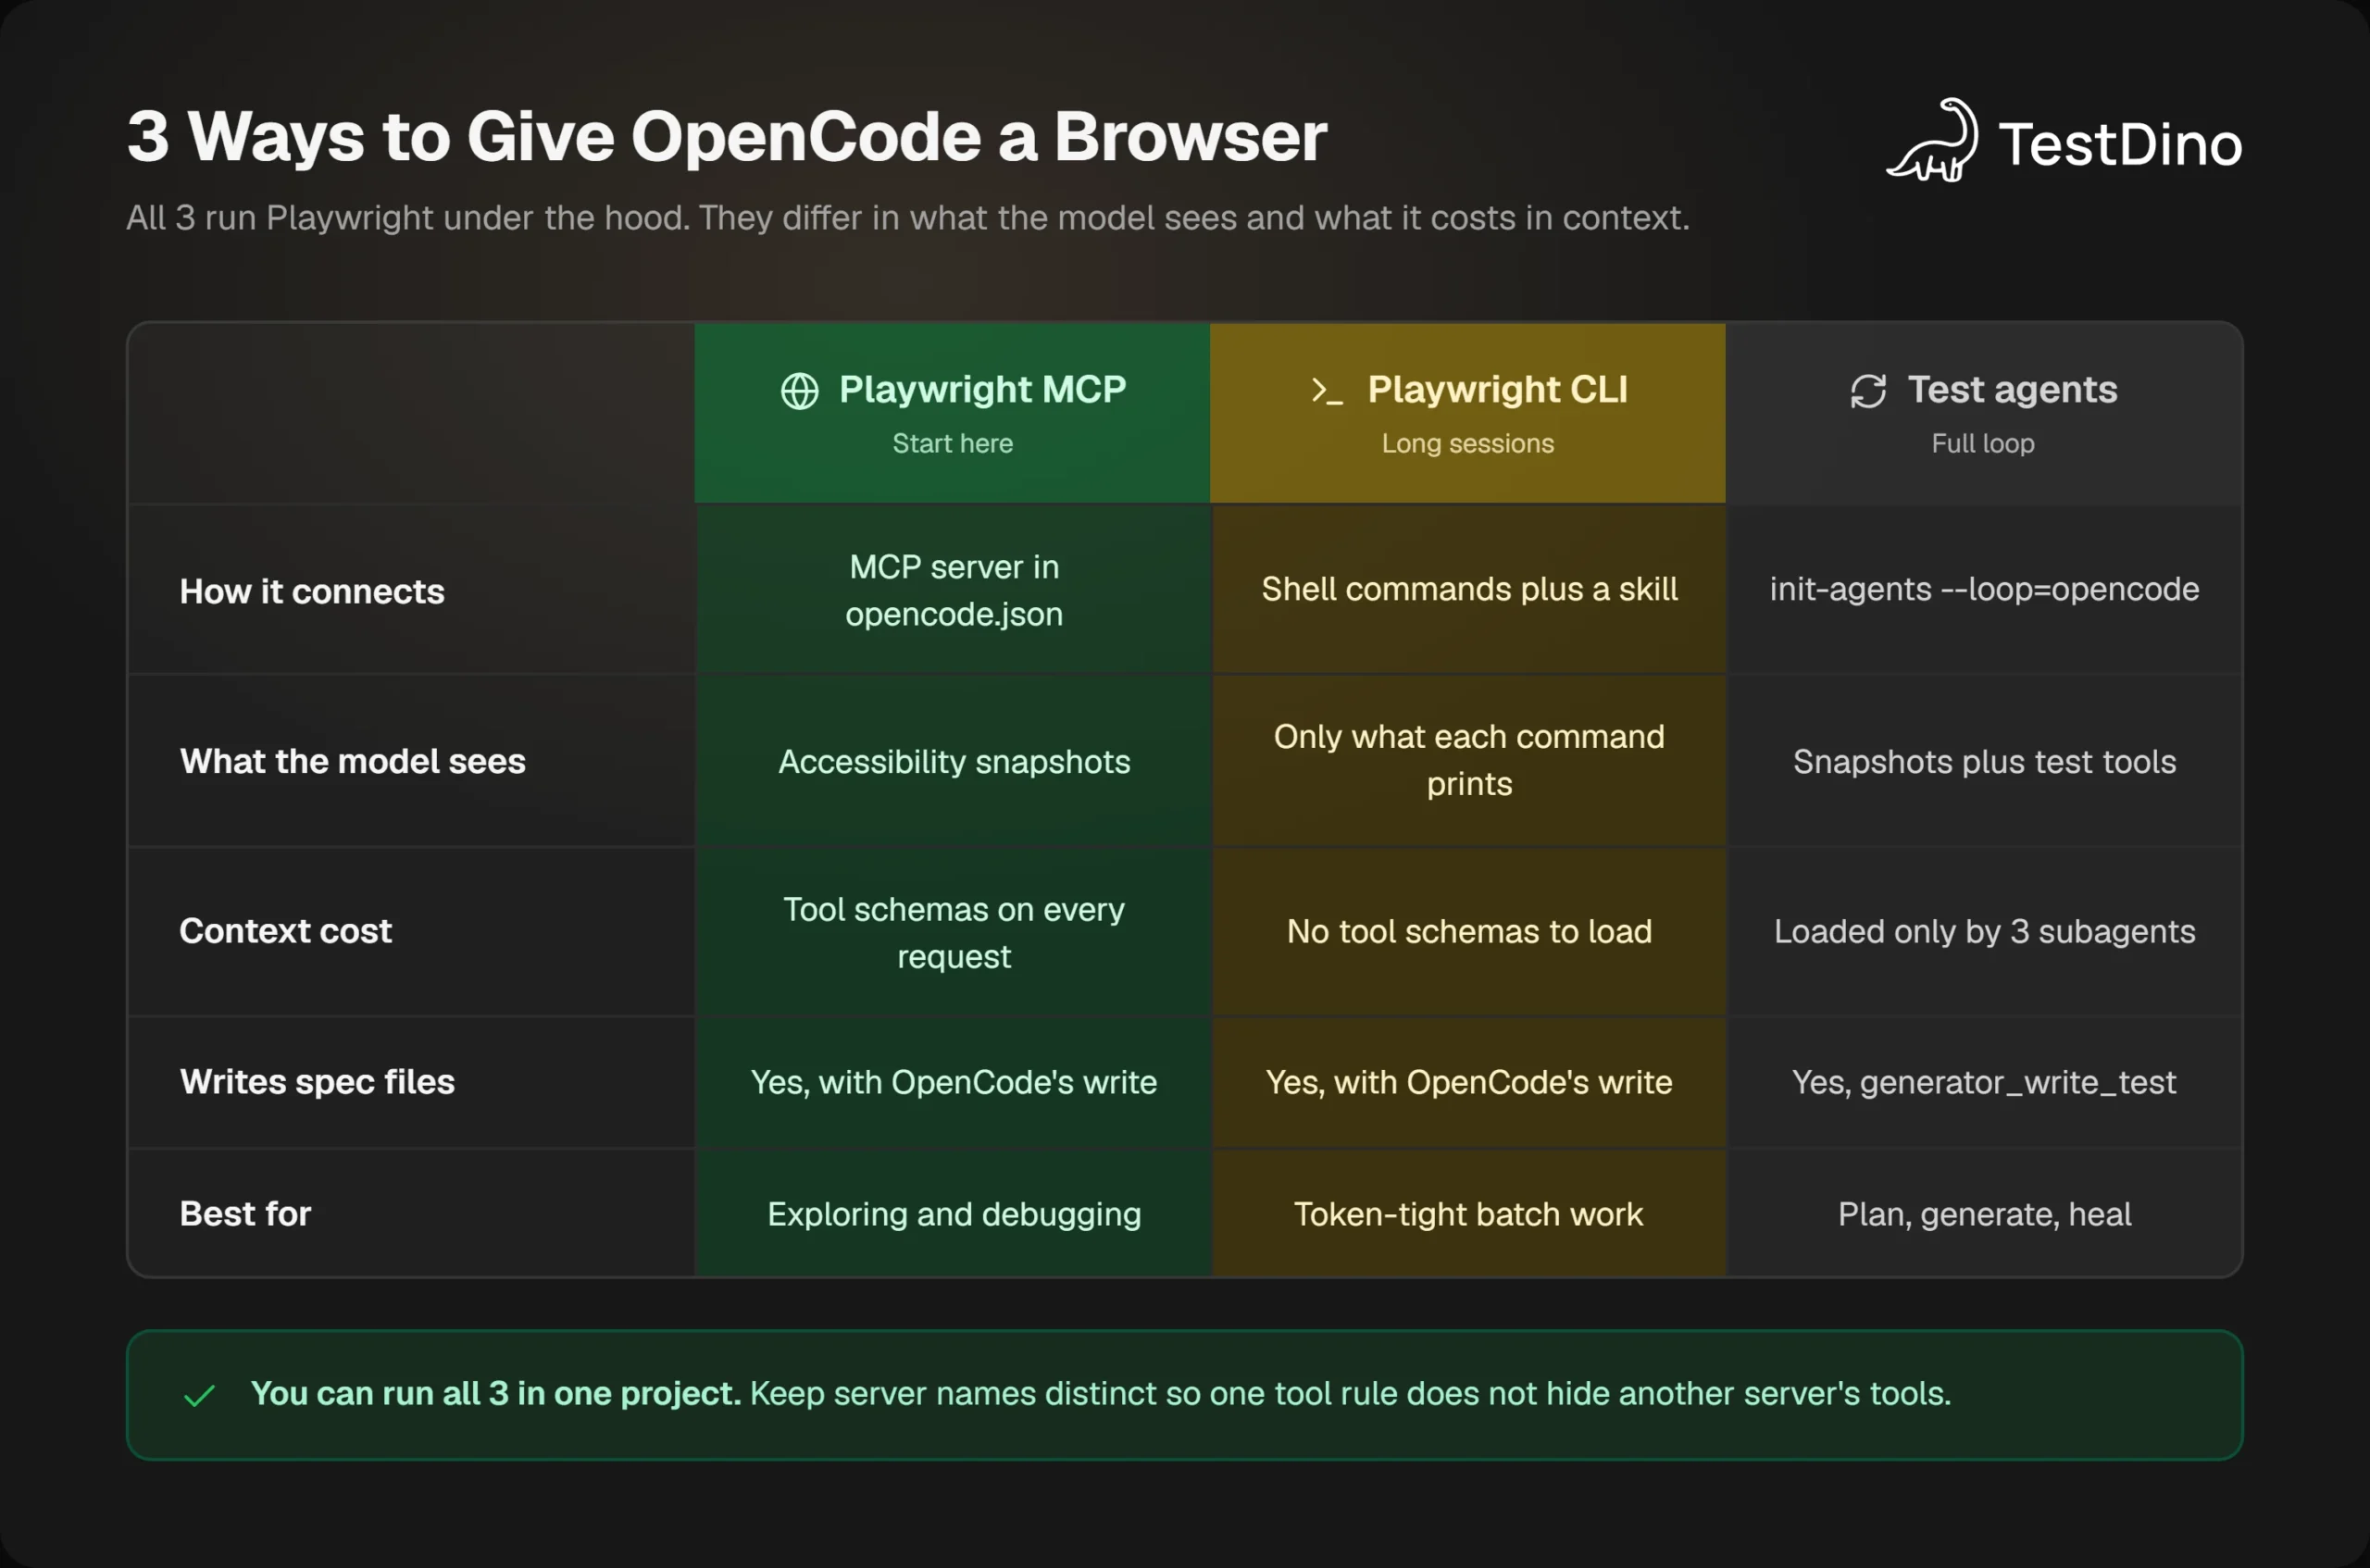
For OpenCode, the practical rule is MCP for exploring and debugging, the CLI for long batch sessions, and test agents when you want a plan before any code. TestDino's own measurements are in Playwright CLI vs MCP.
Adding the CLI route takes 2 commands. The second installs its skills locally, and Playwright CLI covers the commands those skills teach.
npm install -g @playwright/cli@latest
playwright-cli install --skills
When another agent fits better
Choose Claude Code when your team already pays for Claude and wants a multi-agent pipeline; Claude Code with Playwright walks through one. Choose Gemini CLI when you work under a Google enterprise license, as covered in Playwright with Gemini CLI.
Choose OpenCode when you want open source, a free choice of model, and Playwright's agents generated for you. Those 3 together are hard to find elsewhere.
Note: An OpenCode Playwright workflow and a Claude Code one produce the same kind of test, because both read the same page through the same server. Pick the agent by licensing, model access, and how your team scripts it, not by test quality.
For a wider survey, agentic testing tools compared lines up a dozen agents, and AI test generation tools covers the hosted options.
Conclusion
A working OpenCode Playwright setup comes down to 6 decisions: one OpenCode version, a Playwright MCP block in the right file, a short AGENTS.md, a first spec you reviewed, test agents with the generated traps fixed, and a reporter that shows how the tests behave over weeks.
Key takeaways:
- Commit the OpenCode 1 config shape. OpenCode 2 reads it, Playwright generates it, and OpenCode 1 cannot read the newer one.
- Check tools, not connection status. A server can show as connected while a generated rule hides all of its tools.
- Tell the healer who is right. It will not guess whether the test or the app holds the correct text, and it should not.
- Review passing specs. Ours passed with a hardcoded count and a parent-hop locator that we would not merge.
- Measure the agent's tests separately. Tag them, stream them to TestDino, and let the history judge your rules.
The prompting side is covered in more depth in how to write Playwright tests with AI. If you prefer to record a flow first and let a model clean it up, Playwright AI codegen shows that route.
FAQs

Ayush Mania
Forward Development Engineer